

Simulation is a good starting point for projects but they are really far away from real world. It happened to me a lot of times that my simulations are working perfectly fine but when I design the same circuit in hardware then it says no I am not gonna work. :) So, the bottom line is never trust simulations, unless you properly test it on hardware. So, today I am gonna interface an Ultrasonic sensor with arduino and will check its output on the Arduino Serial Terminal.
1. Introduction to Ultrasonic Sensor
- "Ultrasonic Sensor HC-SR04 is a simple sensor which emits Ultrasonic Radiations from its transmitter and is used for measuring the distance between sensor itself and any obstacle in front of it. The sensor has a transmitter and a receiver on it."
- This sensor consists of four pins, which are:
- Vcc (+5V) : You need to provide +5V at this Ultrasonic Sensor HC-SR04 Pin.
- Trig (Trigger) : It's a trigger Pin where we need to provide a trigger after which this sensor emits ultrasonic waves.
- Echo : When Ultrasonic waves emitted y the transmitter, hit some object then they are bounced back and are received by the receiver and at that moment this echo Pin goes HIGH.
- GND : We need to provide ground to this PIN of HC-SR04 Ultrasonic Sensor.
- If you haven't bought your components yet for this project, then you can buy them from these reliable sources:
| [ultimate_spacer height="13"] | [ultimate_spacer height="13"] |
- Trigger pin is an output pin while the Echo pin is an input pin, we will discuss them in Working section in detail.
- Moreover, it requires +5V to start operating.
- It is normally used to detect objects in front of it or to measure the distance between different objects.
2. Working of Ultrasonic Sensor
- Its working is quite simple, as discussed above, it has a trigger and an echo pin.
- A signal of +5V is sent over to Trigger pin for around 10 microseconds in order to trigger the sensor.
- When ultrasonic sensor gets a trigger signal on its trigger pin then it emits an ultrasonic signal from the transmitter.
- This ultrasonic senor, then goes out and reflected back after hitting some object in front.
- This reflected ultrasonic signal is then captured by the receiver of ultrasonic sensor.
- As the sensor gets this reflected signal, it automatically make the Echo pin high.
- The time for which the Echo pin will remain HIGH, depends on the reflected signal.
- What we need to do is, we need to read this time for which the echo pin is high, which we are gonna do in our next section.
- So, let's have a look at Ultrasonic Sensor Arduino Interfacing.
3. Interfacing of Ultrasonic Sensor With Arduino
- Now we have seen the working of Ultrasonic sensor, so we have some idea what we need to do in order to get the values from it. Let's now have a look at Ultrasonic Sensor Arduino Interfacing.
- First of all, we need to generate a signal of 10 microsecond and then send it over to trigger pin.
- After sending the trigger pin we then need to read the echo pin and wait for it to get HIGH.
- Once it got HIGH then we need to count the time for how long it remained HIGH.
- On the basis of this time, we are gonna calculate the distance of the object from the ultrasonic sensor.
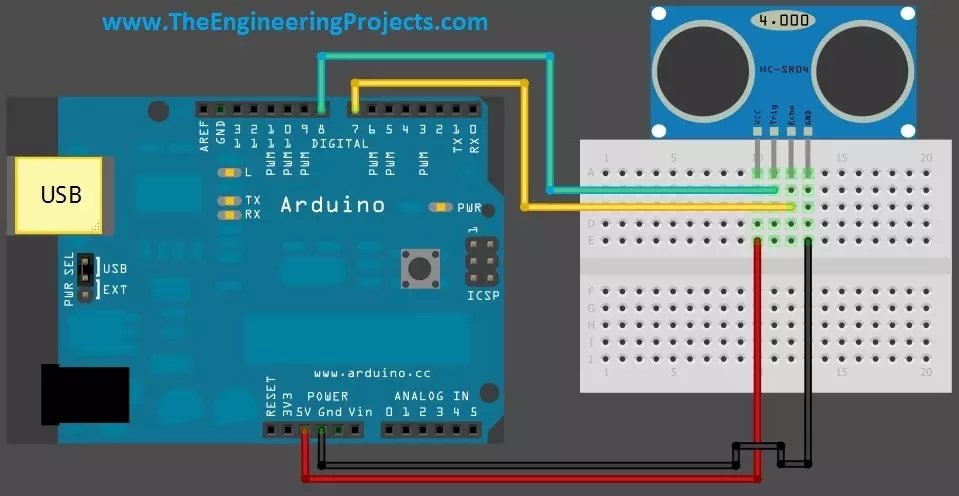
- So, first of all, interface your ultrasonic sensor with arduino as shown in below figure:
- Now, use the below code and upload it your arduino board. After uploading the code, open your serial terminal of Arduino software and you will start receiving the values.
#define trigPin1 8
#define echoPin1 7

long duration, distance, UltraSensor;

void setup()
{
Serial.begin (9600);
pinMode(trigPin1, OUTPUT);
pinMode(echoPin1, INPUT);
}

void loop() {
SonarSensor(trigPin1, echoPin1);
UltraSensor = distance;
Serial.println(UltraSensor);
}

void SonarSensor(int trigPin,int echoPin)
{
digitalWrite(trigPin, LOW);
delayMicroseconds(2);
digitalWrite(trigPin, HIGH);
delayMicroseconds(10);
digitalWrite(trigPin, LOW);
duration = pulseIn(echoPin, HIGH);
distance = (duration/2) / 29.1;
delay(100);
}
- Now if you check in the SonarSensor() function, we are generating a pulse of 10 microsecond and sending it to trigPin, which is the trigger pin of our ultrasonic sensor.
- After sending this pulse weare using a funcion pulseIn() , its a builtin arduinofunction and is used to check for how long the echoPin remains HIGH.
- This value is further saved in the duration value and after that we have divided this duration by 2 because the pulse is first sent and then received so in actual it covers double distance, so we need to divide it by 2 in order to get distance between object and the sensor.
- Furthermore, it is again divided by 29.1, which is basically the speed of ultrasonic sound and finally we saved it in a variable named distance which is now in centimeters.
- After uploading the sketch in Arduino, you need to open the Serial Terminal and you will start receiving the values of distance.
