

Temperature sensor DS18B20 is a one wire temperature sensor means we can get its data through a single wire and we can connect as many as we want temperature sensors with this single wire and can call them through their addressing. Each temperature sensor is allotted an address and when we call that address, we get its value. So, in today's project, I have used two sensors and displayed their values on LCD. Both of these sensors are connected with single wire. I am not using both DS18B20 sensors instead I am using one 18B20 and one 18S20 temperature sensors just to give a taste, but you can connect any kind of Dallas Temperature sensor. I have designed the simulation in Proteus and the simulation is also available for download. Anyways let's get started with interfacing of Multiple Temperature Sensors DS18B20 arduino.
Interfacing of Multiple DS18B20 Arduino
- You can download the complete simulation along with progrmming code by clicking the below button:
- Now, let's design our simulation because its always a good practice to design from basics. So, open your Proteus software and design the below circuit diagram:
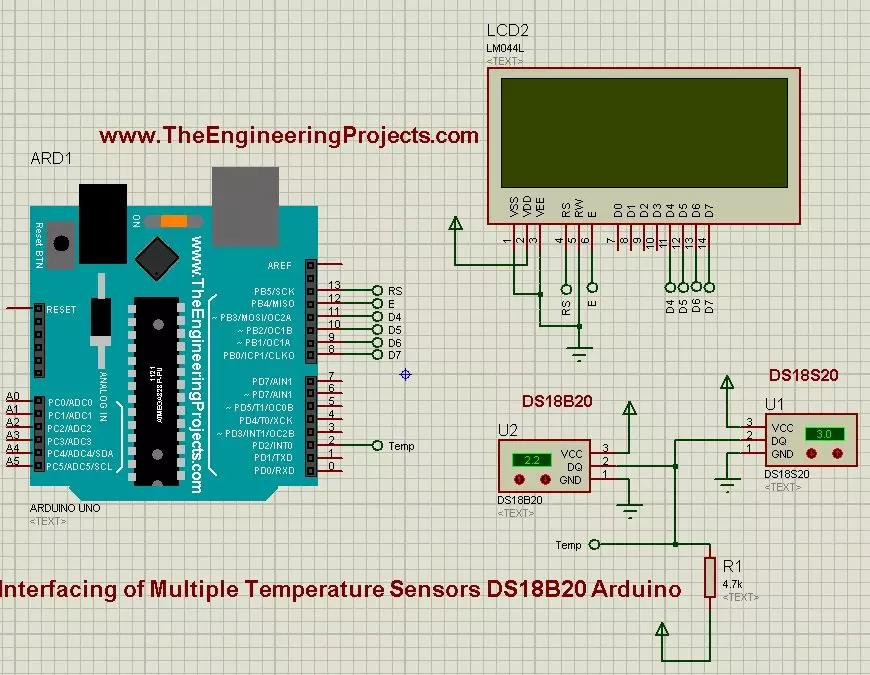
- Now, as you can see in the above figure, I have used two temperature sensors DS18B20 Arduino is used as a micrcontroller and LCD is used for displaying the values of these two temperature sensors.
- Both of these temperature sensors are connected with a single wire of Arduino board which is Pin # 2.
- So, now using this single wire we can connect as many temerature sensors as we want.
- So, now next thing we need to do is to Get the Hex File from Arduino Software. So for that place the below code in your Arduino software and get your hex file.
#include <LiquidCrystal.h>
#include <OneWire.h>

OneWire  ds(2);  // pin 2
LiquidCrystal lcd(13,12,11,10,9,8);

void setup(void) {
  lcd.begin(20,4);
  lcd.print("Temp 1 = ");
  lcd.setCursor(0,1);
  lcd.print("Temp 2 = ");

  lcd.setCursor(1,2);
  lcd.print("www.TheEngineering");
  lcd.setCursor(4,3);
  lcd.print("Projects.com");
}


void loop(void) {
  byte i = 0;
  byte data[9];
  byte addr[8];
  int temp;
  boolean type;

  //get the addresses of Temperature Sensors
  if(!ds.search(addr)){
    return;
  }

  switch(addr[0]){
   case 0x10: type = 1; break;//DS18S20
   case 0x22: type = 0; break;//DS1822
   case 0x28: type = 0; break;//DS18B20
   default: break;
  }

  ds.reset();
  ds.select(addr);
  ds.write(0x44);
  delay(750);

  ds.reset();
  ds.select(addr);
  ds.write(0xBE);

  //Leitura
  for ( i = 0; i < 9; i++) {
    data[i] = ds.read();
  }

  if(!type){//DS18B20 ou DS1822

  lcd.setCursor(9,1);

    if((data[1]>>7)==1){
      data[1] = ~data[1];
      data[0] = (~data[0]) + 1;
      lcd.print("-");
    }
    else{
      lcd.print("+");
    }
    temp = (data[1]<<4) | (data[0]>>4);
    lcd.print(temp);
    lcd.print(".");
    temp = (data[0] & 0x0F) * 625;
    if(temp>625){
      lcd.print(temp);
    }
    else{
      lcd.print("0");
      lcd.print(temp);
    }
  }
  else{//DS18S20

  lcd.setCursor(9,0);

    if((data[1]>>7)==1){
      data[0] = ~data[0];
      lcd.print("-");
    }
    else{
      lcd.print("+");
    }
    temp = data[0]>>1;
    lcd.print(temp);
    lcd.print(".");
    lcd.print((data[0] & 0x01)*5);

  }
  lcd.print(" ");
  lcd.write(223);// degree symbol
  lcd.print("C    ");
}
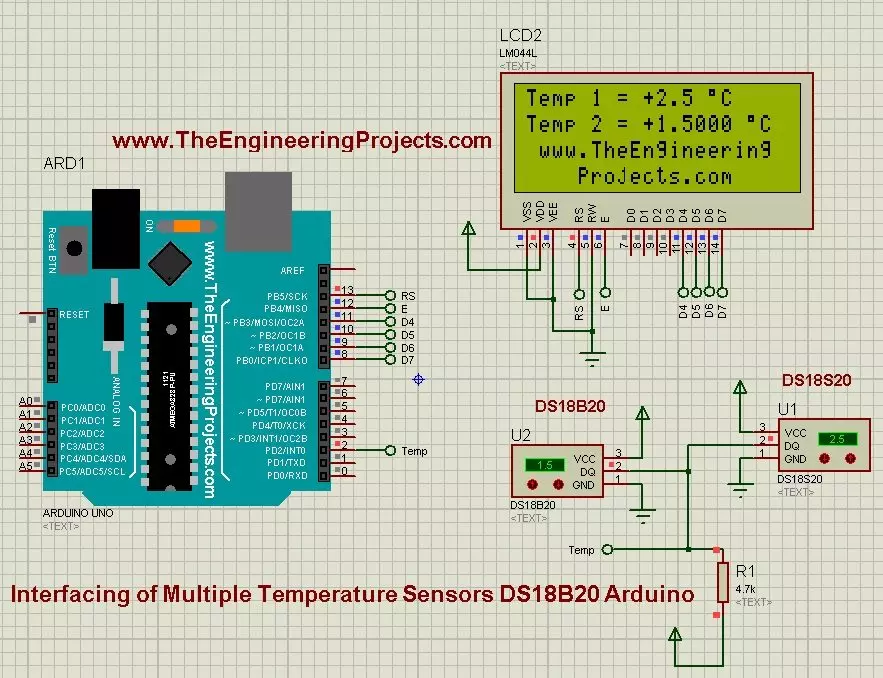
- Now, when you uploaded your hex file in Arduino board of your Proteus software then run your Proteus file.
- If everything goes fine then you will get the results as shown in below figure:
- So, you can see in the above figure that I am getting the data of both these temperature sensors and displaying them on LCD.
- Both of these temperature sensors are showing different temperature values and their respective values are displayed over the LCD.
