


I have used Keypad, LCD and PIC Microcontroller in order to design the simulation in Proteus ISIS software. You should also have a look at Electronic Door Lock using PIC Microcontroller, which is quite similar with the only difference of keypad. In that previous project, I have used serial monitor for taking inputs but in today's tutorial, I have used Keypad for taking inputs. I hope you are gonna enjoy this one.
I have used Proteus software for designing the simulation and I have used MikroC Pro for PIC compiler for designing the programming code for PIC Microcontroller and I have used PIC16F877 Microcontroller for designing this project. The code and simulation is given below for download. If you have any problem then ask in comments and I will try my best to resolve them. So, let's get started with Password Protection using PIC Microcontroller.
Password Protection using PIC Microcontroller
- You can download the complete simulation along with the code by clicking the below button but as I always suggests that you should design it on your own so that you get most out of it:
- So, now let's design this Password Protection using PIC Microcontroller project, so design a circuit as shown in below figure:

- You can see in the above figure that I have used LCD 20x4 along with Keypad, motor and PIC Microcontroller.
- I have also used a transistor which is kind of a driver for DC Motor, because DC motor is operated at 12V while PIC Microcontroller signal is of 5V so we need this transistor in order to drive our motor.
- If you want to use this new stylish LCD in your Proteus simulation then you need to download and install this New LCD Library for Proteus. All instructions are given in this link for using this LCD.
- Next thing we need to do is to design a programming code for this project.
- I have designed the code in MikroC Pro for PIC compiler so copy the below code and paste it in your project of MikroC Pro for PIC and compile to get the hex file:
unsigned short kp;
char actual_password[] = "123123";
char given_password[] = "000000";
int count;
// LCD module connections
sbit LCD_RS at RB4_bit;
sbit LCD_EN at RB5_bit;
sbit LCD_D4 at RB0_bit;
sbit LCD_D5 at RB1_bit;
sbit LCD_D6 at RB2_bit;
sbit LCD_D7 at RB3_bit;

sbit LCD_RS_Direction at TRISB4_bit;
sbit LCD_EN_Direction at TRISB5_bit;
sbit LCD_D4_Direction at TRISB0_bit;
sbit LCD_D5_Direction at TRISB1_bit;
sbit LCD_D6_Direction at TRISB2_bit;
sbit LCD_D7_Direction at TRISB3_bit;
// End LCD module connections

// Keypad module connections
char  keypadPort at PORTD;
// End Keypad module connections

void Password_prompt(){
  Lcd_Cmd(_LCD_CLEAR);                     // Clear display
  Lcd_Out(1, 1, "Motor is Off");
  Lcd_Out(2,1,"and Locked");
  Delay_ms(1000);

  Lcd_Cmd(_LCD_CLEAR);                     // Clear display
  Lcd_Out(1, 1, "Enter 6 digit no:");

  Lcd_Cmd(_LCD_BLINK_CURSOR_ON);                // Cursor off
  Lcd_Cmd(_LCD_SECOND_ROW);
}

//Initialization starts here-------------------------------
void Init(){
Lcd_Init();                        // Initialize LCD
  Lcd_Cmd(_LCD_CLEAR);                     // Clear display
  Lcd_Cmd(_LCD_CURSOR_OFF);                // Cursor off
  Lcd_Out(1, 1, "Welcome to");
  Lcd_Out(2, 1, "Password Lock");
  Lcd_Out(3, 2, "www.TheEngineering");
  Lcd_Out(4, 5,"Projects.com");

  Delay_ms(5000);
  Password_prompt();
  TRISB=0;

count=0;
Keypad_Init();                           // Initialize Keypad
}
//Initilization ends here----------------------------------------

//Password check routine starts here-----------------------------
int Check_password(){

Lcd_Cmd(_LCD_CLEAR);
if(!memcmp(actual_password, given_password, 6)){
 Lcd_Out(1, 1, "Password Matched");
 Lcd_Out(2,1,"Motor is on");

 return 1;
}
else{
  Lcd_Out(1, 1, "Incorrect Password");
  Lcd_Out(2, 1, "Try Again!");

  Delay_ms(2000);
  Password_prompt();
  return 0;
  //Enter_password();
  }
  count=0;
}
//Password check routine ends here-----------------------------

void main() {
      Init();
    do {
      kp = 0;                                // Reset key code variable
      if(count==6)
       {
          PORTB.B7=Check_password();    //0/1 according to password check and drives the motor
          count=0;
          if(PORTB.B7==1){
             Delay_ms(1000);
             Lcd_Cmd(_LCD_CLEAR);
             //Lcd_Cmd(_LCD_FIRST_ROW);*/
             Lcd_Out(1,1,"Press * to Off");
             Lcd_Out(2,1,"and Lock again");
             Lcd_Cmd(_LCD_CURSOR_OFF);           // Cursor off

        do
         // kp = Keypad_Key_Press();          // Store key code in kp variable
         kp = Keypad_Key_Click();             // Store key code in kp variable
        while (kp!=13);
         if(kp==13){
           PORTB.B7=0;
           Password_prompt();
          }
         }
       }
    // Wait for key to be pressed and released
      do
      // kp = Keypad_Key_Press();          // Store key code in kp variable
      kp = Keypad_Key_Click();             // Store key code in kp variable
      while (!kp);
     switch (kp) {
      case  1: kp = 49;Lcd_Chr_Cp(kp);given_password[count]=kp;count++; break; // 1        // Uncomment this block for keypad4x4
      case  2: kp = 50;Lcd_Chr_Cp(kp);given_password[count]=kp;count++; break; // 2
      case  3: kp = 51;Lcd_Chr_Cp(kp);given_password[count]=kp;count++; break; // 3
      case  4: kp = 65;Lcd_Chr_Cp(kp); break; // A
      case  5: kp = 52;Lcd_Chr_Cp(kp);given_password[count]=kp;count++; break; // 4
      case  6: kp = 53;Lcd_Chr_Cp(kp);given_password[count]=kp;count++; break; // 5
      case  7: kp = 54;Lcd_Chr_Cp(kp);given_password[count]=kp;count++; break; // 6
      case  8: kp = 66;Lcd_Chr_Cp(kp); break; // B
      case  9: kp = 55;Lcd_Chr_Cp(kp);given_password[count]=kp;count++; break; // 7
      case 10: kp = 56;Lcd_Chr_Cp(kp);given_password[count]=kp;count++; break; // 8
      case 11: kp = 57;Lcd_Chr_Cp(kp);given_password[count]=kp;count++; break; // 9
      case 12: kp = 67;Lcd_Chr_Cp(kp); break; // C
      case 13: kp = 42;Lcd_Cmd(_LCD_MOVE_CURSOR_LEFT);count--; break; // *
      case 14: kp = 48;Lcd_Chr_Cp(kp);given_password[count]=kp;count++; break; // 0
      case 15: kp = 35;Lcd_Cmd(_LCD_MOVE_CURSOR_RIGHT);count++; break; // #
      case 16: kp = 68;Lcd_Chr_Cp(kp); break; // D

     }
    } while (1);

}
- This code is used for design the code for this Password Protection using PIC Microcontroller project.
- Now after getting the hex file from this code, upload it in your simulation and if everything goes fine then you will get results as shown in below figure.
- The first screen will be look like something as shown below:
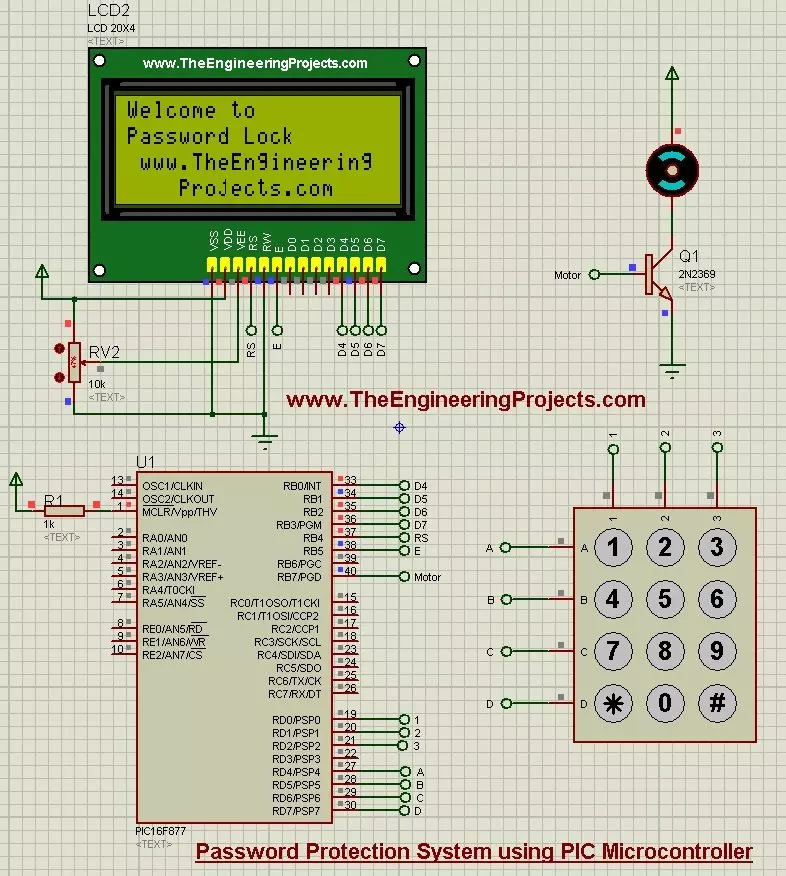
- So, its saying Welcome to Password Lock and the the link of our blog.
- After that it will ask for 6 digit password, as shown in below figure:
- Now the default password for this project is 123123, so if you have given the correct password then the motor will start moving but if you given the wrong password then it wont move and will ask for password again.
- So, let's give it a wrong password at first:

- Now you can see in the above figure that when I have given the wrong password then it says Incorrect Password and Try again.
- The motor will also remain stationary.
- Now I am gonna give it a correct password and we will see the motor will start moving as shown in below figure:
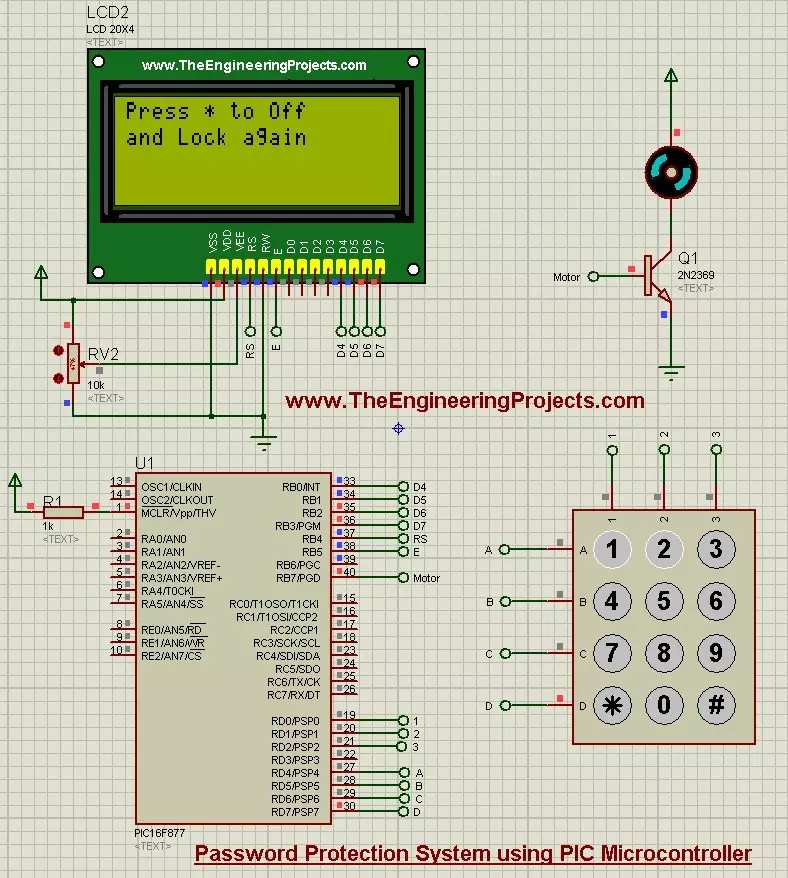
- Now when I have given the correct password, the motor started moving and the LCD says, press * to OFF and Lock again.
- So, now when you press * then the motor will stop and it will again ask you to enter 6 digit password.
- I have design this below video which will give you a better idea of working of this project:
