Hello everyone! I hope you all will be absolutely fine and fun. Today, I am going to tell you that how to make a simple algorithm for Stepper Motor Speed Control using Arduino. I have already discussed with you about DC Motor Direction Control using Arduino, Matlab and NI LabVIEW. Moreover, I have also discussed the DC Motor Speed Control using Arduino,Matlab and LabView. If you are working on Stepper Motor, then you must have a look at Stepper Motor Direction Control using Arduino, Stepper Motor Direction Control using Matlab and Stepper Motor Direction Control using NI LabVIEW. Now, in this tutorial I will explain you about the program which will helpful for Stepper Motor Speed Control using Arduino. Before going into the details of this tutorial you must have go through my previous tutorials because I am using the same hardware. So, they will be a lot helpful for the better understanding of this tutorial.
In this tutorial I will explain you about making an Arduino program for Stepper Motor Speed Control using Arduino with the help of the serial communication. If the stepper motor is rotating at its maximum speed and you are continuously sending the command through the serial port to reduce its speed, it s speed will be reduced in proportion to the number of command sent through the serial port. Similarly the same procedure will be followed to increase the speed of the stepper motor.
Stepper Motor Speed Control using Arduino
In the tutorial Stepper Motor Direction Control using Arduino, I will explain you about making an algorithm to run the stepper motor at different speed. If the stepper motor is already running at its maximum speed and you want want to accelerate it further then nothing will happen to the speed of the stepper motor. If the stepper motor is rotating slowly and you enhance its speed, then the speed of the motor will increase in proportion to the number of accelerating command sent through the serial port.
You can download the complete Arduino source code here by clicking on the button below.
Download .rar file, extract it and enjoy the complete source code.
Flow Chart
I have made a flow chart so that you can easily understand the entire algorithm because sometimes it becomes difficult to understand the algorithm with the help of the source code.
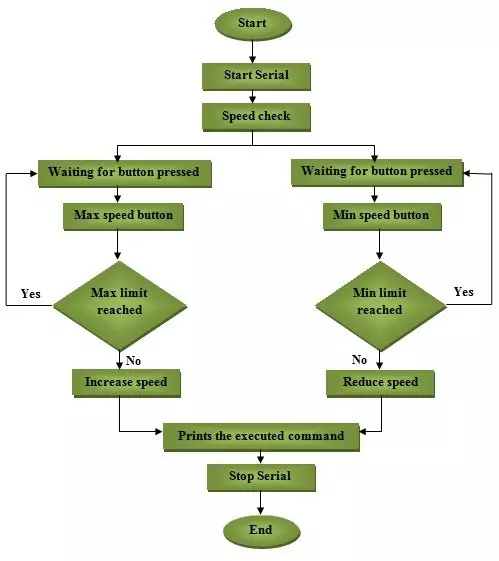
Flow chart for the Stepper Motor Speed Control using Arduino is shown in the figure below.
First of all we need to start the serial port so that our communication could be started.
Then there is a method to check the speed, if the speed is greater than the maximum speed of the stepper motor then the program will wait for the next command.
If the stepper motor is not rotating with its maximum speed then we can increase its speed.
Similarly if the minimum speed of the stepper motor is reached then the program will rotate for the next commands.
If the minimum limit of the speed of the stepper motor is not reached then we have a option to reduce its further.
At the end we should close the serial port so that exchange of unnecessary commands through the serial port could be avoided.
Block Diagram
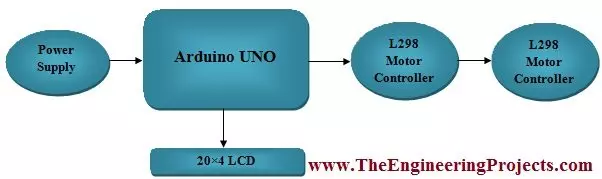
Block diagram will be helpful for use for the better understanding of the exchange of information.
It tells us that how the information is exchanged sequentially among all the components used.
Block diagram is shown in the figure below.
Arduino UNO communicates with the L298 motor controller to control the speed of the stepper motor.
L298 Motor controller manipulates the Arduino's commands and starts to control the speed of the stepper motor.
Arduino Code Description
In this section of the tutorial Stepper Motor Speed Control using Arduino, I am going to elaborate you about the Arduino source.
I have made two different functions for increasing (accelerating) the speed of the stepper motor and for decreasing (deaccelerating) the speed of the stepper motor respectively.
I have declared a variable named as count.
In Accelerate function, you have to send the command H through the serial port to increase the speed of the stepper motor.
In this function, I am continuously increasing the value of the count i.e as many times you send the command H the speed of the stepper motor will increase continuously.
The source code of the Accelerate function is given below.
   void Accelerate_Motor()
   {
    count=count+10; //Speed will increase continuously as we continue to press H
    if (count>120)  //Speed must not be greater than 120
    {
      count=120;
      }
    Serial.println("Accelerating"); //printing on the serial port
    Serial.println("");//prints blank line on the serial port
    myStepper.step(stepsPerRevolution);//counter clockwise rotation
    myStepper.setSpeed(count); //Updating the speed of the motor
    lcd.setCursor(3,0);//setting LCD cursor
    lcd.print("Acelerating"); //printing on LCD
   }
In Deaccelerate function, you have to send the command L through the serial port to increase the speed of the stepper motor.
In this function, I am continuously reducing the value of the count i.e as many times you send the command L the speed of the stepper motor will reduce continuously.
The source code of the Deaccelerate function is given below.
void Deaccelerate()
{
  count=count-10; //reducing the speed of the motor
  if (count<20) //speed of the motor must not be less than 20
  {
    count=20;
    }
  Serial.println("Deaccelerating"); // prints on the serial port
  Serial.println(""); //prints blank line on the serial port
  myStepper.step(stepsPerRevolution);
  myStepper.setSpeed(count); //Updating the speed of the motor
  lcd.setCursor(3,0);  //setting cursor on LCD
  lcd.print("Deaccelerating"); //prints the command on LCD
  }
In the main source inside the loop I am calling both of these Accelerate and Deaccelerate functions.
The executed commands will also be printed on the LCD (Liquid Crystal Diode).
The main source code is given below.
#include <LiquidCrystal.h>//Library for LCD
#include <Stepper.h>     //Library for Stepper motor

const int stepsPerRevolution = 255;

// initialize the stepper library on pins
Stepper myStepper(stepsPerRevolution, 4, 5, 6, 7);
char data;
int count = 120;
//LCD pins assigning
LiquidCrystal lcd(8, 9, 10, 11, 12, 13);
void setup() {
  // set the speed at 60 rpm
  myStepper.setSpeed(60);
  // initialize the serial port:
  Serial.begin(9600);// rate at which the arduino communicates

lcd.begin(20, 4);//LCD type

lcd.setCursor(3,0);//setting LCD cursor and printing on it
lcd.print("Stepper Motor");
lcd.setCursor(6,1);
lcd.print("Speed");
lcd.setCursor(5,2);
lcd.print("Control");
lcd.setCursor(2,3);
lcd.print("via Arduino UNO");

delay(3000);

lcd.clear ();//Clearing the LCD screen

lcd.setCursor(0,2);
lcd.print("www.TheEngineering");
lcd.setCursor(4,3);
lcd.print("Projects.com");
}

void loop() {
  if(Serial.available())
  {
    data = Serial.read(); //Reading the data from serial port
  }

    if(data == 'C'){Clockwise();}      //Clockwise rotation
    if(data == 'A'){AntiClockwise();} //Anti-clockwise rotation
    if(data == 'S')                  //stopping the stepper motor
    {
      data = 0;
      lcd.setCursor(3,0);
      lcd.print("No rotation");
      Serial.println("No rotation");//print on the serial
      }
     if(data == 'H'){Accelerate_Motor();}
     if(data == 'L'){Deaccelerate();}
}
Complete Hardware Setup
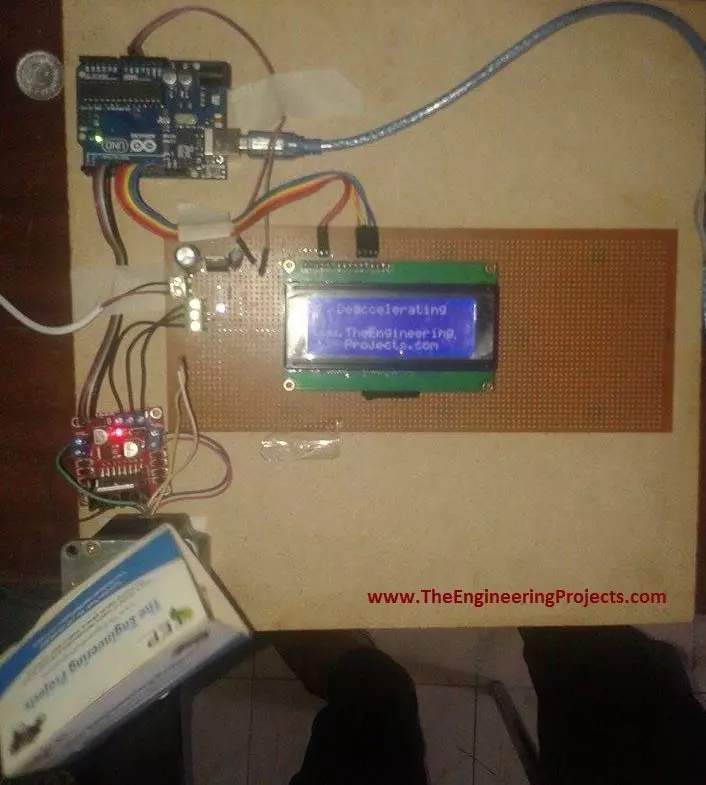
In this section of the tutorial, I will show you the complete hardware setup that I have used for this project.
Hardware consists of 12V power supply, Arduino UNO, L298 motor controller.
When you upload the code to the Arduino board the system will look like the figure shown below.
When you press H to increase the speed of the stepper motor, the statement accelerating will be printed on the LCD.
The printed executed command is printed on the LCD and is shown in the figure below.
When you press L to reduce the speed of the stepper motor, the statement Deaccelerating will be printed on the LCD.
The printed executed command is printed on the LCD and is shown in the figure below.
That is all from the tutorial Stepper Motor Speed Control using Arduino. I hope you all have enjoyed this tutorial. If you face any sort of problem regarding anything you can ask me anytime without even feeling any kind of hesitation. I will try my level best to solve your issues in a better way if possible. I will explore Arduino by making further projects and I will share them with all of you as well in my later tutorials. So, till then, Take Care :)
syedzainnasir
I am Syed Zain Nasir, the founder of The Engineering Projects (TEP). I am a
programmer since 2009 before that I just search things, make small projects and now I am sharing my
knowledge through this platform. I also work as a freelancer and did many projects related to
programming and electrical circuitry. My Google Profile+Follow
Get Connected
Comments on ‘’ Stepper Motor Speed Control using Arduino ‘’ ( 3 )
0
juancarlos
Says:
Good afternoon Syed.
I need you to write me a code for arduino. It is about controlling two nema 23 motors. They must turn to the right and left and make intermediate stops when receiving a signal from the inductive sensor.
Can you do it for me?
Thank you very much.
Reply
100
1
alekh
Says:
can u show the sketch diagram of connecting arduino, L298, lcd and powersupply with eachother.
Reply
100
2
meenakshinegi
Says:
is there a possibility to perform task without using library files
Reply