

In the previous tutorial, we have seen How to control the direction of a DC Motor, which is important when you are working on some robot and you need to move that robot in both forward and reverse direction. So, in such cases you need to do the direction control of DC motor. But in most projects, along with direction, we also need to control the speed of DC motor so that we can implement some PID algorithm on the motors. So, in such cases, there comes a need for DC Motor Speed control, which we are gonna cover in today's post. So, let's get started with it.
DC Motor Speed Control using Arduino in Proteus
- As I have explained earlier, I am gonna take it further from our previous tutorial. So, in previous tutorial, what we have done is, we have controlled the direction of DC Motor using Serial Terminal.
- When we send commands on the Serial Terminal the motor moves in clockwise or Anti-clockwise direction.
- So, now the above mentioned functionality will remain the same but an addition will be of speed control.
- I have placed a LDR sensor in the simulation and depending on the value of that LDR sensor our DC motor speed will either increase or decrease.
- So, you can download the complete simulation of DC Motor Speed Control by clicking the below button:
- As I always recommend, design this simulation on your own so that you learn most of it.
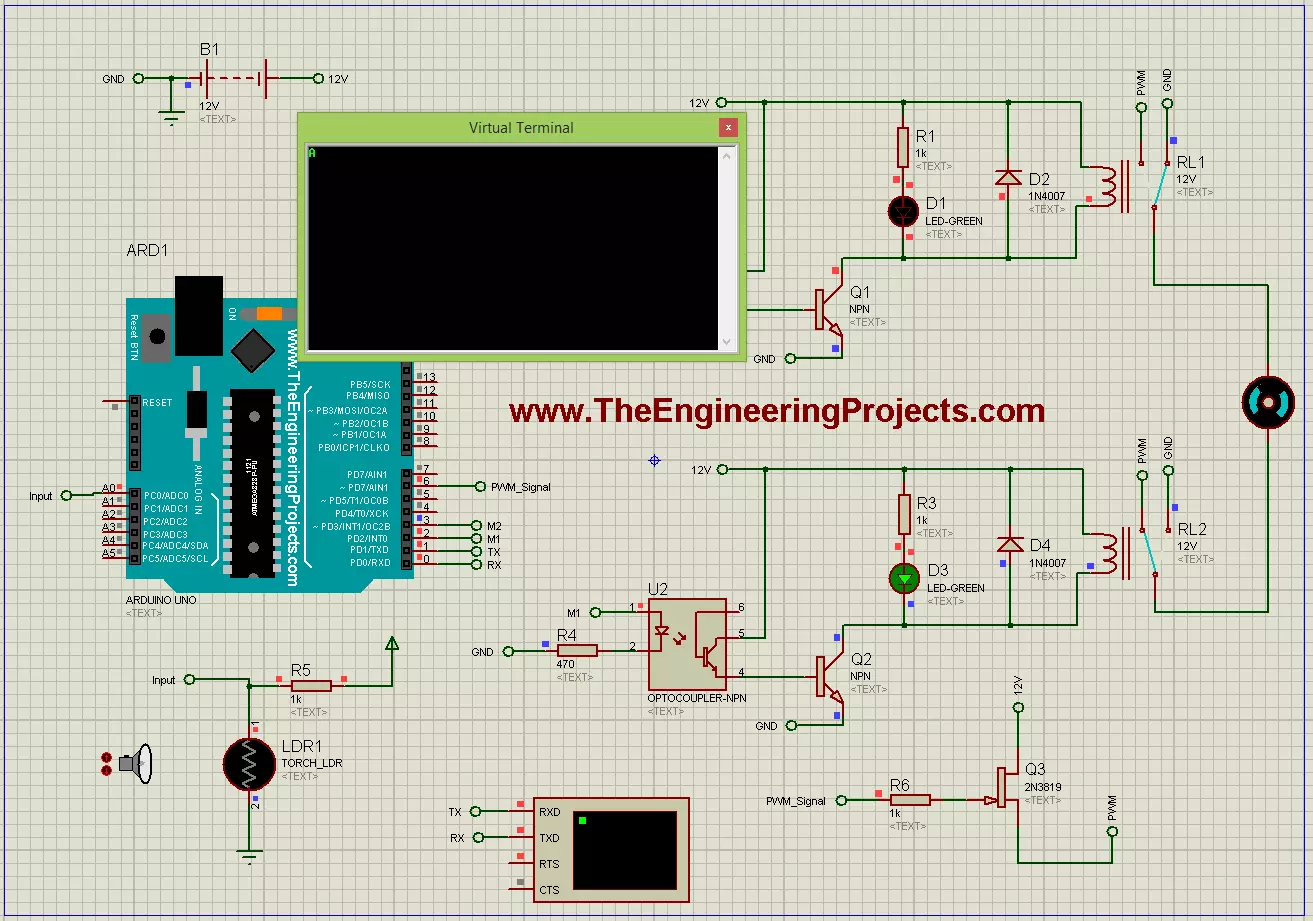
- So, first of all, design a circuit as shown in below figure:
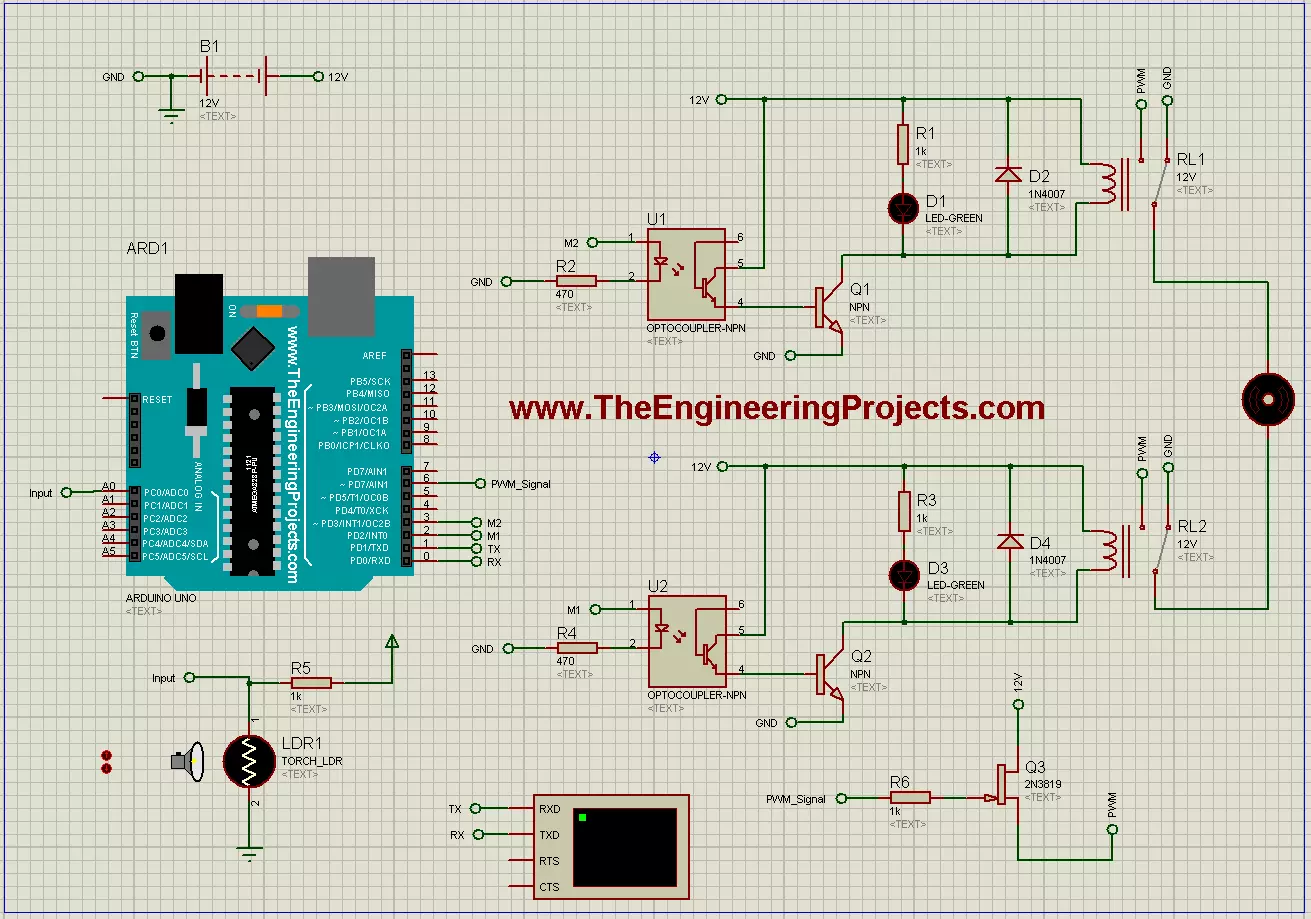
- As you can see in the above figure, its exactly the same as we designed for Direction Control of DC Motor in Proteus ISIS with a slight difference.
- The difference is NPN transistor which is used for DC Motor speed control.
- The base of this NPN transistor is connected with PWM pin of Arduino board.
- So, I am generating a PWM pulse on this pin which is then applied on the base of transistor.
- Now if I increase the duty cycle of this PWM pulse then the transistor induction will increase and thus the speed of the DC motor.
- Now in order to control this PWM pulse I have used the LDR sensor, now depending on the LDR sensor the speed of DC motor will increase or decrease.
- Now upload the below code in your Arduino software and Get the hex file from Arduino software.
int Motor1 = 2;
int Motor2 = 3;

int PWMControl= 6;

int PWM_Input = A0;

int PWM_Value = 0;
void setup() {
  pinMode(Motor1, OUTPUT);
  pinMode(Motor2, OUTPUT);
  pinMode(PWMControl, OUTPUT);
  pinMode(PWM_Input, INPUT);
  Serial.begin(9600);
}

void loop() {
  PWM_Value = analogRead(PWM_Input);
  PWM_Value = map(PWM_Value, 0, 1023, 0, 255);
  analogWrite(PWMControl, PWM_Value);
  if(Serial.available())
  {
    char data = Serial.read();
    Serial.println(data);
    if(data == 'C'){MotorClockwise();}
    if(data == 'A'){MotorAntiClockwise();}
    if(data == 'S'){MotorStop();}

  }
}

void MotorAntiClockwise()
{
  digitalWrite(Motor1, HIGH);
  digitalWrite(Motor2, LOW);
}

void MotorClockwise()
{
  digitalWrite(Motor1, LOW);
  digitalWrite(Motor2, HIGH);
}

void MotorStop()
{
  digitalWrite(Motor1, HIGH);
  digitalWrite(Motor2, HIGH);
}
- So, now I am starting the simulation and then will send the commands via virtual Terminal and it will start moving and then by changing the LDR position DC motor speed control will take place.
- I know its not clear from above figure so that's why I have designed this video. In the below video you will get the clear idea of DC Motor speed motor.
