Today, I am going to provide the detailed discussion on PIR Sensor Arduino Interfacing. PIR basically stands for Passive Infrared Sensor. Basically PI...
Hello everyone! I hope you all will be absolutely fine and having fun. Today, I am going to provide the detailed discussion on PIR Sensor Arduino Interfacing. PIR basically stands for Passive Infrared Sensor. Basically PIR is an electronic equipment which is often used to measure the infrared light radiating from the different objects in their field of view. It detects the infrared energy released from animals as well as from human beings, when this energy is higher than the certain threshold level PIR sensor shows an indication correspondingly. The energy detected by PIR sensor is usually in the form of heat i.e. emitted by humans as well as from animals.
We can also test and verify our results in Proteus using PIR sensor. I have already shared PIR Sensor Library for Proteus. PIR sensor is most of the time used for sensing the motion of the different objects. It can sense the different objects up to 10 meters. It has three different pins. Each pin is assigned with the different task to be performed when the sensor is in working condition. PIR sensor has several different features like wide voltage supply ranges, automated induction, photosensitive control, low micro-power consumption, high output signal and many more. PIR (Passive Infra Red) sensor is most of the time used in security systems. Moreover, it can be used in OEM applications, automatic illuminating devices, building detection, building automation, alarm & security systems and at a lot more places in real life. The further detail about PIR Sensor Arduino Interfacing will be given later in this tutorial.
PIR Sensor Arduino Interfacing
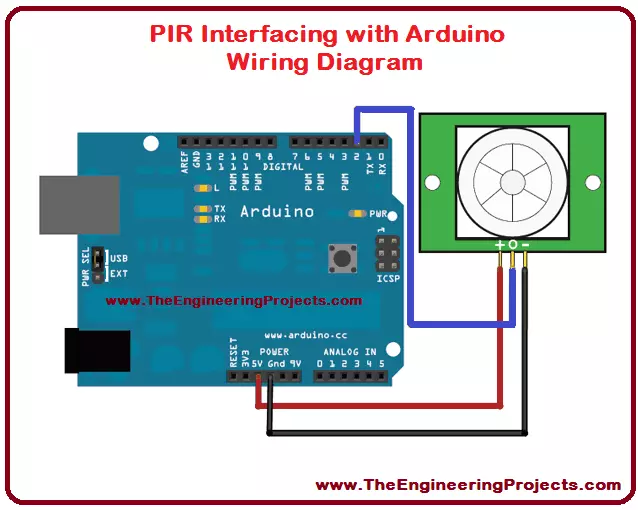
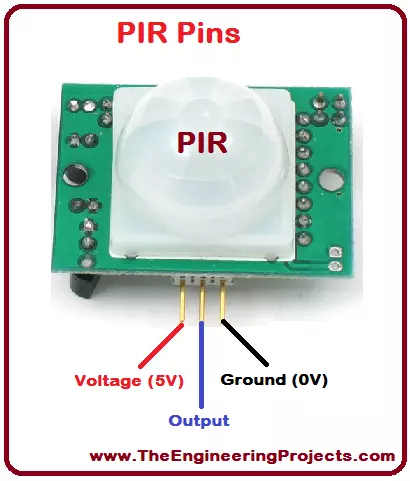
PIR sensor stands for Passive Infra Red sensors. As it is clear from its name that PIR is an electronic device or sensor used to measure the infrared energy emitted by animals and human beings. This energy is emitted in the form of heat. When this energy is above the certain level, there is algorithm to show an an indication that the desired level has be reached. This tutorial is based on PIR interfacing with Arduino. PIR sensor is shown in the figure below along all of its pin names.
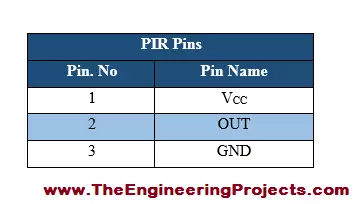
1. PIR Sensor Pins
PIR sensor has three pins voltage, output and ground respectively.
All of the pins are provided in the table shown in the figure given below.
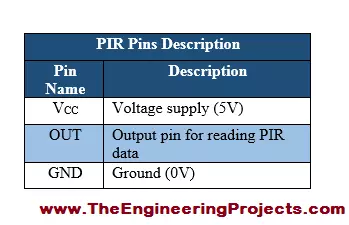
2. PIR Sensor Pins Description
Each pin has different task to perform while the sensor is in working condition.
PIR sensor pin descriptions are listed in the table shown in the figure below.
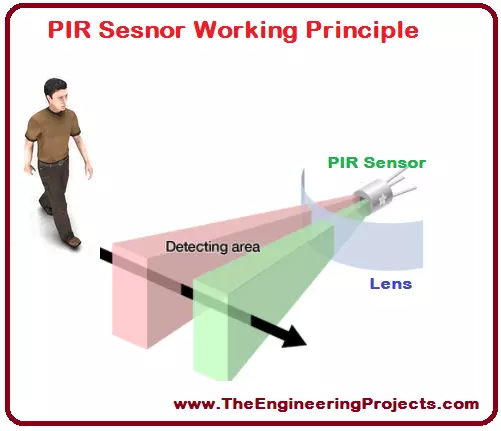
3. PIR Working Principle
PIR sensor has two different slot which are sensitive to infrared light/energy.
When the sensor is in normal condition, both of the slots measure the same amount of infrared energy radiated by walls etc.
When a warm body e.g animals and human beings crosses its coverage area, they first cross PIR sensors's first slot, which produces positive differential change between two slots.
When an animal or human being leave from the sensing area, a corresponding negative differential change is produced.
By detecting these types of changes PIR sensor can detect the motion of different objects which radiates infrared energy.
I have tried to elaborate the PIR working principle through some visuals shown in the figure given below.
I have also provided the visuals about how PIR sensor generates an output signal after sensing different objects/
PIR sensor object sensing is given in the figure shown below.
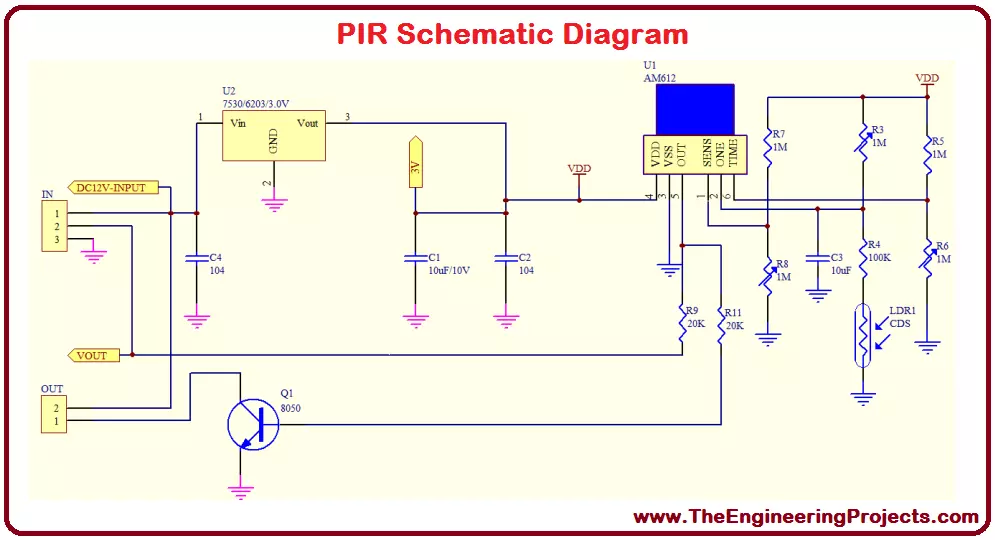
4. PIR Sensor Schematic Diagram
To understand the internal structure of any electronic device, we must have a look at its schematic diagram.
PIR sensor schematic diagram is shown in the figure given below.
5. Apparatus Required
A list of apparatus required for PIR interfacing with Arduino is given below.
int LED = 13;
int inputPin = 2;
int PIR_STATE = LOW;
int VALUE = 0;

void setup() {
  pinMode(LED, OUTPUT);

  Serial.begin(9600);
}

void loop(){
  VALUE = digitalRead(inputPin);
  if (VALUE == HIGH) {
    digitalWrite(LED, HIGH);
    if (PIR_STATE == LOW) {
      // we have just turned on
      Serial.println("Motion has been detected!");
      PIR_STATE = HIGH;
    }
  } else {
    digitalWrite(LED, LOW);
    if (PIR_STATE == HIGH){
      // we have just turned of
      Serial.println("Motion has been stopped!");
      PIR_STATE = LOW;
    }
  }
}
I have initialized the LED pin, PIR state pin and the pin and a variable for reading sensor's data.
Then I have checked whether the detected value from the sensor is above or below the certain level.
Then I have decide to be print the certain values on Serial Monitor.
If it is above the certain level a message "Motion has been detected" will be displayed on the serial monitor through Serial Communication.
If the detected value is below the certain level then the message "Motion has been stopped" will be displayed on the serial monitor in Arduino software.
So, that was the brief description of the source code designed for PIR interfacing with Arduino.
You can download the complete wiring diagram along with the complete Arduino source code here by clicking on the button below.
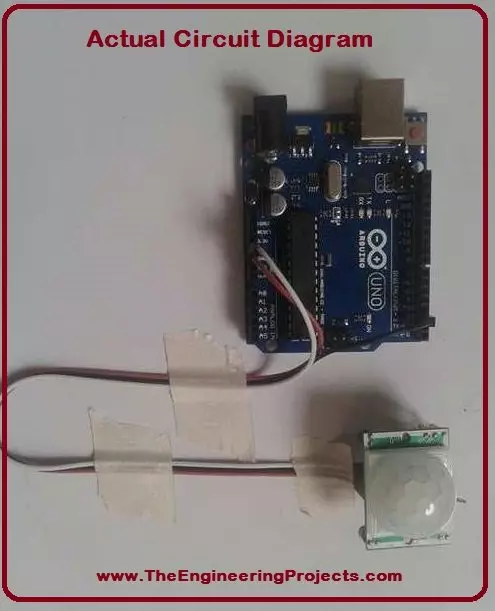
8. PIR Sensor Interfacing with Arduino Actual Circuit Diagram
I have also provided the actual circuit diagram for PIR interfacing with Arduino.
Actual circuit diagram is shown in the figure given below.
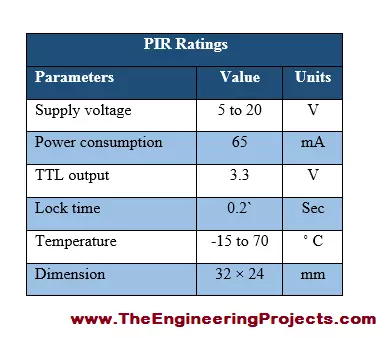
9. PIR Sensor Ratings
To know the power, current and voltage requirements of an electronic device can be known through its ratings.
PIR sensor ratings are listed in the table given in the figure shown below.
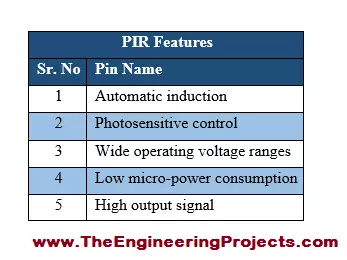
10. PIR Sensor Features
A device can be popular on the basis of its amazing and unique features, which make it different from other devices.
PIR sensor some of the main features are listed in the table given in the figure shown below.
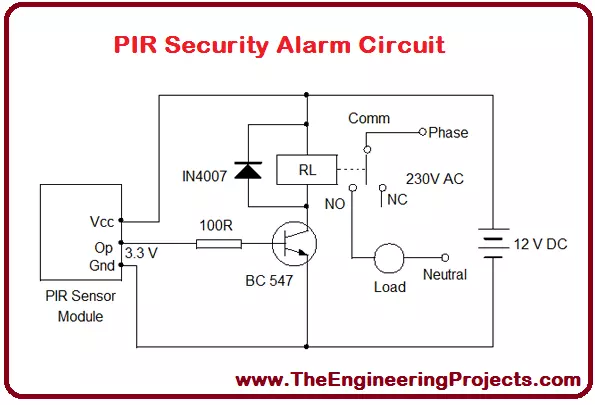
11. PIR Sensor Applications
PIR sensor has several different real applications.
Some of common applications associated with PIR sensor are provided in the table shown in the figure given below.
I have provided a circuit designed for security alarm system, which is its most common application.
The complete circuit design for security alarm system is given in the figure shown below.
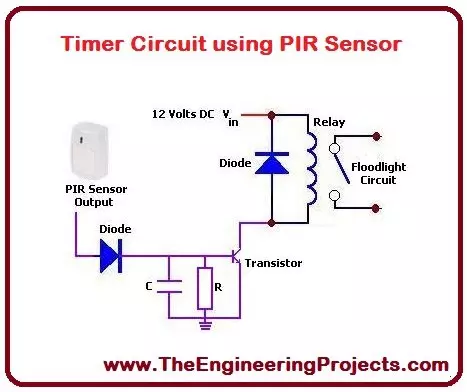
PIR sensor's another application is making a timer circuit using PIR.
I have provided timer circuit using PIR sensor, shown in the figure given below.
Another most common application of PIR sensor is the motion detection.
Motion detection circuit diagram using PIR sensor is shown in the figure given below.
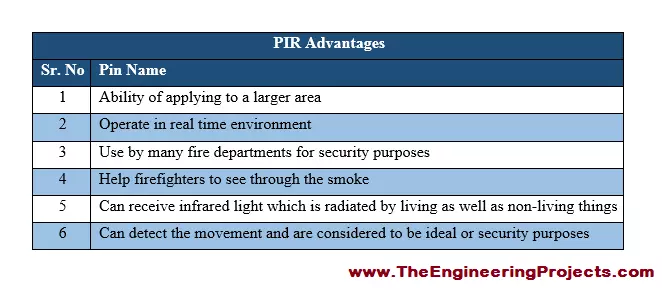
12. PIR Sensor Advantages
There are a lot of advantages associated with Passive Infrared Sensor, few of them are given below.
13. PIR Sensor Disadvantages
Infrared sensors also have some disadvantages but they are in a very small as compared to its disadvantage.
Infrared sensor disadvantage are listed in the table given in the figure shown below.
The tutorial PIR Sensor Arduino Interfacing has provided the detailed discussion about the interfacing of PIR sensor with Arduino. If you feel any problem in PIR Sensor Arduino Interfacing, you can ask me in comments anytime. I will try me level best to entertain you and to solve your problems. I will share further informative topic in my later tutorials. Till then take care and bye :)
syedzainnasir
I am Syed Zain Nasir, the founder of The Engineering Projects (TEP). I am a
programmer since 2009 before that I just search things, make small projects and now I am sharing my
knowledge through this platform. I also work as a freelancer and did many projects related to
programming and electrical circuitry. My Google Profile+Follow
Get Connected
Comments on ‘’ PIR Sensor Arduino Interfacing ‘’ ( 2 )
0
winnermohamed
Says:
Hii,im winner, i need water sensor is its available?
Reply
100
1
brhanu1
Says:
it really helps me alot, thank you. I couldn't got the heart sensor module library? pls help me how to get this library?
Reply