Hi Friends! Hope you’re well today. I welcome you on board. In this post today, I’ll walk you through the Introduction to Arduino Beetle.
Arduino beetle is the smallest Arduino board that comes with the functionality of Arduino Leonardo. This board is a remarkable addition to the minimalistic Arduino technology. It is based on the microcontroller Atmel Atmega32u4.
With the inception of innovations in modern technology, electronic devices are becoming light, more compact that happen to perform a lot of functions. These devices are economical and require little to no prior knowledge to get your hands dirty with them.
All Arduino boards are microcontrollers but not all microcontrollers are Arduino board. While using the Arduino board, you don’t need to attach extra peripherals with the board, as it comes with built-in functions that don’t require the addition of external components.
Earlier we have shared the articles on scores of Arduino boards including Arduino Uno, Arduino Leonardo, Arduino Due, and Arduino Mega. You can check these articles to find the basic information about them.
I suggest you buckle up, as I’ll walk you through the complete introduction to Arduino Beetle covering datasheet, pinout, pin configuration, features, communication and programming and applications.
Let’s jump right in.
Introduction to Arduino Beetle
Introduced by Arduino.cc, Arduino Beetle is the smallest Arduino Leonardo board that is based on Atmel Atmega32u4.
The Atmega32u4 is an 8-bit CMOS low power microcontroller
Arduino.cc offers an open-source platform for everyone which means you can optimize the boards and software programs as you like better.
The IDE (integrated development environment) is a software used to program the Arduino board. You don’t require prior knowledge and technical skills to start working with this board. The C and C++ are the languages used to program the Arduino beetle.
Though IDE software is compatible with MAC, Windows, or Linux Systems, Windows is a preferable operating system to use this board.
This tiny device comes with a micro USB port which means you can directly connect the device with the computer and program it based on your needs and requirements.
You don’t need a separate burner to burn and run the program on the board as it comes with a pre-burned Bootloader that allows you to upload the code in the hex file of the board.
The beetle is mainly introduced to provide the solution for low-cost disposable projects including DIY, gift projects, student projects, and e-textile.
This device operates at 5V and it also functions at 3.7V. Make sure voltage doesn’t exceed 5V else it can damage the device.
It comes with a clock time 16MHz. Several pins are incorporated on board out of which 10 are digital pins, 4 are PWM pins and 5 are analog pins.
This module comes with a crystal oscillator frequency up to 16 MHz that is mainly used to produce the clock pulses with decent speed. This oscillator is required for the synchronization of all the internal operations.
This module supports different communication protocols including I2C and UART.
The flash memory is 32KB out of which 4KB is used by the Bootloader. It is the memory where the sketch (the program we create on IDE is called a sketch) is stored.
The SRAM memory is 2.5KB which is the memory where sketch manipulates and produces variables when it operates. And EEPROM memory is 1KB and it is the space used for storing long-term information.
The price of this board at the time of writing this article is around 8$ which carries all powerful functions like Arduino Leonardo.
Arduino Beetle Datasheet
Before you incorporate this device into your electrical project, it’s wise to go through the datasheet of the device that features the main characteristics of the board. Click the link below to download the datasheet of Arduino beetle.
Arduino Beetle Features and Specifications
The following are the main features and specifications of Arduino beetle.
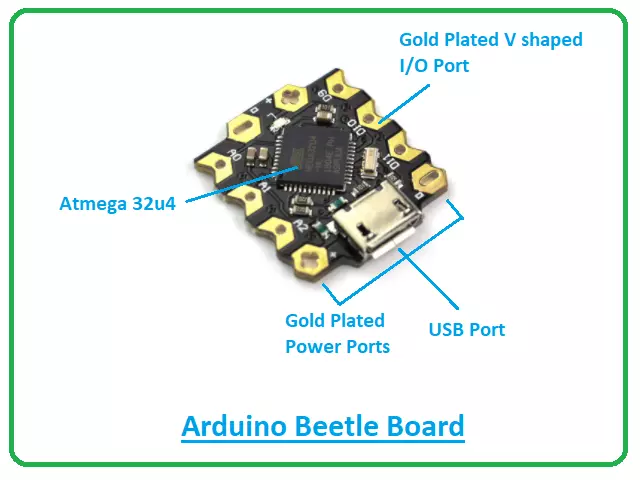
Board size 20mm x 22mm.
Direct testing and uploading program through a micro USB port.
I/O ports are V-shaped gold plated.
Two power interfaces that are gold plated and are used to supply power to the board.
Blue Light blink indicator which indicates the operation of the board.
Incorporated with Atmel Atmega32u4 microcontroller.
The operating voltage is 5V and the clock speed is 16MHz.
There are 5 analog pins, 4 PWM pins, and 10 digital pins on board.
Micro USB = 1
UART = 1
I2C = 1
EEPROM = 1KB
SRAM = 2.5 KB
Flash Memory = 32KB out of which 4KB is used by the Bootloader.
Write/Erase Cycles: 10,000 Flash/100,000 EEPROM
Data retention: 20 years at 85°C/ 100 years at 25°C
Arduino Beetle Pin Configuration
Still, reading? Perfect.
I hope you’ve got a clear idea about this board. In this section, we’ll cover the pin description of the pins incorporated on the board.
Analog Pins
There are 5 analog pins incorporated on the board. These pins can receive any number of values in contrast to digital pins which receive only two values HIGH and LOW.
PWM Pins
This board doesn’t incorporate DAC (digital to analog converter) but it does incorporate 4 PWM pins which are used to get some of the analog output’s functions. During this PWM (pulse width modulation) process, the board generates analog results with digital means.
Digital Pins
There are total 10 digital pins incorporated on board. These pins are developed to be configured as outputs or inputs based on the requirement. These pins are either ON or OFF. When they are ON they are in HIGH voltage state getting 5V and when they are OFF they are in LOW voltage state getting 0V.
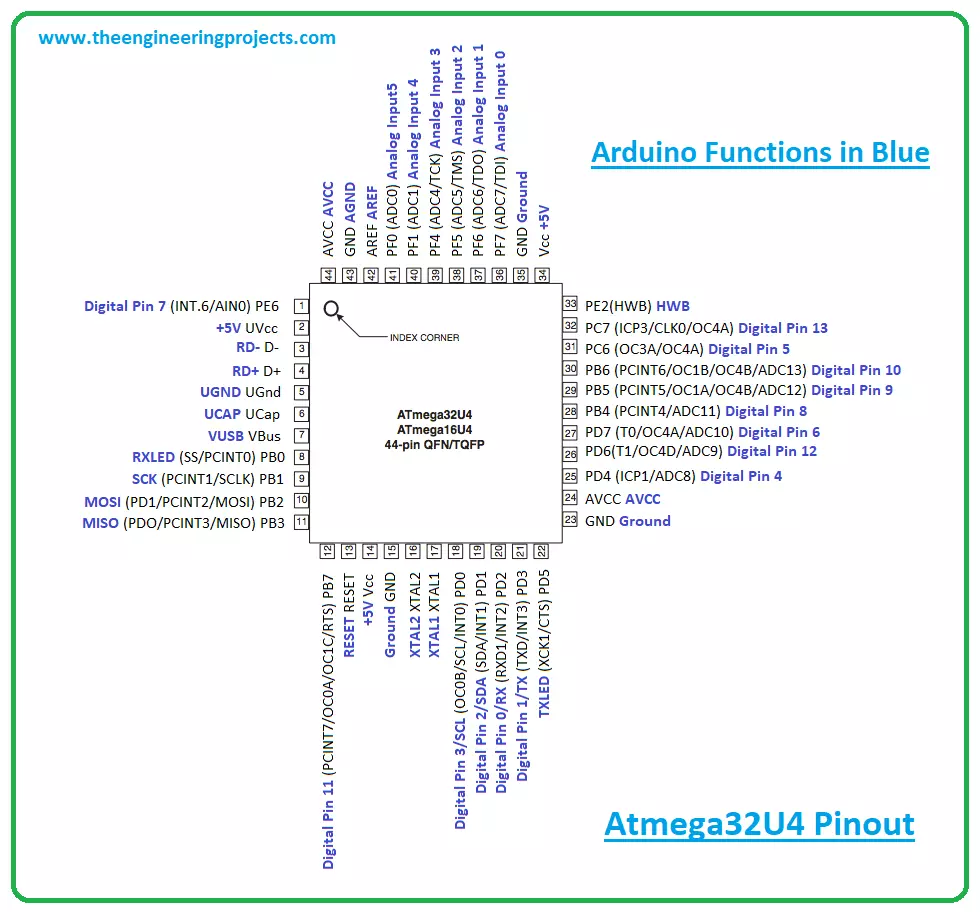
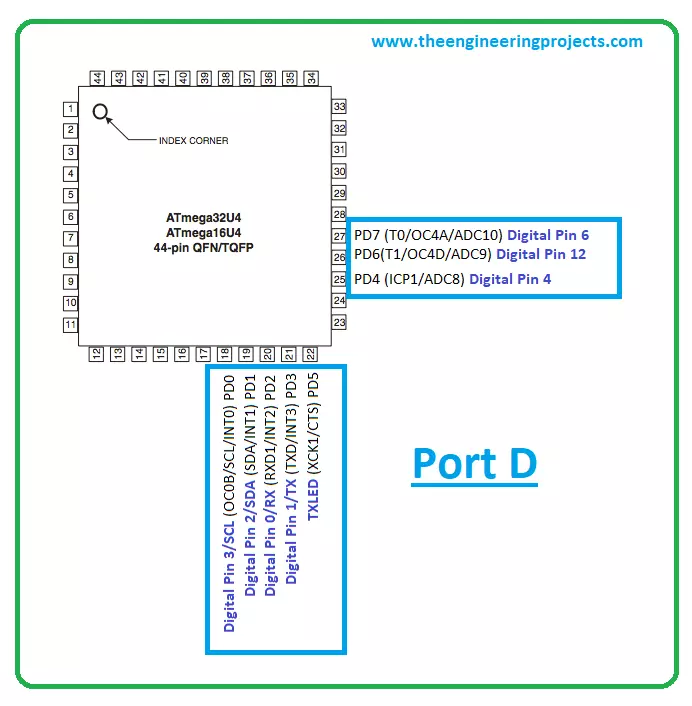
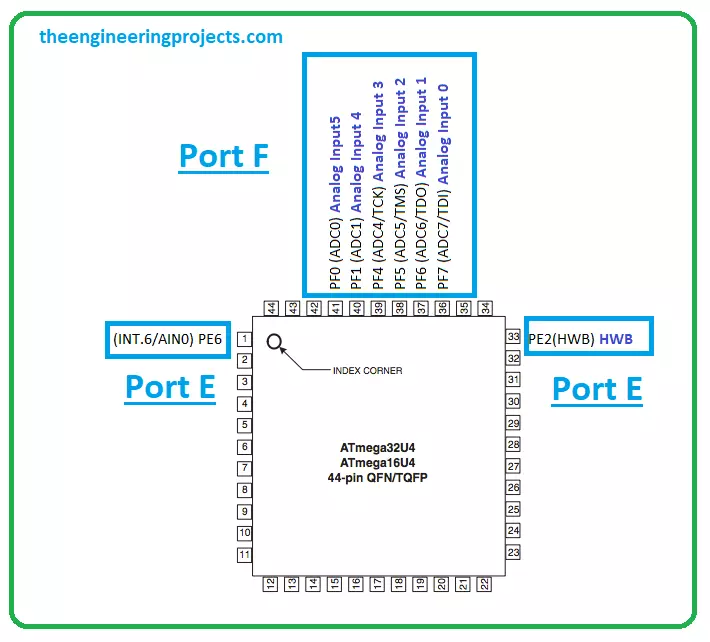
Atmega32u4 Pinout
The following figure shows the pinout diagram of Atmega32u4.
Atmega32u4 Pin Description
In this section, we’ll cover the pin description of each pin incorporated on Atmega32u4.
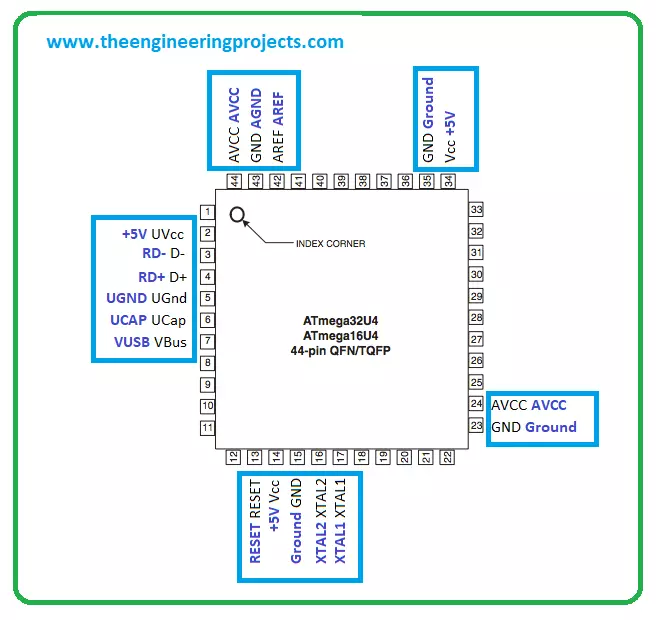
Vcc
It is a digital voltage supply pin.
GND
This pin is connected to the ground.
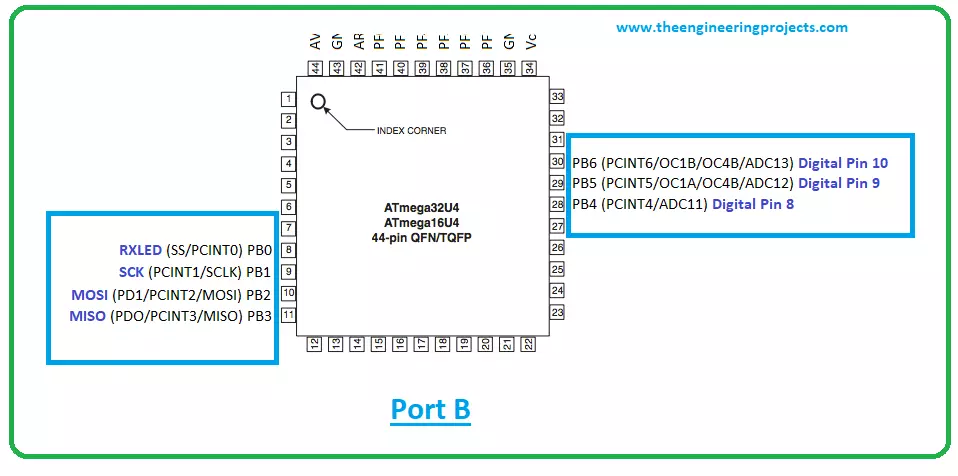
Port B (PB7...PB0)
Port B is an 8-bit bidirectional I/O port that is incorporated with pull-up resistors. These resistors are used to limit the current and prevent it exceeding from a certain number.
This port comes with efficient driving capabilities compared to other ports.
When this port is used as an input, this will source current due to the port pins that are extremely pulled low. This happens when the pull-up resistors are activated.
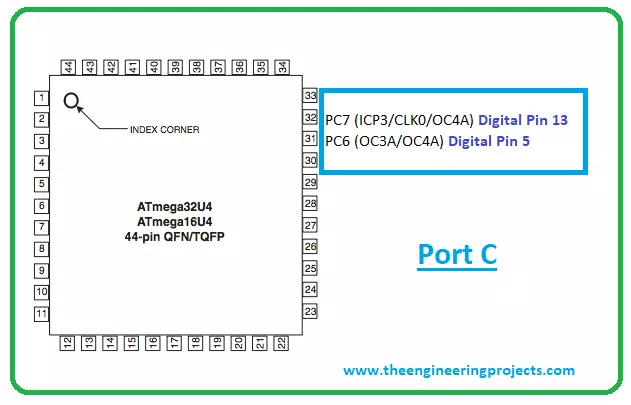
Port C (PC6, PC7)
Port C is similar to Port B - an 8-bit bidirectional I/O port incorporated with pull-up resistors.
When the pull up resistors are activated, Port C will source current with port pins extremely pulled low.
Port D (PD7..PD0)
Port D is an 8-bit bidirectional I/O port that comes with pull-up resistors.
When the reset condition meets, the Port D pins are tri-stated.
Port E (PE6, PE2)
Only two bits... PE6 and PE2 are present on the device pinout. It is an 8-bit bidirectional port incorporated with internal pull-up resistors.
Port F (PF7..PF4, PF1,PF0)
Port F is a bidirectional port that acts like analog inputs to the A/D converter.
Two bits PF2 and PF3 are not present on the product pinout.
D-
USB Full speed / Low Speed Negative Data Upstream Port. It should be attached to the USB D- connector pin along with the serial resistor 22W.
D+
USB Full speed / Low Speed Positive Data Upstream Port. It is connected to the USB D+ connector pin along with the serial resistor 22W.
UGND
USB pads ground.
UVCC
Regulator Input supply voltage applied to USB pads.
UCAP
Internal Regulator Output supply voltage applied to USB pads.
VBUS
USB VBUS monitor input.
RESET
This is a reset pin. A low level applied to this pin for a longer time will produce a reset. Shorter pulses may not generate a reset.
XTAL1
Input to the internal clock operating circuit and Input to the inverting Oscillator amplifier.
XTAL2
Output from the inverting Oscillator amplifier.
AREF
This is used as the analog reference pin for the A/D Converter.
AVCC
AVCC is the supply voltage pin for all the A/D Converter channels.
Communication and Programming
Recall, this module supports different communication protocols i.e. I2C, and UART.
The I2C is a two-wire communication protocol that carries two main lines called SCL and SDA. The former is a serial clock line required for the synchronization of all data transfer over the I2C bus. While the latter is a serial data line mainly employed to carry the data.
And the UART is mainly used for serial communication and comes with two lines Tx and Rx where the former is used to transfer the serial data and the latter is used to receive the serial data.
Arduino IDE software is used to program all types of Arduino Boards.
Attach micro USB to the Beetle and select Arduino Leonardo from your board type on the Arduino IDE software.
Arduino Beetle Applications
This tiny little beast is a full system in a small package as it incorporates almost all functions like Arduino Leonardo. The following are some applications of Arduino Beetle.
Health and security systems
Creating a wireless keyboard
Industrial automation
Embedded systems
Student projects
Automatic pill dispenser
Water level meter.
You’ll find a lot of microcontrollers in the market that are more economical than the Arduino board. But still, most of the hobbyists and students prefer Arduino Board over microcontroller.
The reason is clear.
Arduino board comes with a big community that shares expertise and knowledge for a wide range of audiences. Help is readily available that you’ll never find in the case of microcontrollers.
Moreover, when you select Arduino board over microcontroller, you don’t need additional components and extra peripherals to connect with the board, as this board comes with a lot of built-in functions, setting you free from the hassle of connecting a lot of components. Simply, you need to plug the device with the computer and play with it on the fly.
That’s all for today. I hope you’ve enjoyed reading this article. If you’re unsure or have any questions, you can pop your comment in the section below, I’d love to help you the best way I can. Feel free to share your valuable suggestions and feedback around the content we share so we keep coming up with quality content customized to your exact needs and requirements. Thank you for reading the article.
syedzainnasir
I am Syed Zain Nasir, the founder of The Engineering Projects (TEP). I am a
programmer since 2009 before that I just search things, make small projects and now I am sharing my
knowledge through this platform. I also work as a freelancer and did many projects related to
programming and electrical circuitry. My Google Profile+Follow
Get Connected
Comments on ‘’ Introduction to Arduino Beetle ‘’ ( 0 )