How to use MATLAB Operators?

Hello learners welcome to the next tutorial on MATLAB where we are learning about this excellent environment in detail without skipping anything. Last time, you have seen the data types and their detail through practical implementation and this time, you will get information about the operators used in MATLAB and the text-related information in an efficient way. By the end of this lecture, you will be able to answer the following questions:

  • What are the operators and can we use operators in MATLAB?

  • How can you implement the arithmetic operators in your MATLAB?

  • What is the significance of the relational operator?

  • What is the detail of the logical operators in MATLAB?

  • What are bit-wise operators?

  • How can you give a brief introduction to the short circuit operators?
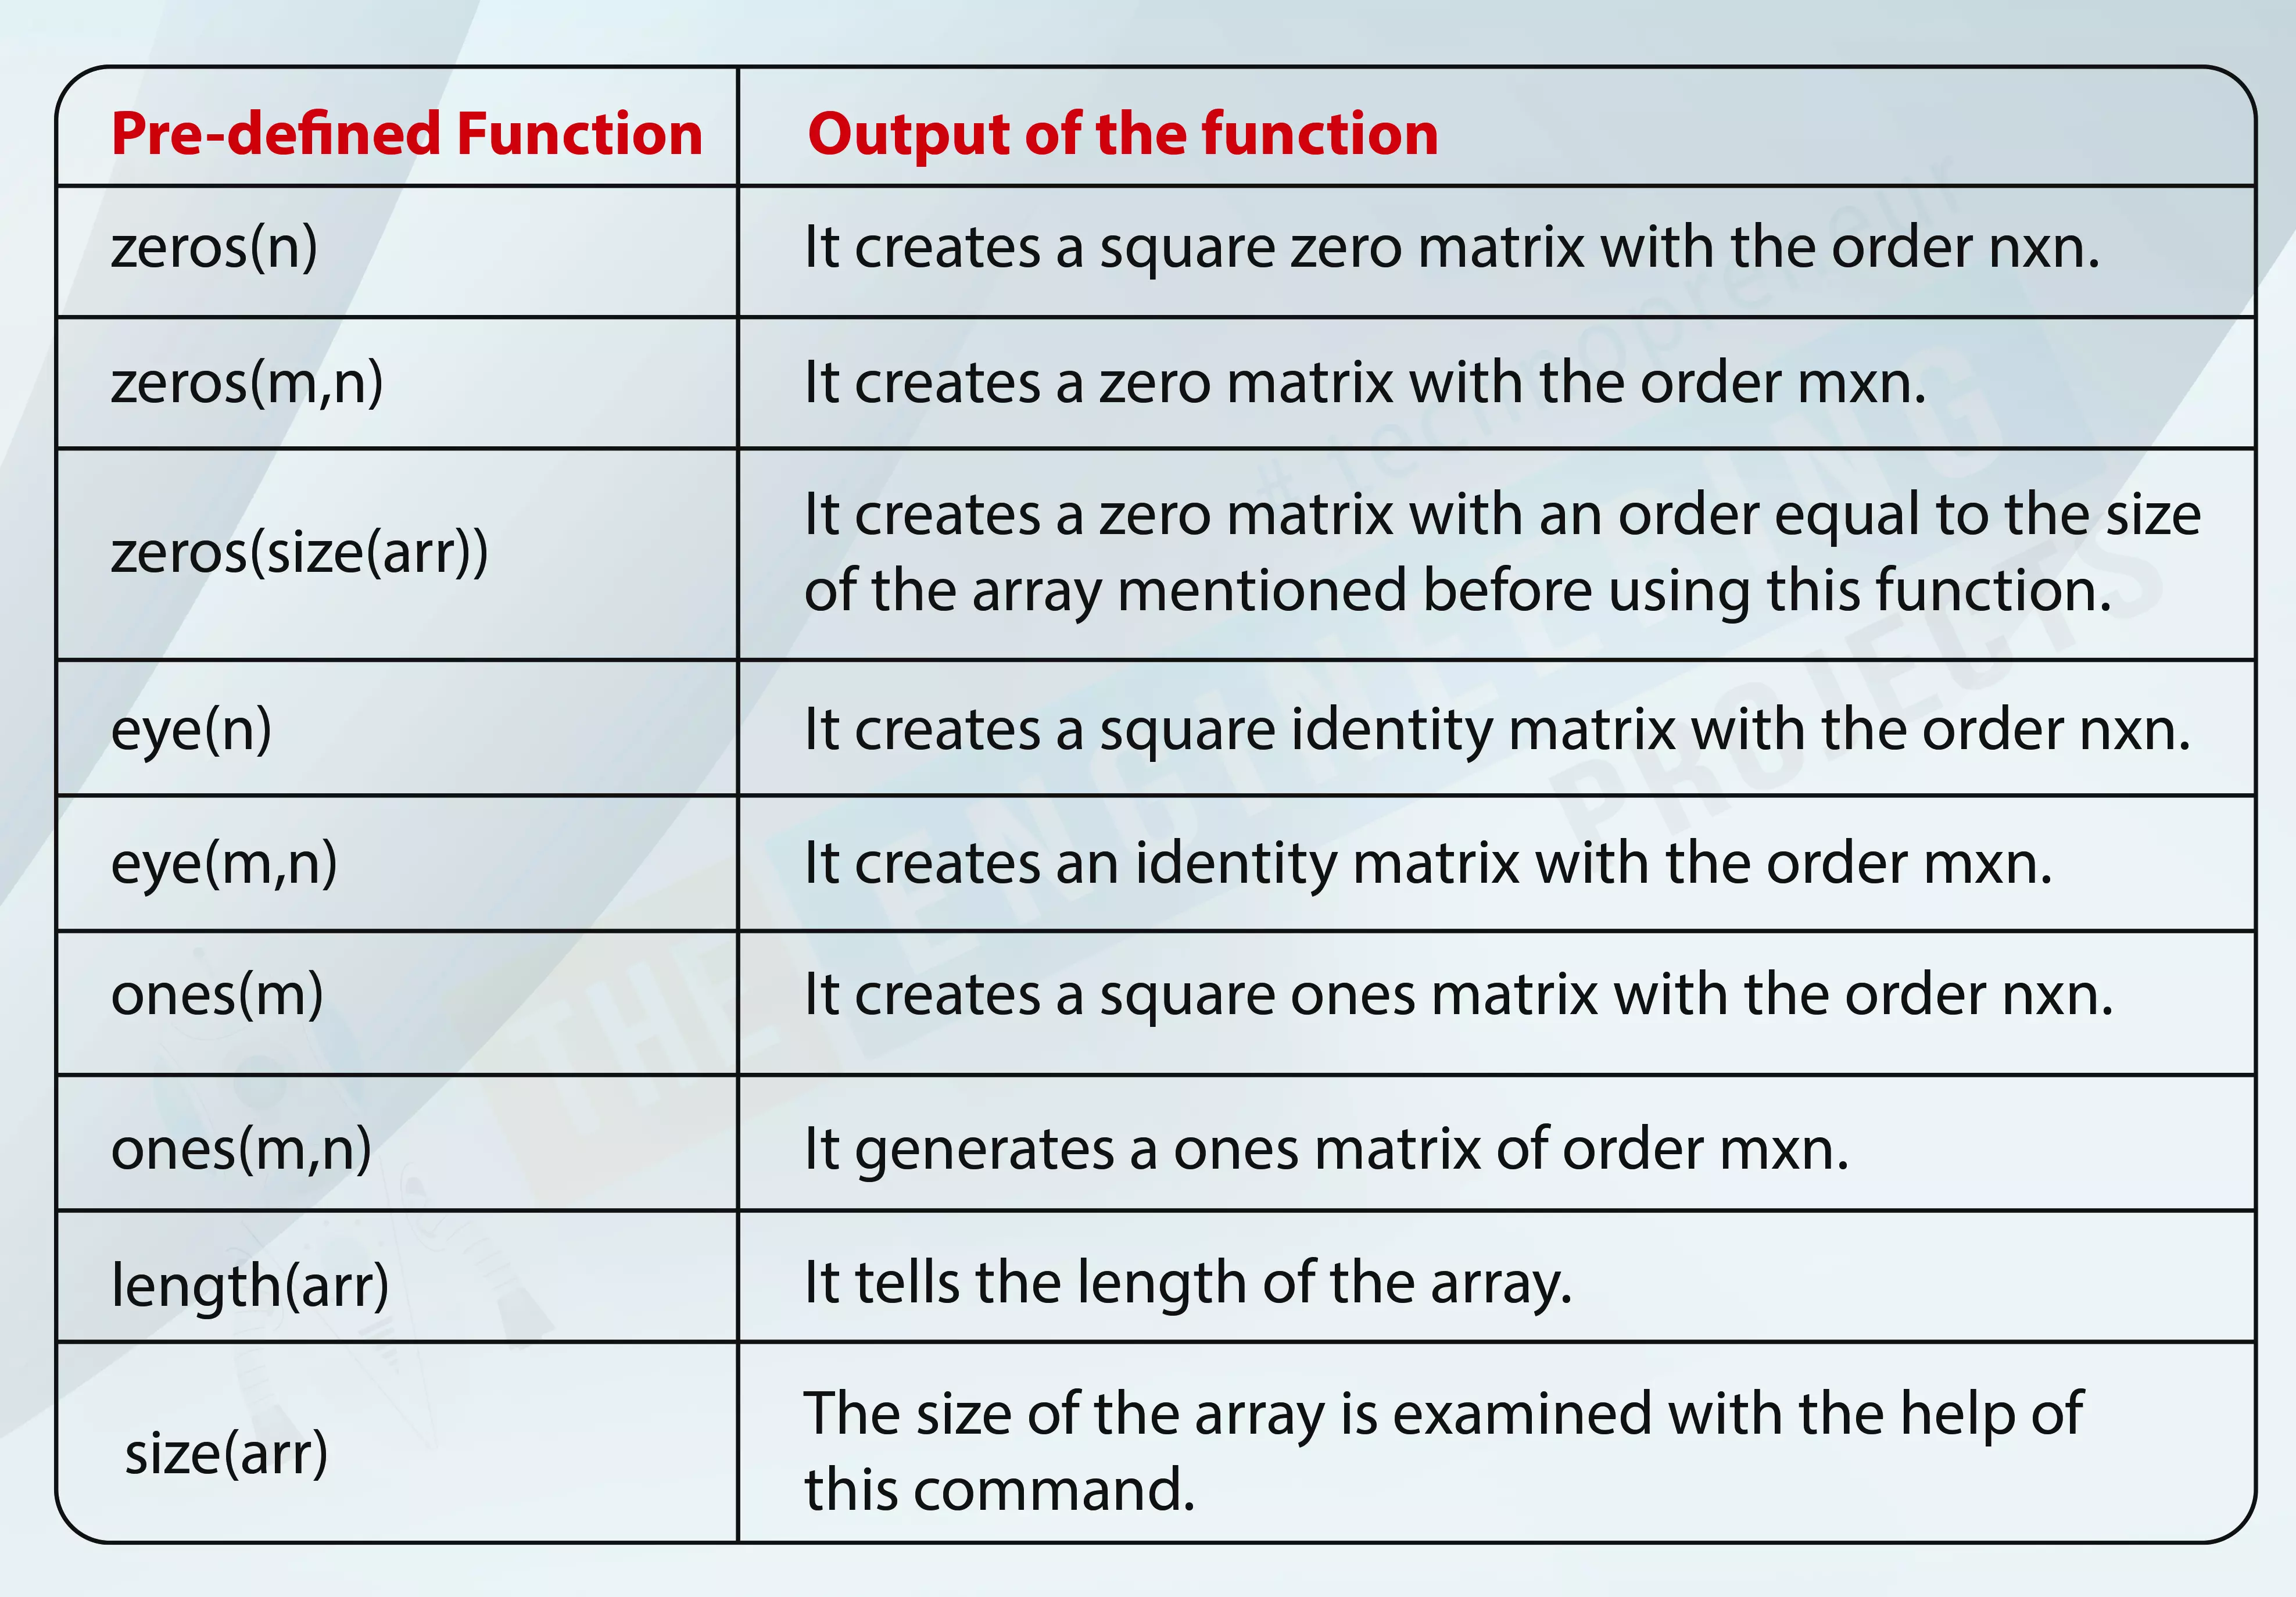
All of these are important questions not only in programming in the MATLAB language but this is also related to other mathematics and related fields. In order to understand well, I’ll suggest you open your MATLAB software and practice every case on your own because it is super easy to work with the operators in MATLAB even if you are new to this programming environment. 

Introduction to Operators in MATLAB

An operator is a symbol that instructs the compiler to perform numerical or logical operations. MATLAB is designed to work primarily with whole matrices and arrays. As a result, MATLAB functions can operate on both scalar and non-scalar data. For a detailed introduction, have a look at the statement given next:

"The term operator refers to a symbol in computer programming and mathematics that is used to perform specific logical and mathematical operations. It can also be defined as a personification of an action."

So, we can say, you have used the operators knowingly or unknowingly hundred or thousands of times in different software and today, we are just relating all the procedures to MATLAB and will learn what can we do with these operators. 

As we have used the basic operations on the matrix many times so, we will be more involved in a little advanced example this time. 

Using Operators in MATLAB

The procedure to use different operators is somehow the same as in the real life when we use them in our notebook in mathematics or related subjects. Basically, we divide the operators in MATLAB into the following categories:

  • Arithmetic operators

  • Relational operators

  • Logical operators

  • Bitwise operators

All of these will be discussed in detail and we believe that most of them are known to you so for your practice, we will have more focus on the examples of each case. In addition, you can also make your own matrices and arrays in addition to my example to have fine practice and it is also fun.

Arithmetic Operator

The first and the easiest operator is, as you can guess, the arithmetic operation in which we use the basic operations of mathematics through these operators and therefore, this will be easy for you to understand. But here, the new thing is, the arithmetic operations are categorized into two classes:

  • Matrix arithmetic operators

  • Array arithmetic operators

 The introduction of both of these are self-explanatory but when we talk about the difference between them, we come to know that if the operator is applied to the matrix then it is the matrix arithmetic operation and vice versa. Another point that differentiates between these two is, we use array arithmetic operation, then we use a dot between the symbols of the array to highlight the procedure. The detail of each operator is now given below:

Addition Operator

As you can guess, this operator is denoted by a plus sign between the two values to be added and it is the simplest and most frequently used operator. The condition is applied on this operator according to which, both the values (either in MATLAB or simple additional values) must be of the same size if they both are vectors otherwise, if one quantity is a scaler, then it will be added to every member of the matrix. 

Subtraction Operator

The subtraction operator is the same as the subtraction in the real world done by us. It also follows the same condition as the additional operation. But you must know, it also includes the negative values in it because many times, the larger value is subtracted from the smaller one we get the negative values in matrices or arrays.

Matrix Multiplication Operator

Here comes a slightly different operator than the simple arithmetic operation of the daily world. We can use this operator if and only if the number of rows of one matrix is equal to the other to be multiplied. Otherwise, the same as the other operators, the results are impossible to get. 

If A and B are two matrices then C, which is the resultant of the multiplication can get as

C=A*B

The reason why we are checking the formula of this operation will be clear to you when you will read the next section. 

Array Multiplication Operator

There is a bit of difference between this operator and the one discussed before. In this case, each and every element is multiplied by the corresponding element of the other. It is denoted by the dot between the signs of the matrices. 

If we take the same example as given above, we will denote the array multiplication as:

C=A.*B

Matrix Right Division

The right division of the matrix can be explained well with the help of the example that if A and B are two metrics then their right division is obtained by the following expression:

C=B/A=B*inv(A)

Array Right Division

Just like the array multiplication, the array right division method includes the dot sign between the arrays and we can understand this concept while looking at the expression given next:

C=B./A

Matrix Left Division

Let’s say that if A is the nth order matrix and B is a single column metric then their division, denoted by C=A\B is equivalent to CA=B.

Array Left Division

In this type of MATLAB operatorA.B is the matrix with elements B(i,j) a(I,j), where A and B must be the same size.

Power of the Matrix

The power of the Matrix is obtained when each Element in the matrix is multiplied by itself equal to the number of the power written just at the upper right corner of the matrix. You can perform this operation by using the A^n sign where n is the power of the matrix.

Transpose of the Matrix

You know the transpose of the matrix and its procedure. But in MATLAB, it's more simple and you can easily get the transpose of the Matrix by Using the A’ command where the A is a matrix. 

Relational Operations in MATLAB

A relational operator determines the relationship between each element and two arrays. If a relation exists, the value is returned as true or false.

The operator returns an array of the same size with the values true or false depending on the outcome of an operation. These operators can operate on both scalar and non-scalar data:

  1. < is called Less than

  2. <= is called less than equal to

  3. > is the sign of greater than

  4. >= is a sign greater than or equal to

  5. == can be stated as equal to

  6. ~= refers to not equal to

Logical Operations in MATLAB 

The logical operations are somehow different from the first two types. In these types of operations, only two possibilities are there. Either you get 0 or 1. We hope you are aware of the boolean expressions and by connecting the discussion with them, we get the idea that:

"The logical operations in MATLAB follow the logic of the boolean operations and therefore, the results in such calculations are always either 0 or 1 and therefore, we get the true or false conclusion."

If we talk purely about MATLAB, we come to know that there are three types of logical operators and functions listed below:

  1. Element-wise logical operations

  2. Bit-wise logical operations

  3. Short circuit logical operations

Element-Wise Logical Operations

These are the operations that take the elements of all the cases and perform the procedures separately. Three types of procedures are listed in this type and operators used for different processes are & (AND), |(OR), and ~ (NOT). Moreover, XOR operation is also included in the same category. This will be clear when you will see the representation and the quick revision of the results related to these operators. Suppose we have two elements with the following values:

X=[0 1 1 0 1];

Y= [1 1 0 0 1];

Then, the result of each element-wise logical operation will be:

Operator Name

Symbol

Description

Result

AND

&

It gives the value 1 only if both the elements are one, otherwise gives zero. 

X & Y= 01001

OR

|

It gives the value 1 every time when any of the elements are one, otherwise gives zero. 

X | Y = 11101

NOT

It gives the opposite result all the time and it is a unary operation. 

~X = 10010

XOR

It gives the value 1 every time when the elements have the same value. If they have opposite values, then it is always zero.

X⊕Y=xor(X,Y)=10100

One thing that has been noticed here is, as we said earlier, the values in the logical functions are always 0 and 1 therefore, we have also used only these two numbers in the elements and got the results with the same results.

I hope you now have the best idea about the calculations. Let’s move towards the next type.

Bit-Wise Operator

The bit-wise operation, as the name suggests itself, is used when there is a need of bit by bit calculations. Same as in the previous case, the functions are shown with the help of signs and by looking at the table explained below, you can get an idea of the working of each operator.

P

Q

P & Q

P | Q

P ^ Q

0

0

0

0

0

0

1

0

1

1

1

1

1

1

0

1

0

0

1

1

Matlab provides the following bitwise operators: 

  • bit and (a,b) – Bitwise AND (integers a and b).

  • Bitmap (a) – It is used to bitwise the compliment of a.

  • Bitget (a , pos) – Get bit at a specified position, in the array a

  • Bitset (a , pos) – set bit at a specified location of a

  • bitShift (a,k) – It is used to get the equivalent results as multiplied by 2k. Therefore, if k is negative, it shifts right, on contrary to this, if k is positive, it shifts to the left position.

  • bitor(a, b) – The operation of this operation is Bit-wise XOR of integers a and b

    Short Circuit Operator

    In addition to the general operator describe before, we have some more interesting operators as well. The operators listed below perform AND and OR operations on logical expressions, including scalar values. They are short-circuiting operators because their second operand is calculated only when the first operand does not fully determine the output.

    &&

    It gives the value of 1 only if both operators give the result 1 otherwise it is zero.

    ||

    It gives the value 1 if either or both inputs are one. We get the contrary results otherwise. 

    Trus, we have seen a lot of operators today that are helpful to understand the introduction of the operators in MATLAB. Many of these have the same symbol and representation of the operators and results. We have seen arithmetic operators, relational, logical, bit-wise, and short circuit operators. It is important to mention here that other operators such as set operators are also included in this learning but I have not mentioned them because these are less known and less used operators in MATLAB. We’ll discuss them in some other tutorial. For now, it is enough to have this information and your homework is to perform all the remaining operators that I have not shown you in MATLAB.

    How to use Data Types in MATLAB?

    Hey geeks, welcome to the next tutorial about MATLAB software and language. In this series, we have been working on MATLAB with the basic information and in the previous lecture, we worked deeply with the workspace window and learned about the functions and variables that are commonly used when we are dealing with the data in the command prompt. In the present lecture, we are dealing with the data types in MATLAB. This is related to the command prompt window but the reason why I have arranged this lecture after the workspace practice is, there will be different steps where the usage of the workspace will be included. Other details will be cleared when you will take this lecture yet, have a look at the list of content that will be included in this tutorial:

    • Introduction to the data types.

    • What are some important data types that we will use in MATLAB coding?

    • What is meant by the numeric and text data types?

    • How can we make tables in MATLAB?

    • Why data types are important in programming?

    • How can you say that different programming languages have different data types?

    What are Data Types

    In almost every programming language, the data types are the important topics and these do not end with a single lecture, but knowingly or unknowingly, you have been using these data types in the practice of your MATLAB codes. So, first of all, I am going to provide you with the proper definition of data types:

    In programming, a data type is a classification that specifies what type of value a variable has and what mathematical, relational, or logical operations can be performed on it without causing an error.

    If this definition seems difficult to you then do not worry, all the details will be clear to you when you will see the example of each of its types. When you use any type of data in your programming language, it is not of the same type but varies according to your needs and requirements. There are several data types but we will discuss the basic and most important in this lecture so we may elaborate on each and every type effectively. But before going into the examples, I am dividing the whole languages into two main classes:

    1. Strongly typed programming languages

    2. Weakly typed programming languages

    Both of them have different ways of implementation, so have a look at them.

    Strongly Typed Programming Language

    Strongly types data types are the ones in which there is a restriction of using the particular variable is used according to its data type. You must know, MATLAB is a strongly typed programming language because you can not connect irrelevant data types together in it but you have to use the same data type all the time when connecting two or more together. 

    Let us have an example. We have seen the concatenation process in the previous lecture where two digits may have the arithmetic operation if they belong to the same class that is the same data type. So, if you try to connect an integer with the string, it will throw an error. 

    Weakly Typed Programming Languages

    The weakly typed data type, contrary to the first case, can be used in an easy way because there is the independence to use the different data types together with the help of any operation. It happens in only a few programming languages and it is not relevant to our MATLAB so I am not explaining it more. 

    List of Data Types in MATLAB 

    Finally, I am going to describe the detail of almost all the data types that you are going to use in the MATLAB throughout your course and with the help of this knowledge, you will be able to use these data types according to your needs and at the final result, you will code in the best way. So, have a look at the detail of each data type. 

    Numeric Types

    The first and most basic type that we all know is the numeric type. Here, if you are new to programming, I must mention that numerics also has different classes in it and two of them are:

    1. Integer

    2. Floating Points

    3. Single

    4. Double

    Integers: 

    The numbers that mostly we use in our daily life are integers we have read the definition of integer in our begging classes that these are whole numbers ranging from positive infinity to negative infinity but we are mentioning here the definition because I want to make sure you use the code without any confusion.

    Floating Points:

    The floating points are the numeric types that contain the part, less than one in them, in addition to the whole number. This portion is then added in the form of points. To memorise well, you can think that every integer has zero additional points than a whole number and the floating point digits additional to that whole number. 

    Single:

    It is the array of single precision numbers that occupies less memory because it just stores the first digit after the point. Basically, it is the subclass of the floating number and is less accurate than the other case that we are discussing next. It is less likely to choose and if the user is not using scientific information, then they use the single integer to fix less memory for their data type. For instance, the result of the calculation will only be shown just after one point such as 12.3 only.

    Double:

    It is also the class of the floating point that stores more memory than the single data type. It is more accurate because it can store the two numbers after the floating point. For example, if you choose the double floating point, it will provide you with the results as 12.34. The numbers having a value more then this will require to be saved int eh data type of character or string according to the length of the number.

    IntX numbers:

    These are the interesting types of data in which users may get the integer type of his/her own choice. There are different int X numbers where the X varies from 8 to 64. So, by applying the numbers 8, 16, and 64 with the X separately, you can fix the memory space of your own choice where you can easily declare the variables. 

    For example, if you want to declare the variable of the size 8 bits, you will write the following command: 

    int8(value)

    It will create a space of 127 numbers. The total size of this 8 bits data is one byte and it occupies the space to accommodate 0 to 127 numbers. By default, if you do not specify, it is the unsigned data that starts from 0 to 127. 

    If you want the numbers with the same memory size but the ones that include the negative sign as well, you can do so by changing the command to:

    uint8(value)

    Now, I am writing both these commands in the command prompt and with the help of the workspace window, you can compare the values stored in both these cases.

    Similarly, you can check for the int16 and int64 as well and the workspace window will tell you about the detail of each and every case with the signed and unsigned value. 

    If you do not want to use the workspace window, you can find the details of your data type with the help of whos command that we have learned in the past lecture.

    So in this way, it becomes easy to search and get the results of details of any kind you want about the particular data type. 

    Class of The Data Type

    It is time to tell you about a useful and simple command to get the class of the data type easily if you do not remember the size or data type of your variable. So, the syntax to do so is:

    class(variable)

    Where the variable amy be any data type, this keyword will help us to find its class.

    Keep in mind, the A varialbe was declared by you before using this class keyword otherwise, you will ge tthe error.

    Text Data Type

    When using the text in the code in any way, you have to use the alphabet, as expected. But, you must know that there are also two types of text data types that are, the same as the numeric type, have a slight difference between them and we use them according to the need of time. Here are these two:

    1. Character  type data

    2. Sring type data

    CharacterText:

    The character type data is used when we want to declare the variable of the text with relatively less memory space. In simple words, when we want to declare a single alphabet or small sentences, we use the character. The declaration for the characters is as follows:

    A=’Tom’

    Where the single quotation tells the compiler that we want the space for the character text.

    String Text: 

    The string text, as you can expect, has more memory space than the character. These concepts are discussed in the last lecture so I am not going to give you unnecessary details and examples.

    Tables

    Row and column variables are present in the table. Each variable can have different data types and sizes, but they must all have the same number of rows. A variety of functions are used to access data in order to create, edit, and read table data.

    Syntax

    A=table(column1,column2,....,column(n))

    Here, you can easily declare the column's name and after that, you can enter the data according to your choice.

    Structure Data Type

    Data containers are used in the structure to group related data and their types, which are referred to as fields. Fields can hold any type of data. The dot notation is used to access data in structures.

    Why We Use Data Types in Programming?

    We know you have an idea that data types are important in programming languages yet, I always use the explanation of the importance of the topic that is being discussed. 

    • The data types are used to occupy a specific amount of the data according to the need of the user. For example, there is no need to reserve the memory space equal to the string data when you need only the data of a single integer. In this way, the program runs slowly and this problem is unbearable if you have a large data in the program or have a slow system than required. 

    • The data types make the code more organized and clean. 

    • With the help of data types, the path of the program is more clear that how the flow is being used from start to end when you are programming your code. 

    • The readability of the program is enhanced with the help of clearly defined data types. 

    Data Types in Different Programming Languages

    It is an interesting question that must be cleared when dealing with programming languages. We know you have a basic knowledge of programming languages and therefore, I am not explaining from the scratch. But, you must know that it is not necessary that all the programming languages are based upon the same data types. Usually, the code of the programming language is distinguished by its data types and the keywords that we use with the specific syntax.

    Hence, it was a detailed lecture on the data structure where we learned a lot about the data types and we have learned a lot of infprmation in differnet ways. All the work was practiacally performed but if you find that something that needs implementation, you should practice it by yourself as your homework. We had a lot of discussion related to the different case where we use some special keywords to find the type or the relation of different data types. Hence, you can now designed you codes according to the required data type. Stay with us for more interesting tutorials. 

    How to use MATLAB Workspace?

    Hello, readers. Welcome to the MATLAB tutorial, where you are learning the basics to advance information about MATLAB without discussing unnecessary concepts. In the last lecture, there was a discussion about variables and their declaration, usage, and types in detail using the MATLAB command prompt. This time, you are learning the workspace window of MATLAB. Usually, people while learning ignores this window because they do not bother about what is happening in it, but the experts know that by applying the simple rules in the workspace window, they can easily get better results. At the end of this lecture, you will be able to answer the following questions:

    • What is the workspace window of MATLAB?

    • How can you save the files from the workshop in different ways?

    • What is the method to load the files of the workspace window?

    • How are characters implemented in MATLAB?

    • What are the details of using the string in the command prompt?

    • What are some of the important functions of MATLAB?

    Workspace Window of MATLAB

    The workspace window is a type of window that appears in the upper right corner of the MATLAB window. At first, the focus of the user is usually on the command prompt, and hardly anyone observes the presence of the list of variables in the workspace window that they are declaring. So, the user is not required to store the variables separately in this particular window. Keep in mind, the variables in this window can lose their existence when the environment is closed, the same as in other windows. Yet, the reason why I am mentioning this point here is, the variables are saved in this window on their own, and even after we clear the screen of the command prompt, the variables are still shown in the workspace. So, we can say, even if the command prompt does not show the values of the variables, you can find them in the workspace window with all the details of their values and dimensions. 

    Now, it is important to show you the above discussion in action with the help of an example. The workspace window has two portions and they are labelled as names and values. Here, we are declaring the variable with the name A in the command prompt and all its data is saved in the table-like format in the workspace.

    Notice that when we write clc in the window, we can still see the value of A in the workspace. So, whenever you want the value of A again, you can simply write A in the command prompt and you will get your required value. 

    Using Files in Workspace

    As we have said earlier, the data in the workspace vanishes once you close MATLAB. So, to save your data, you can easily use it in the future if you want. To do this, you have to follow these steps:

    • Go to the home tab. 

    • Search for the “save workspace” option.

    • Give a meaningful name to the file so that you may remember the name to search for it in the future.

    MATLAB will save this file with the extension .mat.

    Once you have saved it, you can easily reuse this file whenever you want by merely going into the “Open” option and selecting your desired value, The procedure is the same as the other files in the computer system. 

    Saving the Documents Through Command

    Another way to do the same task is to use the command prompt to save the file. For this, you just have to write the command in the prompt and I found it more interesting than the first procedure. So, to save the file in the command prompt, you can follow the command given below:

    Save MyFile

    Once you save your file, the same file with the name chosen by you will be shown in the “current folder” window of your MATLAB. In this way, it becomes super easy to use your required folder again.

    How to Load the Files in Workspace

    Another command is used to load or open the file saved by you the previous day. So, the command used for this purpose is given as:

    Load MyFile

    Keep in mind, you have to follow the rule that the name you are specifying must be the name of the file you have same. The spelling and the case size of each and every word must be the same. So, I usually prefer to load the file from the current folder window where I can find all the files saved by me arranged alphabetically.

    Usually, people face the issue of an error when they choose the load command on the file saved by them.  Or sometimes, the user gets the error of saving the file in the form of a folder. The issue may be resolved by using the correct current folder from MATLAB. If you are facing the issue as shown in the figure, maybe you are selecting from the wrong folder. The best way to check it is to notice the path of the folder where your files are being saved while saving the file.

    Here, before going into other details, I consider it important to tell you about the tabs and the setting of the workspace window. It may be the issue with your MATLAB that you do not get all the required tabs that is shown in the tutorial, so if you want to add more, you can simply do s by going into the settings and choosing the best tabs for you.

    Character in the MATLAB

    Characters in MATLAB can be used as they are written in normal life. In contrast to most other programming languages, such as C++, you do not have to specify the type of content you want to add to the compiler. You just have to write it between the inverted commas and you are good to go.

    In some tutorials, you will also observe a single semicolon at the end of this command. I am not using it because it is up to the choice of the user, so I do not prefer to have additional words in my code. 

    A special case comes into observation when we want to add the double quotation in our string message but are not able to do so. Then, the user may use the double quotation mark twice.

    This case is important when you are writing long sentences with information about a particular person or thing. 

    Concatenation of The String

    It is time to discuss an interesting and useful process while using the strings in the array. If you are familiar with the process of concatenation, then you must know that:

    “The term "concatenations" means to merge two things together, and in programming languages, it is the process of connecting two strings together in a single sentence.”

    You can save the values of the variables and then use them with each other with the help of concatenation.

    This helps a lot when you have to use the different types of numbers again and again in different ways. 

    Character in the Form of Array in MATLAB

    To store and arrange the data in an organized way, arrays are used. If you have great numbers of strings and want to store all the data in the array format, you can do so as you were dealing with the normal numbers before. Yet, this time, you have to put quotation marks before and after the character work or sentence. 

    Strings in MATLAB

    Strings can be used as characters in MATLAB, but these have two very basic differences that are mentioned below:

    Character

    String

    It has less size than a string.

    It is bigger than the character.

    It is assigned by using a single quotation mark. 

    It is assigned by using the double quotation mark. 


    Usually, sentences are used in the strings because they save a large amount of memory, and characters are used in cases where single letters are to be used. Basically, a string in MATLAB is an array of characters. Usually, we can memorize the difference between different data types by keeping in mind, when we deal with the alphabet, we use either strings or characters, and usually, a string is considered the sentence that has to be printed on the screen.

    Important Functions In MATLAB

    There are different functions of MATLAB that you must know if you are dealing with large data such as strings and characters, For your information, we are discussing some of them.

    • Display function

    • Clear function

    • Maximum Function

    • Minimum function

    • Whos function

    The details of both of them are given here:

    Display Function

    The display function, as the name suggests, is used to display the results, function, or anything that is fed into it. The main use of this function starts when you save any data in the variable or get the result of any calculation and want to describe the result on the screen. No matter if you have other calculations written between the display function and the result you want to show, you can easily get the required output instantly when you call it with the help of the display function. The syntax of this function is given here:

    disp(data to display)

    Here, the data may be any string, number, variable, or anything that you have saved in the compiler and want to display now. 

    Clear Function

    We have discussed many times that we can clear the data off the screen, but you have not seen the implementation of this function. This is one of the simplest commands, and I love it because, through this, we can make room on the screen for the new calculations. The syntax is given below:

    clc

    Yes, it is as simple as shown above. You just have to write this in a new line and your screen will be cleared. One thing that must be cleared up here is that when you use this command, the data is not deleted. It is just cleared from the screen. You can see in the workspace window, all the variables and results are present just in the memory of MATLAB. 

    Maximum Function

    While dealing with the numbers, you will find this function interesting and useful because it tells you the maximum value of the data that you have provided. It may not look as important as it actually is now, but consider the case when we have a large amount of data, let's say 100, or even 1000, numbers. How will you check what the maximum number is among them? In such cases, the maximum function gives you results. Have a look at the example given below:

    I have just tried to give you the simplest example of this function by using some ordinary numbers. Once my data is stored in the variable C, I can now easily get the maximum value among all these values by using a simple command of the maximum function.

    Hence, there is no need to check each and every number all the time when I have this function. 

    Minimum Function

    Another pre-defined function of MATLAB is a minimum function that gives the exact opposite results of the case discussed above so I am not explaining it again and just showing you the implementation. 

    Whos function

    Here is the last function that I am interested to share with you. This function tells the user about the details of a particular matrix, array, or variable at the command prompt. As in the workshop window, all the values related to that variable will be displayed on the screen.

    So, it was the lecture where we defined the little but important concepts of MATLAB. The focus of this lecture was on the workshop window, and we have proved that this simple window is important to us because it shows the summary of all the variables and the saved values at just a glance. So, we hope you have learned a lot from this tutorial. Stay tuned with us for more amazing and easy tutorials.

    Variables and Arrays in MATLAB

    Hello peeps! Welcome to another tutorial on MATLAB where we are starting the code learning and its procedures in this lecture. In the previous sessions, we have seen the windows through which you can work in different ways for specific tasks. The focus of that lecture was on the figure window and editor window. Now, we are coding in these windows. You will see the implementation of these tasks in the command prompt because we are dealing with arrays as well. So, have a look at the topics that will be cleared in your mind after having the knowledge of this lecture.

    • What are the variables in MATLAB?

    • What is the relationship between the matrix and variable?

    • How to use the built-in functions of the MALTAB in command prompt?

    • Give the example of built-in functions.

    • How can you input a string message or store the results in the form string.

    We’ll try to get the example fo each case and make sure to provide you with the easiest but accurate information.

    Variables in MATLAB 

    In the prerequisites of this course, we have told you that one must have a basic knowledge of programming language. So, I am assuming that you know what actually variables are. Yet, for the sake of revision, I am discussing the concept of variables. The structural unit of the programming in MATLAB is the array. As you know, MATLAB work very closely with arrays and variables are also saved in the form of arrays in MATLAB. We have a detailed series about the matrices in MATLAB and you will see the implementation of the arrays in the command prompt window. 

    Naming the Variable in MATLAB 

    If you are confused that how MATLAB do all its task in the form of arrays, then have a look at the description of the procedure that we are giving you now. The assignment statement can be elaborated well with the help of this statement:

    var = expression;

    Consider the case when we save any value in any variable say A. The following statement is used in the command prompt.

    A= 23

    Unlike some other languages such as C++, there is no need to define the type of value in every case when declaring the variables' name in MATLAB. We have simply told MATLAB that there is a variable A with the data type int because we are saving an integer value in it. MATLAB stores this variable in the form of a one-dimensional array where the integer value 23 is saved with the name A. Now the question arises, what if we do not declare any variable name and just declare the operation on the value? This can be illustrated by the statement given below:

    sqrt(22)

    When you put the above statement in MATLAB’s command prompt, you will get the required results you were expecting. Yet, as you have not given this value any name, by default, your answers are shown with the name “ans” if you do not specify the name of the variable. All the above discussion will be cleared up with the help of the following image.

    The above discussion was made to provide the firm basis of variables and matrix in MATLAB, but now have a look deep into this procedure and check the link between these two terms. 

    Relation of Variable and Matrix

    We all know that matrices are the types of arrays that vary from one-dimensional structures to multi-dimensional according to the declaration and needs of the user. The dimensions of the matrices depend upon the number of rows and columns that we declare when introducing the matrices in MATLAB. In the case discussed above, the matrix was one-dimensional because we used a single value in the matrix, so basically, we used one row and one column only.

    The area of the memory in MATLAB, where the variable is sorted, is saved with the customer-specified name, as we have seen before in this topic, but here, it is important to notice that you can change the name of the variable at any time and the data saved in the variable will not be affected.

    While naming the arrays and, in return, we can say any variable, we have to keep in mind that the name of any variable starts with a letter. You can use special signs such as underscore after the first variable but not in the first place.

    Using Built-in Functions of MATLAB

    The real magic of MATLAB lies in its built-in functions. It seems that the designers and programmers of MATLAB have made a special effort to make the working of the mathematical functions easy and interesting, so they have made the built-in functions of the mathematical functions that, in real life, are difficult to perform and take time. A slight mistake in any step can alter the results, and it becomes difficult to recognize the mistake. Yet, with the help of built-in functions, you can easily put the values in the formulas and you are good to go. To explain this well, let me tell you about a simple type of matrix. 

    Zero Matrix in MATLAB

    A unit matrix is a type of matrix that has all the values zero in it. It is not empty, but at every place of the value, zero is saved. At the start, you must be thinking, why do we use this matrix? But these types of matrices are the basis of important functions and features of mathematics. Well, let’s design your own zero matrices of your own choice. The values obviously remain zero in every case, but the size of the zero matrices varied and, for practice, we are using the three examples.

    To apply the zero matrix at the command prompt window, we use the following formula:

     x= zeros(3)

    This will create a square zero matrix with three rows and three columns. It makes sense because we are providing MATLAB with only a single value; therefore, it uses it for the informational rows and columns.

    In the case when we want the rectangular matrix, we can use the same formula with two values inserted into it. 

    y = zeros(3,2)

    Another way to use the zeros matrix with the indirect declaration is to simply save the values that will be inserted in the zero matrix formula into a separate variable, and then simply enter that variable into the square matrix formula.

    c = [1 2; 3 4]

    z = zeros(size(c))

    In this way, I have taught you the usage of the size variable, which is another built-in function that does not look at the values saved in the matrix but just picks the size of the matrix. 

    We hope it is clear to you now. There are certain matrices mentioned in the previous session; therefore, I am not explaining more. For your practice, check and implement the table given elbow in your MATLAB command prompt.

    So, have you noticed that in our third example, we have made a matrix of size 2 by 2 and MATLAB just picked the size and used it for the formation of a zero matrix of the same size. It is one of the examples of a matrix into a matrix.

    Pre-defined Function

    Output of the function

    zeros(n)

    It creates a square zero matrix with the order nxn.

    zeros(m,n)

    It creates a zero matrix with the order mxn.

    zeros(size(arr))

    It creates a zero matrix with an order equal to the size of the array mentioned before using this function.

    eye(n)

    It creates a square identity matrix with the order nxn.

    eye(m,n)

    It creates an identity matrix with the order mxn.

    ones(m)

    It creates a square ones matrix with the order nxn.

    ones(m,n)

    It generates a ones matrix of order mxn.

    length(arr)

    It tells the length of the array.

    size(arr)

    The size of the array is examined with the help of this command. 

    Variables with the Keyboard Input in MATLAB

    Up till now, we were dealing with the variables that were related to numbers and the functions related to numerical operations. But, just like other programming languages such as C#, MATLAB also provides you with the facility to get the output in the form of a string. 

    If you want to print the message on the screen or want to have the functionality of taking input from the user, then you can do so easily by following the instructions given below:

    To print the message in the form of a string when you want to take the input from the user, you use the following command:

    user_input=input(‘message from the input’)

    Here, we have specified the general representation of the whole command, and if it is not clear to you right now, you will get it when you have a look at the example given next. This command does two tasks:

    1. It prints the exact words on the screen that are written into inverted commas. 

    2. It stops the compiler here and waits for the user to input the required values so that the compiler may use it for further calculations. 

    It is interesting to note that the user has to provide valid input all the time. MATLAB has the functionality to check the input type and it throws an error instantly. Another important point to notice is that we will write the code at the command prompt in our case. Yet, you can also write the same code in the editor window or live script, and in that case, the input stream will be shown on the command prompt presented just below the live editor. Let’s see all this discussion in action with the help of MATLAB.

    We are using the simple addition operation in the command prompt to explain the workings of the input stream. Here is the code for it.

    My_Message=input('Write two numbers to be added with the addition sign:  ')

    The user then gives the input properly and gets the results instantly.

    I have written the whole string in detail and given a long name to the variable to show you the details. Usually, the variable names are kept short because these will be used again and again in the long programs and long names can be the reason for errors because of more typing. 

    Note that, by using the command that we have mentioned before, you can not use the string as a message. Once you write the answer in the form of a string, you will get the error that there are fewer arguments in the command given above. Yet, not every time does the results in the numeric format. When you want to save the results as a string, you have to use the second argument as “s” so the compiler may know that you can also provide the input in the form of a string.

    So, you can use the input function for the string and integers and you know that integer values are just simple numbers and if you want to save the floats or other types of values, you have to save it int he form of string by using s as the second argument.

    Truss, in this lecture, we had the basic and detailed information about the variables in MALTAB. We know that MALTAB work by saving all the information in the form of arrays and therefore, at the start, we have related the variables with the arrays. After that, the implementation of the functions by the user in the MALTAB by usign different windows was discussed. Moreover, at the end, we looked at some example in which we have taken the input form the user and after that, performed the operations on it. We have taken very simple examples to make sure you are getting the best knowledge all the time. The next lecture will be related to the information given today but we will talk about some advance problems.

    MATLAB Windows | Figure Window | Editor Window

    Hello learners, Welcome to another tutorial on MATLAB. In the previous tutorial, we learned a lot about MATLAB's command window, saw some exciting commands related to the system, and found guidance from the pre-defined data. In this lecture, you will learn a great deal about the other two types of windows we defined in the earlier sessions. Let me discuss the points that will be discussed today. 

    • What is a Figure window?

    • How to get started with the figure window?

    • How can you change the background colour of the figure window?

    • What are some functions of the figure window?

    • Give a brief introduction to the editor window.

    • What is the live script?

    • How to run code on the live script?

    • What is the difference between the run all and run section options in MATLAB?

    We shall discuss all these questions during our session you are going to learn a lot of things because we have precise and interesting data for your learning and practice related to MALTAB.

    Figure Window

    MATLAB provides us with various functionalities related to the mathematical operations and working of different theorems in the best way. When talking about graphics, we come to know that they provide the perfect way to facilitate the user in the best way. So, it provides the user with a high-quality graphic window that shows the results of different calculations in a pictorial way. This will be clear when you see the implementation of different commands while designing your own figure window in the command prompt. 

    Getting Started with the Figure Window

    It is amazing to know that you can easily label your own figure window according to your task by using some simple commands. So, have a look at the following steps:

    Open your MATLAB software.

    Go to the command window.

    The syntax for creating a new figure window is as follows:

    figure (‘Name’, ‘Value’)

    Where the keyword “Name” tells MATLAB that you want to name your figure window according to your will, and the value shows the value that you want to store in place of the window’s name.

    Now, write the following command there.

    figure (‘Name’, ‘My Figure Window’)

    You will observe that it will create a square window that is labelled with your required title, and it will appear instantly when you finish your command and press enter.

    Making The Graph in Your Figure WIndow

    As we have been discussing since the beginning, the figure window has made the representation of different graphs super easy. You just have to put in the values and the graph with the accurate values will appear on the screen. If you want to do so, check out the following way:

    Go to your Command window and provide the values of the bar to MATLAB. In our case, we are storing these values in a variable named “Y”. Examine that all the values are stored in a square bracket. 

    Y = [1,44,66,8,33,89,34,4,22]

    In the next line, you have to write the function of the window's formation. Write the next line in your code.  We are making a new window because we wanted to teach you another thing related to the figure window. Write the next line in your code.

    figure ('Name', 'My Figure Window', 'NumberTitle', 'off')

    With the help of this command, MATLAB will surely create a window for you not only with the same title but also without any additional title other than your written statement, as we have observed in the previous case (title with the figure number).  It seems like an ordinary feature of the figure window, but most of the time, you are not going to use these options.

    In the end, we are using the pre-defined function of MATLAB named bar that creates the bar graph of the values stored in your variable Y.

    bar (Y)

    You will see, a nice and interesting figure window with all the data that was fed by you.

    Background Colors in Figure WIndow

    During this discussion, when I said that you are also going to design your own window, I meant that you can change the background colours and the data of the figure window made by you. If you want to do so, then you just have to make little changes in the command for the formation of your window.

    figure ('Name', 'My Figure Window', 'NumberTitle', 'off', 'Color', 'r');

    Here, the colour function is specified in red by using the keyword “r”. There are different keywords for different colours. Check the same command by using ‘b’ instead of ‘r’ and you will get the blue screen. 

    Functions in Figure Window

    Let me tell you another command through which you will get some points scattered on the screen with the blue background. Just write the following command on the command prompt.

    figure ('Name', 'My Figure Window', 'NumberTitle', 'off', 'Color', 'b')scatter((1:23),(rand(1,23));

    Here we have used two different functions that may be new to you. 

    The scatter function gives the MATLAB some values, say x and y, where x shows the starting point and y shows the ending point, in between which the distance between the points shown in the figure is taken by MATLAB. 

    On the other hand, the random function chooses one of the random numbers between the limits provided by us. After that, it shows the number of dots accordingly. Both of these are important functions, and one thing that must be kept in mind is that the limits of both these functions must be equal. Otherwise, MATLAB will make the error that the dimension of these functions must be the same. You can pick any number for these limits. 

    Editor Window in MATLAB

    The MATLAB editor is a fantastic window because most of the commands and functions that are related to different functions are done with the help of pre-defined commands and functions. We discussed the basic introduction of the editor window in our previous lecture. This time, we are discussing it deeply. MATLAB provides two versions of the editor window:

    1. Editor Window

    2. Live Editor

    To use the editor window, simply follow the steps that we are specifying here:

    • Open your MATLAB software.

    • Go to the command window.

    • Write “Edit” in the command window. 

    It will open a new screen where you can create multiple windows, and the screen now looks like this:

    As soon as you try to run this file, a window will appear that will require the information of the file where this code will be saved in your MATLAB folder. So, I suggest naming it meaningful so that any time you need the code, you simply click on the saved file, and your saved code will be shown as expected.

    The command window now lies below the editor window, and you can use it for several operations. The editor window is also referred to as the script window, and at this point, we want to work on the other type of editor, which is the live window. 

    • Go to the main menu of your screen and choose the live editor there. You will be directed to the new window.

    Let’s start by writing the code in this window. 

    • For now, I am going to show you the result of some coding and, hopefully, you will love it. 

    • Copy this code from here and paste it into the editor window. 

    For the compilation of this code, t=2:0.1:1

    x=[1 2 4 7]

    h=[4 7 8 1]

    a=xcorr(x,h)

    subplot(2,1,1)

    stem(a)

    title('Correlation')

    xlabel('Time / The Engineering Projects’)

    ylabel('Amplitude')

    grid on;

    • You have to press f5 for the compilation of this code. The advantage of this window is that the results can be seen instantly without the need to store the code in a file. 

    So, you will get the result as shown in the picture.

    For now, I am not going to elaborate on the code and the concepts, but for now, you just have to get an idea of how the live window is used. 

    The Difference in MATLAB Editor Windows

    The difference between these two types of editor windows is given below:

    Editor Window

    Live WIndow

    The code has to be saved in a separate file to see the results.

    There is no restriction on saving the results into a separate file. 

    The results are shown in a separate figure window if applicable. 

    The results can be seen instantly when we run the program by pressing f5 in a side window. 

    We can change the position and size of the figure window and can minimize it if required. 

    The results can be shown at the side of the code or just below it. 

    It is a simple window resembling the command prompt window with a white background. 

    It is a relatively stylish window with a grey background. 

    The compilation process shows the results all at once when we run the program. 

    An indicator at each line tells us the position of the current compilation line.

    Hence, both of them have the same type of work, but they are different with respect to some features that are used according to the skills and requirements of the user. 

    Live Script Options in MATLAB

    You can find different types of operations related to the live editor or simple editor window that you will use every time no matter what type of function it is performing. These options appear when you hover over the options present on the upper side of the screen just above the live editor window.

    For different operations on MATLAB, you can use all these windows, but for now, our concentration is on the live editor window. It gives us the independence to use the new, open and save file options. You are not new to these functions, so I am not going to elaborate, but the things that must be clarified here are the workings of the run all and run section options. 

    These buttons have the same function, but the way they work is a bit different. The "Run all" button obviously runs the code at once, but when we talk about the "Run section" button, it is somehow different from the first case. 

    Run Section in MATLAB

    The "Run Section" button gives us the independence to run the codes in different parts. It was designed to give ease to the coder because in most of the codes, we have long and confusing codes, and it feels like a gift from the designers because many times, you do not know which part of the code is not working or showing the error. So, it becomes super easy to run the code in different sections to check the results separately and detect the error.

    Hence, it was an important lecture where we found interesting information about the windows of MATLAB. Keep in mind, MATLAB has a gigantic amount of information about different types of functions used in math, and therefore, it provides sections and different windows for the usage and working of different tasks related to the academic and professional world in the best way. If we talk about the commands and functions along with all the features it provides with the help of these manus, then the lecture will become very lengthy. For now, your homework is to check the manus by applying different options to your code. 

    MATLAB has amazing windows for its work, and the figure window is one of the most important because it allows you to have the results in the form of graphs. By the same token, the editor window is the one that is used to write code and get the result in different ways. We have two types of windows to write code that is called editor windows and live scripts. Both of them seem alike but have different features, and programmers use them according to their needs.

    Command Window in MATLAB

    Hello, peeps! Welcome to another exciting tutorial on MATLAB in which we are discussing one of the most important windows of MATLAB that you are going to use the most. In the previous tutorial, we learned a lot about the basics of MATLAB and the different types of windows that are used in MATLAB and are present on the face of MATLAB when you launch it. There was a piece of interesting information about the basics of this fantastic development environment. This is the next step in the related tutorial in which we study the applications and workings of command windows in depth. Here is a glance at the topics that you are learning about today. 

    • How can you define the command window of MATLAB in detail?

    • What are some examples of commands related to online help?

    • How can you use the useful commands on MATLAB related to the variable?

    • Give the information about the commands related to the files, directories, and the PC that you are using. 

    • What are some examples of the type of equations that are solved in the command prompt?

    Thus, let’s start learning.

    Introduction to Command Window in MATLAB 

    Recall that the command window is the basic window that is shown in the centre of the screen when you fire up your MATLAB, and here, the pre-defined commands are run in the easiest way by merely providing the command and values. If it seems to be normal right now, then maybe you have unclear programming skills because programmers know that in most languages, the commands and functions have to be defined first. 

    Not only this, but the command window also performs another responsibility. In some programs, when we are using the edit window, the command window shows us the results and outputs of the calculations, if applicable. The usage of edit windows is not yet discussed in his tutorial, but you can understand that the command window shows us the numerical output and the command’s results when we allow it to do so. 

    Using Command Window for Online Help

    As we have said earlier, the command window is used for different purposes, and therefore, at the beginning, we are telling you about the different ways to seek official help from MATLAB if you are stuck in any situation and do not know how to tackle it. The good thing about MATLAB is that it provides you with the maximum information and helps in different ways and it is made for students. Therefore, it not only provides you with the terms of help but also defines them in the easiest way so the students may know where they have issues in the calculations. So let’s start the process of finding help in different ways in MATLAB. Just follow the steps given below:

    • Launch your MATLAB software. 

    • Go to the command prompt where the function catalogue is blinking. 

    • Start writing the following commands to check what they do.

    1. help

    By writing this in your command window, you will get the list of the commands for which, MATLAB can help you by defining the introduction and codes of that particular command.

    1. helpdesk

    It creates a helpdesk for you and directs you towards the MATLAB official page where you can report and find help regarding your issues. 

    1. help topic

    This command provides you with help regarding a particular topic. Assume that you want to get help related to MATLAB's "help" command, which was also mentioned above. You can type "help" instead of "topic" in this command. You will get the details all the time. 

    1. helpwin

    It is a special command that is used to get the help link and details in a separate window.

    1. lookfor string

    This is an interesting command that is designed to provide you with help related to the strings that we will use in the codes. If you are new to this concept, skip it for now because you are going to learn about it in detail in the coming sessions.

    1. demo

    It is one of the most amazing commands in MATLAB where you can find demo examples of different types of code by merely writing a single word, and you will be directed to the official page of MATLAB where all the demos of various programs are present. 

    1. whatsnew

    If you want to get the Readme files of MATLAB, you just have to write this command in the command prompt and you will get the required output.

    1. why

    This command has some different types of work. Every time you write “Why” in your command prompt, you will get a different type of sentence with a different meaning.

    1. home

    This is a command resembling the “clc” command where you can go to the start of the command prompt and all the results and writings will be cleared from the screen and you will start writing from the beginning.

    1. global

    This command is used to declare the variable globally. In other words, you will not have to declare the variable again and again in different sections, but it will be defined once and can be used anywhere in the program.

    Commands Related to variables in and Workspace Information

    Here is another category that deals with variable or workspace information, and you can easily perform them as you have practised the commands discussed above. So here is the list of this particular type. 

    1. who

    This command is used to get all the variables that are declared in the workspace in which you are working.

    1. whos

    If you want to know the variables declared in the workspace along with their sizes, then you will use this command. In this way, by adding only one character, you can also examine the size of the variable.

    1. clc

    Sometimes, or I should say, many times, we want to clear the screen so we may try other codes and commands. For this, you do not have to select all the content and then press backspace, but you just have to write a simple “clc” command and all the data will vanish from your screen. But be careful while using this command because once the data is removed, you will never get the same data back.

    1. clear x,y,z

    Consider the case when you just want to remove the specific lines of code or the variables and other code that are useful to you. Then you will use the clear command in a specific manner in which you will specify the variables that you want to remove from the screen and the memory. In this way, the declaration and erasure of data become easy.

    1. mlock fun

    As we said earlier, it may be a disaster in your code if you clear the instructions in the code that were supposed to be there in the command prompt, and in such cases, you can lock the function by putting the name of that particular function just at the place of “fun” in this command.

    1. clf

    As we have defined the figure window in our previous lecture, if you have the results of your code in the form of a figure window and want to close it with the help of a simple command, then simply write this command and the window will be closed.

    Commands Related to Files and Directory Information

    While using MATLAB, I face some cases where I have to think a lot about the directory and want to get information about different files saved in MATLAB by e. So, I found some interesting commands that tell me the exact information about the directories and files I am using efficiently and in great detail. Some of them are given below:

    1. cd

    It changes the current working directory. It seems the same command we use in the command prompt of windows.

    1. dir

    The purpose of this command is to see the content of the current directory. 

    1. copyfile

    This command is used to copy the content of the files that we are working on. 

    1. rmdir

    To remove the current directory from your MATLAB, we use this simple command. 

    1. what

    It is an interesting command. You can access all the data on which you are working with the help of this simple one-word command.

    General Information with The Help of Command

    Yes, it is right. You can find general information about your computer with the help of commands in the command prompt. MATLAB does not only work as simple software that works separately from the other functions of the computer but it is also connected to the internal system of your PC. For instance, if you want to know the basic information about your PC, then you have to see the commands given below:

    1. clock

    This is my favourite command. You can have the time and date in the form of a vector wall clock by writing this on your command prompt.

    1. ver

    The licence and version of MATLAB can be seen with the help of this command.

    1. bench

    This command must be used when you want to compare your computer to other devices while MATLAB is running. 

    1. computer

    Many times, people do not know the type and specifications of the computer, and they can find them with the help of this command.

    Keep in mind, just like some other programming languages, MATLAB is a case-sensitive language, and therefore, if you put these commands with different spellings or change the way of the writing that they were supposed to be, you will get an error. Usually, if the case or one or two characters are changed, MATLAB gives you the suggestions and, therefore, you can easily press the enter key and get the required work from MATLAB. Otherwise, you have to write the exact command.

    Examples of Numerical Problems in MATLAB Command Prompt

    Now, you know the basics and easy commands that are used in the command prompt, you can easily use the command prompt for different numerical problems. Now, we are starting MATLAB and solving the simplest numerical problems, and then we will move towards more complex problems. 

    First of all, have a look at the equation that we are going to solve in MATLAB.

    4x + 2 = 18

    Here, x is the variable, and we want to find the value of this variable. So, we are using the following code to get the required output. You must know that the 18 on the right-hand side is moved to the left-hand side and, therefore, the equation becomes

    4x + 2 - 18= 0

    4x -18 = 0

    We will write this problem in MATLAB and will get the results:

    As you can understand with the help of this image, we are declaring a variable with the name “equation” and then feeding the values of x and the constant into it. By default, MATLAB reads the equation from the right side, and it reads the rightmost value as constant, and after that, moving towards the left increases the value of the polynomial. So, MATLAB understood that 4 is the value of variable x. 

    Consider another equation that is shown as:

    34x4 +45 -12=0

    Here, you can see that the cubic value of the variable x is missing, so in place of this value, we will write zero. So the code and the output of the equation given above are:

    You can use any word instead of "equation" to declare the equation. Yet, be careful, you have to write the exact word in the root command to get the desired results. The roots command simply takes the equation, solves it, and provides us with the result instantly.

    So, it was the day when we learned a lot about the command prompt and saw some amazing commands related to MATLAB that, when written on the command prompt, give us the useful required information, and we checked most of them during the lecture. Your homework is to check the missing commands and get the results related to MATLAB. We will do some complex calculations in the next session, and now you are ready to get the answers to the complex calculations and codes, so stay with us for more action.

    Basic Information About MATLAB to Get Started

    Hey learners! Are you enjoying the welcome window of MATLAB? If yes then cool but if no, then you must be waiting for a task or the command to run and check on the MATLAB. Before starting the experiment on any software, one must have basic information about the uses and structure of that particular software. We have seen many cases where people try to use software for the first time and find it difficult because of a lack of basic concepts and ultimately, they lost interest in learning. So, if you are a complete beginner in the MATLAB, then this tutorial is the best way to learn it if you know a little bit about it, you should read this lecture to refresh the concepts and you are going to learn some new points that will help you throughout this course.

    In the previous lecture, we downloaded and installed MATLAB with a trial version of 30 years so you may learn the free software and try it before buying it. The next step is to know about your screen when you open the screen. But here, we want to make clear that if you are not able to download and install your software, there is another way to use it. You can easily use MATLAB online and can learn and complete your tasks without any issues. So, have a look at the topics that you are going to learn today and after that, we’ll move toward the details.

    • Can I use MATLAB online?

    • What is the MATLAB licensing and system requirements in the online version?

    • Describe the important details about the MATLAB Environment.

    • What are the different types of windows on the screen of MATLAB?

    • How can we use the workspace window for the editing of the content?

    All these concepts will be cleared in this article in just a bit so let’s start learning.

    Using MATLAB Online

    As we have mentioned in the lectures just at the beginning, MATLAB was developed for the teachers and students to use, understand, and test the engineering rules and theorems in a better way without having the need for practical tools and information. But, not all students have Personal Computers all the time many of them do not have the powerful devices to load this complex environment on them. So, MATLAB becomes easy when you use it online and the plus point is, you find all the updates and changes as soon as possible and can get the best version all the time without making any changes but keep in mind, the online version also have the specifications that must be matched with your system.

    Feature

    Requirement

    Memory

    Least 2GB

    Screen Resolution

    1024 x 786 (minimum)

    Browser

    All the latest versions of the browsers since 2009

    Important Setting in Browser

    Enable cookies, Enable pop-ups, enable JavaScript setting

    Speed of Internet

    1 Mbps (Minimum)

    We have specified here the least requirements that must be in your PC when you are using the MATLAB online but more powerful is your system better and quick responses you will get. For example, if your internet speed is 2 Mbps or more, you will get the results quicker all the time as compared to the case discussed before.

    MATLAB License

    Just like the downloaded version, online MATLAB also has the licensing of the packages that you want to share. We suggest you just get the license for the basic packages such as Simulink if you require them because it makes no sense to load the packages that you are not going to use for days. Usually, when you need any type of license, you will be guided by the instructors before starting, and therefore, do not bother to about the missing license.

    In addition to these licensing, you will also be required to load some ad-on and toll bars as well but do not worry, we’ll discuss them side by side and you are not missing any part. 

    MATLAB Environment

    Recall that MATLAB has a matrix as the structural unit of data and that the collection of the data is efficiently organized in the form of rows and columns. The interesting thing about MATLAB is, even scalers deal in matrices. There is more than one way to execute the commands that you want to run on it. When you start MATLAB, your screen shows three types of windows:

    1. Commands window

    2. Figure window

    3. Edit window

    A brief introduction of each of them is given below. You can find the details of when we will use these windows in detail in the next session. Still, for now, it is enough to know that:

    Command Window in MATLAB 

    The command window, as you can guess by the name, is used to write and run the commands that are pre-defined in MATLAB, and you have to just provide the values at which these commands will be applied. Usually, simple mathematical formulas are applied in the command window, such as addition, subtraction, or transpose of the matrices. But the good thing about this window is, you do not have to save the program on it because it is just made for the commands and the results are shown in just a bit without saving the files on your PC.

    Figure Window in MATLAB

    A figure window is shown to us when we run the program on MATLAB and the result depends upon any figure or is shown in the form of a graph or figure. It is usually seen as perfect for subjects such as signals and systems, where almost all the outputs are in the form of figures and graphical signals.

    Edit Window in MATLAB 

    The editing window is related to the figure window. Here, we write the codes of the program in the MATLAB language and save these files on our PC. In the end, when we run our programs, we get the output if the program is written correctly. Otherwise, you will get errors. You will see this window most often because we will run a lot of programs in this course in the edit window. There are different versions of these windows, and we will use them according to need.

    In addition to these windows, there are certain portions of the MATLAB window, and we are going to discuss them one after the other. When you click on the installed software of MATLAB, you will see a window resembling the figure given below:

    The main window where you can see the function catalogue is the command window that we have discussed before. Other characteristics of this screen are explained here.

    Function Catalog in Command Window

    In the command window, you will see two consecutive “greater than” signs that are used in the function catalogue. The cursor here shows that you have to write your required action here and the MATLAB will complete it. Usually, it is used to

    • Enter the variable

    • Call a function

    • Express the calculation

    • Write the values 

    With the examples in the coming sessions, you will learn the details of this window in a better way.

    Current Folder Window in MATLAB

    The current folder does not mean this is the opened folder, but it shows the list of all the folders that we have saved in the “MATLAB” folder during installation. Usually, the user does not save them intentionally, but during the process of downloading and installation, you have allowed the installer to add all these folders to your PC so that MATLAB may work best with your PC. It has folders that include licenses, a production server, Java files, and all the other files that are necessary for the working of your software. Keep in mind, never delete any file from this folder because it may affect the working of your environment and, in some cases, reinstallation is needed for the working of MATLAB.

    Workspace in MATLAB

    On the right side of the command window, you will see the workspace window. With the help of this window, you can interactively manage and deal with the content of the MATLAB workspace. ordinarily, people do not pay heed to this window and never teach you the uses but I think, you should learn this for some task that is highly useful. 

    How to Open Workspace Browser in MATLAB 

    I think I should discuss the working and usage of the workspace window here because it is quick and easy to understand. By default, the workspace is shown in the upper right corner of the screen, but if you do not have it, you can have the workspace window in two ways:

    1. MATLAB Toolscript: Go to the Home tab> Environment section> Layout> Show section> Workspace.

    2. In the MATLAB command prompt, just type Workspace.

    If you are using online MATLAB, then you can easily collapse the panel according to your requirements and mood. You can collapse it on the left or right, or expand the panel by just clicking on the required option. You can also minimize it in a simple way.  

    Changing the Values of Matrices Using Workspace

    You will learn the matrices in detail in the next sessions, but for now, I am showing you the usage of the workspace and how you can simply change or delete the values of a matrix with the help of the workspace. For this, follow the steps given next. 

    • Fireup your MATLAB software. 

    • Write the following cde int he command window: 

     A=[1 2 3; 4 5 6; 7 8 9]

    • In this way, you will get a matrix with the same values and names. Observe that you will get a matrix with all the value same as the A in the wrkspace. It indicates that workspace saves the content of command prompt in it and you can also change it in an easy way. 

    • Click on the variable A at the workspace window and you will be directed towards the workspace tab at the place of command prompt. 

    You can see we are easily changing the value of element 5, and you can have any value. When you save the result, you will come to know that the same value has been changed in the command prompt. Therefore, you can easily use the workspace window for multiple operations.

    You can also check the result by writing the letter A in the command window. Now, the matrix A will have the updated values. 

    Figure Window

    The figure window, as indicated by its name, will show you the results in the form of figures and graphs. It automatically arises when the code in the command prompt has the results in the form of a picture, graph, or image. You can also change the colors of the indicators or add some other details to get clearer and better results.

    There are some other uses of the figure window, and you will see the real use of this window and definitely love it in the upcoming sessions where we will show you the colorful and beautiful images and graphs by using simple lines of code. If you are new to MATLAB, maybe you will be confused about how you can use the code to show the images, but it will be crystal clear when you learn about the fantastic codes and functions of this environment.

    Thus, we have learned a lot about the MATLAB screen today, and I am sure you have learned something new even if you are not a beginner in MATLAB. We are progressing slowly toward the codes and other practical work because I want to teach you all the fundamentals first, and then we will begin the practical work with no need to research why we are doing this and how things work. In the next lecture, you will learn about the command prompt in detail along with the editor window, and we will also see some interesting commands that are designed by the MATLAB developers, so by default, you can easily use them without any declaration. So, stay with us because we are going to show you almost all the important features and commands of MATLAB in an easy yet useful way.

    Installation of MATLAB Software

    Hey peeps! Are you excited about installing your own MATLAB and performing amazing and interesting programs on it? Not only this, you are going to use simple and easy commands on it to make your complex problems easy and interesting. In the previous lecture, we discussed some very basic but important introductions to different parts of MATLAB and shared information about its history and algorithms. In this tutorial, we are about to move forward toward some action. Usually, most of the software has the same procedure to be followed, and people only know that. Yet, to install MATLAB on your PC, you have to follow some specific steps. Do not worry if you have never installed any software or are not aware of the technical stuff because we will explain each and every step with the visual aid.  Yet, it is always helpful to know the points that will be discussed in the next sections so that you may make up your mind. So, here are the important features of this article. It contains:

    • The system requirements for the installation of MATLAB.

    • The downloading process of the MATLAB details without missing any steps.

    • The process of installation helps to figure out the information about the types of packages and different versions, along with the file size and the time required for the installation of MATLAB on the PC. 

    MATLAB System Requirements

    When installing any type of software, you must see the system requirements first because we have seen many cases where the installation process is not completed, or even if completed, it does not work properly as it was expected. There are certain reasons behind this, but we are not going to discuss them because it is out of the scope of this article. For now, you just have to knowYou must know that the first thing that you must check before starting the installation of any software on your PC, is the system requirements. With the evaluation of technology and computer structure, we come across different types of situations where the user needs more and more space in the form of RAM and ROM to install advanced software. When talking about the great and complex development environment, you must have a bulk amount of memory on your PC to accommodate MATLAB. Keep in mind, we will work on MATLAB R2016a, so we are telling you about this. We have not chosen the latest version of MATLAB because not everyone has the PC to install the latest version all the time. Moreover, it becomes easy to work on a relatively older version because if we face any issue, we can find help on the internet related to these versions. So, have a look at the system requirements in detail.


    64-bit MATLAB System Requirements with Different Operating Systems

    Operating System

    Windows 10

    Windows 8.1

    Windows 8

    Windows 7 Service Pack 1

    Processor

    Intel or AMD x86-64 processor of any version

    AVX2 instruction set support is highly recommended

    With Polyspace, 4 cores (recommended)


    Disk Space

    2 GB (MATLAB) 4–6 GB (typical installation)

    RAM

    2 GB, 4 GB extra for Simulink, and 4 GN per core for the playspace.

    Graphics

    Hardware accelerated graphics card supporting OpenGL 3.3 with 1 GB of GPU memory.

    It is recommended to use the SSD RAM on your PC so that you do not have to wait much for every program. You must know that MATLAB is the most complex calculator, and therefore, you may have an idea that it takes time to start, run, and execute the calculations on relatively slower computers. In this course, we are going to use Simulink after we cover the MATLAB command window. Therefore, you must have 2GB+4GB of RAM for this course. Do not worry in the future if you feel that your MATLAB is slow because it is the normal observation that MATLAB runs slowly because of the gigantic amount of data fed into this software.

    Downloading Process of MATLAB

    Now, it's time for some action. We know it is boring to check the system requirements, but it is a compulsory task. Well, for now, you have to have high-speed internet because this software takes time to be downloaded and installed on PCs, and therefore, you need some patience. We are going to discuss the whole procedure in the form of steps, and if you have the system requirements completed, you can start downloading while you are reading this tutorial. 

    Another thing that is important to mention here is the types of MATLAB versions and accounts that are designed for different people. In short, there is versatility in the availability of this software, and by the same token, the features vary from one account to another. The following options are there for you when you download this fantastic software. 

    • Student

    • Start-ups

    • Enterprise

    • Individual use

    You must know that all of these are paid versions of MATLAB, but you can also have a trial period of 30 days to check the system and the workings of MATLAB. You can also have alternative ways as well. Here is the list of steps that you have to follow:

    Visit the Website,

    First of all, you have to visit the official website of MATLAB. You can find the link there to download the MATLAB version of your own choice. The official link is www.mathworks.com and you can download any version with the specification of the language of your own choice. Usually, people download MATLAB in English, and we are also going to do the same.

    Choosing the Trail Version

    We are going to show you the trial version downloading process, and the buying process is also the same. In that case, you just have to put in your credit card information. But we recommend using the trial version before buying because it is safer to try and then buy. So to do this, go to the footer of the page and click on the trial software link option.

    Personal Information 

    In the next step, you have to provide your email. This must be an active email because it is used for verification later. Moreover, anytime you feel any difficulty opening or upgrading the account, you can easily do so with the help of this email. 

    Once you click "Continue,” you will be directed to the screen that asks for the type of account and the purpose for which you want to use your MATLAB account. Now, go to the email account and verify it.

    Account Information

    The next step is to choose the type of account that you want to open. The type of account varies in rates and in return, as well as in features. For this course, we recommend you buy the student’s account, and then, you can also upgrade it if you want any other type of account in the future. 

    There will be different phases where you have to provide your personal information. When you provide all the required information, then the agreement will appear, and you have to read it and click on the agreement button to show that you are okay with all the terms and conditions.

    Getting Your Required Package

    It's an exciting step. You are going to pick the best package and related add-ons. Do not worry, you can also access all of them later when you need them, so at this point, do not hassle to get all the add-ons at once, because it can slow down your PC without providing any benefit. So, for now, just tick the image processing and computer vision boxes and you are good to go. Click the next button to move forward.

    Details and Downloading of MATLAB

    At the end, a screen will be shown to you that describes your email and license details. It is important to note them all, or the super easy way is to keep a screenshot so that you may have it all the time when you are using your PC. Usually, it is not required for different tasks. Yet, if you feel any emergency situation, you can use it easily.

    After this process, the downloading will begin. That will take some time because of the heavy load of this fabulous development environment. So do not worry. It takes time according to the The speed of your PC. Usually, students feel strange waiting so long for a single piece of software, yet, you must have the idea that it is a set of different packages and, therefore, it takes time. 

    Once all the downloading processes are carried out without any issues, the MATLAB icon will appear to tell you that it is time to take action. 

    Installation of MATLAB 

    Like the downloading process, the installation is also divided into different steps. We are providing you with the general process so that people with technical knowledge and absolute beginners may easily understand the steps. So again, go to your download folder and start your installation.

    Type of Login

    When you first click the downloaded file, you will be directed to a login window where you have to choose the type of login and then you will provide the personal information that you have given before while downloading the file. 

    It is not compulsory to discuss that you have to agree with the terms and conditions because, usually, people know this. Well, you just have to give the required information and the installation process is somehow smoother than the downloading process.

    Saving Your Files

    Once you specify the type of version that you want to use, you will be directed to the pop-up window that asks for the location of the files where you want to save the MATLAB. By default, the location is in the C folder, and we are also saving the default settings. You can change the folder if you have the knowledge to save other files related to MATLAB that are also saved in the same folder, but you have to provide the same path at that moment.

    Product Selection

    Just like package downloading, product selection is also an important point. Keep in mind that it is compulsory to install “MATLAB”. It may seem to be a matter of common sense, but basically, I just want to tell you that at the moment, you just have to install this single product and not move towards the other options. 

    Now, the installation process will take a few minutes, and then you will notice that it is asking for the desktop icon of MATLAB. You are going to use it often, so we suggest you create a shortcut for MATLAB.

    So, in this way, the fantastic software of MATLAB is installed on your PC with all its functions and features that are compulsory for beginners. Do not worry if you feel that it is taking a long time. The software takes a long time to be downloaded, installed, or get started because it has a lot of information and features and you have to have a powerful PC to run it smoothly. Don did not hesitate to ask any questions if you had any confusion. We are going to discuss each and every step but will not provide you with unnecessary information. We believe that you have all the prerequisites and have the basic knowledge of the concepts. So, even if you are not a beginner, you are not going to be bored with this course. In the next lecture, you are introduced to the amazing world of MATLAB, where simple commands are enough to solve complex problems that take lots of pages to solve manually. Here, you must also keep in mind, the requirements of the system that we have mentioned above are the minimum requirements. So, the faster your PC, the faster and better your results in MATLAB. Do not overload your PC by installing heavy packages without any requirements installed. You just have to install MATLAB for smooth working all the time.

    Basics of MATLAB

    Hello people! Welcome to an exciting series on The Engineering Projects in which we are studying MATLAB. This series is not just organized just for technical people but for anyone with a basic knowledge of programming and mathematics. We will define each and every concept from scratch and you are not going to bore in any lesson because you will learn new and exciting things in every lecture. If you are wondering what MATLAB can do and what some of its features make it the best calculator and it performs complex calculations in just seconds. You will also see some other parts of MATLAB that make it the best. Have a look at the list of the topics that we are going to discuss with you:

    1. What is MATLAB?

    2. What are some basic features of MATLAB?

    3. If I need to have some prerequisites in MATLAB?

    4. What is an example of a simple task in this software?

    5. How different disciplines of mathematics are getting benefits with MATLAB?

     First of all, let us see the introduction of MATLAB and after that, we will move towards some different concepts. 

    Introduction to the MATLAB

    MATLAB is a programming language specially designed for engineers and mathematicians and the company that leads the production, maintenance, and other operations of this software. It is interesting to note that MATLAB takes its name because it is a matrix laboratory and is called so by using the combination of both words. It has different parts such as Simulink which is the graphical window helping electrical and electronic engineers to solve different types of circuits in an efficient way without the need for real components. So, we can say that:

    “MATLAB is a specialized programming language introduced by MathWorks for the students of engineering and mathematics and has the multi-windows for different types of operations.”

    As we said, this software is a specialized laboratory of matrices and we see a hundred different operations that are specialized for the matrices but are also implemented on different related concepts. The LINPACK and EISPACK did the initial development of this language but we see that MathWorks has the main authority and is working more and more in this field.

    The best thing about MATLAB is its multi-paradigm nature that attracts every type of users.

    such as functional users, Object-oriented programming experts, and others. Here is the image that describes the multi-paradigm nature of MATLAB.

    In this way, you can conclude that MATLAB is used in two ways:

    • Environment

    • Programming Language

    But in general, we will use the word  “software” throughout this course for the sake of simplicity because most of the students are unaware of different technical terms. 

    You must know, the operations in the MATLAB are stored in the form of matrices no matter if you are using the string, character type, or variable type, these are stored in the form of matrices in MATLAB and in this way, by using properties of matrices, MATLAB performs almost all types of operations by using these matrices.

    Understanding the MATLAB System

    To understand the importance and usage of MATLAB, we are discussing a brief description of the system inside MATLAB you are going to enjoy it because it has some extraordinary features that make your boring practical work easy and fluent. For the sake of simplicity and a clear concept, we can divide the MATLAB system into five parts which are shown in the image given below:

    If you are not familiar with every part, do not worry because I am going to express it in very simple words. There is no need to memorize each of them, you just have to simply put these words into your mind and decide which type of feature you are going to use most of the time when you will discoverMATLAB in detail. 

    Development Environment

    The first thing that must be kept in mind is the basic introduction to MATLAB. It is a development environment that helps programmers to get the desired result in a better way. It has a unique set of environment that enables the users to operate MATLAB functions and files that is usually pre-installed in MATLAB. It has the following features:

    • A desktop 

    • Command window

    • A command history

    • An editor

    • A debugger

    • Different browsers

    When you start MATLAB, you will be fetched by all of these without searching much. Some of these are just a click away from the main window and you can use them simultaneously. 

    Mathematical Function Library

    This is a magical library for every type of engineer and for pure mathematicians. The pre-defined functions are there for you through which you can use trigonometric functions such as sin, cosine, Bessel function, fast Fourier transform, and other functions that help the users get rid of long derivation and calculations. Instead, they simply use the function library and pre-defined functions in an easy way. The main purpose of these libraries is to ignore the long calculations and focus on the working and results of these functions. Usually, people learn the long derivations in the theoretical part and get practice about the same topic in MATLAB  by ignoring the long calculations all the time when they solve the problems. 

    MATLAB Programming Language

    MATLAB is a great programming language that gives users to use it for a great number of tasks. No matter if you have a simple and easy task to perform through the program or if you have a complex program to perform on MATLAB. All the programs are easy to perform and if a person has an understanding of this superb language, you can easily make complex programs in an easy way because MATLAB knows best what you want. 

    This language was developed by the owners of MATLAB and it is closely related to the language that we use in our daily life. In this way, we get a more user-friendly language that is easily understandable by non-technical people as well if they pay to heed the basic concepts. 

    User-Friendly Graphical Experience

    When I started to learn MATLAB, I wanted to perform the signals in this fantastic development environment and I was amazed to see the versatility of the programming languaging and the options and facilities it provides to highlight the results in the best way. 

    For the best data visualization of data, MATLAB has a three-dimensional and two-dimensional high-level structure that provides the best and most impressive representation of data in the best manner. 

    API or External Interface of MATLAB

    MATLAB is not just limited to the specific language but it gives you the independence to use multi-languages on ti such as FORTRAN and C. If you are not familiar with these two, do not worry because MATLAB is not just limited to these two but you can do many useful tasks with this versatile software. 

    Pre-requisites to Getting Start With MATLAB 

    As we are discussing from the beginning, this environment is for technical people such as engineers, and therefore, we assume that if you are starting to learn this fantastic software you must have the following concepts in your mind:

    • Little knowledge of programming. At least you must know what is programming and why we are doing this. 

    • What is a statement?

    • How can you declare the variables and constants and what is the purpose to do so? 

    • Plotting of graphs and other visual pieces of information like this.

    Do not worry if you do not have all these concepts or if you are new to the programming procedures because we are going to discuss all the things in an easy and brief way so that the new users understand all the concepts and the technical people may revise their concepts. Sometimes, you do not have to have all of these concepts in mind when you have the task of simple or basic level but I think it becomes fun when you start using MATLAB and after that, you try to have more and more practice to get the amazing results on this user-friendly software.

    Example of MATLAB Commands

    Are you excited about using MATLAB? If yes then let’s talk about a simple and easy command on MATLAB to show you a glance at the working and the screen of MATLAB. I am not going to explain each and every part of this command because you will learn a lot about it in the upcoming lectures. For this, if you have the basic concept of matrices, you will get an idea of what is going on on the screen MATLAB. So, let’s have a look at the simple addition of two matrices.

    In the simplest command that we have used above, we have simply declared two matrices with the names A and B. It is important to store the values of matrices in the variables to use them later. You are going to use these values for the addition with the help of easy command. You must know, you can use any name of the variable instead of A and B but usually, we utilize these variables because they are simple to understand.

    Role of MATLAB in Engineering

    There is no need to explain why MATLAB is important in the engineering field because it is specialized for engineers and all the features of this marvelous software are designed with keeping engineers in mind especially when we talk about electrical and electronic engineers. Usually, MATLAB is easy to use for technical people because, during their educational period, they use different types of software and languages and know how to deal with such environments for the sake of complex tasks and calculations in engineering.

    Many students of engineers are providing the best ideas about their fresh ideas in engineering concepts through MATLAB without spending a large amount on experimentation, they can easily propose their ideas with the help of simulations in MATLAB.

    Usually, the instruments have errors in the calculation and do not provide 100 % accurate results but when we perform the simulation with software such as MATLAB, we get the ideal results all the time without any issues with accuracy.

    MATLAB in the Field of Economics

    When talking about the applications of MATLAB in the field other than engineering, you will find economics one of the most important because of its built-in capabilities to work with time series data, computation techniques, presentation of the result with the help of visualizations, and some other features that are up to mark and makes the study and teaching of economic’s in a better way.

    The graphical representation of results in different ways makes this environment more user-friendly to even those who are less aware of the technical stuff and software. So, it becomes easy to understand the concepts with the help of this amazing environment.

    Statistic With the Help of MATLAB

    When we are dealing with statistics, we can use MATLAB for different types of tasks such as descriptive or inferential and people related to this field find it useful to use MATLAB instead of using the typical manual methods or other software because these all are time taking and have some limitations.

    Trus, MATLAB is a powerful programming language that is used in the programming environment developed by different companies and maintained by Mathworks for engineers. But, other disciplines such as economics and statistics also have applications in MATLAB because all of them are related to mathematics. MATLAB is developed with the help of concepts of matrices and therefore, it also involves the user-friendly functions and commands of matrices that are extremely useful in a great number of departments. It was the introductory lecture on MATLAB and you will learn more about it in the next session where you will be directed to install MATLAB in the best way with all the required information. This course is equally useful for the beginners and the persons with intermediate concepts about the programming language because the revision and tips will be there for you at every steps and you are not going to bore throughout this series.

    Applications of Matrices in MATLAB

    Matrices are an essential topic in different fields of study, especially in mathematics, where you have a bulk of data and want to organize, relate, transfer, and perform different operations on data in a better manner. We have studied a lot of types and operations on the matrices and have worked on different types with the help of MATLAB. Today, we are here to present the applications of the matrices in different fields of study to clarify the importance of this topic. So, have a look at the list of topics we are going to learn. Yet, first of all, I am going to describe what a matrix is.

    What is a Matrix?

    In the fields of physics and mathematics, there is the use of different types of numbers in groups of various types. In order to organize the data into a manageable format, matrices are used. A matrix is a rectangular array of numbers that are enclosed by a square matrix (or, in some cases, parentheses). 

    The information about the numbers of rows and columns is called the order of matrices, and on the basis of this information, we can recognize different types of matrices. The types, in turn, are used in different applications because of their unique behavior. By changing the order of the matrix, the properties and working of the matrices changes according to the changes. Mostly, square matrices are used in different applications.

    It is interesting to know that in the early days of matrices, these were considered arrays. With the passage of time, when they were involved more and more in different research and methodologies, matrices gained popularity. Because of the ease of usage, this popularity is not going to end. So, have a look at the different types of fields where matrices are used in different ways but before going into details, you must know, these fields are not only dependent on the matrices but the normal functioning of these fields include the usage of matrices in different ways. 

    Applications of Matrices

    As we have said earlier, matrices are used to deal with massive amounts of data better. The matrices that we have learned and seen till now are of very minimum order, and these are kept simple for the better concepts in easy ways, but in practice, we have seen that there are gigantic matrices with complex data in them, and at that point, it is difficult to solve and save them manually. Have a look at the different fields of practical life where matrices are used in a routine.

    Matrices in Cryptography 

    Data cryptography is an important department in data communication in which the encryption of the data is an important process. It is done by using different keys and codes to secure the message and communication in a better way. A large amount of data is sent and received by different parties, and the encryption techniques also require some other space as well. Matrixes are used to make sure that all the data and its codes are stored in a better way. These matrices 

    save the keys of the encrypted data to decrypt them on the receiving end and in this way, matrices play a key role in cryptography.

    Use of Matrices in Wireless Communication

    We all know that in wireless communication, usually air is used as the medium to send and receive messages from one point to the other. In this process, matrices are used to detect, extract, and process the information about the message that is to be delivered. Here are some other uses of matrices in this department:

    Signal estimation and the detection of the problem during communication are done with the help of matrices. 

    • Sensor array signal processing involves the matrices.

    • In the processing and representation of a digital image, matrices have a great role. 

    • Radar signals

    • Underwater surveillance

    With the help of matrices, wireless communication is done efficiently, and understanding the code becomes easy. Think about the case if the data of different queries are not used in the form of a matrix, then finding the data of a simple command would never be organized. 

    Matrices in Mathematics

    The use of matrices in the field of mathematics is not new to us. We all know that it is a basic concept in mathematics and a great variety of concepts of matrices are used in different ways while solving mathematical problems. One of the major use in mathematics is a solution of linear equations with the help of matrices. The complex and time taking equations can be easily solved with the help of rules of matrices in different ways. 

    In engineering and other related fields of mathematics, matrices are the basic concepts and it is used in different ways to make the working of the system better manner. We have seen different cases in which the matrix is used as the alternative method to find the unknown value because it is a more organized way and the great number of research resulted in different theorems and laws therefore, the long calculations are minimized to their result by simply using the theorems.

    Matrices in Computer Graphics

    One of the amazing applications of matrices is in the form of computer graphics where the pictures and the graphics comprise pixels and the array of these pixels and points are arranged in the form of matrices for easy transformation and working. Overall, you can say that in computer graphics, each digital image is treated as a matrix. Therefore, different types of operations used in the matrices are applied to the graphics with great ease. Not only in the dimensions and the sizes but also for the colors of the images, matrices are used to store and reuse the values for the images and graphics. For example, in the CNN technique, different types of matrices are used. For the greyscale image, only a 2D image is used and if one wants to get the RBG system image, there is a need for a 3D matrix. 

    Three Dimensional Games and Matrices

    Gaming is one of the most important filed in graphics and when we talk about three-dimensional games, matrices are important there in order to alter the 3D space in different ways. For this purpose, if we use simple words, the conversions between the 2D and 3D matrices are used by different techniques, and therefore, we get the final output. Moreover, the quality of the result depends upon the way you use the data in different ways. 

    Matrices and Geology

    During the seismic survey in geology, matrices are used in a great way. For real-time surveys of different areas of common real problems such as mortality rate, population, the number of people in different areas of the world, and other specific counting related to real-life problems involve the use of matrices because it becomes easy to deal with great data using different operations on the data.

    The Matrices in the Field of IT

    In different Information technology organizations, matrices are used to execute and search the different queries. The IT security system needs to have a secure way to deal with all the information and once saved, data is to be retrieved in an efficient way with the help of minimum commands. If the data is not present in the form of tables, or we should say, in the form of matrices, organizing, storing, retrieving, and dealing with the data will be like a nightmare. 

    Using Matrices to Find the Collinear Points

    It is one of the procedures in mathematics in which the values of collinear points are found with the help of matrices. If it seems simple at this time then you should think of the case where gigantic collinear points are found with the help of matrics with the help of different software and these points are in return used in different ways. 

    Pre-allocation of Matrices in MATLAB

    As we have said, matrices make the working of daily life data and complex calculations easy. We read different types of commands about the matrices when we were learning about their functioning and therefore, we can now use them in a simple program to prepare the code in which the matrix is used for the pre-allocation of the data in a simple way by using limited lines of codes. Trus, have a look at the code given below:

    Code:

    p=zeros(5)

    p(1,:)= [ 3 6 2 8 7]

    for i=3:4

    p(i,:)=p(i-1,:) +1

    end

    Output:

    Understanding the MATLAB Code

    In this code, we have used a simple function of zeros and used a loop to execute the whole instruction. Let us discuss both of them in detail:

    Zeros Function

    It is a pre-defined function of MATLAB that is used to make a null matrix of the required dimensions by using just a simple signal command. For the null matrices, there is the condition that the square matrix should be used.

    For loop in Matrix

    There are certain loops used in the MATLAB and with the help of this for loop, we just have to simply follow the syntax given below:


    for index = value

    statement

    end

    Here, the index value is the starting point where we want to start the matrix formation and the statement is the condition that we want to be executed while the formation of our matrix. If it is not clear right now in your mind, just have a look at the flow of the program.

    • First of all, we have used the zeros function to allocate the space in the memory according to the requirement. We have used the square matrix which has the order of 5 by 5. 

    • I wanted to pre-allocate the values in the matrix row after the row therefore, we simply changed the values of the matrix p formed before from 0 to other values defined by us. If you are not familiar with this function, have a look at the notation given below:

    p(a,b)

    Where,

    a=number of row

    b=number of column

    As we did not want to alter any value in the columns so we have used a colon in its place. 

    • By using the for loops, we have specified that the index value starts from 3 and ends and 4. 

    • In the next step, we are using these index values and specifying to MATLAB that we want to change the values of the 3rd and 4th rows only and the program ends. 

    • MATLAB does this task step by step and changes the null or zero values of the matrix p into the required pre-allocated values in the matrix.

    • For the best concepts, we have changed the values of just two rows and the other matrix remains the same.

    Larger versions of these kinds of procedures are used in diverse ways to recognize, store, and use the data in a better way, and with the help of this short program, we have seen a glimpse of a real-time application in which a matrix can be used to pre-allocate the different values and people can have benefit from it.

    Trus, today, we have learned a lot about matrices and their applications. We have read great information about matrices in the past lectures and it was quite interesting to know how can you use these basic pieces of information in a better way and how people are working on the matrices to make their daily tasks easy during their professional life. We have seen different departments where matrices are making the work easy and more efficient. Most of them can not work without using matrices. Moreover, one must have the idea that many times we use matrices in our daily life unintentionally. As we have said earlier, 3D games require the involvement of a matrix. So, when your child is playing the game, he or she is enjoying the application of the matrices without knowing it. In the end, the small program was helpful to understand how little programs and the working of matrices are helpful to perform different tasks automatically.

    Syed Zain Nasir

    I am Syed Zain Nasir, the founder of <a href=https://www.TheEngineeringProjects.com/>The Engineering Projects</a> (TEP). I am a programmer since 2009 before that I just search things, make small projects and now I am sharing my knowledge through this platform.I also work as a freelancer and did many projects related to programming and electrical circuitry. <a href=https://plus.google.com/+SyedZainNasir/>My Google Profile+</a>

    Share
    Published by
    Syed Zain Nasir