What is Prototyping? Meaning, Types, Process, Tools and Examples

Hello everyone! I hope this article finds you happy, healthy and content. Today we are discussing a very interesting and versatile topic that might have crossed your path many times if you are related to any of the engineering fields most probably software, electrical or mechanical or if you are a final year student struggling to get your project approved then you know the drill absolutely, or maybe you are someone who works with materials and crafts related to product design, Yes! You guessed it right! The topic we have at hand today is Prototyping. Before proceeding and diving into the sea of prototyping I want to make one thing very clear here, I'll be treating it in a generalized and systematic way, we would not limit our discussion to machine design or an app design only!

What is Prototyping?

So let's get started with the most important question of all, What is Prototyping?

Definition of Prototyping

  • Prototyping can be defined as the Conversion of an intangible idea either related to the physical or digital world into a tangible configuration to test its feasibility, validity or efficacy.
You might have pondered many times, Why we need to prototype our product or why prototyping is important in engineering? Prototyping is crucial because it helps in;

Materializing Raw Ideas:

  • It helps the designers and engineers in materializing their raw ideas.

Rectification:

  • Prototyping helps in the rectification of design flaws and loopholes in the very beginning of the project.

  Material Versatility:

  • It helps in testing the design along with the materials proposed for use in the product.

Prototyping Attracts Investments:

  • Prototyping a product or a project attracts investors which can be a sigh of relief for the designers involved in the process.

Prototyping Saves Money:

  • It can help save money for the investors who are involved in the due process of mass production.

Profit Loss Estimation:

  • Prototyping can help in the estimation of profit margin or loss for the parties involved in the project.

Refine the final outcome:

  • Prototyping helps refine the final outcomes either in the case of a digital product or a physical one.

Prototyping Protects Intellectual Property:

It helps reserve the intellectual property of the ideator, just imagine you presented a rough sketch of a revolutionary idea to your friend or anyone in your vicinity and after some time you find your idea gaining money and fame but not with your name instead of your friend’s who researched it, prototyped it, sold it to an investor and earned money and fame, so now you know why we need to prototype an idea and how it protects intellectual property!

Prototyping and Materialization

  • Why Prototyping is called Materialization? Prototyping is also called Materialization because it turns an idea into something materialistic or tangible which totally justifies the term being used.

Types of Prototyping

Now the question arises, how we identify the type of prototype we require for our project to get approved? Or which type of prototype is needed for your product if you are working for a company? It certainly depends on the two factors:
  • How the product would be used and which would be the target audience?
  • Representation or general appearance of the product we need to prototype.
We all have been somehow a part of the product testing and prototyping process in one way or the other when it comes to different types of prototypes either consciously or unconsciously. You must be wondering, "How you have been a part of it!" You would find out the answer to this intriguing question after knowing the types of prototypes explained in this section. Following are the few famously known types of prototyping depending on their usage and representative nature;

Feasibility Prototypes

  • These types of prototypes are made to test the viability and feasibility of the product.
  • For example, consider making a spatula we use in cooking with a material other than silicon, as silicon is the most commonly used material these days, in order to test the feasibility of your product, you would definitely prototype it first with a material other than silicon.
 

Live data prototypes:

  • A prototype intended to test the digital features and functionalities of a program or a solution.
  • Iit is very closely designed to the original product or solution using JavaScript, HTML or CSS.
  • Live data prototypes help analyze the success or failure of the project with the help of feedback provided by users involved in testing the product.

Miniature prototypes:

  • As the name suggests, this prototype is the three-dimensional or two-dimensional depiction of the product in a miniature form.
  • For example, in the inauguration ceremonies of the buildings and monuments, you might have seen their smaller versions being grounded there for the groundbreaking ceremony, a mini sculpture more precisely. Those are miniature prototypes.

Low Fidelity Prototypes:

It is a rough or low maintenance prototype of a product that doesn't give an advanced idea of the end results or feasibility of the project, they serve the purpose of;
  • Educating the audience.
  • Communicating with the audience.
  • Informing the people of a certain solution.
These low-fidelity prototypes can help connect with the target audience through the materialization of concepts and ideas in a tangible manner. Low Fidelity prototypes can be made in the following ways:
  • They can be made in the form of rough sketch.
  • Clickable wireframe.
  • A drawing representing the idea.
  • A mood board with all the collected data, summarized in the form of pictures, charts or graphs.

High fidelity prototypes

High fidelity prototypes as the name suggests are a high-end form of prototypes which are almost similar to the end product but not exactly the same as the original would be, it is used by companies with relatively high budget and sponsors. Qualities of high fidelity prototypes may include:
  • It is almost similar to the product.
  • A combination of materials can be tested making a high fidelity prototype.
  • A high-fidelity prototype may lack a feature or two as compared to the original product.
  • It renders enhanced user interaction and testing.
  • It can help identify and rectify design flaws in a more effective and efficient way.

Display prototypes

Display prototypes are made around the end feel or appearance of the product, it may not be a working model of a product instead, it is intended to show the audience how would they feel about the product when they would hold it for the first time in their hands! For example,
  • A non-working, non-functional physical model of a mobile phone is yet to be launched in the market.
  • A display of a desktop screen of a laptop prior to its launch.
  • A draped dress on a mannequin with pins without being stitched to perfection just to give the idea of how it would look like when stitched in actuality.

Video Prototype

You might have seen countless animations and short clips on the social media pages of certain websites related to technology and lifestyle, when they are about to launch a product, they video prototype its functionality and forward it to social media platforms.
  • It’s another way to connect with your audience.
  • People get hooked to the screens more in the case of animation.
  • Video interaction with the users intrigues them.
  • It compels the audience to make a buying decision which enhances sales.

Process of Prototyping

  • By now you are fully aware of Prototyping and its types, we will be discussing the process involved in prototyping.
  • First thing first, do you know why an engineer or a designer is compelled to prototype a product?
  • Which makes him or her indulge in the process?
  • Which circumstances initiate this tiresome journey?
  • Let me summarize this pathway for you mapping it straight to the prototyping;
  • When a certain individual or a company face a problem either be it digital or physical it paths down to a significant amount of research,
  • The research proposes a lot of solutions,
  • Amongst all the proposed solutions, the one feasible enough is chosen,
  • The chosen solution is then tested in terms of feasibility, durability and market parameters.
  • The product or the solution is then prototyped, upon rejection or approval, it decides the fate of your idea in solving the problem which hindered your path!

Qualities of a Prototype

A prototype must have the following qualities when accessed:
  • Accuracy

The prototype must be precise and accurate enough to be interpreted and accessed accurately, to move further with the production process of a product.
  • Articulation

All the parts of the prototype should be articulated well, a well configured and a well-structured prototype has higher chances of approval from the clients.
  • Basic Functionality

A prototype must perform basic functionalities if it is somehow related to the digital field or a digital solution. Take the example of an app to be launched in the market, the app must have the basic functions to help understand its usability when prototyped.

Tools for Prototyping

You must be wondering, How we prototype a certain product or an idea? Create a rough sketch in mind, we will be discussing it in detail within the next section,
  • We design our prototype digitally at first with all the dimensions and specifications
  • After that, we move towards the solidification of that digitally approved prototype if it is a tangible product!
  • Just as we can say that, we would definitely digitally prototype a mobile app meanwhile a silicone spatula would be physically prototyped in a three-dimensional structure and form.
  • Keep one thing in mind whether it a digital or physical prototype, you have to design it first using software that suits you best.
  • With advanced solutions and boom in soft technology, we have now countless tools in the prototyping industry which can be picked up and used according to client's convenience and ease either paid or free, each of them has their own specialties and workflow.

Problems Requiring Digital Prototyping:

Some of the things that require digital prototyping include;
  • UX/ UI
  • Website design
  • App development
  • Video animation
  • Architectural design
  • Product design
  • Artificial limb replacement
  • Orthotic devices
  • Weapon design and production
  • Tech packs in the fashion industry

Commonly used Software for Prototyping

There are countless tools and software to create a digital prototype which includes;
  • Photoshop CC
  • Figma
  • Vectr
  • Envision
  • Webflow
  • Grunt
  • Axure
  • Origami studio
  • SketchUp
  • Gulp
  • Yarn
  • AutoCAD
  • Solid works

Photoshop CC:

Photoshop creative cloud is a famously used software for modeling, sketching and rendering designs, who have not used Photoshop even once in life? Almost every designer had gone through it once. You need to buy a paid version of Photoshop CC in order to start your journey as a product designer. It is an extremely versatile software of the digital world.

Figma:

Figma is a web-based graphic designing app that allows graphics of almost every kind to be designed either it is a user interface, website design a 3D model of a tool or a product under construction. A fully functional version of the website is only available once you pay for it, you can buy a membership plan which suits you the best. Multiple designers can work on Figma on one document which is a unique feature only provided by Figma.

Vectr:

Vectr is a very easy-to-use software that you can use for prototyping a certain object you require, it is simple and can be learned with a bit of practice within no time. It is readily available offline as well, the collaborative feature of the website makes it possible for multiple users to work on a single design at a time.

InVision:

InVision is widely used for prototyping and collaboration among people who work remotely, it improves workflow among the participants. The initial version is absolutely free of any cost for everyone using the software. You can sketch your design and turn it into a prototype by using tools provided in InVision.

WebFlow:

Webflow, as the name suggests, is solely dedicated to website design, you can design your prototyped version of the website without any hassle, as it is very user friendly and convenient, another sigh of relief is that you do not need to code the website while designing it, doesn't it make the prototyping process easier and convenient?

Grunt:

Grunt is a slightly high-end tool available in the market amongst the one we have studied above, it’s a JavaScript task runner which is used to perform many automated tasks which have been predominantly defined ahead into the Grunt file. The most amazing feature it provides is the availability of files having routine tasks that a user can run anytime on its system, and another amazing feature includes the customization of the files, a user can cut and prune the file according to its own needs without any inconvenience.

Axure:

Axure is one of the most celebrated prototyping tools out there in the competitive market, it generates high-quality, user-friendly and interactive prototypes that can later be coded through HTML, CSS and JavaScript by using its in-built HTML output file and then published accordingly. It is available free for the students and teachers although the professionals have to pay for their monthly or yearly subscription. It is widely used by website designers, Head designers, UX analysts and researchers as well.

Origami Studio:

Origami studio was developed by Facebook. It is absolutely free and has a user-friendly interface and provides hassle-free creation of digital prototypes which can, later on, be analyzed on their app as well. You can build your prototype and check its user interface and interactions in a real-time situation, it also helps analyze workflows.

SketchUp:

SketchUp is advanced software that is used in machine design by a lot of designers for its rendering capabilities,
  • It can render a lot of dimensions of a prototype.
  • It is used for the 3D modeling of a design.
  • It has a very simple user interface that is easy to understand and comprehend.
  • SketchUp makes 3D modeling of a prototype relatively easy for new users as well.

Gulp:

Gulp is a JavaScript toolkit used in web development, it provides seamless workflows through shorter and simpler configurations as compared to other provided tools in the market, you just need to understand the basics to use Gulp, and then you are good to go! Create website prototypes and test them easily anytime through already configured settings, you can ever tweak them here and there as per your liking, isn't it a lifesaver? Definitely, it is!

Yarn:

This is not your ordinary Yarn used in textile for clothing purposes, it’s a tech solution that is completely known as, Yet Another Resource Negotiator.
  • The yarn has outdone its competitor in the market because of its insanely high spend, a speed that is matchless and can download multiple packages in one go!
  • It also acts as a project manager for your coded website or a design by sharing it in the form of packages with other designers and developers to test your website, with high security and reliability! Isn't it amazing? Multiple people can test and rectify your prototype without any hassle!

AutoCAD:

If you are an engineering student or somehow related to product design then it is impossible that you are not aware of AutoCAD! AutoCAD helps to design a 3D prototype of a product with all the dimensions and specifications, after approval of the 3D design you can get it printed in 3D form for presentation on different platforms. AutoCAD is widely used in the physical 3D modeling of prototypes in the industry.

Solid works:

Solid Works as the name suggests, presents a very solid base for product design for engineering purposes, from sketching to rendering and then prototyping which leads to 3D modeling and printing solid work knows its virtue! Solid works has an extremely user-friendly interface but some people find it difficult to work with just because of the lack of exploration and practice, a little practice and dedicated time would definitely make you a pro. Solid Works has changed the lives of engineers and product designers for good! Do give it a try if you want something detail-oriented yet simple to work with!

Examples of Prototyping

Our discussion started with the basic definition of prototyping followed by the characteristics of an insanely good prototype, leading to the types of prototyping and the tools we use to develop these prototypes we are now at the end of this discussion and I presume that you have a basic understanding of all we have learned by now! Now, let's have a look at a few examples of prototyping:

Prototyping Examples in Industrial World

  • There are endless examples when it comes to prototypes, almost every industry related to the design and development of a product or software implements it.
  • Let’s have a quick view of the industries that use prototyping.

1. Prototyping in Automotive industry:

  • Before releasing or launching a new model, it is always designed and prototyped first, initially into a digital form using software like AutoCAD or Solid Works and then it is moved on it 3D printing for representation.

2. Prototyping in Architectural Design:

  • A building is first prototyped in software like SketchUp, AutoCAD, InDesign, Revit, Photoshop, 3D max studio and whatnot!

3. Prototyping in Biomedical Industry:

Have you ever gone for a tooth replacement? Or you might have observed someone's knee replacement? Everything is prototyped with the proposed material first, after checking for material, allergies associated with the material and the design elements related to the prosthesis and the approval of the prototype, actual replacement is made for the limb or a part of body to be replaced which can be a joint, teeth or a bone. It is certainly a long process and costly too  

4. Prototyping Machine Assembly and Spare Parts:

Have you ever seen a machine whose parts do not articulate into each other well enough? You must have not because of the fact that it designed and prototyped first and after completely testing it and getting approved by the quality control department, it is launched in the market and same goes for its assembly parts or spare parts available in general.

5. Prototyping in software and web design:

Our discussion would have been incomplete if software prototyping wasn't here in the list, the most commonly heard and tested prototypes of all are the ones used in the software industry, let me tell you how! Whenever you are about to launch an app, a prototype with limited functions is given to some of the users for testing purposes to check the user interaction and workflow.
  • The prototype doesn't have all the functions the app or the website would possess, instead, it provides a few basic ones to analyze the user reaction on the launch.
  • You must be thinking about why the prototype doesn't have all the features? The answer is so simple to hunt, who would buy the complete package after the launch if your prototype has it all? Obviously no one!
 

6. Prototyping in product design:

  • Let's take IKEA as an example who has never let anyone come even closer to the revenue it generates yearly!
  • IKEA has a very unique selling point, which is hidden in the self-assembling of their furniture by customers, this assembling of the furniture provides a sense of self-satisfaction and achievement which compels them to buy more.
  • Do you really think, all these self-assembly parts which seamlessly fit into each other by the customer itself are achievable without being prototyped? No, not at all!
  • All these parts and designs are Sketched and prototyped, first digitally and then physically in 3D forms. Now you know the power of prototyping? Definitely Yes!

7. Prototyping in Aerospace Industry:

Prototyping is an essential element to the design process in the aerospace industry, evaluation of the parts designed, their feasibility and durability are checked with the help of prototyping, designing it first and then modeling with the help of 3D printing. A design flaw or a loophole can be rectified using a prototype saving everyone from a major disaster.

Military Prototyping:

Military prototyping is extremely crucial to military Industry when checking the feasibility and viability of a weapon, from tanks to guns and missiles prototyping has a significant role in the successful launching of a weapon checking its utility and design, a minor loophole or a flaw can cost millions to the inventors which would be derogatory to the budget as well.

Prototyping in Robotics:

  • Prototyping in robotics goes hand in hand with the design and configuration of the robot, without prototyping the manufacturer would never be able to see the true outcome of the features and added designs that are essentially required for the successful launch.

Scenario-Based Example of Prototyping:

  • We are now done with the practical examples of prototyping in different industries, in this section, we will discuss a scenario-based example to help you grasp the concept in a better way.

Prototyping a Physical Product

For understanding, this scenario put yourself in the shoes of a product designer, you are a product designer now who has been asked to design a mug that keeps things warm in winter and cold in summer, but with a very unique instruction in the design elements of the mug, it must not be covered on top. What would you do now? Let's us break the process down for your convenience;

Step 1: Research

  • Research is the utmost part of a project, what can you do without it? Obviously nothing! Research must be your strong forte, search for the already existing designs in the market with similar specs.

Step 2: Design

  • After research, you would definitely be considering the design and material for your mug, which keeps the liquid warm in winter and cold in summers!
  • Ultimately after design selection you would sketch it in your desired software in a 3D form be it AutoCAD or solid works or any other one you like the most; it would be the digital prototype of your project.

Step 3: 3D printing of the prototype

  • After the approval of the digital prototype, the next step would be the materialization of your design into a three-dimensional structure, this step would be achieved with the help of 3D printing and it would be a physical prototype of your product.

Step 4: Approval of the Prototype and Rectification of Errors

  • In this stage of product development, we have a digital and a physical three-dimensional prototype of our product which has been tested with different materials and design constraints.
  • The final design is approved after all the rectifications have been done.

Step 5: Mass Production of the Product According to the Prototype

  • The final prototype got our mug with unique design and features approved, and is now all set for mass production.
  • Voila! You have made it to the competitive market with a revolutionary product. Good work!

Prototyping a Website or an App

Now you know how the prototyping process takes place and leads to the production of a product either be it small or large, without prototyping it would not have been possible to make a design or a product error-free, which is a really important factor for influencing the buying decision of our target audience. The previous example was all about a physical product launch and how prototyping is involved in the process, in the next scene we would be discussing an example related to an intangible product which is a website or an app design. Let's get started;

Step 1: Researching the Key Features and User End Expectations

  • App development starts with the research phase, but this time you have to orient your research around your target audience, find out the features they want you to add or the things that don't like in the user interface and all the necessary stuff required for the job with the help of survey or a poll.

Step 2: Design a Low Fidelity Prototype for User Interface

  • After identifying the key requirements develop a low fidelity prototype with the help of any software you like such as Invision which would help create the basic functionalities of the user interface.
Step 3: Production of Live Data Prototype
  • A low fidelity prototype can be turned into a live data prototype making a few features of the app functional.
  • This would help in generating true feedback and analysis for the app when tested by the people, you might have seen some testing versions of an app saying; "this feature of the app is not available in this version”, which is the reason why they aren't available.
 

Step 4: Approval of the Prototype and Rectification of Errors

  • After the approval of the prototype by the investors and data collected by the audience, we move towards adding the complete features that were planned for the app.

Step 5: Release for Public Use

  • The app is then released with complete features and is made available to the general public for use.
That was all about the use of prototyping in the app and website development, you can yourself see that the process would have been incomplete if prototyping has to be skipped completely or partially. It is not necessary that all the steps mentioned above have to be followed exactly in the process, instead any of the steps can be altered by the developers according to their plan of action.

Limitations of Prototyping

  • Nothing in this world exists without imperfections and minor flaws, same is the case with the process of prototyping, no doubt the process in itself is remarkable enough to do wonders wherever implied, but it has some limitations as well which are being stated below:

Exaggerated Expectations:

  • The product or the object which is prototyped can sometimes create unreal expectations for the final outcome which may not be achieved in real life.

Material Constraints:

  • Material constraints can play a major role in creating problems for the product designers, the material which is prototyped may not turn out well enough when used for mass production on a large scale which can add additional costs and strains the budget in turn upsetting the shareholders.

Lack of Absolute Imitation of the Presented idea:

Prototypes are scalable models which are materialized on large scales in real life, the digital forms of a prototype may not be able to communicate everything about the final physical product what the designer has in mind, in simple words, you cannot put everything in your mind you have on a piece of paper accurately. So, summing up, this section concludes our journey of prototyping,  without any second thought I can say that you have learned and understood the concepts well, if not, it is never too late to mend just give it another read! Good luck!

What is Rapid Prototyping? Techniques, Software, Examples and Advantages

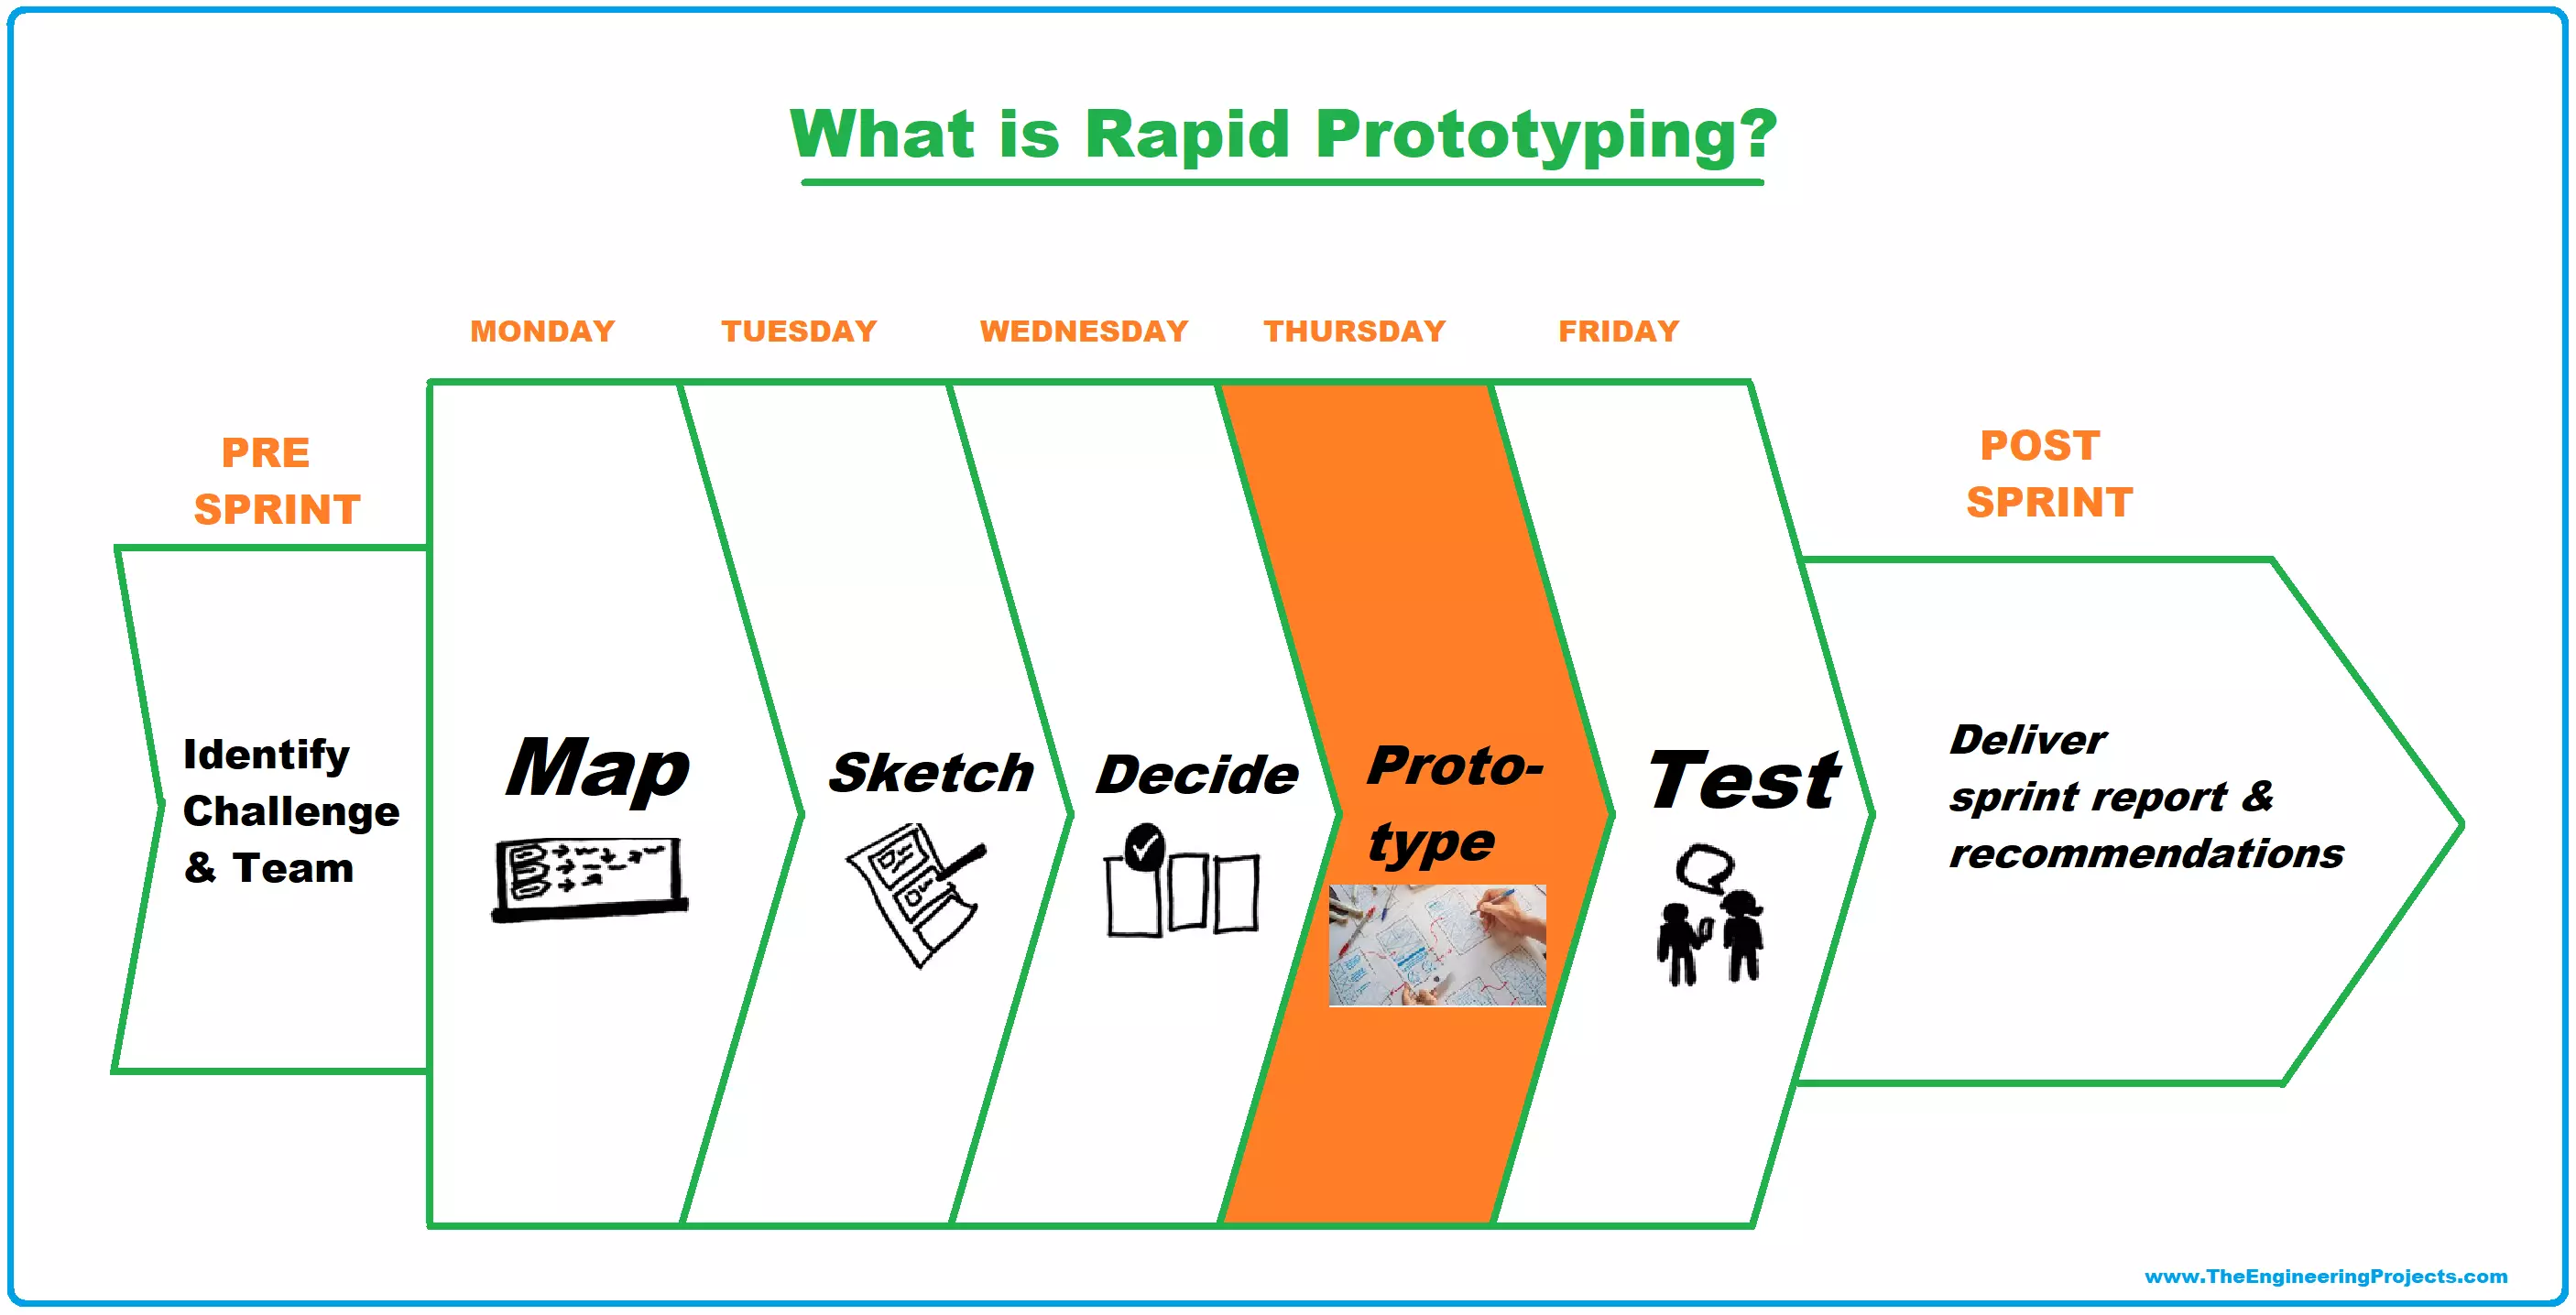
Hello friends, I hope you all doing great. In today's tutorial, we will have a look at What is Rapid Prototyping? We will also discuss different techniques used in rapid prototyping, Rapid Prototyping Software, Examples, Advantages etc. Have you ever witnessed the manufacturing process of new launches in large-scale and renowned industries? From rough draft to the final approval a lot of steps are involved to launch something new into a competitive market where a single flaw or defect can wipe you and your product off from the market. Rapid prototyping is one of those steps and techniques which helps mitigate that risk and is implied worldwide in many industries and businesses. Before we start our discussion on Rapid Prototyping, let's first discuss;

What is a Prototype? & why do we use a prototype?

A prototype can be defined as; "The three-dimensional model or imitation of an object or a project that provides the real-time information and visualization regarding its functionality, design and the fact that how much better or worse the product or project would turn out in reality after completion" We can say that prototyping serves the following purpose
  • We make prototypes to decide in the favor of a product or against it.
  • It can help us rectify flaws even before the production starts on a large scale, to avoid any future losses.
  • Prototyping gives us the idea about the substantial future of the project whether it would be a hit or a miss
  • The future product can help gain investors and sponsors if the prototype turns out to be successful.
As of now, we are well aware of the prototype and what is it used for, from now onwards we will be discussing our actual topic, “Rapid Prototyping". Rapid prototyping has revolutionized the manufacturing process to a great extent, with advancement in technology there comes revolution and ease, you might have witnessed or experienced one or two steps of Rapid Prototyping in your industrial internships or University assignments, in case you have or you haven't, I'll be explaining everything in detail, Don't worry!

Rapid Prototyping definition

We can define rapid prototyping as;
  • "Rapid prototyping encompasses an amalgamation of several techniques for making a three dimensional model of a certain product or mechanical part of an object to be manufactured, through data provided by Computer-Aided Design ( CAD) after the approval of the initial design for the product or a smaller part of the product"
Following are some points peculiar to the rapidly prototyped object:
  • The model which is produced through this method is scalable, which means that actual values and measurements are used to make a prototype that can be extrapolated on a large scale afterward turning it into a gigantic object.
  • Computer-aided design (CAD) data is processed further into reality for fabricating the three-dimensional model after approval from the design team.
  • The techniques of additive layer manufacturing and 3D printing is used, in case you don't know about additive layering and 3D printing, it can be defined as,
“Rendering the  use of adding certain materials like plastics, solids, resins and powdered products layers by layer into the design to make the final product."

Grades of Rapid Prototypes:

There are two grades of prototypes used for this purpose;
  • High Fidelity Prototypes
  • Low Fidelity Prototypes

High Fidelity Prototypes:

  • A prototype that is almost exactly similar to the end product we are opting for is called a high fidelity prototype, it is mainly used in machine design, aerospace, automotive industry and biomedical engineering. We are going to discuss high-fidelity prototypes today which are the face of the present and future!

Low Fidelity Prototypes:

  • A low fidelity prototype is a rough imitation of the product or a part we are about to manufacture, it can be on paper or any other medium, this type of prototyping is not much used in machine design and manufacturing.

History and origin

In older times when there was not much advancement in the field of design and manufacturing, it was a very laborious task to shape a model of an upcoming project or a product in three-dimensional forms, the measurements and the outcomes were not that accurate to the extent they needed to be, they were not three dimensional either and were made from wires and hooks, yes! You heard it right! Our forefathers used to make planning and development models by hand and that too with wires!

Pioneer of Rapid Prototyping

  • Research and development was a nerve-wracking task back then, until in 1970 when Unix Circuit Design System also called as USDS surfaced on the horizon, Henryson and his colleagues at Bell Labs laid the foundation of a new era.

Evolution with Time

  • Just like human beings evolved and adapted to the environment with time, in the same way, our technology evolved too, the following are some of the happenings which tremendously changed the future of Rapid Prototyping:

Topography

  • In 1982 the technique of TOPOGRAPHY was widely used, it involved using resin plates with designed edges and contours on them, combined together to form a model.

Photopolymers

  • In 1974 photopolymer resins were used along with the topographical techniques in order to harden the slices of different layers which were glued together later on for making the final product.

Photo sculpturing

  • After photopolymer resins and topographic techniques, finally in the 19th-century photo sculpturing was introduced to make a 3 Dimensional image which was an achievement in itself indeed!

Topography and Photo sculpturing

  • In 1944 Topography and Photos culturing were merged to form a more detailed three-dimensional model on different materials and objects.

Computer-Aided Design

Charles Hull was one of the first persons involved in the development of CAD, a computer-aided design which later on turned into the first rapid prototyping system after which there was no going back, technological advancements took this method to a whole new level making 3D modeling achievable and easier than ever before.

We do not need an in-depth history of rapid prototyping, for now, this section was only intended to make a foundation so that you may understand simple processes that were involved in modeling objects which later on evolved into the complex processes and techniques we use today for this purpose. Don't worry, we will be discussing the techniques involved in Rapid Prototyping in the next section!

Rapid Prototyping vs Traditional Prototyping

The prototyping that was done in older times was regarded as the traditional prototyping. Following are some distinguished points that would help you understand the difference between Traditional prototyping and Rapid Prototyping:

Modernity

  • Rapid prototyping is a modern technique meanwhile traditional prototyping as the name implies an older approach.

Time and Effort

  • Rapid Prototyping is time-saving and efficient meanwhile traditional prototyping consumed a lot of time and effort.
  • A lot of manual and laborious tasks have been cut down by the use of rapid prototyping which was a part of the traditional approach years ago.

Precision and Accuracy

  • Rapid prototyping intends to be more accurate and precise with the help of modern techniques and methods developed over time, on the other hand, traditional prototyping was a bit of a hassle with the least amount of accuracy and precision.

Material Versatility

  • Traditional prototyping techniques involved the use of wire frameworks manually to make a prototype of a product, meanwhile, rapid prototyping can implement a huge variety of industrial-grade manufacturing materials for the production of a prototype.

3D Slicing in Rapid Prototyping

Before studying the techniques involved in the process of rapid prototyping, you must be aware of the concept of SLICING, which is used in the process of 3D printing while making a rapid prototype of an object, 3D Slicing is comparable to slicing a big loaf of bread, let me explain how! consider a loaf of bread, when a loaf of bread is baked it is not in individual slices instead we make bread as a big chunk of flour and added ingredients, after baking, it is split into individual slices to make a sandwich or a toast, in the same way, these 3D designs are created as a single unit which is later splatted. So, slicing can be defined as;

  • "Splitting of the 3D design into individual layers for additive layer 3D printing"
  • This process is also called layering
  • 3D slicing is carried out by 3D Slicer software used as an extension of AutoCAD or Solid Works
  • 3D slicer is a free, open-source software
  • It allows a systematic, smooth workflow when paired with any of the modeling software like AutoCAD or SketchUp.
 

Rapid Prototyping Techniques

  • Rapid prototyping companies employed 3D and additive printing initially, the use of these two extended to such an extent that people started recognizing 3D printing and Rapid Prototyping as one entity, but it is not true to be accurate!

1. 3D Printing:

  • Rapid prototyping has evolved to a much higher level since its organ as we discussed earlier, although 3D and additive printing is still used for rapid prototyping but they cannot be regarded as two names for the same thing, so cutting it short, let's find out how 3D printing works.
  • Following is the step by step process which takes place when we model a prototype through 3D printers;
Step 1:
  • As the first step, a completely computer-based model is designed with all the dimensions that the final product would have.
  • Designing process takes place through Computer-Aided Design software also commonly Known as CAD.
Step 2:
  • Secondly, the data from CAD software is extracted and fed into the 3D printer for modeling.
Step 3:
  • 3D printer requires STL file format for conversion of CAD design into a 3D model.
  • After file extraction and translation, slicing and layering are carried out to model the final 3D product using triangular facets.
Similar to 3D printing are some complex techniques as well which are being used commercially on large scale, here is a brief introduction to each of them,

2. Selective Layer Sintering or SLS:

  • Selective layer sintering refers to the process which requires a powder bed and laser beam to form the prototype layer by layer, a laser beam is projected on the powder bed which helps in the incarnation of the design on the plates,  this process is not much appreciated due to roughness of the prototype manufactured.

3. Stereolithography, SLA or VAT Photo Polymerization:

As the name suggests stereo lithography makes use of an ultraviolet laser beam to carve the design on the light-activated resin sheet. If you don't really know about light-activated polymers or photopolymers and how they work, then you must know that these are substances that alter their shapes when exposed to a certain wavelength of light on specifically exposed areas. The most commonly used photopolymers include Acrylates and Methacrylate added with other materials to prevent shrinkage of the photopolymers while slicing the design.

4. Material jetting:

Materials jetting is less expensive than other methods discussed earlier, it is considered a good choice for 3D modeling when it comes to design and development in small-scale industries. Material jetting is also known as fused depositing modeling or FDM, a thermoplastic filament is used in the process for slicing the product. The product is made layer by layer in it but the only difference is the presence of thermoplastic filament which is present in the nozzle of the barrel, being melted at the time of modeling! , During the initial days of FDM the results were a bit off in appearance but now the quality has considerably improved.

5. Selective Laser Modeling or SLM:

It is also known as Powder Bed Modeling and has a wide range of applications in industries that require precision and accuracy at any cost and can invest in anything that fulfills this demand. Powder Bed Modeling as the name suggests making use of high-quality metal powders including Aluminum, Cobalt and Titanium. These powders are then melted with a very high-intensity laser beam to shape the layers of the prototype being produced. SLM is used in the aerospace, medical, automotive and defense industries, give it a thought, all these industries cannot miss their targets at any cost, isn't it? That's why they use this SLM prototyping technique, which is expensive yet reliable and durable.

6. Binder jetting:

Binder jetting works almost the same as selective Laser modeling but there is only key difference in the process of making a prototype, the process is not carried out in slices and layers as done in selective laser modeling, all the layers are made at once binding them with one another with a binding agent. Microfine droplets of liquid are sprayed on the top of the powder bed which acts as a strong adhesive for the powder molecules to bind together forming a layer, the layer just produced is not removed then, it is compressed to start another layer on it. The layers made altogether are put into an oven or a unit that burns the binding agent making it look seamlessly combined in place.

7. Laminated Object Manufacturing or Sheet Lamination:

You might have guessed the process by the title till now, Laminated Object Manufacturing makes use of thin laminations or layers produced one by one. These laminations are produced with the help of a laser beam or any other software which helps carve the design on the laminations. Once the individual laminations are done, they are glued together with an appropriate binding agent to form the final prototype. This technique is relatively inexpensive than the techniques we have studied above.

8. Digital Light Processing or DLP:

Digital light processing is one of the new advancements in the field of prototyping, DLP technology makes use of digital projection light beams. These projection light beams then carve out the three-dimensional design on the surface of the photopolymer layer. Digital light processing and SLA is also known as Stereolithography only differ in the use of projection light instead of the laser beam on the resin photopolymers for prototyping. The process is fast as compared to other available options in the industry and can be used for a variety of materials to create the desired 3D prototype.

Rapid Prototyping Software

  • As we are done with the basic understanding of Rapid prototyping and its techniques, you must be wondering which software are involved in the process, I have got you covered!
Following are the few well-known software being used in the process, just keep one thing in mind, you are not restricted to stick to any one of them, these software provide a  complete  visualization of  the design from every nook and corner, the thing that suits you the best can be used, so here's the list :
  • Solid Edge.
  • Sketch up.
  • SolidWorks.
  • AutoCAD.
We will briefly discuss each of them so you might get a clear idea of what they actually do and choose for yourself!

1. AutoCAD:

Who is not aware of AutoCAD? The insanely famous software of all the software being used in the 3D modeling of prototypes. It is used for creating a 2D or 3D blueprint of the prototype. AutoCAD has a wide range of functionalities that help make a design with accuracy and precision. It is widely used by engineers in automotive, aerospace, biomedical, architectural and manufacturing fields. The Industrial file formats supported by AutoCAD includes;
  • dwg
  • dxf
The production formats that the software supports include;
  • stp
  • igs
  • step
  • stl

2. SketchUp:

SketchUp is similar to AutoCAD but is comparatively less complex in interface and design, 2D and 3D modeling can easily be done with the help of Sketch Up. SketchUp is highly liked by the designers for providing better rendering of the designs to give a clearer picture of what you would be getting in your hands if you invest in a certain product or project.

3. Solid Edge:

If you are somehow related to any of the engineering fields you must have heard of solid edge software for 2D and 3D modeling of the designs, there are many additional features that make the solid edge a go-to option for its users, product lifecycle management from third parties and finite element analysis being two of them. Solid edge provides Synchronous technology so that the user may switch between parametric and direct modeling whichever suits him best, by the help of this functionality you can edit a single aspect of the design individually without disturbing the whole design.

4. Solid Works:

Solid works and solid edge are always in comparison with each other being the talk of the town, this software may have some common features when come to designing and simulation like 2D and 3D modeling like many others, but Solid works differ from the solid edge in providing simulations for liquids as well, on the parallel lines it can also predict the stress withstanding capabilities of certain parts of the assembly with the help of stress analysis.

5. Other Software:

There are many other software for 3D modeling like Creo, Inventor, fusion 360, CATIA and blender among many others. You can easily learn any of them by watching tutorials and practicing the designs again and again. One must keep in mind the difference between the real world and the 3 Dimensional world, a lot of factors limit the viability and feasibility of a 3D model in the physical world which was rather possible in your 3D files!

Example of Rapid Prototyping

You might have heard and observed a lot of things involving Rapid Prototyping especially if you're an engineering or a biomedical student, or if you design orthoses and prostheses for disabled people, here is a step by step example of process rapid prototyping includes;
  • Rapid prototyping is used in machine design, an engineer who has specialized in machine design makes a 3D model of the product or part of an assembly in his desired software according to his requirements.
  • The 3D files made by AutoCAD, Sketch-Up, Creo or any other software are later on approved by higher authorities.
  • After approval these files are further moved on to the next department for 3D printing, the file is then translated into the file format which is apt for the 3D printer.
  • An appropriate technique is then chosen out the available options, the technique employed could be SLA, SLM, Material jetting or Lamination, and it solely depends on the demand and available resources.
  • The prototype is then modeled according to its design in a 3D shape.
  • This three-dimensional model is then presented for approval and is used to attract investors as well, it can also identify the flaws and loopholes in the final product that the designer might have missed while making the design.

Applications of Rapid Prototyping

There are numerous applications of Rapid Prototyping and here I am mentioning a few of them:

Assembly Parts

  • Rapid prototyping is used in making assembly parts for machines, individual parts can be designed and manufactured according to the need.

Development of Artificial Body Parts

  • Biomedical engineers can use rapid prototyping for making a model of artificial limbs either legs or arms.

Dental Industry

  • Dental implants and dentures can be manufactured with the help of rapid prototyping.
 

Electronic Circuits and Boards

  • An electronic circuit or a loop can be preliminary designed and modeled through this technique.

Aerospace Industry

  • Rapid prototyping is also used in Aerospace Industry for designing new parts and tools in order to replace the outdated ones

Prototyping A Building

  • Civil engineers take refuge in Rapid Prototyping when they' are asked to present the three dimensional model of the building, bridge, mall or any large scale monument to their investors, you might have seen small-sized models of the building prior to the commencement of the project, Haven't you? That's the rapid prototype of that building!

 Usage in Hospitals

  • Rapid prototyping is also used in hospitals where advanced technology is used for surgical operations, you might have seen the seasons like The Good Doctor and The Night Shift when they are about to perform a complex surgery e.g. removal of a lesion from a certain body part, they firstly perform a three-dimensional analysis then a prototype is made to explain the complexity of the procedure to be done.

Jewelry Design

  • Jewelry designing implies the use of Rapid Prototyping as well, the design to be produced in bulk quantities is prototyped first for approval and after design approval sent to the production house.

Currency Notes and Coins

  • Currency and coins are also prototyped first before their release and presented to higher-ups of the state first.

Replacement of Small Parts

  • Small parts of airplanes and jets to be replaced are rapidly prototyped when needed to replace by the new ones.

Automotive Industry

  • The automotive industry is one of the largest manufacturing industries, a huge amount of assembly parts are needed in bulk, even a small defect in design can cost billions if not pointed out in the initial design that is the reason we automotive industry makes use of rapid prototyping before implementing a new design or spare part.

Robotics

  • When I was in school whenever I heard of the prototype I used to think of it as a kind of robot, I fancied a prototype as a robot which was clearly nowhere near reality, but nowadays robotics do implement the use of rapid prototyping to save their time and energy experimenting on new features and models of robots.

Designing New Models

  • A new model for a car or a heavy bike, for a ship or a submarine, or anything that has something to do with machine design is rapidly prototyped first and then manufactured after approval.

Analysis

  • Rapid prototyping is also used for analysis, such as finite element analysis, withholding capacity of a part or a structure on the whole, durability and flexibility of the product under study.

Advantages of Rapid Prototyping

We are almost at the end of our discussion about rapid prototyping, I hope and I expect that you might have grasped the concept by now! Everything in this world has its advantages and disadvantages, nothing has been made perfect but let's highlight a few advantages of rapid prototyping.

Time-Saving

  • In this modern world where every minute of a man's time is calculated on the scale of progress, who doesn't love time-saving technologies?
  • Rapid prototyping saves your time and energy by helping you identify the flaws in your design at a very initial level.

Value for Money

  • A small defect can cost millions to companies that invest in a competitive market, a prototype not only saves time but also saves money.

Determining the Future

  • Rapid Prototyping can determine the future of a project, if liked and appreciated it can attract clients which means it can attract money and investment for the production.

Pace

Prototyping is for the people who are at a high pace, slow and slovenly cannot win the race in this era, to be a rabbit who wins the race this technology is a go-to solution for turning your visualization into reality within no time, In older times when rapid prototyping was not a thing, people used to spend months and years over making a design which used to be flawed and messed up in the end. The models which used to take years of grind are now made in weeks, this benefit implies a greater pace at which a product can be launched into the market.

Cost Reduction for a Project

When a prototype is made in a week or two, it leads to the approval and production within a shorter period of time, you'll have to pay for lesser days to your staff which cuts down the overall cost of the project.

Room for Trial and Error

There is a lot of room for trial and error when you are using this methodology, even if your designs get rejected in the first attempt you can always give it another try and so on, because of the fact that 3D printing is extremely cost-effective, and you haven't paid for the mass production of an article yet, it is the price for a single 3D model which can be compensated later on with the success of your product.

Versatility of Materials

Let's suppose you want to make a screwdriver, firstly you'll make a design in your desired software may be AutoCAD, sketch up or anyone you like, after that you would contact the 3D printing services or any related agency for 3D printing, they would make a 3D print of your product, but now you want to test the materials which can be implied to make the screwdriver, what would you do? You'll definitely ask your service provider to make an imitation for the materials you want to test, they can make dummy materials for the testing of your product making it possible to test the end product with different materials. You can choose the best one for your final product when it is all set for production!

Assessing an Array Of Design Variations

Rapid prototyping helps test a huge number of design variations for a single product, you can alter any dimension of your product at hand according to your requirements. Previously it was not possible for the engineers to test as many designs as they wanted because of expensive machining processes, but now it is possible without worrying about the huge amount of money.

Altering a Single Part in the Whole Assembly

With rapid prototyping you don't have to make your design from scratch whenever you figure out a loophole in your design, the defective layer in the design can easily be replaced without disturbing the whole product at hand.

Manufacturing on A small Scale

Rapid prototyping not only allows the creation of scalable models, but it also allows the production of assembly parts in limited quantities being cost-effective and efficient too.3D printers are much cheaper and cost-effective than large production units.

Disadvantages of Rapid Prototyping

  • We have observed a lot of advantages related to Rapid Prototyping, but nothing on this Earth has been made without flaws, here are a few drawbacks of this technology:
  • 3D modeling might create a highly unachievable model of a product, which may not be scalable in real life.
  • Material imitated and tested in 3D printing can, later on, prove to be fragile and breakable when it comes to real-world material procurement.
  • The actual product might not be able to bridge the distance between the three-dimensional world and the real world.
Summing up, we can say that Rapid Prototyping is a lifesaving technology that is evolving day by day, learning 3D modeling and related software would add to your skillset being a valuable in-demand skill these days, you can definitely capitalize on it once you are a pro.it would be a great investment indeed, a right investment at the right time pays back in the future! So, that was all about it, I tried to keep rapid prototyping simple and easy for you, hopefully, you might have understood the basic concepts and techniques involved in the process, along with its pros and cons. I'll see you soon with another interesting topic, stay tuned!    
Syed Zain Nasir

I am Syed Zain Nasir, the founder of <a href=https://www.TheEngineeringProjects.com/>The Engineering Projects</a> (TEP). I am a programmer since 2009 before that I just search things, make small projects and now I am sharing my knowledge through this platform.I also work as a freelancer and did many projects related to programming and electrical circuitry. <a href=https://plus.google.com/+SyedZainNasir/>My Google Profile+</a>

Share
Published by
Syed Zain Nasir