Evaluate Your Capital Spend Before Investing In The Oil & Gas Software

Optimizing the well cycle portfolio is done by assessing the investments secured by the company’s management and opting for software systems assigned to the operational needs. Allocation of funds for equipment, vendor contracts rigs and accounts constitute the bulk of expenses for each project. The use of capital planning oil and gas software, requires evaluation and quality assessment before money is diverted towards it. This could be a daunting task in a market where prices fluctuate daily. Are you aware of the needs before relying on an expensive complex software? We shall try to relieve your pain points, take a test and undergo proper trials before considering the next purchase. Then select a vendor who can put together the system for long-term use.

Testing Systems Vital Before Capital Spend

There are no standard measures by which different petroleum companies invest in an accounting software. Nor are there any specific criteria on the dashboard of the CEO that defines the tailor made processes. To maximize the scope and identifying the pain points the management will need to earmark the following:
  • Demographics Of The Company – Its size, number of employees onsite and in the office, testing staff. Each department should be a part of the survey.
  • Agile Automation Tools – The specifications for an upstream company will be different from a mid-stream organization. Integration of several processes will be tested.
  • Researching The Business ECO-system before start of a new project or well cycle.
  • Maintaining track of regulatory standards before implementing the software.
  • The testing team will report the parameters that impact the purchasing decision of the capital planning oil and gas software.
  • Close down negotiations with suitable vendors and contractors for your organization.
While there will be certain niche frameworks that define your organization, some general factors every company requires. In the case of bigger companies, some operations are centralized for convenience. They also have a primary hub for business analysis and employ various testing stacks. They can identify the areas where systems are deficit. Such lack of discrepancy necessitates a new software system for better compatibility. Eventually, this software will be valuable in supporting key financial decisions of the organization. It will also provide insights that can improve the well cycle management and accounts - which are the two most critical areas where complex systems are required.

Assess The Necessity With Employees

The staff in various sites understand exactly what works and they should be asked about the functions that impact, their performance. At the corporate level, the management team can only map the plans theoretically. However, the ground reality is, the employees have knowledge of the workflow and what hurdles they face. If your organization is already using a software system, you are experienced to classify the areas where it does not perform to its optimal degree. Before buying a new Capital planning oil and gas software the above testing is crucial. For example, the accounts department allocates funds to every other subdivision. Ask the team about the current software functions.
  • Are all the features being implemented?
  • Does the software adhere to and achieve all the requirements?
  • Do they have other expectations from the system?
  • Would they consider improvisations?
  • Which areas should be given priority for better performance?
Survey other departments by speaking to the users directly. Present the report to the decision makers, so they know where the funds have to be allocated. Such an exercise will help to improve the workflow and the productivity. The survey should address:
  • Flow of operations required at the rig site and all productive wells
  • Current compliance stipulations for data
  • Financial reports preparation according to survey and intel
  • Integration of new system with existing ones
  • Training, maintenance, and support essential of the systems
  • Make a dashboard of tracking jobs, teams, and tasks
  • Each department should be enabled to access only the part of the system that they need.
  • Consider the industry needs and separate data entry and access via a single central hub.

Time To Save The Petrodollars

It is difficult to control the fluctuations in the oil prices. But with technology-driven functions efficiency can be achieved. Your choice of capital planning oil and gas software can offer ideal time and money saving solutions. You will be able to anticipate needs in many areas with the accurate method. Even if you have special needs, a structure can be tailor made by evaluation, testing tools and processes that allow consolidation of data. Your decision making process can be improved by having multiple ledger classifications in the accounts department.

Why Creative Thinking is Important for Web Design Projects

If you look in the past, having a website was enough to generate leads and keep yourself running in the business. But today, the concept of a website has emerged to the whole new level. It is not only a source for your business but a platform to gain exposure globally. With the advancement in the competition, the companies are investing heavily on their websites to achieve maximum ROI. If your website doesn’t get successful in grabbing customers attention at first, then your competitors take up your place. That’s why creativity is essential!

Web Design: what's audience looking for?

If you think of a design and start implementing it right away - you won’t get the results no matter how creative, you go. At first, you need to put yourself in the audience shoes, think about what they are looking for? What interests them? What features attract them? Does animation move them? What is the first impression you’re making from your website? The second most crucial factor in bringing the website in your audience attention is the keywords. If your website is SEO-optimized, your audience will find you on the search engines and if not optimized, no matter how much effort you put - you’ll be missing from their list.

Fluidity and Adaptability

Once your audience land on your website, they look for the information they want. If they are looking to order something, they’ll go directly to the order page. But if your website is taking too long to load, then this might turn your visitors off.  The designers need to design each page creatively and organized for the incoming website traffic. Not only this, but the website also needs to be adaptable to all screen sizes. While some people still browse from the desktop, the majority view from their mobiles. If your website isn’t dynamite, it’ll have less readability and viewability. The summary is when you’re starting a web design, make sure it is adaptable to the OS and efficiently accommodate the size of the screen.

Learn to Stand Out

Social media has act brilliant in educating the customers; be it about the brand, design, marketing, or the happenings. The customer knows who’s the right fit for their needs. That’s why brands focus on building the campaigns that are audience-centred and revolves around their interest. When you design a website same as others are doing, your audience doesn’t find any engaging factor in it and withdraw you from the list. And grabbing the first impression is highly important. So, creativity is the factor that separates you from the rest, and unless you have innovative ideas that will work for you, don’t start the project.

Creativity in Website Branding

Your website speaks about you. It defines your objective, mission, vision, achievements, and everything you want your customers to know. People can learn about you with a simple online search that’s why big brands spend considerable time in creating a web design that appeals to their customers and conveys the information creatively. A silent message, short video, whiteboard animation, or a great story that clicks your audience. Learn what your audience is searching for and answer them through visuals. Use the power of social media to grow your brand reach. Images, color theme, and text should reflect the tone of your company. If you search some of the successful brands like Starbucks, Adidas, Amazon, Apple - you’ll find an X factor in it, be it the idea, design, tagline, or the style. Innovation and creativity pique the audience interest in your brand. So, when you come up with an idea which your audience hasn’t seen before sparks their interest and lead the customer down the conversion funnel.

Sound Financial Advice For Recent College Graduates

Hello friends, I hope you all are doing great. In today's tutorial, we are going to share some Sound Financial Advice For Recent College Graduates. After four years in college earning that degree, you're ready to begin climbing up the ladder of your chosen career. Now you have to think about what you want to do with the salary your new job pays. Yes, you want a new car, nice clothes, and a big apartment, but hold on—what you really need is a financially stable future. It starts now.  Some sound financial advice for recent college grads is listed below.

Use Credit Wisely

Credit becomes necessary when buying a new home or car. You begin building a credit history and score by paying monthly bills like your cell phone and electricity. Your credit score also rises and falls according to your student loan payments and any defaults. The average monthly payment on a student loan is about $280, according to the Colorado Department of Higher Education. By accepting the lowest monthly payment, you'll have more cash to save. You can choose to pay it off faster, but you lose the savings and the higher credit score you earn by paying on time every month. Unsecured credit cards are a double-edged sword: They can lead to a mountain of debt that compounds with high interest, but they are also a way to build a high credit score and a resource to use in case of an emergency. Choose a credit card with a low fixed interest rate and low fees. Start with just one, use it wisely, pay it off each month and keep a low credit line ($500 or less). Watch out for low-interest rates with high fees; the fees negate the interest rate. You are entitled to one free credit report a year, too, so take advantage of this and monitor your credit.

The Cost of Living

"When choosing a place to live, look at the big picture before committing to a lease," says Allen. If you have roommates and the living arrangements agree with you, stay there. Splitting rent and bills saves a lot of money. If you choose to live alone, consider the actual amount of time you spend at home and the room you need to live. Single living doesn't take much room, and a two-bedroom apartment may mean you'll waste money on space no one uses. A one-bedroom or a studio apartment costs less and still gives you room for comfort. Your monthly bills will cost more than necessary if you don't comparison shop. If you live in an area with more than one energy provider, you're lucky, because the competition keeps the price down. And just because your parents or roommates have a bundled cable, Internet and phone contract with a big company, doesn't mean you have to follow suit. Shop around to find the best deal, and always ask what your monthly bill will be once the promotion ends, as some packages almost double in price after the initial promotion.

The Budget

For budgeting help, use a program like Mint.com. It's free, and it will organize and categorize your spending for you. Most experts agree that 10 percent of your monthly gross pay is what you should save at a minimum. To make saving easier, set up a savings account and have the amount automatically deducted from each check. You never see it, which makes saving easier.

Why should we use Torch Lighters

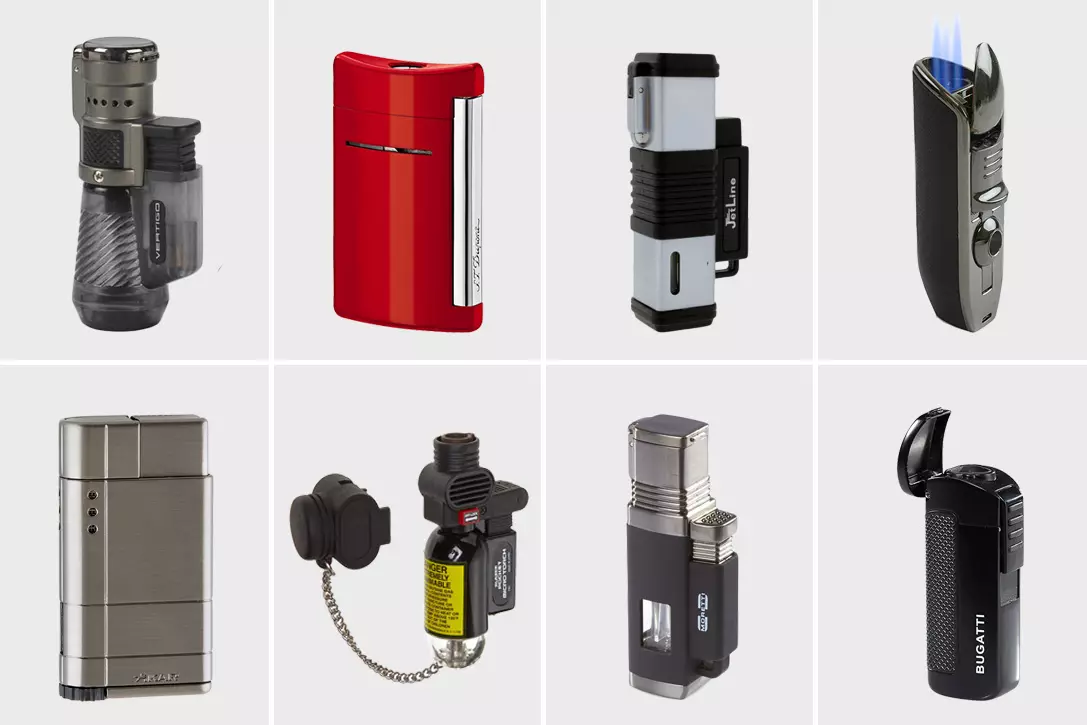
Lighters are popular for the cigar smokers but not only have the smokers used the lighters but also for the people who are interested in camping, picnicking and any other activities in the outside the windy environments. Usually, cigar smokers prefer butane torch lighters during the smoke. A torch lighter is a portable thing that is used for instant flame or fire. It is used for many activities like outside cooking, lightening in the dark area, fishing, and many many activities. Butane torch lighter in an instrument that is worked by utilizing butane creates hot flames. If you can’t buy a good torch lighter, it can make you in trouble in a serious condition. Suppose you are when you need instant fire and you have a lighter and unfortunately your lighter is not working, just think about that feeling. There are many reasons for not working your torch lighter. If you can identify those, then you can avoid the situation you don’t want. These reasons are described below why torch lighters stop working.

1. INCORRECT BLEEDING

It’s important bleed the lighter correctly because incorrect bleeding can be the reason for not working your lighter properly. You should bleed your lighter when the flame drops and fuel tank about to be empty; the fire is not frequent. During the bleed, turn off the gas valve, position the light up a stand that the port is facing the floor, then put a small screwdriver into the port and press. Keep the pressure until the hissing sound stops. Then continue pressing for a few more seconds for making sure escape the air.

2. NON-PREMIUM FUEL

The quality of your fuel is very much dependent on the quality of your lighter. If you don’t put premium fuel to your lighter, it will affect your lighter. Non-premium fuel can cause longevity and work. If you are not skimped about the fuel, then your lighter will work properly. Inexpensive fuel or butane is poorly refined or not adequately refined, which is very harmful for the torch because it contains microscopic impurities. The port of torch is tiny that’s why it can create a focused flame and the impurities refined can block and once it blocked, it is very much difficult to unblock them. You should continue with better fuel or butane.

3.INCORRECT REFILLING

Your lighter can be malfunctioned if you refill your lighter incorrectly. Incorrect refill sometimes means the air will insert the fuel tank, and it malfunctions the work of a lighter. To avoid this situation, every time you do it by the position of the torch upside down. So during the refilling fuel, be careful. Put the nozzle directly to the gas valve and firmly press it a couple of seconds when you feel that the hissing stops, the tank becomes full stop the press. This is the process of refilling the tank correctly. Know of it.

4. ALTITUDE

Altitude problems can occur in butane torch lighters. There are the functions of fuel and air ratios, which are mixtures of different fuel. If you use non-premium fuel, then this altitude problem can occur. When the lighter refilled in a lower altitude and it is operating it, then it is a higher possibility to occur an airlock with a valve. If the partial release of pressure is done with the adjustment valve, then it can unlock the air.

FLAME ADJUSTMENTS

The flame adjustment will be needed if your torch is not working properly, such as the flame too high or too low. Adjust the flame by using the (-), (+) button in front of the torch. If you have fueled inexpensive fuel and bled incorrectly, then it can be the flame change problem. Lighters are very much important for those people who spend a lot of time outside the home and especially at night. The smokers are required the torch lighters more than the other. Though people can use matches, I think torch lighters is more convenient and portable and also economical than the matches. However, it is very helpful for our many types of activities. So it is also can be a troublemaker if it is not working properly. For making it works properly you have maintained certain things I have described above, if you follow those things and keep maintaining then you will experience a better use of torch lighters.

Series Clippers and its types in Proteus

Hello friends, I hope you all are having fun. In today's tutorial, we will have a look at Series Clippers & their types in detail, we will also implement the simulations of Series Clippers in Proteus software. In the next article, we will discuss the next two types of Clippers i.e. Shunt Clippers & Dual Clippers. Today, We are going to learn:

  1. What is a Clipper?
  2. What are the types of Clippers?
  3. Series Clippers Simulations in Proteus.
So, let's get started:

What is a Clipper???

  • Clipper (also known as Limiter) is an electronic circuit, which clips or limits the amplitude(positive, negative or both) of an AC source wave.
  • Diodes are normally used for designing Clippers and such circuits are normally referred as Diode Clipping Circuits (Diode Limiting Circuits).
  • Here's an example of a Diode Clipping Circuit, where we are clipping the positive amplitude of the AC pulse:
  • As you can see in the above figure, we are clipping the positive side but if we want to clip the negative side, we just need to reverse the diode polarity.
  • Clippers are normally used for protection purposes i.e. if there are some voltage spikes then clip it to secure home appliances.
  • Half wave Rectifier is also a type of clipper as it clips one side of the AC pulse to 0V.

Now, let's have a look at different types of clippers:

Types of Clippers

In the previous section, we have had a complete understanding of what is clipper. Now let's have a look at three different types of Clippers:

  • Series Clippers.
    • Positive.
    • Positive with bias.
    • Negative.
    • Negative with bias.
  • Shunt Clippers.
    • Positive.
    • Positive with bias.
    • Negative.
    • Negative with bias.
  • Dual (Combination) Clippers.
As today's topic is about Series Clippers, so let's implement them in Proteus ISIS:

Series Clippers Simulation in Proteus

  • First of all, we need to open the Proteus ISIS software to design our circuit.
  • Select the following components from the "Pick Components" section:
    • Diode
    • Resistor
    • Vsine source
    • Battery
  • So, first of all, let's place our AC source Vsine and GND in the proteus workspace.
  • Double-click on the Vsine source and change the value of amplitude and frequency to 11V and 1000Hz respectively.

Our power source is ready, now let's design different types of Series Clippers in proteus:

1. Positive Series Clippers in Proteus ISIS

  • In Positive Series Clipper, the positive half cycle of the wave is clipped(removed).
  • In the positive clipper circuit, the arrowhead of the diode points towards the input source.
  • So, let's design the circuit as shown in the below figure:

  • As we can see in the above figure, diode D is connected in series with the load resistor and is pointing towards the AC source.
  • Double-click at the resistor and change its value from 10k ohm to 500 ohms.
  • We'll also add the DC voltmeter to show the difference between biased and unbiased circuit
  • We've connected terminal A of the oscilloscope with the AC Source(Vsine) and terminal B is placed after the diode.
  • This is the time to pop the play button and set values of the oscilloscope according to the below table:
Components Values
Channel A 20V
Channel B 20V
Time 0.2ms-1
  • If everything goes fine, we will get the required output as shown in the figure:
  • In the above figure, the Yellow curve is showing the input voltage, while the blue line is the output voltage(after the diode) received by the load resistor.
  • We can clearly see that the positive side of the AC source waveform is now clipped and that's why it's called Positive Series Clipper.

2. Positive with Negative Bias Series Clipper

The Positive Series Clipper removes the positive side of the curve completely but what if we want to clip only 25% of the positive side? In that case, we use positive with Negative Bias Series Clipper. It's circuit is shown in the below figure:

As we can see in the above figure, we have added an extra element called Battery.The rest of the circuit is same as that of the Positive Series Clipper i.e. the diode is pointing towards the current source and is in series with the resistor.

The volt meter is giving us -5V, where the 5V is coming from the added battery and the negative sign shows that the circuit is negative bias.

  • The output for the circuit on the oscilloscope is shown below:

As you can see in the above figure, the output curve is slightly clipped at the top. If we reduce the battery voltage, the clipping of the curve increase and at 0V the complete positive part will be clipped out(same as Positive Series Clipper).

If you want a clipper with a positive bias, simply change the direction of the battery. Connect the negative terminal of the battery with the negative side of the diode. It's a task, post your results in the comments.

3. Negative Series Clipper in Proteus

  • In a Negative Series Clipper, the negative half cycle of the wave is clipped(removed).
  • In negative clipper circuits, the arrowhead of the diode points towards the load resistor.
  • Here's the circuit diagram of the Negative Series Clipper:

  • The circuit is the same as that of the Positive Series Clipper with a slight difference in the direction of the diode.
  • The output of the oscilloscope for the series circuit of negative clippers shows us that the negative side of the wave is clipped:

4. Negative with negative bias Series Clippers

As we discussed, the whole negative part of the signal gets clipped in the Negative Series Clipper. So, in order to clip a certain amount of negative side, we need to add a new battery source and this model is called Negative with Negative Bias Series Clipper. It's circuit diagram is shown in the below figure:

As we can see in the above figure, the diode is pointing towards the load resistor. We have connected the negative terminal of the battery with the positive side of the diode. Here are the results from the oscilloscope:

So, that was all for today. In this article, we studied the series clipper and its types, along with their simulations in Proteus software. I hope you have enjoyed today's lecture. Let me know your feedback/queries in the comments. Have fun!!!

The Key Benefits of Data Visualization

Hi Friends! Hope you’re well today. I welcome you on board. In this post today, I’ll walk you through the key benefits of data visualization. Data visualization is something that used to be a competitive advantage, but now it is becoming a necessity to survive. I have outlined some of the key benefits of data visualization and I will explain each point very briefly. If you take one thing away from this post it should be that data visualization is important and you should be implanting data visualization techniques into your business or organization.

Reducing Errors

Keeping track of your data will let you tell a story about your customers and your business. One negative part of the story is that data visualization will let you identify the problems that are happening with your company. For instance, if you analyze your data as an eCommerce business and see that a large percentage of your customers are getting to the checkout and then abandoning their cart, then you are now aware that something is wrong. You could use the data to infer that something is off with your check out system and that you need to make improvements. Testing out new checkout pages could boost your conversions, and that is just one basic way of how knowing your data can reduce errors in your business. There is a good chance that if a company has never used data to identify errors, then they will find ways to limit errors and improve their business from data visualization.

Identify Trends

By using data visualization, you will know what kind of trends are going on with your business and the industry that you are in as a whole. Why would knowing trends help my business? Well, if you can identify trends before your competitors, then that is going to give you an upper hand right off the bat. Leaders in every industry are always looking at trends and seeing if there is a business opportunity in that trend. Usually, if you can be one of the people to capitalize on a trend, then you are going to gain a lot of market share. It is basic economics to know that the early movers and early adopters to a trend are usually the most successful. Use data to identify the trends, and then come up with ways to make money from the trend!

Improve Your Marketing

The last point that I have as a benefit for data visualization is that your marketing can drastically improve. A surefire way to improve your marketing is to look at the data that you have and identify where you can be more effective. It can also let you know which kind of marketing is unsuccessful and not profitable. If you know that something is not profitable, then you could make a much bigger return on investment if you put money into the marketing channels that you are seeing a great ROI! That’s all for today. I hope you’ve enjoyed reading this article. If you have any questions related to this article, you can ask me in the comment section below. I’d love to help you the best way I can. Thank you for reading the article.

How to Calculate PCB Trace Width

Hi Guys! Hope you’re well today. I welcome you on board. Thank you for clicking this read. In this post today, I’ll discuss how to calculate PCB trace width? The PCB (printed circuit board) is a mechanical layout that electrically connects different components on the board using conductive copper traces that maintained current throughout the circuit board. Different electrical components are placed on the non-conductive substrate which are soldered from the other side of the board. On the non-conductive side of the board copper traces electrically connect these components. Earlier end-to-end wiring was used in place of PCB boards but now it’s become obsolete. Needless to say, PCB has revolutionized the modern electronics that are precise and compact and cover less space compared to devices where wire wrap and point to point construction is used. Thanks to technology… nowadays, electrical devices are more sophisticated, economical and are capable of performing more functions than their predecessors. That was all the little intro about printed circuit boards. Let’s dive in and elaborate on how to calculate the PCB trace width.

How to Calculate PCB Trace Width

Before we move further and discuss how to calculate PCB trace width, let’s first define what PCB traces are, and why they are used.

Copper Traces

The base of the PCB is made of a substrate which is fiberglass. And most common fiberglass is composed of FR4 material. This substrate material is non-conductive and provides the core strength and rigidity to the board. On top of the substrate is the copper trace. These traces are conductive and electrically connect different electrical components on the board. They come with varying thickness depending on the applications they are used in. The capacity of the current passing through the copper traces mainly defines the width of the copper trace. More width of copper trace allows more amount of current to flow. If the PCB is a one-layer PCB, then the copper traces are laminated on one side of the board. If it is a two-layer PCB then copper traces are laminated on both sides of the board. Multiple-layer PCB can support up to 16 layers of copper traces on board.

Formula to Calculate Trace Width

The equation to calculate the width of the trace is given below.

Width [mils] = Area[mils^2]/(Thickness[oz]*1.378[mils/oz]) 

… where 1.378 is related to standard 1 ounce pour thickness. So, before calculating the width we must know the trace area which can be calculated by the following equation. Trace area can be calculated by the following equation:

Area [mils²] = (Current[Amps] / (k*( Temp_Rise[°C] )^b) )^(1/c) 

… where for external layer, k = 0.048, b = 0.44, c = 0.725. … and for internal layers value of ‘k’ will change and it will become 0.024 while both value of ‘b’ and ‘c’ remains same. This equation to calculate area tells us how wider the trace needs to be to conduct current without any potential issues. It is important to note that the required widths of traces for inner layers are commonly higher compared to the width of traces on the outer layers. You can use any width depending on the application. -- Know that… after designing the PCB on any software, you need to fabricate the board which you can fabricate yourself. If you don’t want to involve yourself in the hassle of fabrication of PCB right from the scratch, you can outsource the manufacturing of your boards. PCBWay is one of the renowned service providers. Just go to their website, connect with them, and order an online quote for your required board before making your decision for the final circuit board. We have always worked with them, when it comes to PCB designing and they have always provided best job. That’s all for today. I hope you’ve enjoyed reading this article. If you’re unsure or have any questions, you can approach me in the section below, I’d love to help you the best way I can. Feel free to share your valuable feedback and suggestions around the content we share so we keep coming back with quality content customized to your exact needs and requirements. Thank you for reading the article.

Simplest Half Wave Rectification in Proteus

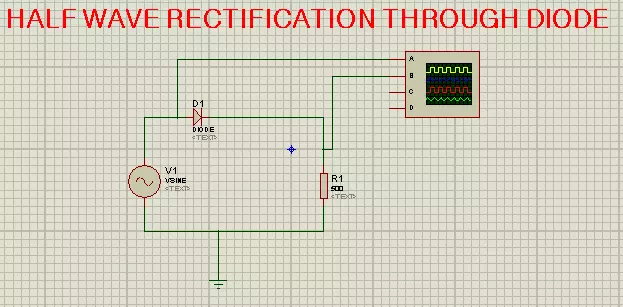
Hello friends, I hope you all are doing great. In today's tutorial, I will show you how to perform Simplest Half Wave Rectification in Proteus.  In this tutorial, we will design a simple Proteus simulation, where we will use a diode for half-wave rectification.

Before designing the Proteus simulation, we will first have a theoretical overview of Half Wave Rectification as it's always the best approach to read theory before practical (Proteus Simulation). So, let's get started:

What is Rectification ???

  • Rectification is an electrical process, used to convert Alternating(AC) Voltage into Direct(DC) Voltage using a circuit called rectifier.
  • The Rectification process is always carried out using diodes, as we know diodes allow the current to flow in one direction only, thus they can easily block the opposite flow of alternating current.
  • Based on DC output, rectification is divided into two types i.e.
    • Half-wave rectification. (needs single diode)
    • Full-wave Rectification. (needs multiple diodes)
  • Now, let's have a look at, what's the difference between these two types of rectification processes:

Half wave Rectification

  • In Half Wave Rectification, half wave of Alternating(AC) Voltage gets converted into Direct(DC) Voltage, while the other half gets blocked.
  • A single diode is used for Half Wave Rectification, as shown in the below figure:

  • We can allow either pulse(positive or negative) to pass or block and it depends on the diode's direction.
  • In the above figure, we are allowing positive AC pulses to pass, while blocking the negative AC pulses.
  • If we reverse the direction of the diode, it will block positive pulses & will allow negative ones.

Full Wave Rectification

  • In Full Wave Rectification, a complete alternating(AC) pulse(both positive & negative) gets converted into Direct(DC) voltage.
  • As you can see in the above figure, we are now utilizing both cycles of AC current and converting them into DC current.
  • Hence, the full wave is more efficient than a half wave, as we have seen half wave simply drops half of the pulse.
As today's topic is about Half Wave Rectification, so we won't discuss it in detail but I hope, now you must have understood the difference between full wave & half wave. Let's design half wave rectifier in Proteus:

Half Wave Rectification in Proteus ISIS

  • Proteus is one of the best software for simulating electrical/electronic circuits.
  • Basically, we have to design a really simple circuit, as shown in the below figure:

  • In order to design this half-wave rectifier, we will need these three components:
    • Sine Wave Generator.
    • Diode.
    • Resistor.
  • So, click on the “pick” button and select these components from Proteus Library, as shown in the below figure:

  • Now, let's design our circuit, so drag & drop these components one by one in the word space.
  • Set the resistor's value to 500 ohms.
  • Connect a ground terminal as we are using Vsine i.e. the alternating current source. You will find the GND component in the Terminal area from the left menu.
  • Now let's connect the wires, as shown n below figure:

  • Once we have completed the basic circuit, we’ll now analyze our output on the Oscilloscope.
  • You will find it in the left menu under "Virtual Instruments".
  • The Oscilloscope has four terminals named A, B, C, D. We’ll connect Terminal A before Diode and Terminal B after the diode, to analyze both Input and output at the same time.

  • Double Click on the alternate current source to set the values.
  • Here, I am using an amplitude of 110 ms-1 and a frequency of 1000 Hz.

     
    • I have normalized the oscilloscope axes for better examination of the pulses, here are my settings:

    • Now run your Proteus simulation, and if everything goes fine, you will get results, as shown in the below figure:

    HWR output through Analog Graph:

    In the previous section, we have analyzed the curve with Oscilloscope. Now, we are going to use another awesome feature of Proteus i.e.e Analog Graph. We will plot our input/ output curves of Half wave rectifier on the analog graph in Proteus.

    • First of all, remove the oscilloscope from the circuit.
    • Select the "Current Source" and place one probe before the diode and one after it, to get both input and output at the same time.

    • For the output, take the analog option from the graph terminal. Click on the screen where you want the graph. You can make the size of the graph according to your choice.
    • So now you have a blank graph screen. You have to set the parameters, add the trace and then simulate it.
    • So, let’s do it. Left-click on the graph screen will show you this dialogue box. Choose add trace.
    • This will show you the screen where you can add the traces. Once you have added the traces one by one by clicking the required prob, we can proceed.
    • This is the time when you have to edit the graph to show right output. Right click again on the graph screen will let you to see the dialogue box again. This time, you have to choose “Edit Graph”. Choose the value according to need. I am choosing "3m"
    • .So, you have set all the required thing. This is the time to stimulate your graph and see the required result.

    • This is the required result. We give the Input as alternating current, but in the output we got pulsating direct current that flow in one direction.
    • We can maximize the result by right click and choosing “Maximize”.
    • The green one is the input and the output that is in red is the output i.e.  direct current.

    So, that was all. This was the tutorial in which we found what is rectification, what is the use of diode in the rectification, how can we use oscilloscope as well as analogue graph to see the result of rectification. For more tutorials and learning stay tuned with us.

    JRC4558 Op-Amp Datasheet, Pinout, Features, Alternatives & Applications

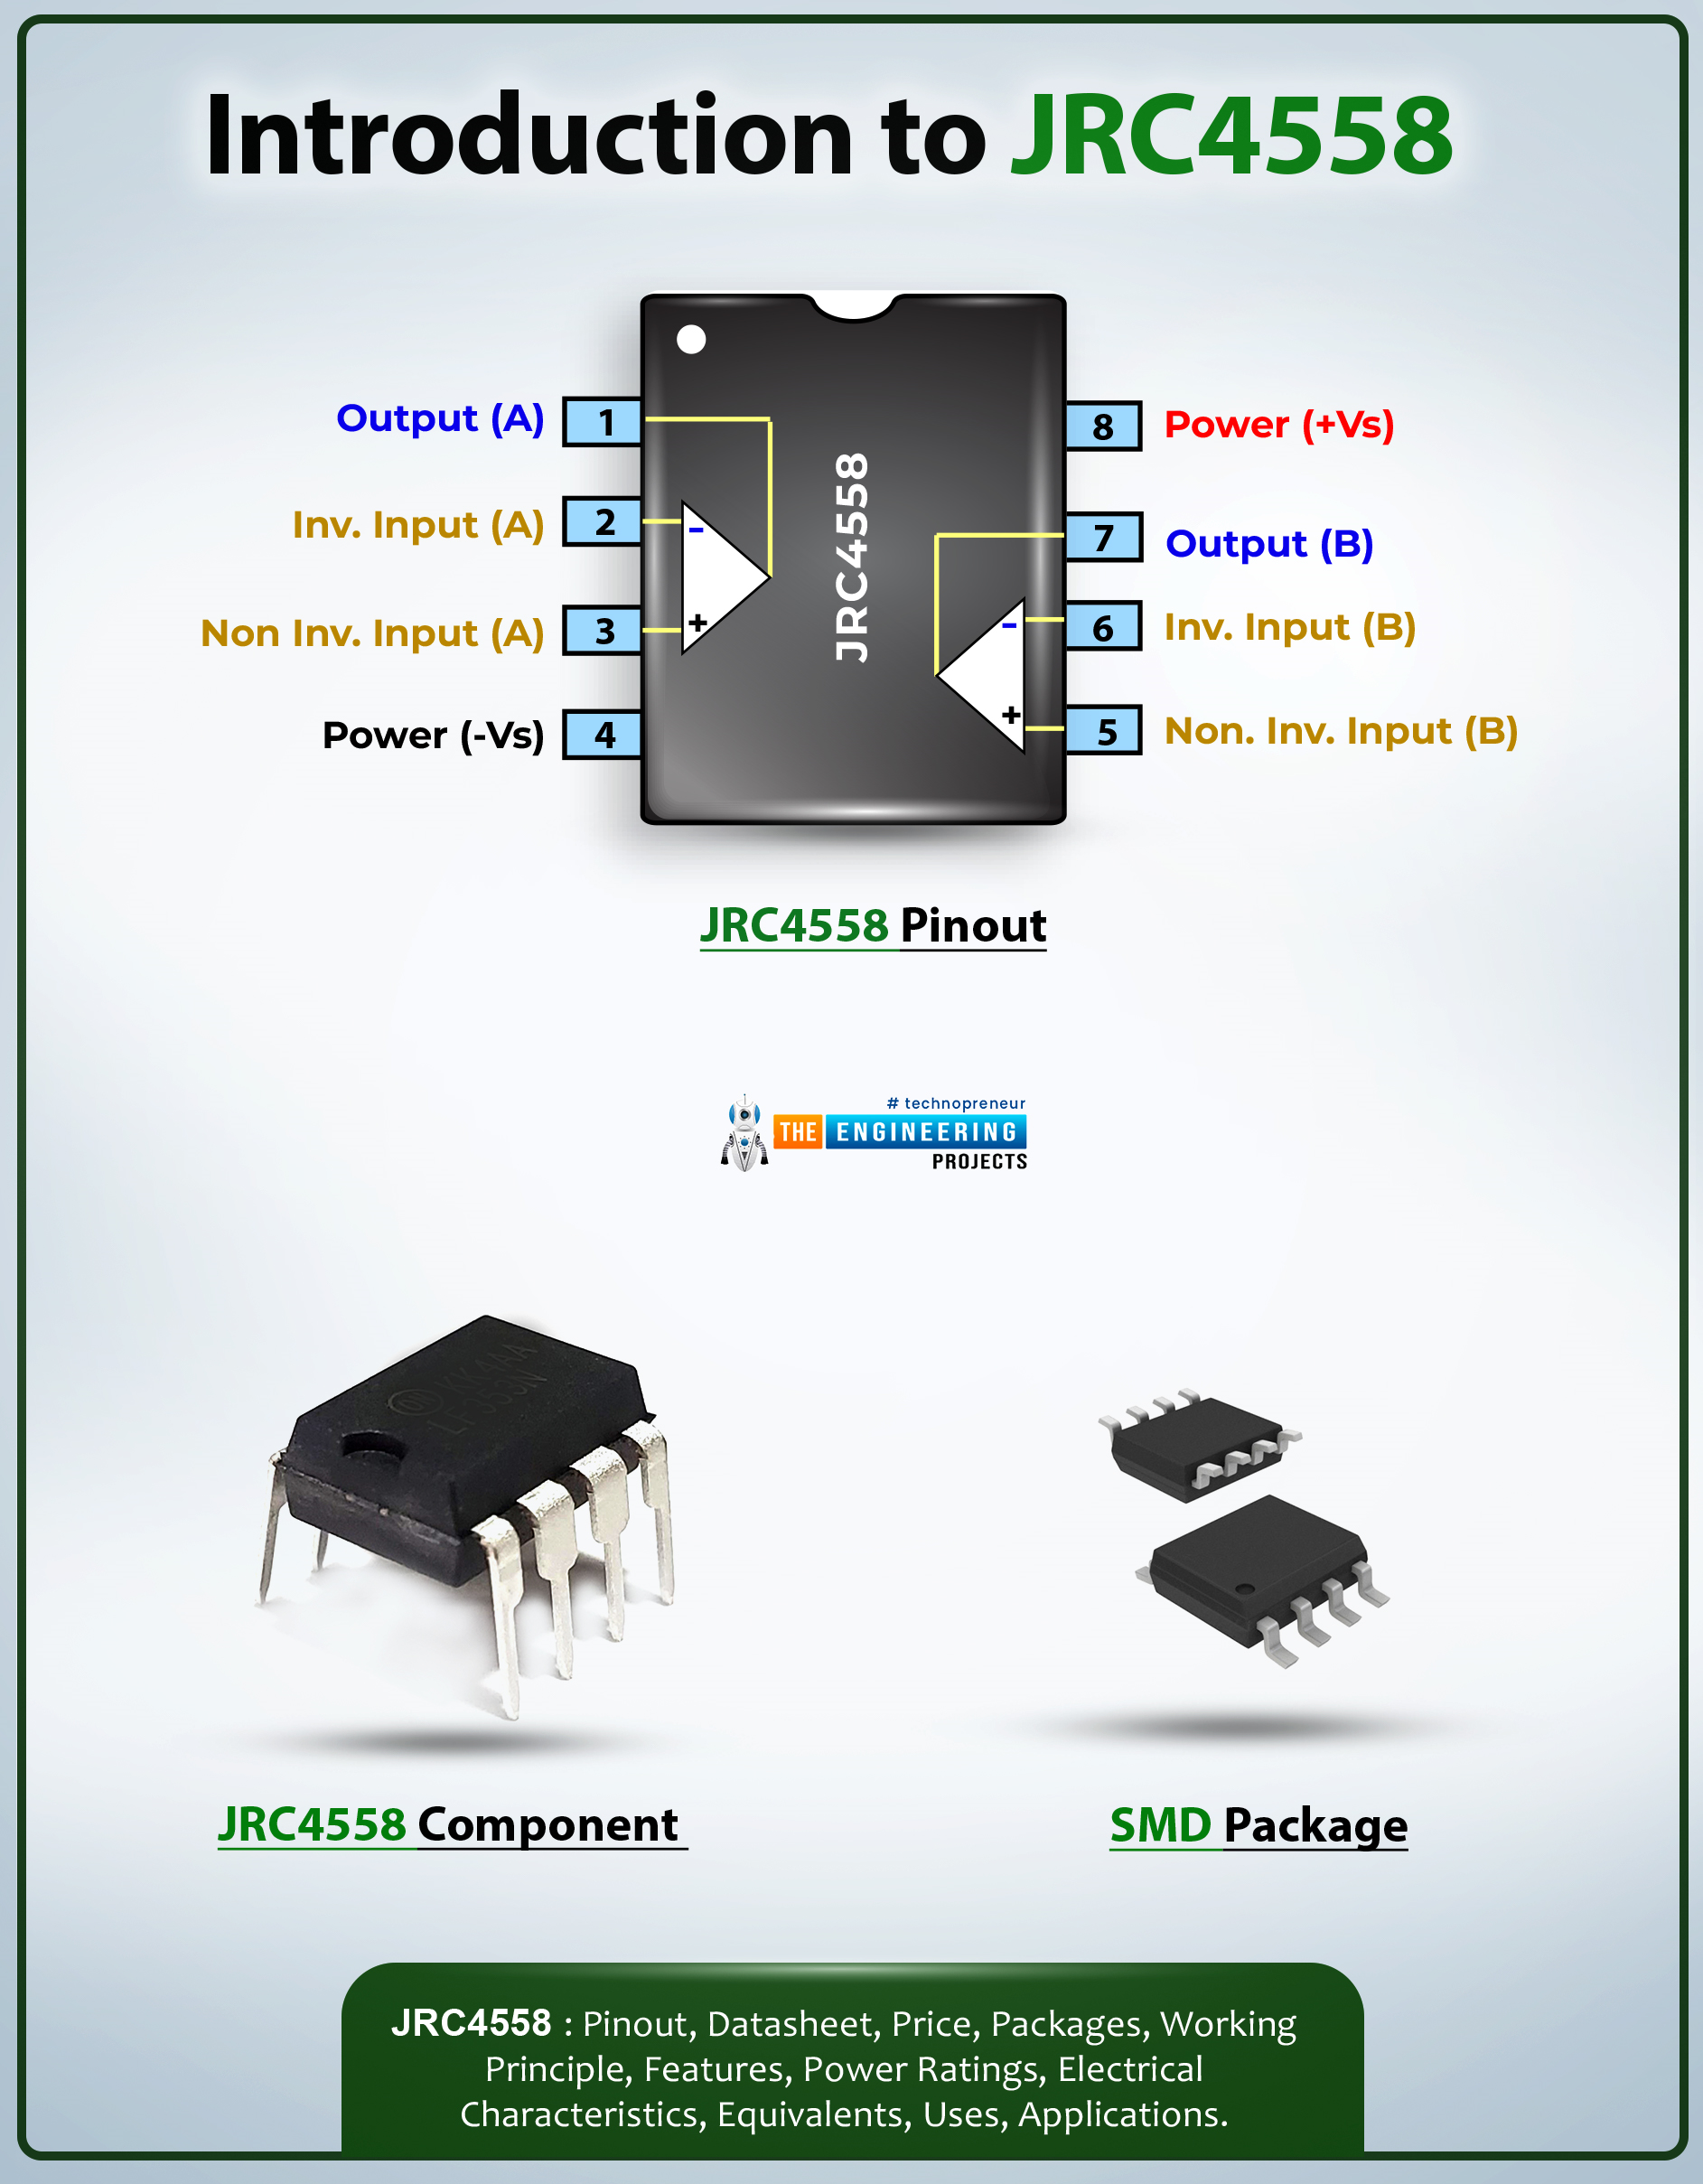
    Hi Guys! Happy to see you around. I welcome you on board. Thank you for clicking this read. In this post today, I’ll walk you through the Introduction to JRC4558.

    The JRC4558 is a single silicon-chip monolithic dual operational amplifier. This amplifier is a high-performance device and is internally compensated. It is widely used in sample and hold amplifiers and pedal circuit designs. The JRC4558 is available with a remarkable input impedance of around 5 MO, a high voltage gain of around 100 dB, and a good slew rate of around 1.7V/µs.

    I suggest you buckle up as I will walk you through the complete introduction to JRC4558 covering datasheet, pinout, features, alternatives, and applications. Let’s jump right in.

    Introduction to JRC4558

    • The JRC4558 is a single silicon-chip monolithic dual operational amplifier that comes with high voltage gain and good input impedance.
    • It is applied in portable instrumentation and Intrusion Alarm Systems.
    • There are a total of eight pins incorporated on the device, where PIN 8 is the voltage supply pin and pin no 4 is the ground pin. And you’ll get two outputs at the same time.
    • There are two inputs i.e. input A and input B and both inputs contain one inverting input (-) with Voltage V- and non-inverting input (+) with voltage V+.
    • The ideal op-amps are different from the real op-amps used in this chip. The ideal op-amp comes with infinite gain while the voltage gain of this device is finite and is around 100dB.
    • The slew rate of this device is around 1.7V/µs which is achieved when the output voltage of the amplifier reaches its maximum rate of change.
    • This chip is incorporated with two independent, good input impedance and internally frequency compensated operational amplifiers that are carefully designed to run over a wide range of voltages from a single power supply.
    • The JRC4558 produces an output signal that is much larger than the potential difference at the input.
    • It is also applied in general-purpose operational amplifier circuits like differential amplification, comparators, and mathematical operations.
    • This device is carefully designed and requires only a 5V standard voltage supply to operate in electronic circuits. You don’t need to include an additional -5V supply to run this device.
    • Moreover, it is also employed in single-supply voltage systems, amplification blocks, and transducer amplifiers.
    • This device is capable of performing two different operations at the same time as it incorporates two op-amps on board.
    • The versatility of this device makes it a good pick for analog circuits.
    • It is widely used in scientific devices and industrial and consumer applications.
    • This device can be used individually or as a component of most complex integrated circuits.

    JRC4558 Datasheet

    Before applying this device to your electrical project, it’s wise to go through the datasheet of the component that contains the main characteristics of the component. Click the link below and download the datasheet of JRC4558.

    JRC4558 Pinout

    The following figure shows the pinout diagram of JRC4558.

    The JRC4558 comes with a total of 8 pins as mentioned below in the table.

    Pin Description of JRC4558
    Pin No. Pin Description Pin Name
    1 The output pin of Op-amp A OUT (A)
    2 The Inverting input pin of the Op-Amp A Inverting Input (A)
    3 The Non-Inverting Input Pin of Op-Amp A Non- Inverting Input (A)
    4 Ground or Negative supply terminal Power (-Vs)
    5 The non-inverting Input Pin of Op-Amp B Reference
    6 The Inverting input pin of the Op-Amp B Output
    7 The output pin of Op-amp B Power (+Vs)
    8 Positive supply terminal +VS

    JRC4558 Features

    The following are the main features of the JRC4558.

    • No. of Amplifiers = 2
    • Voltage Gain = 100 dB
    • Device Slew Rate = 1.7V/µs
    • Input Impedance = 5 MO
    • Available Bandwidth = 3MHz
    • Operating Temperature Max = 70°C
    • Supply Voltage Range = ± 5V to ± 15V
    • of Pins on the component = 8
    • Operating Temperature Min = 0°C
    • Available Package = 8-Pin DIP and SOP Package

    JRC 4558 Alternatives

    The following are the alternatives to JRC4558.

    • LM158
    • LM358
    • LM358A
    • LM2904Q
    • LM158A
    • LM2904
    • LM747
    • LM4558

    JRC4558 Applications

    The JRC4558 is used in the following applications.

    • Applied in Sample and Hold Amplifiers
    • Used in Portable Instrumentation
    • Employed in Instrumentation Amplifiers
    • Used in Long-Duration Timers/Multivibrators
    • Incorporated in Intrusion Alarm System
    • Employed in Photocurrent Instrumentation
    • Used in Comparators and Function Generators

    That’s all for today. I hope you’ve enjoyed reading this article. If you are unsure or have any queries, you can pop your question in the section below. I’d love to help you the best way I can. Feel free to share your valuable suggestions and feedback around the content we share, so we keep sharing quality content customized to your exact needs and requirements. Thank you for reading the article.

    Why EV Pickup Trucks Will Spearhead The Switch To Electric Motors

    Hi Guys! Hope you're well today. Glad to have you here. In this post today I'll detail why EV pickup trucks will spearhead the switch to electric motors. In 2019, approximately 63 percent of Americans looking to buy a car were interested in buying an EV, according to Consumer Reports. The stage is set for major EV manufacturers to contend over the market. Of all body styles, pickup trucks seem to be of particular interest to them. General Motors, Tesla, and Ford are doubling down their efforts in EV pickup design. This is all so that models like the Hummer EV and the Cyber truck can release within the next few years. Trucks are favored for their towing power, traversal abilities, and relatively low need for maintenance. Those are perfect attributes for EV platforms to expand upon. Here are the top advantages EV pickups bring that will let them lead the switch to electric vehicles.

    Pickups Will Make The Switch To EVs More Palatable

    The first and most important reason EV pickups will lead the charge in switching to electric is because they appeal to a wider demographic. At least, that is the case in the United States. The latest data from Hedges & Co. shows that there are almost twice as many pickup owners in America as there are car owners. People from all walks of life find a use for pickup trucks. Hence, capitalizing on pickup trucks will make the switch to electric vehicles more attractive to the common driver. Jessica Caldwell, the auto analyst for Edmunds, says that everyday motorists are the key to bringing the electric dream to fruition, not enthusiasts. They would need to be convinced to change their behaviors to accommodate the differences in operating an electric pickup. But with the benefits that EV engines offer, manufacturers are optimistic that they can be made to see the advantages in making the switch.

    Greater Capacity For Customization And Novel Features

    With so many Americans expressing interest in EVs, selling EV trucks sounds easy on paper. However, General Motors’ Josh Tavel says that it's not as simple as that. The average Hummer buyer, he says, is not buying the truck to have a lower carbon footprint. The target demographic has always been monster truck and military enthusiasts, says Tavel. It has been this way ever since the vehicle first rose to popularity in the late 90s and early aughts. What they are marketing to are the adventurous and outgoing types. This market, GM says, overlaps significantly with engine-savvy car enthusiasts. If they can be made to adopt the electric engine, they can influence everyone else to do so as well. This is why they added some features they know will appeal to vehicle aficionados. These include novel additions such as a crab walk mechanism and intuitive graphic displays. . All these and more can be easily supported by an EV built from the ground up with efficiency as a focal point.

    More Reliability And Power Than Traditional Trucks

    Electric pickups could not have come at a more appropriate time. Nowadays, consumers are clamoring for efficiency and reliability. This is mainly out of concern for the environment. On top of this, however, people also want cars that are simpler to maintain and break down less. Current surveys point to a drastic shift from public to private transport soon. More than 78 percent of commuters will mainly rely on private vehicles for transport from now on. This was according to the 2020 EY Mobility Consumer Index. EVs have fewer moving parts. Thus, they are potentially more powerful and consistently reliable than internal combustion vehicles. Reliability is one of the most prized and sought after traits in trucks, according to consumer truck reviews and rankings.

    Enhanced Performance For Commercial And Recreational Use

    The increased towing power and dependability of EV pickups make them attractive commercial fleet vehicles. The long-range operation of electric trucks is more economical than fossil fuel ones. Headquarters and stop points could be established according to the trucks’ ranges and charging stations set up at these points. This way, refueling can be done overnight at the stops themselves, instead of on the road. A supply line like this can be vastly more efficient in terms of time and energy. As for recreational use, EV pickups can excel at carrying vacationing and camping equipment. This can be of particular appeal to suburbanites, who often vacation by going out into the wilderness to camp and kayak. With a fair number of Tesla owners, they would appreciate being able to do so in an environmentally friendly way as well.  More engine power can allow them to carry more gear, and longer range can let them make better headway before stopping.

    Mutual Benefit For Consumers And Manufacturers

    Auto manufacturers stand to gain much from the demand for EVs, especially in pickups. This is thanks to their high-profit margins and demand. The average price of a full-sized EV pickup is $50,000. Even so, they are easier to maintain and have better long-term performance. This makes them a more sensible long-term investment. Figuring out the right price point is a major point of emphasis for manufacturers. Ken Morris, vice-president of General Motors’ EV and self-driving vehicle division, voiced his views on this challenge. According to him, the tricky part will be to price the trucks low enough to make them preferable over traditional ones, but not so low that it hurts profit. This has turned out to be rather difficult with the 200-kilowatt-hour batteries that EV pickup specifications demand. These would cost $20,000 per unit, which is slightly more expensive than your average economy vehicle. These factors together make it easier for automakers to fund their R&D projects for better EV tech. Even with a higher mark-up, consumers simply accept this as a matter of course for a young technology. And thus, they buy the vehicle anyway. Although controversial, it certainly facilitates the rapid growth of electric vehicles. This growth will likely go faster from here on out. That's all for today. I hope you find this article helpful. If you have any questions, you can approach me in the section below. I'd love to help you the best way I can. Thank you for reading the article.
    Syed Zain Nasir

    I am Syed Zain Nasir, the founder of <a href=https://www.TheEngineeringProjects.com/>The Engineering Projects</a> (TEP). I am a programmer since 2009 before that I just search things, make small projects and now I am sharing my knowledge through this platform.I also work as a freelancer and did many projects related to programming and electrical circuitry. <a href=https://plus.google.com/+SyedZainNasir/>My Google Profile+</a>

    Share
    Published by
    Syed Zain Nasir