Mathematical Operators In JavaScript

Hello everyone, I hope you are fine. In today's tutorial, we are gonna take a look at “Mathematical operators in JavaScript” in detail. Performing math operator in different programing language is very common. JavaScript also allows several operators to help us in numbers.  The mathematical operator in JavaScript is used for performing certain different tasks such as the final price of a financial transaction, browser windows size and calculating the range between the element in a website document.  There are two types of operator that I am going to discuss in this tutorial.
  1. Arithmetic operator
  2. Assignment operator

Arithmetic Operators in JavaScript

To perform an action between two variable or values we use mathematical operators. In the equation 3+2 = 5 (+ is a syntax). Java script has many different operators some are basic math operator and others are additionals operators particular to programming. A table of JavaScript Operators 
Operator Description Example Definition
+ Addition 2 + 3 Sum of 2 and 3
- Subtraction 9 - 2 Difference of 9 and 2
* Multiplication 3 * 2 Product of 3 and 2
/ Division 10 / 5 Division of 10 and 5
% Modulo 9 % 2 Remainder of 9 and 2
** Exponentiation 9 ** 3 9 to the 3 power
++ Increment 9++ 9 plus one
-- Decrement 9-- 9 minus one
  Let me explain to you all of these operators in detail.

Addition and Subtraction in JavaScript

Addition and subtractions are the operators from basic maths. They are used to find the sum and difference of two numerical values.  JavsScript has its own built-in calculator. All these mathematical operators can be directly performed in the console. As you have seen a simple example of addition and now I am going to explain it with detail. Now I will assign numerical values to a and b and place the sum in c
  • Assign the value to a and b
  • Suppose: a = 3;   b = 4;
  • Now add a + b and assign the sum of a+b to c 
  • c = a + b;  alert(c);

Output

   In a similar way, subtraction(-) also work with the same formula but will subtract the number. 
  • Assign the value to a and b
  • Suppose: a = 6;  b = 3;
  • Now subtract a - b and assign the diffrence of a-b to c 
  • c = a - b;  alert(c);
Output We can also do add and subtraction by the float (decimals) and negative numbers. Look below with an example.
  • a = -6.3;  b = 3.5; 
  • Now subtract a - b and assign the difference of a-b to c 
  • c = a - b;  alert(c);
Output There is one another fact about the (+)operator that you should know that adding a numeric number and string.  As we all know that 1 + 2 return the value of 3. But this will have an unexpected result. 
  • Suppose c = 1 + “2”;
  • alert(c)
Output:  The result of this will be 12 because of the one string value(“2”),  javascript concatenate (Concat() function is used to join two or more string together)  it rather than adding 1 and 2. So it is really important to be careful because while coding in JavaScript. Therefore JavaScript is case sensitive language. 

Multiplication in JavaScript

Multiplication (*) and division (/) are also used in Javascript to find the numeric values by division or multiplication.  Multiplication could be used many times like calculating the price of any item etc and division help you in finding the time like the number of hours or minutes.
  • Suppose x = 10; y = 5; 
  • z = x * y;
  • alert(z);
Output 

Divison Operator in JavaScript

  • suppose  x = 100; y=10; 
  • z = x / y;
  • alert(z);
Output 

Modulus in JavaScript

Modulo (%) is used to find the remainder of a quotient after division. It can help us find in that even if the number is even or odd. It is less familiar operator than others. It is also known as Modulus too.
  • Let suppose x = 11; y = 5;
  • z = x % y;
  • alert(z);
Output

Exponentiation in JavaScript

Exponentiation (**) is the new operator in JavaScript. Its calculate the power of a number by its exponent. Its written like this 8^4 (Eight to the 4 power).

  • x = 8; y = 4;
  • z = 8 ** 4;
  • alert(z);
Output 8 ** 4 represents the same as 8 multiplied by 8 four times: 8 * 8 * 8 * 8

Increment and Decrement in JavaScript

The increment operator (++) increase the numerical value of a variable by one and on the other side decrement operator (--) decrease the numerical value of a variable by one. They are often used with loops. You can use these operators with variable only and using them with raw numbers can only result in an error. Look in the example. Increment and Decrement are further divided into two classes: prefix operation and postfix operation. Firstly,  prefix operator. let x = 8; prefix = ++x; alert(prefix); Output

Postfix Operator in JavaScript

let x = 8; postfix = x++; alert(postfix); Output The value of x is not increased in this postfix operator, The value of the x will not be increased until after the expression has been evaluated. But running the operation twice will increase the value. As you can see in the image that I have increased the value of x.       Now see the output. All these increment and decrement operators are used in for loops most of the time.

Assignment Operators in JavaScript

The assignment operator (=) is the most used operator, which we have used already. We used the assignment operator to assign the value to the variable.
//Assign 50$ to price variable Price = 50$
JavaScript also contains compound assignment operators. Let's discuss a compound assignment operator example.
//Assign 50$ to price variable Price = 50$ Price += 5$; alert(price);
The output of this result will be 55$. In this case, price += 5$ is same as price = price + 5$. The arithmetic operator can be combined with the assignment operator to make a compound assignment operator. Down below is a table of the assignment operator.  
Description Operator
Assignment =
Addition assignment +=
Subtraction assignment -=
Multiplication assignment *=
Division assignment /=
Exponentiation assignment **=
Remainder assignment %=
  In this article, we have discussed the arithmetic operator and their syntax in detail. If you have a question regarding this post you can ask me. I will reply to all of your queries. Lastly, thank you for reading this article, and we are working hard to deliver you best content.

While Loop In JavaScript

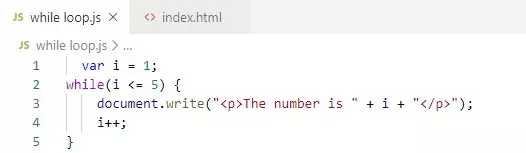
Hello friends, I hope you all are feeling great today. In today’s tutorial, we will have a look at a  detailed “While Loop In JavaScript” topic. It’s our 8th tutorial in JavaScript Series. Loops are used in programming and they offer the easiest and quickest way to do a repetitive task. In this article, we will learn about While and do..while statements as they are the most basic type of Loops.  For example, if we want to display the same line “I am learning JavsScript” 10 times. Then this can be done with the help of loops easily rather than typing long code. It will save your time and energy.

While Loop in JavaScript

In JavaScript, while loops loop through a block of code until the specified condition is true. The condition is evaluated before executing the statement. The syntax of the while loop is very similar to if statement. 
Syntax while (condition) {  // execute this code as long as the condition is true  }
In the following example, we have to take a variable i = 1, and the while condition is that when it executes it should be less than 5. For each iteration of the loop, we will add one number.  Output When we will run the above example, we will receive the following result.

Infinite Loop using While in JavaScript

You might have already the idea what Infinite loop is because of its name. An infinite loop is a loop that will keep running forever. If you make an infinite loop by accident it can crash your browser. So it is really important the awareness of infinite loop otherwise can crash your computer or browser. Look at the example of the infinite loop.
// Start a infinite loop while (true) { // execute code forever }

Do While Loop in JavaScript

We have learned upside about while loop. The while loop will run a block of code until the specified condition is true. Do..while statement is slightly different from while statement, it evaluates the condition at the end of each loop irritation. And do...while condition always executes once even if the condition is never true.

Syntax

do {

// execute code

} while (condition);

I am going to show you the same example with do..while loop so you can understand the difference between them. Output In the following example javascript, we have started variable with i = 1. Now it will print the output and increase the value of the variable i by 1. When the condition will be evaluated loop will continue to run until the variable i is less than 5 or equal to 5. In this tutorial, we have learned about while loop and do-while loop and the difference between them. We also discussed the infinite loop and how it can you save yourself from crashing your browser. This is the last tutorial of loop and if you want to learn more about loops like for...loop, for..in loop and for..of loop then go visit for loop in JavaScript. That's it for today, for more content like this that add value to your life. Keep visiting our website. Comment below if you want to ask anything.

For Loop In JavaScript

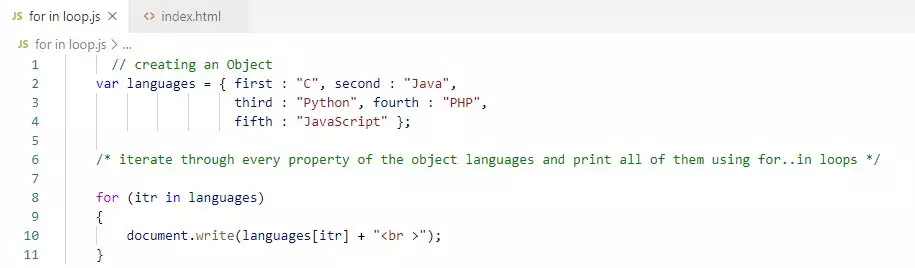
Hello folks, I hope you are doing great in your life. In today’s tutorial, I am going to talk about “For Loop In JavaScript”. This is our 7th tutorial of the JavaScript series.  Loops are designed in JavaScript to automate the repetition task. You may have encountered a lot of time in programming that you have to repeat an action again and again. To help you in reducing the number of lines code and time, loops were created. There are five types of loops JavaScript have:
  1. For Loop
  2. For...In Loop
  3. For...of Loop
  4. While Loop
  5. Do While Loop

For Loop in JavaScript

For Loop will run the same code of block again and again repeatedly, for a specific number of time or as long as a certain condition is met. The For loop of JavaScript is similar to C language and Java for Loop.
Syntax for (initialization; condition; final expression) {  // code to be executed  }
The for loop is the most concise part of looping. There is three expression use in for Loop initialization, condition, and final expression.

For Loop Syntax in JavaScript

  1. The first step is initialization where you have to assign a value to a variable and that variable will be used inside the loop. The initial statement is executed before the loop begin.
  2. The test condition or statement will evaluate that if it is true or false. And if it would be true then the loop statement executes or otherwise, the execution of the loops ends.
  3. The final expression is the iteration statement where you can increase or decrease your statement.
Let me show you a simple example of for loop. As you can see in the image that firstly, we initialize the for loop with let i = 0;. Its means that the loop begins with 0. Afterwards, we declared the condition to be i < 4; means that the loop will continue to run as long as i is less than 3. Our last expression is i++, it will increase by 1 each time the loops runs. Output

Optional Expressions in Javascript For Loop

All of these three expressions in for loop are optional. we can write the for statements without initializations. Look at the demonstration for more clarity.
// declare variables outside the loop var i = 5; for( ; i<10; i++;) { document.write("<p> 'The number is + i +' </p>")  }
Output
  • The number is 5
  • The number is 6
  • The number is 7
  • The number is 8
  • The number is 9
As you can see that it is necessary to put a semicolon ; whether it is empty. We can also remove the condition from the room. For this, we can use if statement combined with a break. This break is for the loop to stop running once is greater than 10.
// declare variables outside the loop var i = 5; for( ; ; i++;) { if(i < 10) { break } document.write("<p> 'The number is + i +' </p>")  }
Output
The number is 5 The number is 6 The number is 7 The number is 8 The number is 9
Never forget to add the break statement. Unless the loop will run forever and potentially break the browser.
// Declare variable outside the loop let i = 0; // leave out all statements for ( ;  ; ) { if (i > 3) { break; } document.write(i); i++; }
Output
The number is 5 The number is 6 The number is 7 The number is 8 The number is 9

For...In Loop

Syntax for (variableName in Object) { statement }
For...in loop is created to help us in providing a simpler way to iterate through the properties of an object. When you will learn about objects, then for..in loop will be more clear to you.  Let me explain it to you with a simple example. Output For..of Loops The for...of statement creates a loop for iterate over iterable objects like arrays and strings. It is the new feature of ECMAScript (or ES), ECMAScript 6.
Syntax for (variable of object) statement
In the following example, we will create a for...of loop. Output In this article, we learn about What are loops and how to construct the For Loops In JavaScript and about for...of and for...in statement. We will discuss while loop and do while loop in our next tutorial. I hope you have found this article informative and learn something new from it. For more tutorial of JavaScript please keep visiting our website. If you have any question related to this tutorial, you can ask in comments and you can suggest any changes you want in the upcoming article. We love to hear your suggestion.

Switch Statement in JavaScript

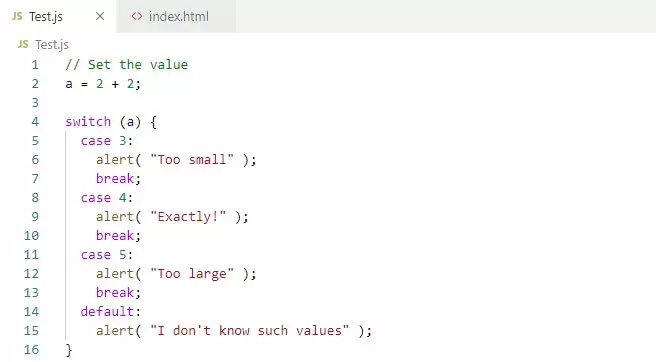
Hello friends, I hope you all are doing great. In today’s tutorial, we will have a look at the detailed “Switch Statement in JavaScript”. It’s our 6th tutorial in JavaScript Series.  As we have learned about the conditional statement and its types (if, if..else, If...else if) in the last article, a conditional statement is the most useful and common feature in the programming language.  Switch is also a type of conditional statement and it will evaluate an expression against multiple possible cases and run one or more blocks of codes base on matching cases. The switched statement work almost as if...else if statement containing many blocks, and it does work so more efficiently than repeated if...else if statements.

Switch Statement in JavaScript

The switch statement is used to perform different action based on multiple cases.  How does switch statement work?
  • Firstly, evaluate the expression once.
  • Value of expression will be compared with each case.
  • If there would be a match, the associated block of code will execute.
Syntax  switch (expression) {         case x:                 // case x code block (statement x)                 break;         case y:                  // case y code block  (statement y)                 break;          default:                  // execute default code block (statement default) }

Break Keyword in JavaScript Switch Statement

As the name says break, When JavaScript reaches the break keyword, it breaks out of the switch block. It will only stop the execution of inside the block. It will continue until reaching the last break case. Eventually, reach the last case and the break keyword will end the switch block. 

Default Keyword in JavaScript Switch Statement

If there is no case match then the default code block will run. There could be only one default keyword in the switch statement. The default keyword is optional, but it is recommended that you use it. Let’s see an example of a switch statement. Firstly, the expression will be evaluated.  The first case, 3 will be tested against the expression. The code will not execute because it does not match the expression and it will be skipped. Then case 4 will be tested against the expression. Since 4 matches the expression, the code will execute and exit out of the switch block.  And your output will be displayed like this. Output Let’s make another example of a working switch. In this example, we will find the current day of the week with the new Date()method and getDay()to print a number equivalent to the current day. 0 stand for Sunday, 1 stand for Monday and then throughout till Saturday with number 6. OutPut This code was tested on Monday that’s why it is displaying Monday. But your output would be change depending on the day you are testing. I have added default too in case of any error. 

Multiple Cases in JavaScript Switch Statement

There is a chance that you may face a code in which you have to display the same output for multiple cases. So, we have made an example for you to understand these multiple cases.  In this example first, the new Date() method will find a number compared to the current month and then apply the month variable. Output In today tutorial, we review about the switch, and how it is similar to if..else if statement. We reviewed the switch statement with three different examples.  To learn more about JavaScript you can read these article series from the start. I am sure these will help you and if you have any question regarding this article. You can comment down below and ask anything.  Thank you so much for reading this article and we are doing our best to deliver you our best. Please visit again. See you in the next tutorial.

If Else Statement in JavaScript

Hello everyone, I hope you are having a fine day. In today’s tutorial, I am going to discuss the if-else statement in JavaScript  and what are conditional statements in detail. In programming, while writing a program there may be an occasion where you need to adopt one out of a given set of paths. In such a case, you need to use conditional statements that allow your program to make the correct decision.

Conditional statements 

Conditional statements are used to run a specific action based on the result of the different conditions (true or false). If the condition would be true one action would be performed and if the condition is false then another action would be performed. A few examples of JavaScript conditional statements:
  • Verify the location of the user and display the language based on the country
  • Send a form on submit, display a missing required field warning next in the missing field.
  • Show a booking form for a bus ticket but not if the bus is booked.
We have the following conditions in JavaScripts.
  1. if statement
  2. if...else statement 
  3. if...else if statement

If Statement in Javascript

If statement plays a very important role in JavaScript to make decisions. It will decide whether the statement is true or false and only run if the statement is true. Otherwise, the code block will be ignored if the statement is false. 
Syntax if (condition) { // block of code that will excute if the condition is true }
Note: if is a lowercase letter and If or IF will cause a JavaScript error. A simple example to see how if statement work in javascript. Let’s suppose you are going to pay your electricity bill through an app where you have a certain amount of money already in your account. Your account money is 5000 and you have to pay the electricity bill of 700. Using the <= help you in finding that whether you have less than or equal to electricity bill money available to pay it. Since the Electricity_bill <= money evaluates to true. The code will run because the condition is true. output See another example, in case you have less money than your Electricity_bill. This example does not have any output because of Electricity_bill <= money evaluated to false. Now the code block will be ignored and the programme will continue on the next line. And there will be nothing in output.

If Else Statement in JavaScript

In if statement code only proceeds when the condition is true but in the if-else statement whether the condition evaluates true or false it will execute.
Syntax if (condition){ // block of code that will execute if the condition is true } else { block of code that will execute if the condition is false }
As an example, to find out an even or odd number. Output Since the condition of if is not true then code moves to the else statement and execute it.  if-else condition is more common than only if condition. It can help users in giving warning and letting them know what decision they should make. 

IF Else If Statment in JavaScript

If you want to check more than two conditions than you can use if...else if statement. With if...else statement, you can find out that if the condition is true or false. However, sometimes we have multiple possible conditions and outputs and needed more than two options. For that purpose, we can use if...else if statement.
Syntax if(condition a) { // block of code that will execute if condition a is true } else if (condition b) { // block of code that will execute if condition b is true } else if (condition c) { // block of code code that will execute if condition c is true } else { // block code that will execute if all above conditions are false }
There is no limit for else if statement, you can add as many as you want but there is a switch statement that would be preferred for readability. Let's see a simple example of checking grade of students based on numbers out of 100.   Output This tutorial provided a brief overview of conditional statement, if, if..else and if...else if statement that you can use in JavaScript. To learn more about JavaScript from the first article you can read  Introduction to JavaScript. Thank you for visiting our website. You have any question regarding this post feel free to comment below and ask any question related to this post. We are looking forward to hearing from you.

Variables In JavaScripts

Hello everyone, I hope you are having a good day. In today's tutorial, I am going to tell you about "Variables in JavaScript". The topic, I am going to highlight today, is how to declare variables in JavaScript and types of Variable? JavaScript has variables too as many other programming languages, so let's get started with it:

What are Variables In JavaScript

Variable means anything that can vary(change). In JavaScript, Variable holds the data value, in simple words, JavaScript variables are containers and can store the data value. Variable in JavaScript are declared with var (reserved keyword).
  • It is the basic unit for holding or storing the data.
  • A variable value can change at any time.
  • Variable must have a unique name.
Syntax

var (Variable-Name) = value;

Variable declaration
  • var number = 5; // variable store numeric value
  • var string = "Hello" // variable store string value
In this example, we have declared two variables using var: number, string. we have assigned each variable a different value. The data value of the number is '5' and string data value is 'Hello". Let's have a look at few other examples: In this  picture, you can see that
  1. x store the value of 9
  2. y store the value of 2
  3. z store the value of 7
  • JavaScript is a dynamically typed language. In simple words, Its data types are converted automatically as needed during script execution.
  • For example in c# language, we have to create an integer variable to use for numerics.
int X = 5;
  • To create a string variable we use string keywords
String str = "Learning"
But in JavaScript, Variable will be automatically detected and you don't have to define their data type that if they are integer or string etc.
var myVarname = 10; alert(myVarname); myVarname = "This is a string value"; alert(myVarname)
Look in this above example, in the beginning, myVarname variable is treated as int numeric type and with alert. Following that, we have worked on myVarname again as a string and showed it. May you have noticed that we have not defined their data types.

How to Declare A Variable in JavaScript

Storing the value of a variable is called variable initialization. You can store the value of the variable at the time of variable creation(in other word declare) or later when you need to call that variable. Example:
var name = "Justin"; var salary; salary = 10,000;
You can create a variable or declare the value of the variable later as you can see in the example. Although you can also do variable initialization too. You can declare multiple variables with the single var keyword without storing the value.
var age, height, class, name;
How you can declare a variable in JavaScript with examples
// initializing variable var x = 5; var name = "Adam";
// declaring single variable var name; // declaring multiple variables var age, height, class, name;

Types of Variables

These are two types of JavaScript variables.
  • Local Variables - Local variable will be visible in the only function or block where you have defined it. Function parameters are local to that function and can't define anywhere in the JavaScript.
  • Global Variables - Global variables are variables that will be only visible in a function where it is defined and can be defined anywhere in the javascript.

Things That You Should Keep In Mind

  • Variables can only store a single value of data that can change later.
  • All the variables can only be defined using a var keyword. Variables declared without var keywords becomes global variables.
  • Multiple variables can be declared in a single line like var age = 10; name = "ali"; class = 3;
   JavaScript Reserved Word
These are all the reserved words of JavaScript. All of them can not use as JavaScript Variable, function, loop labels, method or any other objects name.

  JavaScript Reserved Word

abstract

throws catch var implements
Else native final protected delete
instanceof false new function volatile
switch case transient continue return
boolean throw char typeof if
enum long finally private default
int extends null for void
synchronized byte true const public
break this class try goto
export interface float package debugger
goto public void default if
return volatile delete implements short
while do import static with
double in super
  I have explained every point in detail. We hope you understand it clearly. But if you have any question related this topic you can comment below. We will reply to your message. Thank you so much for reading this article and we are looking forward to share the best content with you. Keep reading JavaScript tutorial. We have covered every topic in this  series.

Basic Syntax And Rules In JavaScript

Welcome back, guys! I hope you are well and having a great day. In today's tutorial, I will discuss the new topic "Basic Syntax and Rules in JavaScript". Learning grammar for a spoken language is necessary before you start writing it. There are rules and regulations you have to follow to write. Similarly, all programming languages have their grammar/syntax and rules which you have to follow in order to execute.

JavaScript Is Case Sensitive

  • JavaScript is case sensitive programing language. Therefore variables, function names, language keywords and any other identifiers must have written with a consistent capitalization of letters.     
Let me show you an example. 
  • In this statement "alert" is case sensitive and if I change the first letter of "alert"  "A".
Alert(“I am learning JavaScript”);
This code sample has uppercase "A" and instead of printing the expected "I am learning JavaScript". The error will appear (alert is not defined) and code would not run. So it is important to be careful with syntax.  Here are some rules you should keep in mind. 
  • JavaScript keywords such as if, for and alert are always lowercase.
  • Built-in objects such as math and date are uppercase or capitalized.
  • DOM(Document Object Model)  are usually lowercase but the methods are often a combination of lowercase and uppercase.
Variable, Function & Objects Name
  • You can define or name your own variable, function and objects.
  • There is no limit in choosing their name you can use uppercase, lowercase and underscore(_) or Numbers.
  • The name must begin with letters or underscore and it can't start with a number i.e getAgeBy_Name,  getHeightUnder_2
  • There is no limit for you in choosing a variable name with uppercase or lowercase, as I told before JavaScript is case sensitive: age, Age, AGE will be considered as three different variables.
  • So make sure to use the same variable when calling it or referring.
  • Most of the code in JavaScript is a statement. Like, this is a statement of JavaScript.

alert(“I am learning JavaScript on https://www.theengineeringprojects.com/”); 

  • Statement can be used to change the color of webpage, background or position of picture etc
  • Always put a semicolon at the end of the statement because each statement in JavaScript ends with a semicolon.
  • White space is not sensitive. You can add spaces and line-breaks as much as you want.

Syntax of JavaScript Comment

The syntax of comment is similar to CSS. JavaScripts comments are used to explain or understand the code, and to make it more readable. Suggestions or warnings can help the end-user too.  With the help of comment, you can stop code from execution while running or testing alternative code. There are two types of comment in JavaScript.
  1. Single Line Comment
  2. Multi-Line Comments
Single Line Comment
Single line comment represents double slash forward (//). You can use it before and after the code.  When you add these two forward slashes (//), all of the code/text to right of them will be ignored. You can see an example in the below picture.
Multi-Line Comment
The multi-line comment is more convenient than single-line comment, you can use it as a single line comment and multi-line too. Multi-line comment represents forward slash with stearic /* and end with a stearic forward slash */.
/* Your comment here */
You can out a segment of code by adding multi-line comment in it. You can look in the image for more detail. These are so helpful in coding.  You can add any comment at any time as you want for your preference. Look in the below image for a more clear example. It is really important for a JavaScript developer to know how JavaScript program executes internally. The code in JavaScript executes from top to bottom. If you want some particular statement to perform in order then you have to write it with a specific order.
Data Types in JavaScript
There are three data types in JavaScript.
  • Number: Number represents all the integer, decimal  and float type etc. i.e 4, 4.345
  • Boolean: Boolean is going to store if the statement is true or false. True/false
  • String: String should be either in a single quote or double-quotes. "I am learning Js" 'Mystring'

Google Chrome Development Tool

  • Google developer tool is available in the google chrome browser. Since you all know the google chrome browser already. So move forward.
  • Hence, all you have to do is press f12 in your google chrome browser.  It will bring a tab like this as you can see on the right side of the Image.
It will take you to the element bar, you can go to the console bar by clicking on it.
  • Element tab shows the HTML of the page.
  • You can open the Javascript file further by right-clicking on it and go down the “open link in resources panel”
  • In the resources panel, you can see the javascript file.
In console Panel, you can type live Javascript in the browser and test it. I will show you with example.
  • Open a new tab in your browser and press f12.
  • Now go in console tab and type this code:
    alert("I am doing this alert form in console");
    And press enter. Then the dialogue box will appear instantly. Don’t worry about this “undefined message”.
  • You can type different numbers in here and get your result, addition, multiplication, subtraction and more. See in the image.
  • Now go back in element tab and you can see the console panel in the last. Look in image:
  I hope you have understood the basic syntax and structure of JavaScript. In the next tutorial, I am going to share more detail of JavaScript. If you have any question related to this topic, comment below. I will answer you immediately.  Thank you so much for reading it and keep reading more article and grow your knowledge in coding. If you want to learn any other language comment below. We will make sure to share those languages with you too.

How to Include Javascript Code in HTML Page

Hello, I hope you all are doing well. In the previous tutorial, I shared a detailed introduction to JavaScript, where we discussed the basics. Today, I am going to tell you in detail How to Include Javascript Code in HTML Page and many more things that can help you understand JavaScript easily.

All right guys let's revise what we have learned in the past article, you saw me adding script & /script code at the bottom of the tags. Today, I will show you in detail what was the reason for adding the tags at the bottom and how can you add an external JS file. If you want to be an expert programmer, you should have a look at this Oracle Java Certification , it will surely excel your programming skills.

How to Include Javascript Code in HTML Page

We have two methods to include the JS code in the HTML file.

  • Put the script tag in the HTML head or body with the Javascript code

script type="text/javascript"

alert("I am learning JavaScript");

  • Put the script tag in the HTML head or bottom of the body with the src attribute to the JavaScript file location.

script type="text/javascript" src="Test.js" /script

Best way to include JavaScript Code in HTML

  • You can add a script tag in the head section of your HTML file, at the start of the body tag and also at the bottom of the body tag.
  • But I would advise you to add it at the end of the body tag. I will show you, why it should be at the bottom of the body tag.
  • The HTML page always loads from top to bottom & if your JS file is present in the head or opening of the body tag, then the browser will run JavaScript first, before loading any of the content and it will leave a negative impact on your webpage.
  • As you can see in the below image, I have added a script tag at the start of the body tag and added a new tag of h1 and p to know how the code works.
  • Save these files and press ALT + B to execute this code.
  • You will notice that only the script tag alert comes up first without loading the rest of the page.
  • But once I click on ok then it has loaded the rest of the page now, as indicated in the image here:
  • If I put the script at the bottom of the body tag and you can see image down:
  • Now save it go again to the browser and reload the page.
  • Content will appear first and then we will have the alert form.
  • So, placing JavaScript code at the end of the body tag is the best way.

Where To Add Your JavaScript File

So, short scripts like this can be added at the bottom of the body content in HTML pages. In case, your JS content is large, has more than 10 lines of code and is full of links here and there.

  1. It would not mess up your HTML file content page.
  2. You have to update it once if you are using multiple pages.
  3. It would make your code easy to read and clear.

It's time to show you how to do this. 

Create a new file by pressing Ctrl + N and add your script alert("I am learning JavaScript"); content in this file. Save it with the name "Test.Js". All JavaScript files have a JS ending.

Now go back to the "index.html" file and add the code as you see down. When you refresh the web browser then it will automatically reload and JS file through the source code. Look down the image.

Here is a little preview of what we have done. If you have a small script then you should definitely include it in the HTML file at the bottom of the body tag. Otherwise, externalize it and add it in a separate file as I have shown you before in images. 

That’s it for today. I hope you understand it and if you have any questions related to this topic. Let me ask in the comment section and I will answer you. Take good care of yourself and see you in my next tutorial. Have a nice day!

What is a Thermal Flow Meter and How Does It Work?

Hello friends, I hope you all are doing well. In today's tutorial, I am going to discuss What is a Thermal Flow Meter and How Does It Work? Let's begin! Thermal flow meters' main principle is to use the heat conductivity of both gases and liquids to determine its mass flow. Unlike flow meters that determine the volumetric flow rate like turbine flow meters or purge flow meters, thermal flow meters are resistant to temperature fluctuations and pressure of the substance’s pressure. This type of flow meter can also be used for measuring gas and airflow. Thermal flow meters have varying designs that are made specifically for different situations. A few of these designs have high-pressure and high-temperature features that are more capable of dealing with these specific cases.

How Does a Thermal Flow Meter Work?

Thermal flow meters, using the thermal properties of the substance, measure the flow of a fluid flowing inside a duct or a pipe. Typically, a thermal flow meter introduces a specific amount of heat to its sensor. Some of the heat dissipates, and as the flow increases, the more heat will be lost, which will then be picked up by the sensor. With this data, the measurement of the fluid flow will then be determined. The amount of heat that is lost in the fluid depends entirely on the design of the sensor used in the flow meter and the fluid’s properties, especially its heat conductivity. In most applications, the thermal properties of the liquid measured can vary in temperature and pressure. These varying factors are too small to make any changes in the overall measurement. In most cases, the temperature and pressure have a fixed value. Thus, thermal flow meters can easily measure the mass flow as it is not dependent on these factors. However, there are also times when the thermal properties of a substance can solely be dependent on the substance’s composition. This can change the outcome of the result, which, in turn, can affect the measurement of the flow rate. With that said, the flow meter supplier needs to know the composition of the fluid so that the calibration factor will be efficient in measuring the liquid. Because of this reason, thermal flow meters are mostly used to measure pure gases. The flow meter must have the calibration appropriate for a specific substance. But, if the material has a different composition, the accuracy of the measurement will be significantly affected. But where can we find flow meters for sale? Flow meters for commercial and industrial purposes are commonly available on hardware centres or shops that sell hydraulic products. These meters can be bought online too as there are online retailers that sell such products.

Principles Used in Thermal Flow Meters

When fluid enters the pipe and comes in contact with a heated object, the fluid takes away some of the heat, which will then make the fluid more heated in turn. This is the main principle that the thermal flow meter uses to determine the mass flow. Thermal flow meters can be divided into two groups:
  • Temperature difference measurement method: A heater will be introduced in the stream and will be measured at two points, both upstream and downstream. The difference in their results will be used to determine the flow. This is more applicable when dealing with low flow pressure.
  • Power consumption measurement method: Just like the other method, it introduces a heater that will put two points in the stream, both upstream and downstream. However, the heater will maintain a fixed difference in temperature, and the amount of power that is needed to do that will be the main variable in determining the flow rate.

Applications of Thermal Flow Meters

To avoid damaging the sensor of the flow meter, it shouldn’t be used to measure abrasive and corrosive fluids. Also, avoid introducing a substance that can coat the sensor of the flow meter as it can affect the relationship of the thermal properties of a liquid and the flow meter, thus harming its measurement. When the sensor gets coated too much, it can be rendered as inoperable. Therefore, you should thoroughly clean it first before going on another operation. Having a different percentage of the individual components in the fluid’s composition that varies from the calibrated values can cause inefficiency and inaccuracy in the flow meter’s measurement. That said, thermal flow meters aren’t applicable in measuring substance that has a varying composition. Mostly, thermal flow meters are used to measure clean or pure gases like nitrogen, air, hydrogen, ammonia, and other industrial substances. Other fluids with a mixed composition like biogas flow and flue stack flow can still be measured, as long as their structure has been known beforehand. One advantage of thermal flow meters is that it measures the fluid using its thermal properties independent from its gas density. Also, when dealing with corrosive or abrasive fluids, it must be emphasized that the composition of the said fluids should be known beforehand to avoid damaging the sensor, which can lead to inaccurate measurements. They are also used in petrochemical and chemical plants, to the condition that the gases that will be measured have information of the composition beforehand.

Advantages and Disadvantages

  • The advantages of thermal flow meters include its ability to detect and measure different gases, not having any pressure loss, and its ability to measure gas flow with known variables.
  • Its disadvantages are difficulty in calibrating to match the composition of the fluid that will be measured, errors that might manifest when the temperature of the fluid changes drastically and being inoperable when a composition buildup occurs in the sensor.

Takeaway

Thermal flow meters are one of the most preferred metering systems by many industries. It represents more or less 2 percent of the sales in flow meters in the global market. Unlike other types of flow meters that calculate the volumetric flow that requires the mass density, pressure, and other factors to measure, thermal flow meters can directly provide mass flow measurements. Usually, thermal mass flow meters can measure and control the mass flow at a molecular level and offers a reliable and accurate analysis that is required in industrial plants. I hope you understand all the points of thermal flow meter and how its work if you have any question related to this you can comment below and ask us. We will answer your queries. Thank you for reading it.

How to Streamline Your Contract Management Process

Hi Guys! I hope you are doing great. In today's tutorial, we are going to discuss how to streamline your contract management process with detail. Running a business involves maintaining a lot of processes. From developing a new product or service to updating your company website, every decision or change your business chooses to undertake can involve many more steps than you realize.

What Is Contract Management

Contract creation and management are some of these necessary processes that your company will have to take on eventually. It can quickly become messy, having to juggle lots of different parties, needs, and obligations. Not knowing how to navigate through the process can lead to bottlenecking during certain stages. One of the top contract management best practices is streamlining your contract management process.  Streamlining your contract management process will not only make things operate much faster but also ensure that nothing crucial gets missed along the way. With so many legal technicalities that could get missed throughout the lengthy process, it is absolutely critical that your process is as streamlined as possible.

Create Contract Templates For Future Use

Before you even engage in the contract creation process, one great tip for time-saving is to draft contract templates for different uses. This is one of the most common contract management best practices that any relevant business will tell you. By standardizing certain clauses, phrasing, and structures for different contracts, you will save a lot of time later on. 

Centralize Your Contract Documents 

Having your files, notes, and templates scattered across different file cabinets, cloud sharing locations and personal folders can really slow down your contract management process. If every time someone working on the contract needs 10 to 15 minutes to gather the contract file and relevant documents, that can lead to a huge bottleneck. Especially in stages of the process where lots of different parties need to be consulted (like the authoring and approval stage), it is important to keep all the files, documents, and templates in a central, easily accessible location.

Outsource Tedious and Manual Work

The global market for outsourced services is huge. Businesses who are finding themselves overwhelmed with copious amounts of reviews, data collection and analysis when creating contracts would be wise to look to outsourcing as an option.  Of course, you can’t outsource a lot of work that goes into a contract. Third-party companies will not understand the needs of your company as well as you and your team do. However, outsourcing legal analysis and review to a legal services provider may be cheaper than sending that work to your in-house legal team. Depending on the importance, confidentiality, and complexity of the contract, you will have to weigh the risks and costs that go with outsourcing. However, it’s good practice to keep this option in mind.

Re-evaluate Your Company’s Approval Process

Getting the appropriate approvals from the right departments and teams is one of the most time-consuming steps in contract management. Approval and authoring both involve getting the contract in front of many different pairs of eyes. This goes back to the previous tip: having the contract in a centralized location and not in some many random email threads and personal hard drives will make sending the document for approval much easier.  Automating approval workflows is a common solution to this problem that contract management software usually employ. They will automatically send a contract to the right people right after the previous steps have been completed and certain criteria met. Most people know that a company’s senior management usually has their hands full with other things, so approving a contract may easily get lost in all the emails and meetings. Making sure that the contract is in front of the right people, ready to be reviewed right when it’s done is the main function of these automated approval workflows. I hope you have learned from this article that how to stram lin your project and if you have any question related to this article you can ask in comments. Thank you so much for taking time out of your busy schedule and reading it.
Syed Zain Nasir

I am Syed Zain Nasir, the founder of <a href=https://www.TheEngineeringProjects.com/>The Engineering Projects</a> (TEP). I am a programmer since 2009 before that I just search things, make small projects and now I am sharing my knowledge through this platform.I also work as a freelancer and did many projects related to programming and electrical circuitry. <a href=https://plus.google.com/+SyedZainNasir/>My Google Profile+</a>

Share
Published by
Syed Zain Nasir