Reading Data from Firebase Database with ESP32

Internet of Things is a system of multiple inter-related computing devices. The factor ‘thing’ in IoT is designated to an entity capable of communicating data over a network (IOT), which can be a digital machine, sensor, human being, animals etc. Each component that is included in IoT network is assigned with an unique identity called UID and the ability to communicate data over IoT network without any external human or computer intervention.

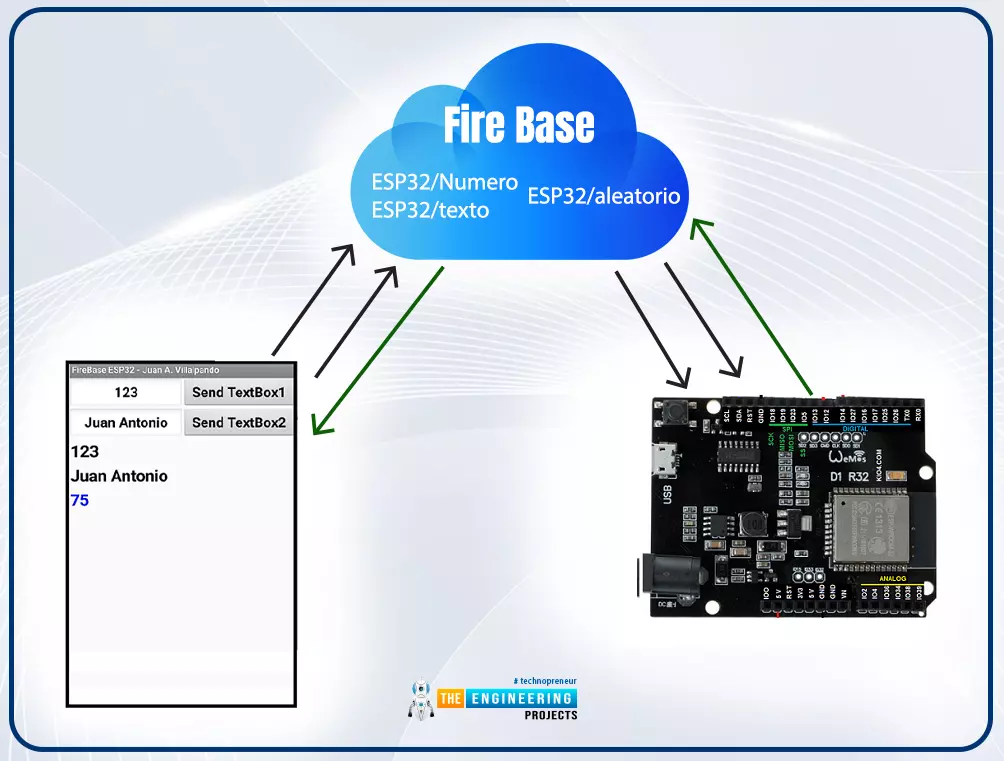
Hello readers, I hope you all are doing great. In our previous tutorial, we discussed how to upload data to Firebase Real-time Database using ESP32. In this tutorial, we will learn how to read the data stored on the Firebase Database with ESP32.

We can access the data stored in Firebase database from anywhere in the world, which makes this preferable in IoT applications.

Where To Buy?
No.ComponentsDistributorLink To Buy
1ESP32AmazonBuy Now

Project overview

In our previous tutorial, we learnt how to upload an integer value (for demonstration) to Firebase real-time database. So, in this tutorial we will learn how to fetch or receive those integer values from Firebase database.

To access real-time data, we are using two ESP boards where one is used to upload/store the real-time data to the Firebase database and another to read the data stored on the firebase.

Although, it is not required to use two ESP boards, we can also access the previously saved data on the Firebase database with only a single ESP32/ESP8266 board.

We can use the same code for both ESP32 and ESP8266 but we need to make some changes like some of the libraries will be different for ESP8266 and the selection of ESP8266 development board while uploading the code with Arduino IDE.

Fig. 1 Reading data from firebase

Firebase

Google's Firebase real-time database is a development platform that includes a number of services for managing and authenticating data.

Firebase is a mobile and web app development platform (that also works well with Android APIs) that includes features such as Firebase Cloud, real-time data, and Firebase authentication, among others.

According to Firebase's official documentation (https://firebase.google.com/docs/database), when a user creates a cross-platform application using JavaScript SDKs for Android or Apple, all clients share a single database.

Fig. 1 Firebase Real-time database and ESP32

The following are the main features of the Firebase Real-time database:

  • Firebase applications remain responsive even when they are not connected to the internet. If any changes were missed while in offline mode, they will be automatically synchronized once connectivity is restored.
  • Unlike hypertext transfer protocol requests, Firebase RTDB uses data synchronization to update changes in the database within milliseconds, making it easier to access the database from a web browser or a mobile device.

Firebase in IoT:

The Internet of Things, also known as IoT, is the interconnection of physical objects or devices with sensors and software accessing capabilities in order to communicate data or information over the internet.

We need an interface medium that can fetch, control, and communicate data between sender and receiver electronics devices or servers in order to build an IoT network.

The Firebase real-time database gives you a place to store data from sensors on your level device. With Android APIs, Firebase performs admirably.

Firebase is especially useful for storing data from sensors and syncing it between users in real-time in data-intensive Internet of things (IoT) applications. For the sake of simplicity and clarity, we can say that it is a Google cloud service for real-time collaborative apps.

Components required:

  • ESP32 development board
  • Arduino IDE for programming
  • Firebase account
  • Firebase API key and project URL

Programming with Arduino IDE

We are using Arduino IDE to compile and upload code into the ESP32 module. You must have ESP32 board manager installed on your Arduino IDE to program the ESP32 module. To know more about Arduino IDE and how to use it, follow our previous tutorial i.e., on ESP32 programming series. The link is given below:

https://www.theengineeringprojects.com/2021/11/introduction-to-esp32-programming-series.html

Steps to add the necessary libraries in Arduino IDE:

  • Go to Tools >> Manage Libraries.

Fig. 2 manage libraries

  • Search for the Firebase ESP Client library in Library Manager and click Install.
  • We are attaching an image, where we are installing the Firebase ESP-Client (2.3.7 version) library.

Fig. 3 Install Firebase ESP Client Library

Firebase API key and Project URL

We have already posted a tutorial on our website on getting started with Firebase real-time database and how to post or upload data to Firebase database from ESP32. Where we discussed, how to create a project on Firebase real-time database, authentication, how to access the API key and project URL etc.

So now we do not need to create a new project, we are using the same project and hence same API key and project URL to read or download the data from Firebase real-time database.

  • To access the project API key, go to Firebase website and open the project you have created.
  • Go to left sidebar >> setting >> project setting and copy the Web API key.
  • Paste that API key in your Arduino IDE code.

Fig. 4 Project Setting

Fig. 5 Project API key

  • Got to Real-time database on left sidebar and copy the project URL.
  • Paste the project URL in your Arduino IDE code.

Fig. 6 Project URL


Code

//--add necessary header files

#include <WiFi.h>

#include <Firebase_ESP_Client.h>

#include "addons/TokenHelper.h" //Provide the token generation process info.

#include "addons/RTDBHelper.h" //Provide the real-time database payload printing info and other helper functions.

// Insert your network credentials

#define WIFI_SSID "ssid"

#define WIFI_PASSWORD "password"

// Insert Firebase project API Key

#define API_KEY "replace this with your project API key"

// ----Insert real-time database URL

#define DATABASE_URL "replace this with your project URL"

//Define Firebase Data object

FirebaseData fbdo;

FirebaseAuth auth;

FirebaseConfig config;

unsigned long sendDataPrevMillis = 0;

int read_data;

bool signupSuccess = false;

void setup() {

Serial.begin(115200);

WiFi.begin(WIFI_SSID, WIFI_PASSWORD);

Serial.print("Connecting to Wi-Fi");

while (WiFi.status() != WL_CONNECTED) {

Serial.print(".");

delay(200);

}

Serial.println();

Serial.print("Connected to... ");

Serial.println(WiFi.localIP());

Serial.println();

// Assigning the project API key

config.api_key = API_KEY;

//Assign the project URL

config.database_url = DATABASE_URL;

/// check signup statue

if (Firebase.signUp(&config, &auth, "", "")) {

Serial.println("ok");

signupSuccess = true;

}

else {

Serial.printf("%s\n", config.signer.signupError.message.c_str());

}

// Assign the callback function for token generation task

config.token_status_callback = tokenStatusCallback;

Firebase.begin(&config, &auth);

Firebase.reconnectWiFi(true);

}

void loop()

{

if (Firebase.ready() && signupSuccess && (millis() -

sendDataPrevMillis > 8000 || sendDataPrevMillis == 0))

{

sendDataPrevMillis = millis();

if (Firebase.RTDB.getInt(&fbdo, "/test/int"))

{

if (fbdo.dataType() == "int")

{

read_data = fbdo.intData();

Serial.print("Data received: ");

Serial.println(read_data); //print the data received from the Firebase database

}

}

else

{

Serial.println(fbdo.errorReason()); //print he error (if any)

}

}

}

Code Description

  • The libraries we are using are:
    • The first one is h, which is used to enable the Wi-Fi module and hence wireless network connectivity.
    • Another library we are using is the h which is responsible for interfacing ESP32 and Firebase Real-time Database.

Fig. 7 Header files

  • We also need to add two helper libraries (required by the Firebase library).
  • The TokenHelper library is responsible for managing the token generation process.
  • On the other hand, the RTDBHelper library is responsible for providing helper functions to print data coming from the Firebase database.

Fig. 8 Helper libraries

  • Next, we need to insert the project API key obtained from the Firebase project setting page.

Fig. 9 Insert API key

  • Similarly, insert the RTDB (real-time database) URL.

Fig. 10 RTDB URL

  • Next, we are defining three firebase data objects, responsible for linking App to Firebase.

Fig. 11 Firebase Data Objects

  • Enter the network credentials in place of SSID and PASSWORD.

Fig. 12 Enter Network credentials

Setup

  • Initialize the serial monitor at 115200 baud rate for debugging purpose.
    • begin() function is used to initialize the Wi-Fi module with Wi-Fi credentials used as arguments.
    • The While loop will continuously run until the ESP32 is connected to Wi-Fi network.

Fig. 13 Initialize wifi module

  • If the device is connected to local Wi-Fi network then print the details on serial monitor.
  • localIP() function is used to fetch the IP address.
  • Print the IP address on serial monitor using println() function.

Fig. 14 Fetch/obtain the IP address

  • Here, we are assigning the API key to the firebase configuration.

Fig. 15 configuring API key

  • Similarly, the database URL is also assigned to firebase configuration

Fig. 16 configuring database URL

  • Next, we are checking or verifying the Firebase sign-up status.
  • In the signup() function the last two arguments are empty, indicating the anonymous user.
  • If you have enabled different sign-up methods during the Firebase authentication method like Google account, Facebook etc then you need to add the respective credentials as arguments.
  • The respective results of signup status will be printed on the serial monitor.

Fig. 17 sign up status

  • Next, you need to assign the callback function for token generation.

Fig. 18

Loop()

  • Once the signup is successfully done, we are ready to fetch the data stored on the Firebase real-time database in every 10 seconds.
  • RTDB.getInt() command is used to store the data in /test/int node. But before that we are checking the data type that is ‘int’(integer). If the data type of the message/data received from Firebase RTDB is ‘int’ only then the data will be stored inside the integer type variable i.e., “read_data”.

Fig. 19 Fetch data from Firebase RTDB

  • If the data type is other than integer then an error will be printed on the serial monitor.

Fig. 20

  • Similarly, we can read/fetch various types of data like float, string, array etc. from the firebase database.

Testing

  • Open your Arduino IDE and paste the above code.
  • Change the network credentials, that is the SSID and PASSWORD as per you network setup.
  • Compile and upload the code into ESP32 development board.
  • Before uploading the code make sure that you have selected the correct development board and COM port.

Fig. 21 Select development board and COM port

  • Once the code is uploaded successfully, open the Serial monitor and select the 1115200 baud rate (as per your code instructions).
  • Make sure Wi-Fi to which your ESP device is supposed to connect is ON.
  • Once your ESP device is connected with Wi-Fi, you should see the data fetched from Firebase, printing on the serial monitor with a particular delay (as per the code instructions).

Fig. 22 Data sent Vs Data Received

This concludes the tutorial. I hope you found this of some help and also hope to see you soon with a new tutorial on ESP32.

ESP32 Firebase

Hello readers, I hope you all are doing great. In this tutorial, we will learn how to access Firebase (a real-time database) to store and read values or data with ESP32.

It is Google’s mobile application development platform that can be used to can access, monitor and control ESP32 from anywhere in the world with its (firebase) real-time database.
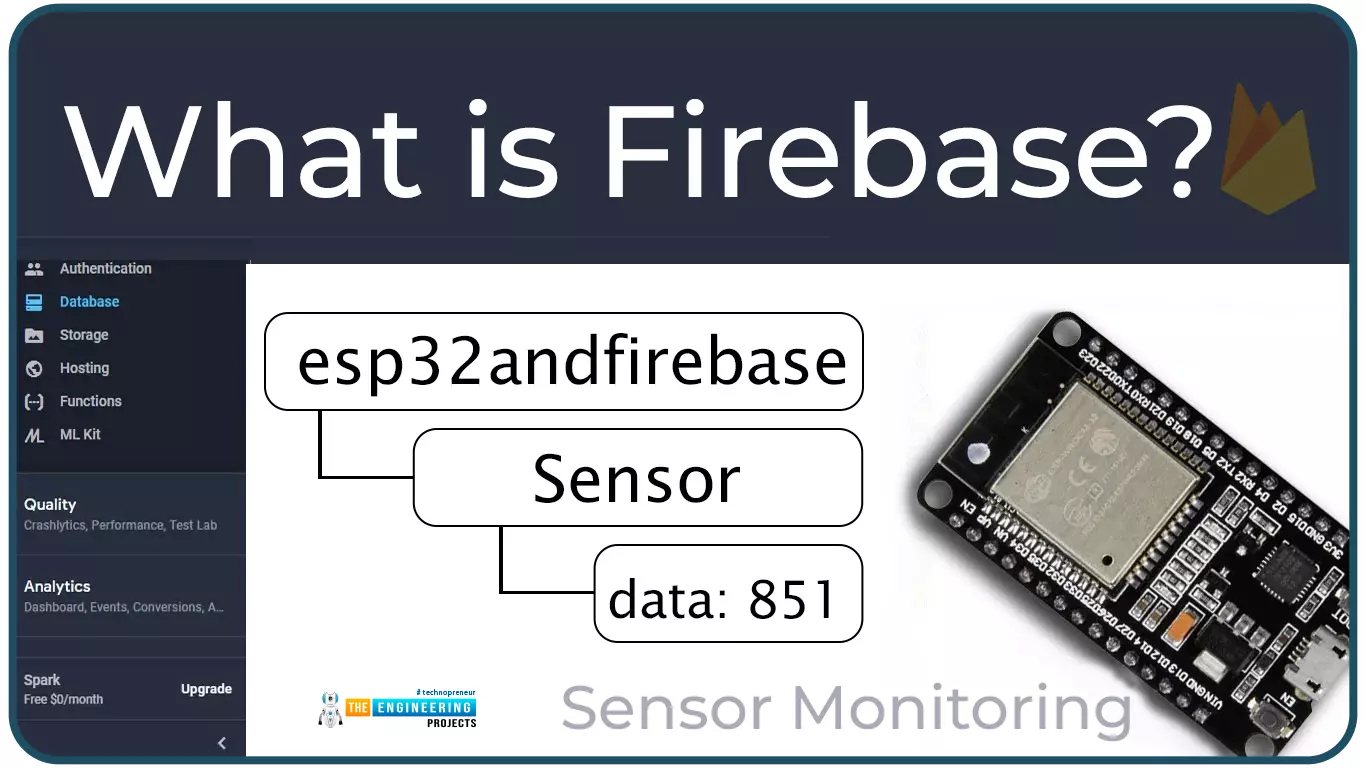
Where To Buy?
No.ComponentsDistributorLink To Buy
1ESP32AmazonBuy Now

What is Firebase?

Firebase real-time database is a development platform provided by Google which included multiple services to manage and authenticate data.

Firebase is basically a mobile and web app development platform I as works great with Android APIs) that includes features like firebase cloud, real-time data and Firebase authentication etc.

As per Firebase’s official documentation (https://firebase.google.com/docs/database), whenever a user creates a cross-platform application like with Android, or Apple, JavaScript SDKs, all the clients share a single.

Fig. 1 Firebase Real-time database and ESP32

The main features of the Firebase Real-time database are:

  • Firebase applications remain responsive even in offline mode. If any changes are missed during the offline mode, then after the connectivity is reestablished those changes will be automatically synchronized.
  • Firebase Real-time database makes it easier to access the database from a web browser or a mobile device.
  • Unlike hypertext transfer protocol requests, Firebase RTDB uses data synchronization which makes it possible to update the changes in the database within milliseconds.

Role of Firebase Realtime Database in IoT

The IoT or Internet of Things is the interconnection of physical objects or devices with sensors and software accessing capabilities to communicate data or information over the internet.

To build an IoT network, we need an interface medium that can fetch, control, and communicate data between sender and receiver electronics devices or servers.

Firebase real-time database provides a platform to store data collected from sensors at the level device. Firebase works great with Android APIs.

Firebase is particularly useful in data-intensive Internet of things (IoT) applications to store from sensors and synch that data between users in real-time. For simplicity or better understanding we can say that it is a cloud service provided by Google for real-time collaborative apps.

Project Overview

  • In this tutorial we are going to create a Firebase project with real-time database to read and store data with ESP32. Steps included to achieve the target are; creating a firebase project, storing data from ESP32 to firebase real-time Database, Reading data from firebase real-time database with ESP32.

Prerequisites

  • ESP32 development board
  • Arduino IDE
  • Necessary Library (Firebase ESP Client)
  • A Google account to access Firebase
 

Getting Started with Firebase

  • Create a project

The steps involved in creating a Firebase project are:

Fig. 2 Get started

  • Click on Create a project.

Fig. 3 Create a project

  • Assign a name to your project and accept the terms and conditions then click on the continue

Fig. 4 project name

  • Disable the “Enable Google Analytics” option and click on real-time.

Fig. 5 Enabling Google Analytics

  • Now your project is ready click the

Fig. 6 Project Created successfully

Authentication

    • Next we need to set the authentication methods for the app.

As per the official firebase documentation at: https://firebase.google.com/docs/auth , the identity of a user is required by most online services or mobile applications or we can say , it handles authentication process and logging in (in this tutorial, the ESP32). Getting to know the identity of a user enables an application to save user data securely in the cloud and provide a consistent personalized service across all of the customer's devices (android phones, computers, applications etc).

  • Click on

Fig. 7 Authentication

  • You will be redirected to a new page, click on ‘get started.
  • There are multiple methods available to authenticate you account, as shown below.
  • Select any of the authentication method.

Fig. 8 Select authentication method

Next thing is creating a real-time database for the project.

  • Creating a Real-time Database
    • Click on the Real-time database given at the left sidebar.

Fig. 9 Real-time database

  • Then, click on Create Database.

Fig. 10 Creating database

  • Select your nearest location.

Fig. 11

  • Select the Start in test mode option and click on enable

Fig. 12 select location

  • Now your database is successfully created. You will be redirected to a new page containing the database URL.
  • Copy the URL and paste in your ESP32 code.
  • Now the next requirement is getting the API key.

Project API

    • Go to left sidebar and click on Project Overview and then project setting.

Fig. 13 Accessing project API key

  • Copy the web API key and paste in your ESP32 code.
  • That’s all about creating a Firebase account, project, and verification. Now, we are ready to interface the database and ESP32 module.

Programming with Arduino IDE

We are using Arduino IDE to compile and upload code into the ESP32 module. You must have the ESP32 board manager installed on your Arduino IDE to program the ESP32 module. To know more about Arduino IDE and how to use it, follow our previous tutorial i.e., on ESP32 programming series. The link is given below:

https://www.theengineeringprojects.com/2021/11/introduction-to-esp32-programming-series.html

Steps to add the necessary libraries in Arduino IDE:

  • Go to Tools >> Manage Libraries.

Fig. 14 manage libraries

  • Search for the Firebase ESP Client library in Library Manager and click Install.
  • We are attaching an image, where we are installing the Firebase ESP-Client (2.3.7 version) library.

Fig. 15 Install Firebase ESP Client Library

Arduino IDE Code ( To store data from ESP32 to Firebase Database)

//--add necessary header files

#include <WiFi.h>

#include <Firebase_ESP_Client.h>

#include "addons/TokenHelper.h" //Provide the token generation process info.

#include "addons/RTDBHelper.h" //Provide the real-time database payload printing info and other helper functions.

// Insert your network credentials

#define WIFI_SSID "replace this with your netwrok SSID"

#define WIFI_PASSWORD "replace this with your wi-fi password"

// Insert Firebase project API Key

#define API_KEY "replace this with your API key"

// ----Insert real-time database URL

#define DATABASE_URL "replace this with your project URL"

//----Define Firebase Data object

FirebaseData fbdo;

FirebaseAuth auth;

FirebaseConfig config;

int value = 10;

bool signupSuccess = false;

unsigned long sendDataPrevMillis = 0;

void setup()

{

Serial.begin(115200);

WiFi.begin(WIFI_SSID, WIFI_PASSWORD);

Serial.print("Connecting to Wi-Fi");

while (WiFi.status() != WL_CONNECTED){

Serial.print(".");

delay(100);

}

Serial.println();

Serial.print("Connected with IP: ");

Serial.println(WiFi.localIP() );

Serial.println();

// Assign the api key ( required)

config.api_key = API_KEY;

// Assign the RTDB URL ( required)

config.database_url = DATABASE_URL;

// Sign up status

if (Firebase.signUp(&config, &auth, "", ""))

{

Serial.println("ok");

signupSuccess = true;

}

else{

Serial.printf("%s\n", config.signer.signupError.message.c_str());

}

/* Assign the callback function for the long running token generation task */

config.token_status_callback = tokenStatusCallback; // see addons/TokenHelper.h

Firebase.begin(&config, & auth);

Firebase.reconnectWiFi( true);

}


void loop()

{

if (Firebase.ready() && signupSuccess && (millis() - sendDataPrevMillis >

10000 || sendDataPrevMillis == 0))

{

sendDataPrevMillis = millis();

if (Firebase.RTDB.setInt(&fbdo, "test/int", value))

{

Serial.println("PASSED");

Serial.println("PATH: " + fbdo.dataPath());

Serial.println("TYPE: " + fbdo.dataType());

}

else

{

Serial.println("FAILED");

Serial.println("REASON: " + fbdo.errorReason());

}

value++;

}

}

Before uploading the code in ESP32 board there are some changes you need to make which includes:

  • Adding network credentials
  • Inserting API key
  • Inserting Firebase project URL
  • Installing necessary library files

Code Description

  • The libraries we are using are:
    • The first one is h, which is used to enable the Wi-Fi module and hence wireless network connectivity.
    • Another library we are using is the h which is responsible for interfacing ESP32 and Firebase Real-time Database.

Fig. 16 Header files

  • We also need to add two helper libraries (required by the Firebase library).
  • The TokenHelper library is responsible for managing the token generation process.
  • On the other hand, the RTDBHelper library is responsible for providing helper functions to print data coming from the Firebase database.

Fig. 17 Helper libraries

  • Next, we need to insert the project API key obtained from the Firebase project setting page.

Fig. 18 Insert API key

  • Similarly, insert the RTDB (real-time database) URL.

Fig. 19 RTDB URL

  • Next, we are defining three firebase data objects, responsible for linking App to Firebase.

Fig. 20 Firebase Data Objects

  • Enter the network credentials in place of SSID and PASSWORD.

Fig. 21 Enter Network credentials

  • Next, we are defining some variables to store integer value, status of sign up to firebase account, and delay element etc.

Fig. 22 variable declaration


Setup

  • Initialize the serial monitor at 115200 baud rate for debugging purpose.
    • begin() function is used to initialize the Wi-Fi module with Wi-Fi credentials used as arguments.
    • The While loop will continuously run until the ESP32 is connected to Wi-Fi network.

Fig. 23 Initialize wifi module

  • If the device is connected to local Wi-Fi network then print the details on serial monitor.
  • localIP() function is used to fetch the IP address.
  • Print the IP address on serial monitor using println() function.

Fig. 24 Fetch/obtain the IP address

  • Here, we are assigning the API key to the firebase configuration.

Fig. 25 configuring API key

  • Similarly, the database URL is also assigned to the firebase configuration

Fig. 26 configuring database URL

  • Next, we are checking or verifying the Firebase sign-up status.
  • In the signup() function the last two arguments are empty, indicating the anonymous user.
  • If you have enabled different signup methods during the Firebase authentication method like Google account, Facebook etc then you need to add the respective credentials as argument.
  • The respective results of signup status will be printed on the serial monitor.

Fig. 27 sign up status

  • Next, you need to assign the callback function for token generation.

Fig. 28

Loop()

  • If, the sign up status is true (or Successful), then we are ready to send the data from ESP32 to Firebase Real-time database.
  • For demonstration purpose, we are sending integer value to the Firebase database. You can also send a string, float, array, sensor reading etc. as per your requirements.
  • senInt() command is used to send integer values. This command is passing three arguments first on is the firebase database object, the second argument is the database node path and the third one is the ‘value’ we are communicating to Firebase real-tie database.
  • Similarly, we can share string, float, or array etc.

Fig. 29 Loop() function

Testing

  • Open your Arduino IDE and paste the above code.
  • Change the network credentials, that is the SSID and PASSWORD as per you network setup.
  • Compile and upload the code into ESP32 development board.
  • Before uploading the code make sure that you have selected the correct development board and COM port.

Fig. 30 Select development board and COM port

  • Once the code is uploaded successfully, open the Serial monitor and select the 1115200 baud rate (as per your code instructions).
  • Make sure Wi-Fi to which your ESP device is supposed to connect is ON.
  • Go to https://console.firebase.google.com.
  • Select the project you have created.
  • Click on left sidebar and then click on Real-time Database.
  • A new page will open, containing the data uploaded from the ESP32.
  • We have attached an image below for your reference.
  • An integer value will be uploaded to the Firebase Real-time database in every 10 seconds.
  • In the image attached below, you can see three different values displaying. But only the integer value (in yellow color) is active and rest of the data is inactive.

Fig. 31 Result 1

  • The integer value is increasing by 1 in every 10 second.

Fig. 32 Result 2

  • Similarly, we can interface and upload sensor reading to the Firebase database.

This concludes the tutorial. I hope you found this of some help and also hope to see you soon with a new tutorial on ESP32.

Syed Zain Nasir

I am Syed Zain Nasir, the founder of <a href=https://www.TheEngineeringProjects.com/>The Engineering Projects</a> (TEP). I am a programmer since 2009 before that I just search things, make small projects and now I am sharing my knowledge through this platform.I also work as a freelancer and did many projects related to programming and electrical circuitry. <a href=https://plus.google.com/+SyedZainNasir/>My Google Profile+</a>

Share
Published by
Syed Zain Nasir