Hello everyone, I hope you are fine. In today's tutorial, we are gonna take a look at “Mathematical operators in JavaScript” in detail. Performing math operator in different programing language is very common. JavaScript also allows several operators to help us in numbers.
The mathematical operator in JavaScript is used for performing certain different tasks such as the final price of a financial transaction, browser windows size and calculating the range between the element in a website document.
There are two types of operator that I am going to discuss in this tutorial.
Arithmetic operator
Assignment operator
Arithmetic Operators in JavaScript
To perform an action between two variable or values we use mathematical operators. In the eq ...
Hello friends, I hope you all are feeling great today. In today’s tutorial, we will have a look at a detailed “While Loop In JavaScript” topic. It’s our 8th tutorial in JavaScript Series.
Loops are used in programming and they offer the easiest and quickest way to do a repetitive task. In this article, we will learn about While and do..while statements as they are the most basic type of Loops.
For example, if we want to display the same line “I am learning JavsScript” 10 times. Then this can be done with the help of loops easily rather than typing long code. It will save your time and energy.
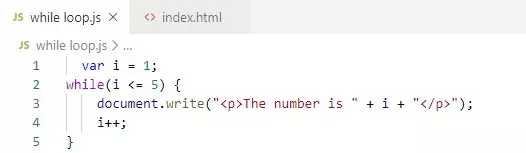
While Loop in JavaScript
In JavaScript, while loops loop through a block of code until the specified condition is true. The condition is evaluated before ...
Hello folks, I hope you are doing great in your life. In today’s tutorial, I am going to talk about “For Loop In JavaScript”. This is our 7th tutorial of the JavaScript series.
Loops are designed in JavaScript to automate the repetition task. You may have encountered a lot of time in programming that you have to repeat an action again and again. To help you in reducing the number of lines code and time, loops were created.
There are five types of loops JavaScript have:
For Loop
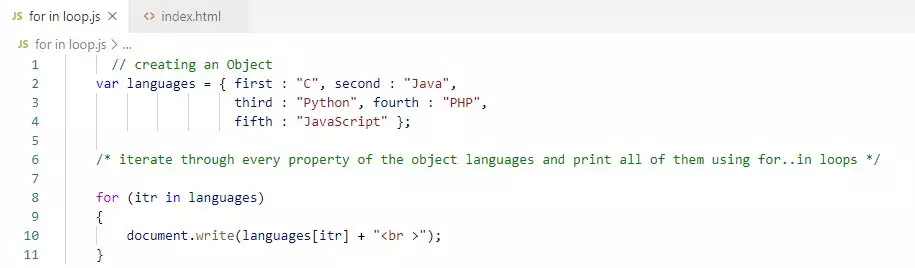
For...In Loop
For...of Loop
While Loop
Do While Loop
For Loop in JavaScript
For Loop will run the same code of block again and again repeatedly, for a specific number of time or as long as a certain condition is met.
The For loop of JavaScript is similar to ...
Hello friends, I hope you all are doing great. In today’s tutorial, we will have a look at the detailed “Switch Statement in JavaScript”. It’s our 6th tutorial in JavaScript Series.
As we have learned about the conditional statement and its types (if, if..else, If...else if) in the last article, a conditional statement is the most useful and common feature in the programming language.
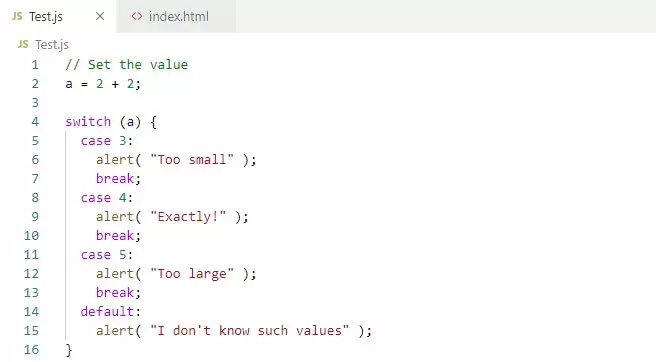
Switch is also a type of conditional statement and it will evaluate an expression against multiple possible cases and run one or more blocks of codes base on matching cases. The switched statement work almost as if...else if statement containing many blocks, and it does work so more efficiently than repeated if...else if statements.
Switch Statement in JavaScript
...
Hello everyone, I hope you are having a fine day. In today’s tutorial, I am going to discuss the if-else statement in JavaScript and what are conditional statements in detail.
In programming, while writing a program there may be an occasion where you need to adopt one out of a given set of paths. In such a case, you need to use conditional statements that allow your program to make the correct decision.
Conditional statements
Conditional statements are used to run a specific action based on the result of the different conditions (true or false). If the condition would be true one action would be performed and if the condition is false then another action would be performed.
A few examples of JavaScript conditional statements:
Verify the loca ...
Hello everyone, I hope you are having a good day. In today's tutorial, I am going to tell you about "Variables in JavaScript".
The topic, I am going to highlight today, is how to declare variables in JavaScript and types of Variable? JavaScript has variables too as many other programming languages, so let's get started with it:
What are Variables In JavaScript
Variable means anything that can vary(change). In JavaScript, Variable holds the data value, in simple words, JavaScript variables are containers and can store the data value. Variable in JavaScript are declared with var (reserved keyword).
It is the basic unit for holding or storing the data.
A variable value can change at any time.
Variable must have a unique name.
Syntax
var (Vari ...
Welcome back, guys! I hope you are well and having a great day. In today's tutorial, I will discuss the new topic "Basic Syntax and Rules in JavaScript".
Learning grammar for a spoken language is necessary before you start writing it. There are rules and regulations you have to follow to write. Similarly, all programming languages have their grammar/syntax and rules which you have to follow in order to execute.
JavaScript Is Case Sensitive
JavaScript is case sensitive programing language. Therefore variables, function names, language keywords and any other identifiers must have written with a consistent capitalization of letters.
Let me show you an example.
In this statement "alert" is case ...
Hello, I hope you all are doing well. In the previous tutorial, I shared a detailed introduction to JavaScript, where we discussed the basics. Today, I am going to tell you in detail How to Include Javascript Code in HTML Page and many more things that can help you understand JavaScript easily.
All right guys let's revise what we have learned in the past article, you saw me adding script & /script code at the bottom of the tags. Today, I will show you in detail what was the reason for adding the tags at the bottom and how can you add an external JS file. If you want to be an expert programmer, you should have a look at this Oracle Java Certification , it will surely excel your programming skills.
How to Include Javascript Code in HTML Page
We have two methods to include the JS ...
Hello folks, I hope you are having a great day. Today, I am going to start this new tutorial series on JavaScript and here's our 1st tutorial titled Introduction to JavaScript. This is a beginner level tutorial series, where we will start from very basics & will slowly move towards complex concepts. If you're not a beginner or looking for secure development training or advanced tutorials, stay tuned, more training is coming.
We can use any development Editor for running JavaScript and for this tutorial series, I will use Microsoft Visual Studio Code, which is free to use & you can download it from official site. You don't need to be an expert programmer, in order to learn JavaScript, but you must have some basic knowledge of HTML & CSS ...