Introduction to MPU6050

Hello friends, I hope you are all fine and will be doing something special in your life. In today's post, we are gonna have a look at a detailed Introduction to MPU6050. MPU6050 is a sensor for motion processing devices. It is the world's first six-dimension motion tracking device. It was designed for low-cost and high-performance smartphones, tablets and wearable sensors. It is capable of processing nine-axis algorithms, it captures motion in X, Y and Z axis at the same time. MPU6050 is used in different industrial projects and electronic devices to control and detect the 3-D motion of different objects. In today's post, we will have a look at its working, pinout, protocol, it's interfacing with Arduino, features, applications, etc. I will also share some links of projects where I have interfaced it with Arduino and some other microcontrollers. Friends if you have any questions about it, please ask in the comment box I will resolve your queries in the simplest way possible. So let's start with a basic Introduction to MPU6050.

Introduction to MPU6050

  • MPU6050 is a microelectromechanical system (MEMS), it consists of a three-axis accelerometer and a three-axis gyroscope. It helps us to measure velocity, orientation, acceleration, displacement and other motion-like features.
  • MPU6050 consists of  Digital Motion Processor (DMP), which has the property to solve complex calculations.
  • MPU6050 consists of a 16-bit analog-to-digital converter hardware. Due to this feature, it captures three-dimensional motion at the same time.
  • This module has some famous features which are easily accessible, due to its easy availability it can be used with a famous microcontroller like Arduino. Friend if you are looking for a sensor to control the motion of your Drone, self-balancing robot, RC Cars and something like that, then MPU6050 will be a good choice for you.
  • This module uses the I2C module for interfacing with Arduino.
  • MPU6050 is less expensive, Its main feature is that it can easily combine with an accelerometer and gyro.

Now, Lets discus PINOUT of MPU6050.

MPU6050 PINOUT & Description

There is a main eight PINOUT of MPU6050, which are described here:
MPU6050 Pinout
Pin# Pin Name Description
01  Vcc This pin used for Supply Voltage. Its input voltage is +3 to +5V.
02  GND This pin use for ground
03 SCL This pin is used for clock pulse for I2C compunction
04 SDA This pin is used for transferring of data through I2C communication.
05 Auxiliary Serial Data (XDA) It can be used for other interfaced other I2C module with MPU6050.
06 Auxiliary Serial Clock (XCL) It can also be used for other interfaced other I2C module with MPU6050.
07 AD0 If more than one MPU6050 is used a single MCU, then this pin can be used to vary the address.
08 interrupt (int) This pin is used to indicate that data is available for MCU to read.
 
  • For better understanding lets see PINOUT diagram:
Now, let's discuss the features of MPU6050.

Features of MPU6050

These are some features of MPU6050.
  • MPU6050 is the world's first integrated six motion tracking device
  • The communication protocol at which it operates is I2C.
  • It is built in 16 BIT ADC, which provide high accuracy.
  • Its operating voltage is 3 to 5 volts.
  • It consists of a digital motion processor, which provide high computational power.
  • It is inbuilt in the temperate sensor.
  • It can be used to interfaces with IIC devices like magnetometer.
  • The pitch of its pins is 0.1 inch.
  • Its Acceleration Range is  +/-2g, +/-4g, +/-8g, +/-16g.
  •  Its Dimensions (excluding pins) are, 21.2mm (0.84") length x 16.4mm (0.65") width x 3.3mm (0.13") height.
  •  Its weight is 2.1g.
  • It has the smallest and thinnest QFN package for portable devices, 4x4x0.9 mm.
  • Its operating current is 3.9 mA when its six motion sensing axes and DMP are in motion.
  • It also has gyroscope feature like its  Gyroscope operating current is 3.6 mA.
  • Its gyroscopic stand by current is 5µA. It also has low improved frequency noise performance.
  • It works at Gyroscope range, ± 250 500 1000 2000 °/ s.
Now let's discuss the I2C protocol on which it operates.

I2C Protocol

As we earlier discus that MPU6050 works on I2C protocol, now discuss this protocol.
  • MPU6050 was first introduced by the Philips semiconductors in 1982. For sending and receiving data between two or more devices we need a path which called BUS. I2C is a bidirectional two-wire bus which use to send data between integrated circuits.
  • I2C consist of three data transfer speed which is, standard, fast-mode, and high-speed mode. I2C sports 7 bit and 10-bit address devices.
  • I2C is the best choice where simplicity and low manufacturing cost are more important than speed.
  • For a better understanding of how I2C protocol works, let's see is a picture.

MPU6050 Arduino Interfacing

Now let's have a look at MPU6050 Arduino interfacing.
  • In the given diagram we have shown its interfacing with Arduino, the value which we can by using this module are given below The following data values can be obtained using this example.
    • Quaternion Components (w, x, y, z), Euler angles, Yaw, Pitch, Real world Acceleration, Roll, World frame acceleration and Teapot invent sense Values.
    Let's see the circuit. 

Applications of MPU6050

  •  It is used for IMU measurement.
  • It can be used in Drones / Quadcopters as direction controller.
  •  It used in Self-balancing robots.
  • It can use as Robotic arm controls.
  • It can be used in Humanoid robots
  •  It used in Tilt sensor.
  •  It can be used orientation or Rotation Detector.
  • It can be in Handset and portable gaming
  •  It used inMotion-based game controllers
  •  It used in 3D remote controls for Internet-connected DTVs and set-top boxes, 3D mice
Friend, that was about MPU6050, If you something else kindly asks in a comment box. I will further guide you in the next tutorial. Till then take care.....

Action Selectors in ASP.NET MVC

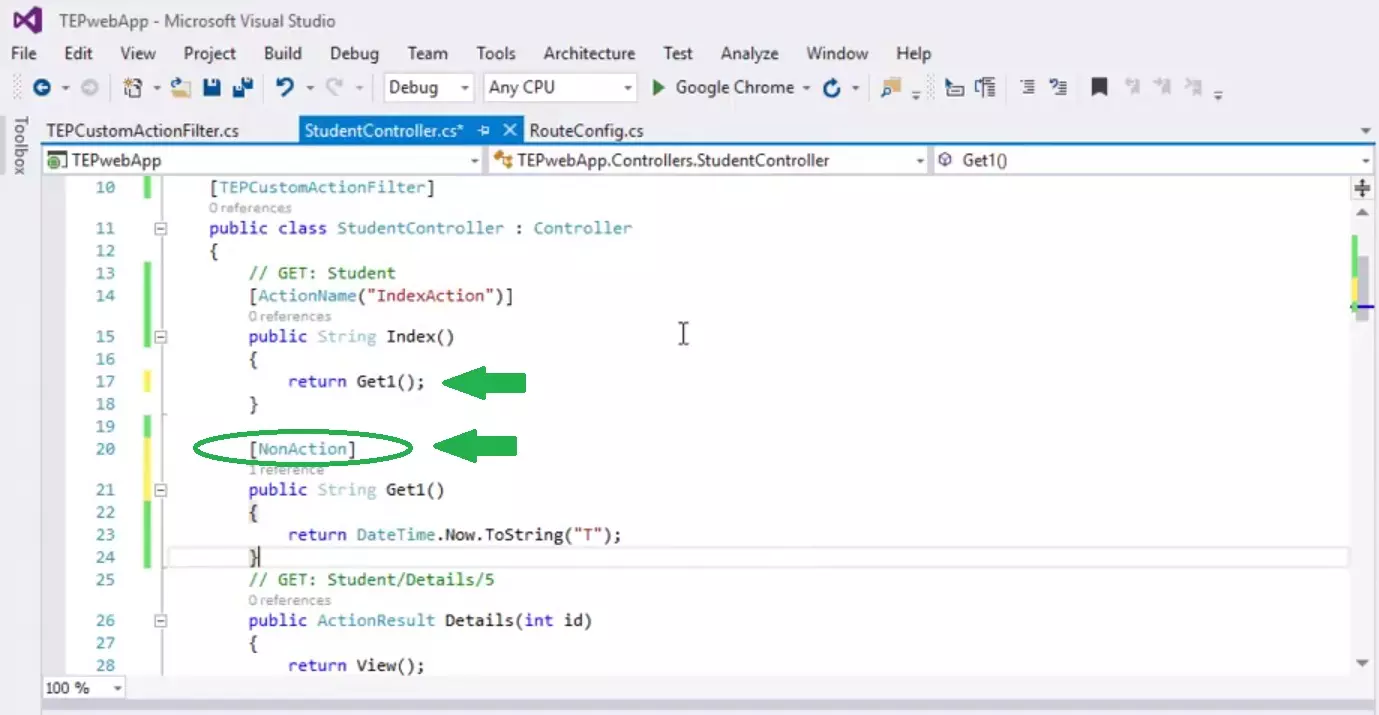
Hello friends, I hope you all are having fun with your lives. In today's tutorial, we are gonna have a look at Action Selectors in ASP.NET MVC. It's the 11th tutorial in ASP.NET MVC series and if you have covered so far then that means you really want to learn this language. Action Selectors are also new for you as we haven't discussed them yet but they are not that difficult to understand. Action Selectors are built-in attributes of ASP.NET which are directly applied to action methods of Controllers. We use Action Selectors to influence on Controller's action methods. In simple words, we use Action Selectors to guide URL Routers in selection of correct action method. Let's have a detailed overview of Action Selectors:

Action Selectors in ASP.NET MVC

  • Action Selectors are built-in attributes provided in ASP.NET MVC and are directly influence our Controller's action methods.
  • Action Selectors guide the URL Routers to respective action method of Controller which then opens up View for the user.
  • Action Selectors are simple C# classes.
  • There are 3 types of Action Selectors available in ASP.NET MVC, named as:
    • ActionName
    • NonAction
    • ActionVerbs
  • So, let's discuss each of them in detail:

1. ActionName Selector in ASP.NET MVC

  • ActionName Selector (as the name suggests) is used to change the name of Action from the name of Controller's Method.
  • Let's open the StudentController.cs file which we created in Tut # 06: Create a New Controller in ASP.NET MVC.
  • I have added an action Method here Get() and above this method I have placed [ActionName("GetAction")], as shown in below figure:
  • If we want to access this action method Get(), then we have to place localhost:12345/Student/Get in our browser.
  • But after placing the ActionName Selector, now we have to use localhost:12345/Student/GetAction in order to call Get() Method.
  • So, in this case the name of action is GetAction but the name of method is Get.
  • But if we don't use ActionName Selector, then name of both Action and Method is Get.
  • Let's have a look at what's the effect of ActionName Selector:
  • As you can see in above figure that when we have used Get then we received Server Error.
  • When we have used GetAction (assigned in ActionName) then our Method Get() is called.
  • Here's the video demonstration of ActionName Selector in detail:

2. NonAction Selector in ASP.NET MVC

  • NonAction Selector is another built-in attribute of ASP.NET MVC and as the name name suggests, it is used to remove the Action from action method.
  • If you place NonAction Selector before an action method in your Controller then you won't be able to access that method directly from its action.
  • URL Router will think this method doesn't exist, if its called directly.
  • Let's add some code in our StudentController.cs file, as shown in below figure:
  • I have added [NonAction] before our action method Get1(), that's how we specify nonAction Selector in ASP.NET MVC.
  • If you have a look in the Index Method then you can see I have called Get1 there.
  • Now when we open the Home Page of our site, then this Get1 action method will be called and it will work fine.
  • But if we want to call the Get1 action method directly then it won't open up and will give us a Server error.
  • That's because we have placed nonAction Selector before it.
  • Results of both Home page & direct calling the action method are shown in below figure:
  • So, its cleared from the above figure that nonAction has removed the action from our method and now its just a simple public method, which we can call from inside but no one can access it from outside directly.
  • Here's the video demonstration of nonAction Selector, must watch it for live action:
 

3. ActionVerbs Selector in ASP.NET MVC

  • ActionVerbs Selector is third built-in selector in ASP.NET MVC and is used to assign some specified HTTP request to action methods.
  • It helps the URL router in selection of correct action method.
  • Let's say you have two action methods in your project and they have a same name but you want to use one for GETting data and the second one for POSTing data.
  • Let's have a look at the similar situation in below code:
  • AS you can see in above figure that we have written two action methods of the same name Get1.
  • So, now if you call it in your browser then you will get Server Error, as shown in below figure:
  • So, now let's place our ActionVerbs Selector before one of these action methods, which one we want to call.
  • I have placed the [HttpGet] before second action method and now because of this ActionVerbs Selector,URL Router will know which action method to call.
  • Now when you open Get1 page, it will open fine.
  • These ActionVerbs Selector are supported by ASP.NET MVC:
    • HttpPost
    • HttpGet
    • HttpDelete
    • HttpPut
    • HttpOptions
    • HttpPatch
  • Here's the video demonstration of ActionVerbs Selector in detail:
So, that was all about Action Selectors in ASP.NET MVC. I hope you have enjoyed today's tutorial and now can easily use Selectors in ASP.NET. Thanks for reading. Have a good day !!! :)

Introduction to MFRC522

Hello friends, I hope you are all fine and doing great. In today's tutorial, we will have a look at a detailed Introduction to MFRC522. MFRC522 is an RFID Embedded module used to read and write RFID cards and operates at 13.56MHz contactless communication. It is a less costly, low-voltage, and small-sized non-contact card chip. It is the best choice for intelligent instruments and portable handheld devices. It communicates with microcontrollers over SPI Protocol.

MFRC522 is used in different engineering projects, mostly for security purposes in offices, banks, plazas, etc. You must have seen in English Movies that a person just shows his ID card to the machine and its whole profile data pops up on the computer and if he is authorized then the front door automatically opens up. Those cards are normally RFID cards.

In today's post, we will discuss its pinout, protocol, working, circuit diagram etc. in detail. I will also share links to projects where I have interfaced MFRC522 with Arduino and other microcontrollers. If you have any questions about this device, please ask in the comments, I will try my best to solve your problems. So let's start with a basic Introduction to MFRC522:

Introduction to MFRC522

Let's start with a detailed introduction of MFRC522:

  • MFRC522 module is a less costly, lower voltage, and small-sized noncontact card chip,  it is the best choice for security instrument and portable devices.
  • This sensor-based on advanced modulation and demodulation concept, this concepts uses in all types of contactless communication methods.
  • MFRC522 also supports crypt-01 encryption algorithm to verify Mifare products.
  • It supports Mifare series of high-speed non-contact communication, by using this series we can send and receive data up to 424 kbit/s.
  • A transmitter of MFRC522 is able to drive reader and writer antenna, which designed to communicate with IEC 14443 A/MIFARE cards. It works with this card without any special circuit.
  • MFRC522 supports MF1xxS20 and MF1xxS70  products.
  • There are two versions of MFRC522:
    • MFRC52201HN1
    • MFRC52202HN1
  • The second version of MFRC522 is fully compatible with version one. It has some better features and improvements which are:
    •  This version has An additional timer pre-scaler.
    • It has more stability in rough conditions.
Now, let's discuss the PINOUT of MFRC522:

MFRC522 PINOUT & Description

There are main 8 pins of MRFC522 which are:
  • PIN 01: SDA,  this pin use for SPI protocol.
  • PIN 02: SCK,  this pin used for providing a clock.
  • PIN 03: MOSI,  this pin is used for master device to get out data and for the slave device to get in data.
  • PIN 04: MISO, this pin is used for the slave device to get out data and for a master device to get in data.
  • PIN 05: IRQ,  this pin is for interrupt purpose.
  • PIN 06: GND,  this pin is used for ground.
  • PIN 07: RST,  this pin is used for reset-purpose.
  • PIN 08: Vcc,  at this supply voltages are applied.
For better understanding let see a picture of PINOUT. Now, let's discuss some features of MFRC522:

Features of MFRC522

  • These are some features of MFRC522.
    • Its operating current and voltage are 13 to 26 mA/DC 3.3V.
    • Its Idle operating current voltage is 10-13 mA/ DC 3.3V.
    • Its sleep current is <80 uA.
    • Its Peak current value is <30 mA.
    • Its Operating frequency is 13.56 MHz.
    • Its dimension is 40 mm×60 mm.
    • Its Ambient operating temperature is - 20 to 80 degrees centigrade.
    • Its Ambient storage temperature is - 40 to 85 degrees centigrade.
    • Its Ambient relative humidity 5% is 95%.
    • It has FIFO buffer handles 64 byte sending and receiving data.
    • It Supports MFIN/MFOUT.
Let's discuss the SPI Protocol on which it works.

SPI Protocol

  • Serial peripheral interface (SPI) is supported to enable high-speed communication to the host. This interface can handle data speeds up to 10 Mbit/s.
  • Communicating with a host, the MFRC522 acts as a slave, receiving data from the external host for register settings, sending and receiving data relevant for RF interface communication.
  • An interface with SPI enables high-speed serial communication between the microcontroller and an MFRC522.
  • MFRC522 acts as a slave during SPI communication. SPI clock signal SCK must be generated by the master. Data communication from the master to the slave device uses the MOSI line.
  • MISO line is used to send data from the MFRC522 to the master.
  • Data on both MOSI and MISO lines are sent with the MSB first.
For better understanding lets have a look at its circuit diagram.   Let disuses some applications of MRFC522.

Applications of MFRC522

  • These are some applications of MFRC522.
    • MFRC522 is a highly integrated reader/writer IC for contactless communication.
    • It can be used for security purposes in office, banks, and some buildings.
    • It can be interfaced with Arduino for some industrial projects.

This was all about MFRC522. I hope you will get a lot of knowledge from this post. If you have any questions about MFRC522, please ask in comments. I will resolve your query. Thanks for reading. Take care!!!

Syed Zain Nasir

I am Syed Zain Nasir, the founder of <a href=https://www.TheEngineeringProjects.com/>The Engineering Projects</a> (TEP). I am a programmer since 2009 before that I just search things, make small projects and now I am sharing my knowledge through this platform.I also work as a freelancer and did many projects related to programming and electrical circuitry. <a href=https://plus.google.com/+SyedZainNasir/>My Google Profile+</a>

Share
Published by
Syed Zain Nasir