How to use Variables in Python?

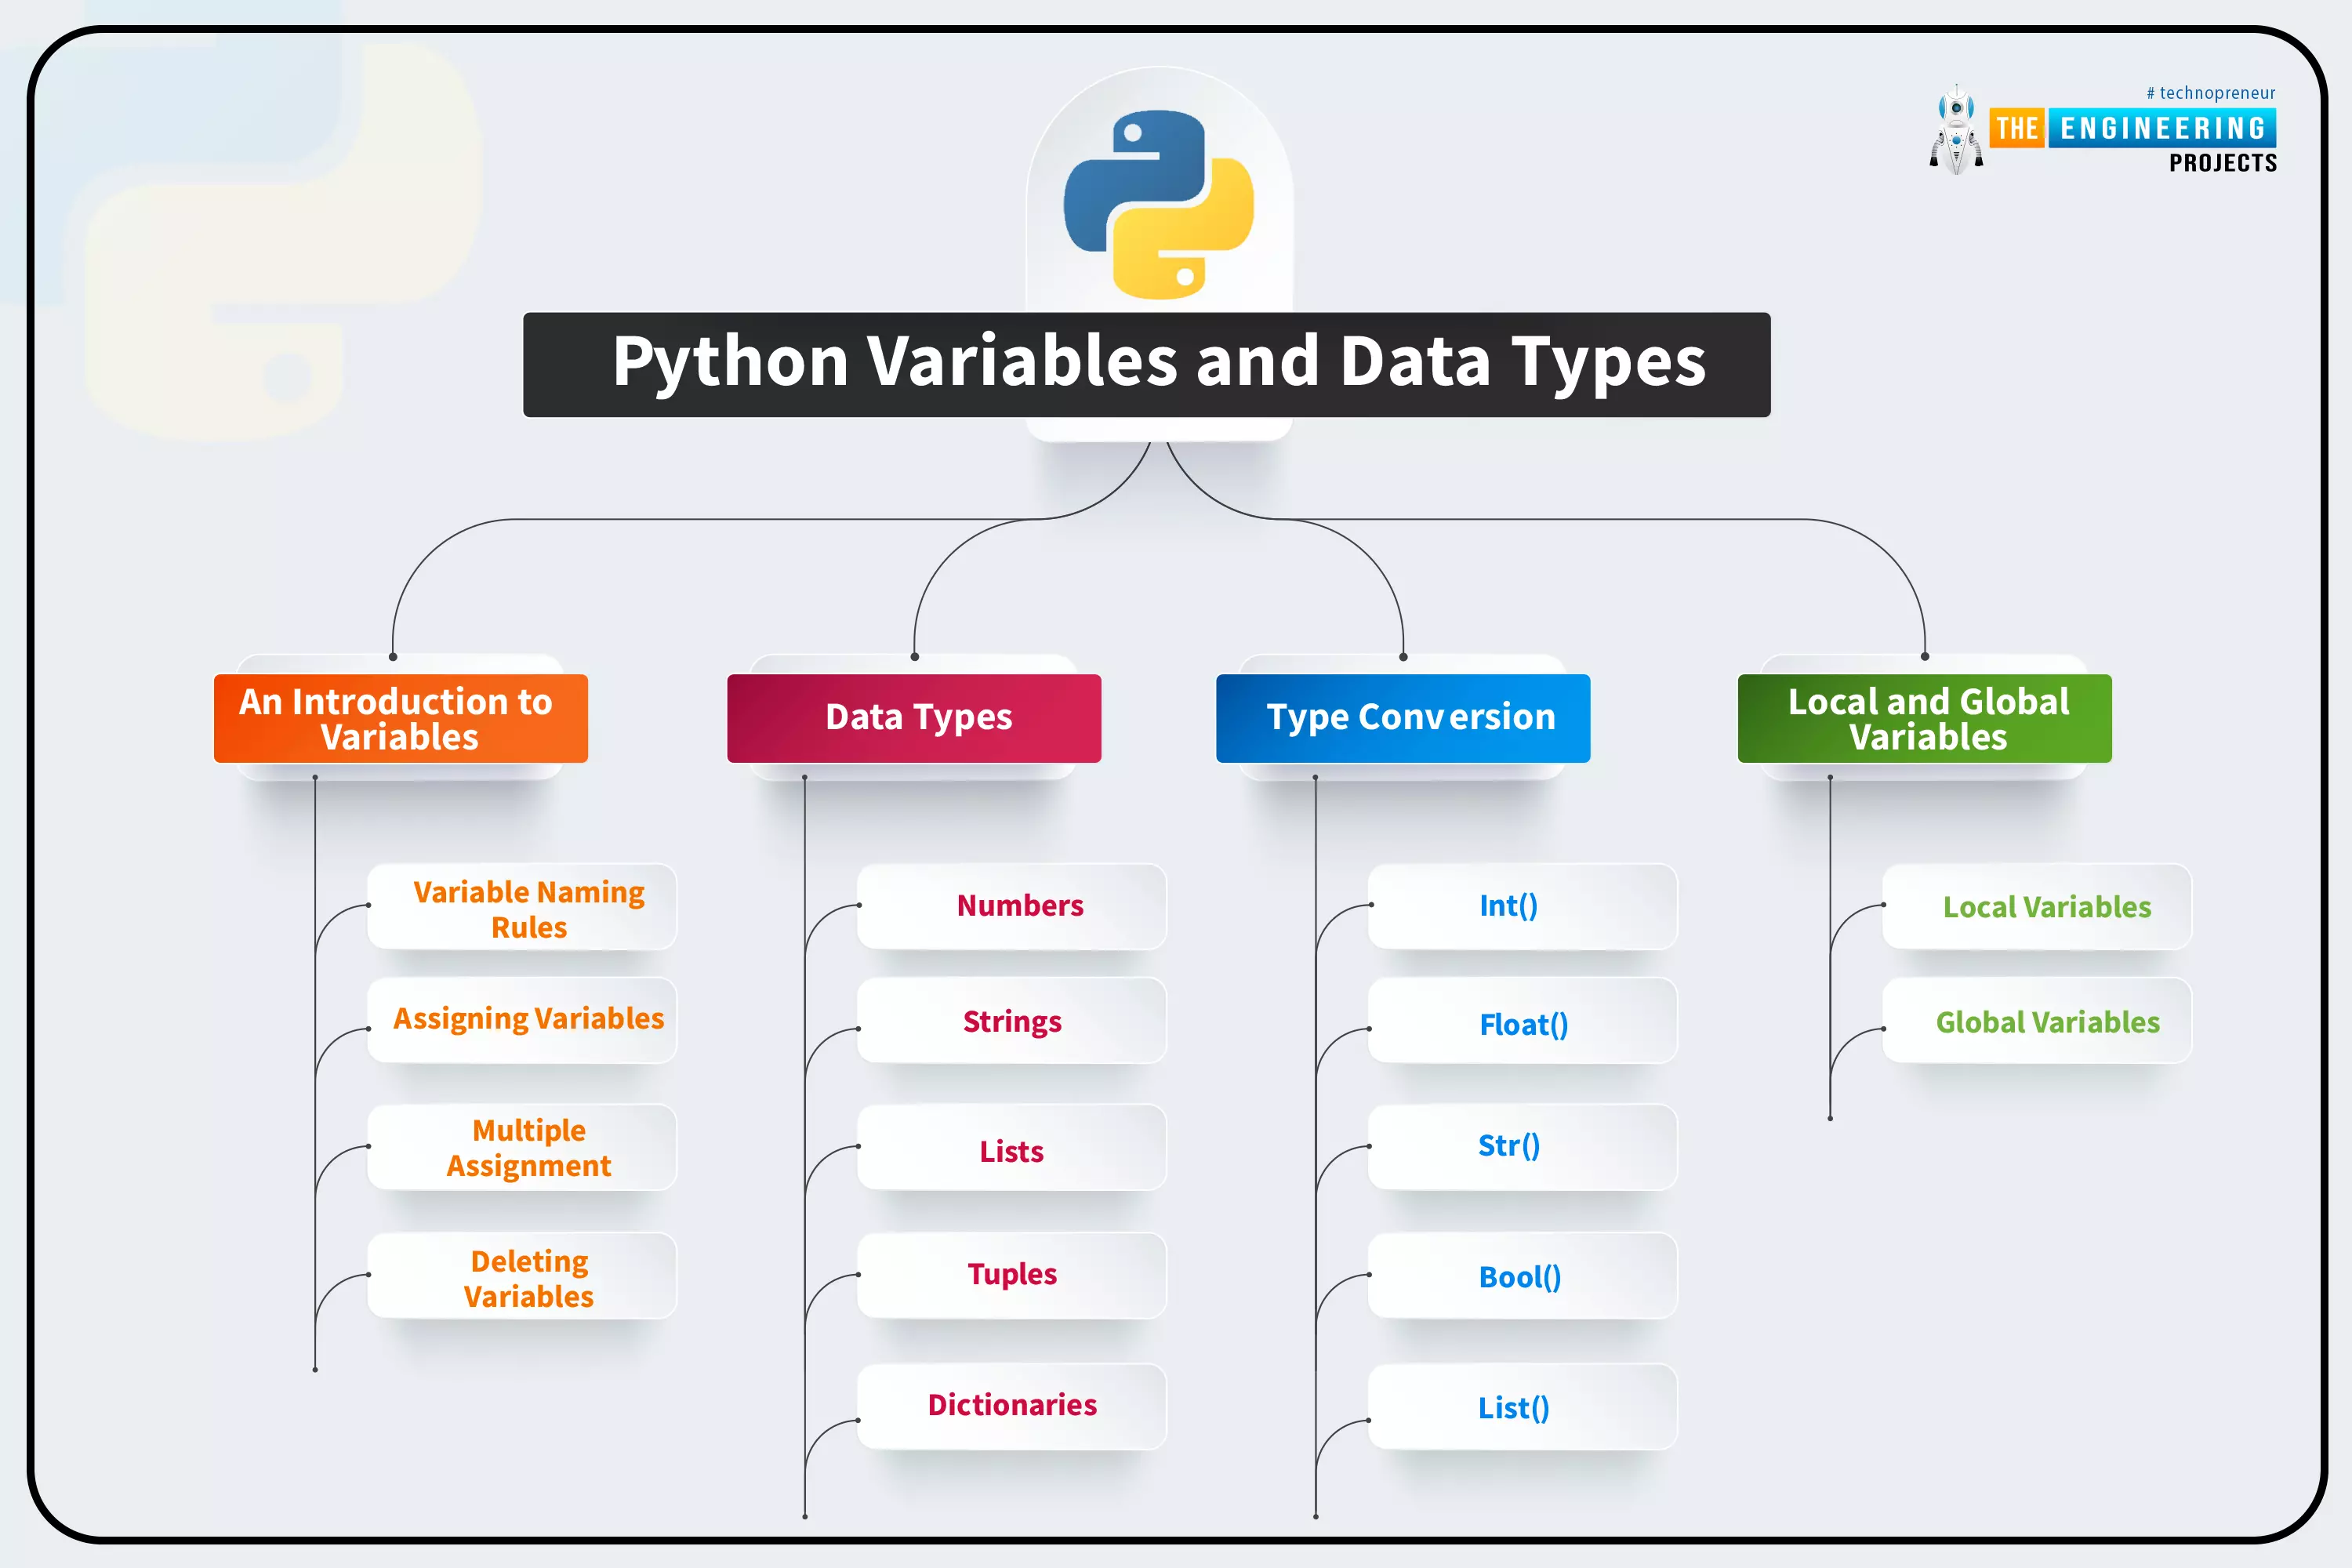
Welcome back! This is the fifth lesson in our Python programming course. In the last chapter, we discussed how string data types are used in Python. In this tutorial, we’re going to discuss variables in python and the rules for naming them in Python. In addition, you'll learn the fundamentals of working with numbers and strings.

What are variables?

All programming languages use variables as a fundamental building block of their language. It is the allocation of memory that is dedicated to data storage and manipulation. Variables are program elements that keep track of data. The following is an example of a variable.

x = 100

It's called x in the diagram below, and it has a value of 100 in it. In this case, the variable name is x, and the data it contains is the number.

For a variable, its data type is just the type of data it contains.

Data types - what are they?

If a variable has a certain data type, it can be used with any mathematical, relational, or logical operation without resulting in an error; this is known as the data type in programming. There are many different types of data, such as strings and integers, that are used to categorize different kinds of information.

How do computers store Python variables?

As a Python programmer, we don't have to do anything to free up space. Garbage collection handles this.

There are two types of memory:

Stack memory

Stack memory is used to hold all functions and their calling references. The lifo rule governs how a stack operates. Continuous blocks make up the stack memory. When a function is called, the variables it returns are kept in the program's call stack, where they can be freed upon function completion and the program's exit successfully.

Heap memory

Heap memory refers to the memory allocated at run time when each instruction is performed. A heap is used to store global variables, which can be shared by all functions in the program, rather than the local variables defined within a function. Here, x = 23 is an example.

Number types in Python

Integers, floats, and complex numbers are all available as numeric types in Python. In this tutorial, we'll learn about integers because we'll be using them to show how variables work.

For simplicity's sake, an integer is a number that does not include a decimal point or fraction. They might be both positive and negative at the same time. For example, the numbers 1, 2, 3, 500, and 10000000.

The int class contains all integer variables. The class name can be found using the type () method, as illustrated in the example below.

Python's Rules for Variable Naming

  • When naming a variable, it should begin with a letter or an underscore (_). For example, Age, _age, and Age.
  • There are no special characters allowed in the variable name, except for the underscore (_). There are several examples of this: age_, _age
  • Variables are case-sensitive. Therefore, age and Age are two different things.
  • However, the variable name can have numbers at the end, but not at the start. Age1 is a good illustration of this.
  • Python keywords should not be used in the name of a variable. Reserved words are another term for keywords. True, False, None, and Def.

Techniques for naming a variable with numerous words.

  • Camel Case: As a visual aid, the second and following words are capitalized. For example, pythonTutorial
  • Pascal Case: Similar to Camel Case, except that the initial letter is capitalized instead of being lowercase. For example, PythonTutorial
  • Snake Case: Underscores divide each word. For example, python_tutorial

Variable Assignment

A variable refers to an item's specific name. Instead of having to declare or specify a variable like in other programming languages, Python simply uses the equals (=) sign to create a variable and assign a value.

As stated, "n is allocated the value of 300" in the example above. You can then use n in a statement or expression, and its actual value will be substituted for n.

Just like with a literal value, variables can be shown directly from the interpreter prompt in a REPL session, without the usage of print ().

In the future, if you use n again and alter its value, the new value will be used:

Chained assignment in Python allows the same value to be assigned to many variables at the same time:

The above-chained assignment gives the variables a, b, and c the value 300 at once.

Python's Variable Types

Python has two types of variables: global variables and local variables. To utilize the variable in other parts of your program or module, you need to declare it as a global one. It is common practice in Python to use local variables when creating new variables.

Using the following program, you can see how Python variables function by comparing the local and global variables.

  1. Using Python, let's create a global variable called "f" and assign it the value 101, which is printed in the output.
  2. f is a new local scoped variable declared by function f. When this variable is set to its default value, "I'm studying Python." is printed as an output. This Python declared variable is distinct from the global variable "f" specified before.
  3. A function call's local variable f is disposed of once the execution has completed. At line 12, the global variable f=101 is displayed when printing the value of "f" once more.

You can utilize a global variable in a function in Python if you include the global keyword in the variable definition.

  1. The "f" variable is global in scope and has been assigned a value of 101, which is printed in the output of the code.
  2. The variable f is declared to exist by using the keyword global. That which was previously defined as a globally applicable variable will be used here. When we print the value, it comes out to 101.
  3. Inside the function, we modified the value of "f." The new value of the variable "f" remains even after the function call has ended. Line 12 prints the value "changing global variable" when value of "f." is printed.

Variables are statically typed in many programming languages. A variable's data type is specified when it is created, and any value that is assigned to it must always be of the same type.

However, Python variables are exempt from this rule. It is possible in Python to give a variable a value of one type and then change it to another type later on:

In reality, what happens when you assign a value to a variable?

This is an important subject in many programming languages, but the answer in Python is a little different.

Since Python is a highly object-oriented language, every piece of data in a program is an object of some type or class. This will be brought up again and again in the course of these tutorials.

References to objects

Take a look at the following coding:

Translators are instructed to perform the following actions when provided with a statement print (300).

  • Creating and supplying the value 300 to an integer object
  • The console will show it.

As you can see, the built-in type () function creates an integer object.

An object can be referenced by a Python variable's symbolic name, which serves as a pointer or reference. After assigning a variable name to an object, you can use that name to refer to the object. However, the object itself still contains the data. For instance,

An integer object with the value of 300 is created and the variable n is assigned as an identifier.

n is a pointer to an integer object, and the following code confirms that:

Then consider the following assertion:

What happens if it is executed? A new object is not created. Since n points to the same item, m points to a new symbolic name or reference.

Next, you may try something like this:

Python now constructs a new integer object named m, which has a value of 400.

Finally, let's consider that the following statement is executed:

As a result, Python generates a string object named "foo" and uses that as a pointer in n.

The integer object 300 is no longer mentioned anywhere. There is no way to get in touch with it.

The lifespan of an item will be mentioned at various points in this series of tutorials. When an item is first created, at least one reference to it is made, which marks the beginning of its life. A reference to an object can be added or destroyed at any moment during its lifetime, as you saw in the example above. As long as there is at least one reference to the thing, it lives on.

Objects are no longer accessible when the number of references to them reaches zero. Its time had come to an end at that moment. The allocated RAM allocated to Python will eventually be reclaimed so that it can be utilized for something else. Garbage collection, as it's called in computer jargon, is a very simple way to manage your own memory.

Object identity

Every Python object is assigned a unique identifier number when it is created. No two objects will ever share an identifier, even if their lives overlap for a period of time. It is not possible to utilize the same identifier for an object after its reference count reaches zero and it is garbage collected.

A Python object's id can be obtained using the id () function, which is part of the standard library. Id () can be used to verify that two variables are actually pointing at one another:

Even after an assignment such as this, which results in the same number being returned for id(n), it is clear that these two numbers point to the same thing. As soon as m is reassigned to the value 400, they no longer point to the same item, but rather to different things, take into account the following:

M and n are both 30-valued integers in this example. The id(m) and id(n) are identical in this example, While running the program, the interpreter makes use of previously created objects for numbers in the [-5, 256] range. As a result, if you assign different integer values in this range to different variables, they will all refer to the same thing.

Delete a variable

Python variables can also be deleted by use of function del "variable name". Python's error "variable name is not defined" indicates that you've erased the variable in the following example of the language's delete variable function.

Variable type casting

Test the concatenation of several data types such as string and integer. The number "99" will be added to the word "Guru," for example, A Type Error will arise if the number is not expressed as a string when declaring variables in Python. This differs from Java, which does not require the number to be declared as a string.

You will obtain an undefined result if you run the following code.

a="Guru"

b = 99

print a+b

Use print(a+str(b)) to concatenate both a and b into a string.

what is type casting?

This is the process of changing one data type to another. Data type conversion is necessary in some scenarios. For instance, you may want to combine two numbers where one of the variables' existing values is an integer and the other is a string. Python typecasting is required before addition, as it must transform a string's data type to an integer.

Types of conversions in type casting

  • Explicit conversion

Type casting in Python can be done using a variety of functions.

  1. The INT () function is used to specify integer literals. A string literal is converted to an integer value.
  2. Use STR () to convert an integer to a string ().
  • Implicit conversion

Data types in Python are implicitly converted by the Python interpreter, which means that the user is not required to intervene in the process. See the examples below for a better understanding of the subject.

Conclusion

Congratulations! Your perseverance has paid off. The focus of this session was on Python variables, object references, and identity, as well as the naming conventions for Python identifiers and a brief discussion of integers. Let’s meet in our next tutorial as we discuss about Python data types and how they're put to use.

Introduction to Metal Core PCB

Hello everyone and welcome to this article. Previously we have been discussing different types of PCB boards and for sure we have not exhausted everything. Today we are going to focus on a very important aspect of the PCB design which is the thermal characteristics of the PCB's working environment. Up to this moment, we have interacted with boards that work best in normal working conditions. But remember there are some working conditions, that have very harsh environment such as high temperatures. Let us take for example temperature in boilers or even electric heaters. Do you think normal FR-4 boards can survive in such temperatures? Don’t you think they will melt off if exposed to high thermal radiation? Your guess is as good as mine. For us to have a solution on this matter of high thermal temperatures, there had to be introduced another type of board that could resist such an environment and gives the solution to what the designers wanted. They had to develop the metal core printed circuit boards. These types of boards are suitable in the environment where there is high heat generation and this heat needs to be dissipated away from the circuit and avoid reaching the most critical components of the same circuit which might damage them.

The rapid developments that have been achieved in the Light Emitting Diode industry more so in the area of high-power LEDs, have brought up a challenge on heat dissipation. The LEDs are always mounted on the printed circuit boards and they might end up bringing a lot of problems, especially on the heat generated from them. Without proper laid down structures to dissipate the excess heat will end up damaging the board. To solve this, designers have chosen to implement the use of metal core PCBs.

Definition of the Metal Core PCB.

  • As the name indicates, the metal core printed circuit board (MCPCB) is made up of a metallic base as opposed to the traditional FR4 material.
  • The metal core material is being used because it offers good heat conduction properties and hence the board will have an efficient heat dissipation mechanism.
  • This heat is being dissipated as a result of heat buildup that originates from the electronics component during the operation.
  • The purpose of the metal core is to ensure that it diverts the heat generated away from the crucial components of the circuit and moves it towards the less critical components such as the heat sink areas.
  • This shows that this type of PCB board is significant for thermal management.
  • When designing a multilayer MCPCB, the metal core layers should be spread on both sides of the board.
  • Let us use an example of the 12-layer MCPCB board, the metal core will be at the bottom and the top layer and also at the center that is at the 6th layer.
  • They are made up of thermal insulating layers, metal copper foil and metal plates.
  • For the purpose of our article, we shall have to use MCPCB as the abbreviation of this metal core printed circuit board.

Metal core PCB boards are special types of PCBs that have a metallic layer that is made up of copper or aluminum. This metallic layer is what gives it this name.

How to order Metal Core PCB?

There are many online PCB companies offering Metal Core PCB manufacturing. We are going to take the example of JLCPCB, a China-based online PCB Fabrication House. JLCPCB offers competitive rates and provides excellent results and is considered one of the best PCB manufacturers. You can place a PCB order on JLCPCB's official website.

  • As you can see in the above figure, I have placed an order of 5 PCBs of size 100x100mm.
  • At the top, I have selected Aluminium, instead of FR-4.
  • It has calculated the price to $2 for 5 Pcs and you will get the delivery in 2-3 days.
Normally, SMD components are placed in Metal Core PCBs and JLCPCB offers the best SMT services. You should first check these JLCPCB SMT services to get an idea. Let me highlight its important points:
  • They offer single-sided placement on the PCB board.
  • JLCPCB has an extensive Library for SMT parts and you need to select the components from there.
  • JLCPCB manufacture SMT Components in-house and thus gives the best results.
  • JLCPCB places automated solder paste and then performs Solder Paste Inspection(SPI).
  • I have attached the SMT Assembly screenshot in the below figure:
You can check JLCPCB SMT Services from this video as well:

So, it's quite easy to order for manufacturing of Metal Core PCB on JLCPCB.

Layers of metal core PCBs

When you compare the metal core PCB with other traditional standard PCBs you will realize that it has special layers. The total number of these layers on the PCB will be determined by the total number of conductive layers that you really need. They can be of single or multiple conducting layers. The layers can be categorized into three types

  • Base layer
  • Copper layer
  • Dielectric layer.

Base Layer

  • The layer is made up of metal and this is the reason the PCB has the name.
  • Since it is made up of metal, the board can withstand a lot of temperature and pressure compared to the traditional FR-4 PCBs.
  • The board is also very strong, lasting and durable.
  • The metal core base plays the role of the heat sink where it spreads the heat away from the components a role that cannot be achieved by the use of the fans.
  • This base layer can be made up of different metals although the most used types of metals are Aluminum and copper.
  • Aluminum is the most preferred metal because of its cheaper prices but copper is the best when it comes to performance but is more costly.
  • The thickness of this base is determined by the customer requirement or the designer specification although it is in the range of between 1 and 4 mm.

Copper layer

  • It is the first layer that is present in all types of PCBs.
  • It is the conduction layer that helps in the transiting of the electric signals.
  • In other places, they refer to it as the circuit layer since this is where all the conductive circuits and even paths are made.
  • The thickness of this layer is determined by the requirements and according to the project layers.

Dielectric layer

  • This is the most important layer in the MCPCB which you will not find in the FR-4 PCB.
  • We have noted that the top layer is the copper layer and the bottom layer is the metal core layer. We know that these layers are conductive and in between than they are separated by the dielectric layer which acts as the insulator for separating the two conductive layers.
  • By separating the copper and the metal layer, the dielectric protects them from electric shorts.
  • The main purpose of this layer is to aid in heat dissipation. It picks heat from the top copper layer, passes it through it into the metal core where it is dissipated completely.
  • The size of the dielectric layer should be kept as thin as possible so that it does not have any effect on the overall thickness of the final board.

Types of metal core PCBs.

There are three major categories of the MCPCB as discussed below;

Single-sided metal core PCB

This type of metal-core PCB has the copper traces printed on one side of the board and the board comprises of the following;

  • The solder mask.
  • The copper circuit.
  • The metal layer performs as the conductive link.
  • The integrated circuit components
  • The dielectric layer

The single-sided board also has a dielectric layer that is sandwiched between the copper and the metal core layer.

Double-sided metal core PCB

  • This type of MCPCBs comes with a metal layer that lies between two conductive layers of the board. It also has a dielectric that is sandwiched between the copper core and the metal core.
  • The metal core is usually the conductor.

Multilayer metal core PCB

It comes with over two layers hence having a structure that looks like the FR-4 type of PCB materials.

  • However, this type of board is much complicated in its design.
  • For this type of board to achieve maximum performance, it utilizes too many components, grounds and the signal nature.

Process for the production of the metal core PCBs.

Let us have a look at the steps that can be followed in the design of the metal core printed circuit boards as listed below;

  • The first step is the creation of the design and the output. This can be done by the use of electronic design automation software such as KiCAD, Proteus, Altium, OrCAD, etc.
  • Check the DFM and after checking, by using a film print the copy of the designer.
  • Use the printed film to print the MCPCB and while undergoing this process, it is advised that you do it in a very clean environment to ensure that your outcome will have no errors.
  • During this process, you might end up with excess copper and therefore you have to use a chemical to etch the excess copper and remove it.
  • Ensure that you have punched all the alignment in a well-organized line.

After this step, you now need to confirm the digital image that you have with the original Gerber files from the designer using an inspection laser to confirm if you have done the right thing.

After the confirmation that you have done the right thing, now the design can be moved to the final process of the design. This final step involves the unpacking of the PCB layers accordingly. We are supposed to locate the drill points and this can be done by the use of the x-ray locator.

Now the board is supposed to undergo the process of plating and deposition of copper where the whole PCB is electroplated with the copper layer before the board is taken through the final process of v-scoring and profiling.

MCPCBs metal bases

The aluminum substrate

The PCBs that are made out of aluminum offer very smart heat dissipation and a good heat transfer mechanism. Aluminum PCBs are very light in weight and are used in LED lighting applications, electronic communication and audio frequency equipment. Listed below in the characteristics of the aluminum substrate;

  • The thickness should be between 2 to 8 mm.
  • Has a thermal conductivity that ranges between 5 to 2 watts per meter kelvin.
  • The peeling strength of not less than 9lb/in
  • The soldering strength; safety factor of 288 degrees centigrade for more than 180 seconds.
  • Has Greater than 3000V of breakdown voltage
  • 0.03 dielectric loss angle.
  • Flammability of UL 94V-0.
  • The size of the panel is 18” x 24”.

Copper base

PCBs made out of the copper core have better performance than those made out of aluminum. But aluminum is preferred to copper by most clients because copper is more expensive. Another disadvantage of copper core over aluminum is that copper boards are heavier and involve a tough process of machining. Copper has a higher rate of corrosion as compared to the aluminum core.

The benefits of the MCPCBs

  • The metal boards can undergo etching to control the way heat that is generated by the components flows.
  • These boards are very important in high vibrations systems since the components cannot fall off due to strong mounting on the metal core.
  • Metals are harmless and can be recycled.
  • With metal, you expect a more durable product as compared to the normal epoxy boards.
  • Metals have high thermal conductivity characteristic and this means that it provides a faster means of heat transfer.

Applications of the MCPCBs

This type of board finds great use in the field of LED technology. Some of the applications are listed below;

  • Light-emitting diodes both in the backlight unit and the general lighting.
  • Heat sinks and heat spreaders for cooling systems.
  • Power regulations and automobiles are more so in hybrid car systems.
  • Used in the semiconductor thermal insulation boards. semiconductors are the top heat emitters in the PCBs and this heat requires a better method to manage it which can be offered by the MCPCBs.
  • Amplifies for audio. Amplifiers can be made from the FR-4 material, but if you need quality, best performance and reliability, I would advise the use of the metal core PCBs.
  • Used in the hybrid and the electric motor control system and motor drivers. These are applications that generate a lot of heat that a normal PCB cannot withstand. For this reason, MCPCBs are best suited for such applications.
  • Used in the modern solar panels
  • Used in the control of motion.
  • Finds application in the solid-state relays.
Syed Zain Nasir

I am Syed Zain Nasir, the founder of <a href=https://www.TheEngineeringProjects.com/>The Engineering Projects</a> (TEP). I am a programmer since 2009 before that I just search things, make small projects and now I am sharing my knowledge through this platform.I also work as a freelancer and did many projects related to programming and electrical circuitry. <a href=https://plus.google.com/+SyedZainNasir/>My Google Profile+</a>

Share
Published by
Syed Zain Nasir