Engineering Your Way to a Successful Project: Writing Tips and Tricks

Engineering projects are a crucial part of a student's engineering degree. Writing a project report is an essential part of any engineering project. The final step provides a summary of the project and its results. A good project report can help students get better grades and advance their career prospects. In this article, we will discuss the importance of engineering project writing and the steps involved in writing a successful project report.

What is Engineering Project Writing? 

Engineering project writing is a form of academic writing used to document an engineering project's progress. This type of report usually includes findings, conclusions, and recommendations. It should provide a clear and concise overview of the project and its impact on society. The report should be written in an organized and professional manner.

Why is Engineering Project Writing Important? 

Engineering project writing is important because it plays an essential role in the success of an engineering project. It provides detailed documentation of the project, its findings, and its results. This helps project managers and stakeholders to evaluate the success of the project. It also helps to demonstrate to potential employers and clients the skills and knowledge of the engineering team. 

https://codete.com/ provides comprehensive IT services and solutions that help companies innovate and increase their competitive advantage.

Steps in Writing an Engineering Project Report 

Writing an engineering project report can seem like a daunting task. However, following a few simple steps can make it easier and more effective. 

1. Gather the Necessary Information: Before you start writing your project report, it is important to gather all the necessary information. This includes details about the project, its goals, the team, its progress, and the final results. 

2. Outline the Report: Once you have all the necessary information, it is time to create an outline for the report. This will help you organize your thoughts and ensure that your report is structured and coherent. 

3. Write the Introduction: The introduction should provide a brief overview of the project and its purpose. It should include an explanation of the project's objectives, the team's involvement, and the results achieved. 

4. Write the Body: The body of the report should provide a detailed description of the project and its results. It should include information about the team, the methods used, the results achieved, and the conclusions. 

5. Write the Conclusion: The conclusion should provide a summary of the project and its results. It should also include recommendations for future action. 

6. Proofread and Edit: Once you have written the report, it is important to proofread and edit it. This will help ensure that the report is error-free and that it communicates the project's results effectively. 

Conclusion

Writing an engineering project report is essential to any engineering project. The final step provides a summary of the project and its results. A good project report can help students get better grades and advance their career prospects. By following the steps outlined above, you can create a successful engineering project report that will help you demonstrate your skills and knowledge. Encouraging students to use their engineering project writings to showcase their technical prowess is also a good idea. It will also help in the post-graduation job search. 

In the end, it is important to remember that engineering project reports should be clear, concise, and organized. With the right approach, you can create a report that will help you stand out from the crowd and advance your career prospects.

Set Up a Network Printer with Raspberry Pi 4

Thank you for being here for today's tutorial of our in-depth Raspberry Pi programming tutorial. The previous tutorial demonstrated the proper wiring of the photoresistor sensor to the GPIO pins. Finally, we learned how it might be included in a Python script for data collection and analysis needs. We also looked at the functions of each component in the circuit. However, I'll walk you through installing a Pi 4 Print Server in this guide. While installing the program is straightforward, setting it up so that a Windows network can locate the print server requires a little more effort. Rather than spending hundreds of dollars upgrading to a laser printer, you may easily upgrade your current USB printer to laser quality by installing a print server.

Because of this software, you no longer have to have the printer physically linked to a single computer, and you may place it wherever you choose and share it with as many computers as you like. In addition, it's a fantastic method of printer sharing that eliminates the need for a pricey tower computer to be on and active all the time. CUPS is the program we'll be using to make this happen. Common Unix Printing System, or CUPS, is the foundation of Linux printing applications. But, the program facilitates communication between your computer and printer. It would help if you visited available printing to verify that the CUPS printing software supports your printer model.

Where To Buy?
No.ComponentsDistributorLink To Buy
1Raspberry Pi 4AmazonBuy Now

Components

  • Raspberry Pi 4

  • Wi-Fi

  • USB Printer

Pi Print Server Software Installation

Since the Raspberry Pi print server is included in the Debian Jessie distribution, setting it up is a breeze. In this lesson, I'll be using Raspbian, so if you're unfamiliar with it and would like to learn how to set it up, check out my guide on how to do so.

We must ensure the Raspberry Pi is up-to-date with the most recent software to get started. Just type in the appropriate instructions into the terminal to accomplish this.

sudo apt update

sudo apt upgrade

We can begin setting up the print software after the Pi 4 has been upgraded. Here, we will be setting up CUPS.

CUPS

CUPS, short for Common Unix Printing System, is a printing system designed for computers running UNIX-like operating systems. The software transforms the host computer into a print server. A CUPS-enabled server may receive print jobs from various client devices, sort them, and send them to the correct printer for output. Conveniently, this program can handle the administration of your printers, whether they're linked locally through USB or remotely via the network. Using the terminal, enter the following command to install the software. Considering HP has CUPS that support its open source project, HP printers, in particular. Even if your specific printer model isn't listed as being directly supported by CUPS, you may still be able to find a compatible generic driver online that will get the job done. These links will take you to a list of CUPS-compatible printers.

sudo apt install cups

We still have some work to do after CUPS's installation is complete. The first step is to include the pi user in the lpadmin set of users. With this group, the pi user can manage CUPS settings without logging in as the superuser.

sudo usermod -a -G lpadmin pi

To make sure it functions properly on your home network, there is one more thing we must do to CUPS: make it available to every computer on your network. At this time, Cups is configured to refuse connections from addresses outside the local network. By entering the following two commands, we can make it listen to all incoming connections:

sudo cupsctl --remote-any

sudo systemctl restart cups

After this, any machine on the network can send prints to the Pi 4 print server. The following command can be used if you need to know your Raspberry Pi's local IP Address.

hostname -I

If you know your Raspberry Pi's IP address, you can use it to access the website at the address below. Be sure to replace "192.168.1.105" with your IP address.

We'll examine how to configure SAMBA so that Windows can find the Raspberry Pi print server. Furthermore, we will demonstrate how to install a printer using the CUPS interface.

Pi 4 Print Server SAMBA Configuration

A proper SAMBA configuration is required if you use your print server in conjunction with Windows. To get SAMBA up and running with the CUPS print drivers, we'll have to install it and tweak its settings.

First, check that SAMBA is installed; to do so, we can use the terminal's built-in install command. Just by typing this into the terminal, we can accomplish our goal.

sudo apt install samba

Now that SAMBA is installed on our Pi 4, we can access its config file and make some changes. The following command will cause the file to be opened in the nano text editor:

Sudo nano /etc/samba/smb.conf

Once the file has been opened, it must be scrolled to the end. To do this quickly, press the Control key plus the V key. The following lines should be added or edited once you reach the very end of the file. The file already contained the "[printers]" and "[print$]" sections; all I had to do was update the values to reflect the following.

[printers]

comment = All Printers

browseable = no

path = /var/spool/samba

printable = yes

guest ok = yes

read only = yes

create mask = 0700

[print$]

comment = Printer Drivers

path = /var/lib/samba/printers

browseable = yes

read only = no

guest ok = no

To save the file, hit CTRL+X, Y, and ENTER. SAMBA needs to be restarted to pick up the updated settings. The following command, when entered into the terminal, will restart SAMBA.

sudo systemctl restart smbd

Installation of a Printer in CUPS

It's easy to set up a printer using CUPS, but first, we need to open the program's graphical user interface. For the IP address of your Raspberry Pi, enter "hostname" into the terminal.

hostname -I

To access the IP configuration page for your Raspberry Pi, type the following into your web browser and enter the IP address you just jotted down. Replace "192.168.1.105" with your IP address when entering this address.

The following homepage is what you should see. Here, we'll go to "Administration" on the main menu.

You'll be directed to Cups's control panel when you click here. On this page, select the "Add Printer" option.

The "Add Printer" screen has been brought up, allowing us to choose the printer we wish to configure Cups with. That printer is a Canon MG2500 series machine. When you've made your print choices, click the "Continue" button.

Ensure the printer is turned on and plugged into the Raspberry Pi through a USB connection if it does not appear here. If your Raspberry Pi still doesn't show up, try restarting it while ensuring your printer is on and connected.

Choose your printer's model from the dropdown menu here. CUPS will automatically identify the printer model and install the appropriate driver when possible. However, this may only sometimes work, so you may need to sift through the list to locate the proper driver manually. Once you've double-checked everything and are pleased, click the "Add Printer" button.

After completing the steps on this screen, the printer will have been added successfully. Here, you can give it a name and a summary that mean whatever you choose. If you have more than one printer in your residence, specifying its location will make your life easier. If you want other computers to be able to use the printer, you must also turn on "Share This Printer." If everything looks good, hit the "Continue" button.

After finishing the printer setup process, you will see the screen shown in the image below. Several of the printer's more nuanced settings are accessible through this panel—the number of pages printed, the quality of the printout, and so forth.

Having finished setting up our Raspberry Pi print server, we will now discuss how to add it to Windows. Having SAMBA set up earlier in the course should make this step less painless.

Setting up a Raspberry Pi as a Print Server in Windows

Installing a CUPS printer on Windows requires selecting the driver that will allow Windows to communicate with and comprehend the printer. Launching "My Computer" or "This PC" and then clicking "network" in the left-hand navigation pane is a quick method to get to Windows' network page, where you can get started. When you get there, you should see a screen like the one below, where your Raspberry Pi's hostname (in my instance, RASPBERRYPI) is displayed. If you double-click your Raspberry Pi's share, it may prompt you to log in. If entering anything other than "enter" fails to log you in, try "pi."

The printers used with your Pi 4 print server should now be displayed on the screen. Select the printer you wish to use by double-clicking on it.

You'll see the cautionary message below if you try to double-click this. Select "OK" to proceed with the tutorial.

Select your printer brand on the left, and then select your printer model from the available drivers for that brand on the right. If your printer isn't listed here, you can identify its model online and install the necessary drivers. For me, that meant tracking down the Canon MG2500 series. When you've decided which printer to use, you may move forward by clicking the "Ok" button.

The procedure will now initiate a link to your printer. Select "Printer" > "Set as Default Printer" to make this the system's default printer.

Now that the printer has been installed on your computer, you can use it with any application that supports printing. By printing a test page, you may verify that the printer is configured correctly.

If you're having trouble printing a file, check to see if you've picked the correct printer driver in CUPS and Windows. Ensure the printer is turned on as well; the Canon MG2500 series, for example, do not immediately restart when a print job is delivered. Adding Apple AirPrint capability to your Pi 4 print server is a great way to expand its capabilities.

The Raspberry Pi AirPrint Server Setup

Apple's AirPrint printing technology eliminates the requirement for users of Apple products to acquire and install the separate printing software. By adding AirPrint functionality, you may quickly and effortlessly print from your iOS smartphone to any nearby printer. You can run an AirPrint server from your Raspberry Pi, and Cups is the software that will power it. It will take care of talking to your printer on your Raspberry Pi's behalf.

The "Avahi daemon" must be set up before AirPrint may be used on your computer. The following command will install the package onto your Raspberry Pi.

sudo apt install avahi-daemon

Using this package, you can make Apple's Zeroconf design a reality. Bonjour has become widely used to refer to this type of network architecture. Using Bonjour, AirPrint can link disparate gadgets like an iPhone and a Raspberry Pi. Once you've selected the files you'd like to print, the Bonjour daemon will forward them to the designated printer.

Let's restart the machine to see whether the AirPrint server has worked appropriately, and everything is ready. Execute this command to force the Raspberry Pi to restart.

sudo reboot

After rebooting your Raspberry Pi, you can check to see if anything went wrong. This should get you to the point where you can print from any AirPrint-enabled device.

Display printer and print

Conclusion

Have you succeeded in following this guide and setting up a Pi 4 network print server? If you've followed these steps carefully, your Raspberry Pi should be ready to function as a network AirPrint server. We were able to accomplish this by putting the Avahi daemon in place. This daemon implements the bonjour protocol used by AirPrint. Feel free to leave a message below if you have any thoughts, suggestions, or problems you'd want to discuss. The following tutorial will review the steps for monitoring a patient's heart rate with a Raspberry Pi 4.

Sets in Python using Jupyter Notebook

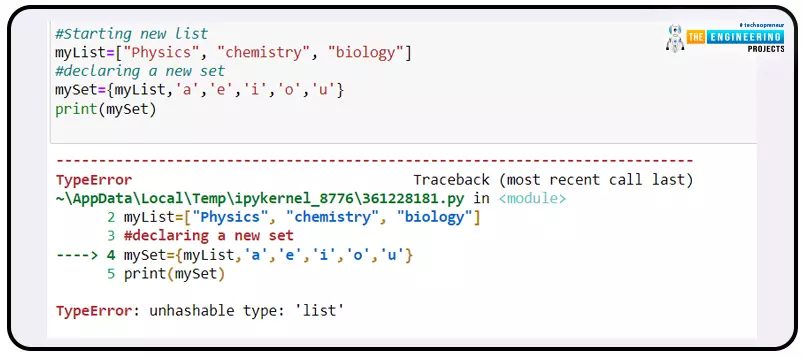
Hello students! Welcome to the new tutorial on Python. We all know that Python is one of the most popular programming languages, and there are hundreds or thousands of developers that are earning a handsome amount with the help of this easy programming language. In the previous lecture, we studied the range in the sequence, and in the present class, our concern is having the command on the sets in Python. We know you are curious about the set's details, but before this, I want to share the list of topics that will be covered in this class.

  • What is a set in the Python programming language?

  • What are some properties that distinguish the set from other data types?

  • What is the mutable data type, and how is it related to the set?

  • Introduction of the Jupyter notebook.

  • Can we have duplicate elements in the set?

  • How to add, remove, and update the elements in the set while using the Jupyter notebook.

  • How can we access the elements using a loop?

  • Give an example of how to use the length function with sets and why it is important.

All of these are important interview questions, and we will not only find the answer to them but also elaborate on them with the help of simple but understandable examples taken from daily life routines. Your duty is to perform each and every code, not only by copying it from the lecture but also test your knowledge and practising more and more by making your own examples.

Introduction to Sets in Python

Since the last few tutorials on Python, we have been studying a lot about the sequence, which is basically the representation of a collection of data types with homogeneity or heterogeneity in the elements. If we talk about the sets, these have the same properties and procedures as their other group, such as list and range, but a slight difference in their property makes them a different data type. This can be elaborated with the help of its basic definition:

“The set is the type of sequence that contains the group of different data types, and it is the collection of unordered or unindexed data types together.”

Until now, the sequence discussed had been represented exactly as it was written by the programmers in the code. Yet, in the sets, the order is not exactly the same all the time. If you are thinking it is strange, then you must know, in the higher level of programming, this property of the set works great because we get the elements in random orders. 

Another difference between the set and the other sequences is the usage of the bracket, or, in other words, the declaration of the sequences. To tell the compiler that we want a set in the sequence, the programmers use curly brackets. You must have noticed that it is very rare to use curly brackets in Python, and therefore we can say that the representation of the set in Python is unique. 

Properties of Set Sequence in Python

As we have a lot of information about the sequences, we can openly discuss the properties of the set, and the reader will easily understand them by comparing them with others. So, here are some of the properties that can be compared:

  • Sets are represented with curly brackets. 

  • The elements of the set can not be duplicated; that is, all the elements are uniquely defined, and no element should be repeated; otherwise, the compiler will show the output in which the duplicate values are shown only once.

  • The set is a heterogeneous collection of elements, and therefore, the programmers can add one or more data types to a single set according to their choice. 

  • The set can be empty, that is, declared with zero elements. 

  • The set can be updated after its formation if the programmer wants to make some changes to it afterwards.

  • There are certain built-in functions of the set that, when used with the sets, have great applications in Python programming.

Each of these properties can be explained well with the help of TensorFlow. We have been using the Jupyter lab of TensorFlow since the start of this tutorial, and now, I want to tell you a better and more professional way to run the code with the help of TensorFlow. For this, you do not have to install any other software but the Jupter notebook already installed on your PC. Simply go to your search bar and run the Jupyter notebook. It will add a new tab with the label "home." Here, go to the “New” dialogue box and select Python 3. This will add the new project to a new tab. You can name it, but by default, it is named "untitled." 

If you are practising all the codes with us by hand, you will observe that the Jupyter notebook has a better user experience, and it adds the ending of common syntaxes such as the double quotation and parentheses by itself when the programmer starts them. We will talk more about it in later lectures, but for now, we are moving towards the codes and properties. 

Sets and Mutable Objects in Python

The first thing that we want to revise here is the definition of mutable elements:

“In programming languages, mutable objects are those that are used to group different items and can change their value according to the instruction of the programmer.”

We have learned many mutable sequences, such as lists, and here, the point is to revise it to a set and not use the mutable sequences as the elements. Only data types such as strings, integers, etc. can be used as the elements in the set; otherwise, the programmer will face an error. This can be explained with the help of the code given below:

#Starting new list

myList=["Physics", "chemistry", "biology"]

#declaring a new set

mySet={myList,'a','e','i','o','u'}

print(mySet)

As a result, it is demonstrated that programmers can combine simple data types into sets, but it is not possible to create collections of mutable objects or collections of collections within sets. 

Duplication is Not Allowed in Set

In the properties, we have mentioned that the process of feeding the duplicate elements into the set is not useful because it checks for each and every element while providing the output, and if the element is being repeated, the sets ignore them. As a result, if we have the element more than once in our input, the number of elements in the input and output are not the same.

#Declaring the set

MySet={21,23.6,55,'Peach', 'Almond', 23.6,21,'Almond'}

#using iteration to print the set

for item in MySet:

 print(item, end=" ")

print()

#calculating the length

length=len(MySet)

print('Numbers of elements = ',length)

This property will be more clear with the help of the following screenshot:

Hence, out of eight elements, the two duplicate elements are removed by the compiler, and we only get five elements that were calculated by the length function.

Addition Method in Set

This is an interesting method that is compatible with the set in Python. Consider the situation where the programmer has declared a set and then needs to add an element to the same pre-defined set. In such cases, the addition method is useful, with the help of which the programmer simply uses the syntax of the add method and there is no need to recreate the whole set again.

NameOfSet.add(element to be added)

If the question arises about the position of the element, this will be clear with the help of an example that we are going to check:

#Initializing the set

mySet={'eggs', 'bread', 'jam',23,67,132,55}

print('Elements of my set is= ', mySet)

#adding a new element

mySet.add("oats")

#printing the set with the added element

print('Elements of my set with new element= ', mySet)

Removing the Element From Set

Keep the scenario in your mind that we have discussed above, but this time, there is a need to remove the lament from the set, and for this, Python has another method that simply searches for the required element from the set and removes it. Afterwards, the results can be printed on the screen to check whether the task is complete or not. The keyword to remove the element is "discard,” and it is used in the same way as the add keyword. 

#Initializing the set

mySet={'eggs', 'bread', 'oat','jam',23,67,132,55}

print('Elements of my set is= ', mySet)

#removing the element "oat"

removeValue=mySet.discard('oat')

#printing the set with the removed element

print('Elements of my set with discarded element= ', mySet)

So, the removal process is also very simple and understandable but the syntax must be kept in mind and before using the final set in this case, always check for the results by printing the elements on the screen as we are doing here because a little mistake on the syntax results in no removal and it may cause the problem in the code. So it is a good practice to have an eye on the elements.

Updating the Elements of the Set

The updating process of the set may include different types of updates, such as increasing the size or changing the elements' sizes. For a better understanding, the best way is to learn how two or more sets can be merged into one large set. In the previous lectures, we have seen this type of process where merging is done with the help of a method. To discuss a new method with you, here we are using the update method. The process and syntax are the same as we have seen in the previous two methods.

setToBeAdded.update(setToBeUpdated)

As a result, the final set has elements from both of these sets. But it is important to notice that both sets have to be declared first, and in the third step, we get the merged or updated search with the help of the command given above. 

#Initializing the first set

myFirstSet={'eggs', 'bread', 'oat', 'jam',23,67,132,55}

print('Elements of first set is= ', myFirstSet)

#Initializing the second set

mySecondSet={'Python', 'Java', 'C++'}

print('Elements of second set is= ', mySecondSet)

#Updating the sets

myFirstSet.update(mySecondSet)

#printing the final set 

print('Elements of final set= ', myFirstSet)

Hence both of these are merged together and as we are using the sets, the order of the final set is different and unarranged. Well, it is a good practice to check for the numbers of elements using the length function all the time.

For Loop in Set

We hope by now you have an idea of the for loop and how we use it with different data types in Python. Similar to the list, the programmers can access each and every element with the help of iterations (loops). So, let us review the elements of a set with the help of the for loop. 

#declaring our set with the name to-do list.

ToDoList={'assignment', 'coding', 'prayer', 'washing cloths', 'doing dishes'}

#starting for loop

for work in ToDoList:

 print(work, end=" ")

If we look at the output, we get the following results:

Hence, it was an interesting tutorial on the sets where we learned a lot about the topic and the details were interesting and related to our daily life. At the start, we saw the basic definition and a brief introduction to the topic. We have seen some properties of the sets that were resembling the types of sequences but these were also different in many ways and we not only studied them in detail but practically proved them in the Jupyter notebook. It was nice to use the Jupyter notebook that we are going to use onward in this series. In the next tutorial, we will put light on some other features so stay tuned with us because we are preparing our next lecture on Python.

Range Sequence in Python using TensorFlow

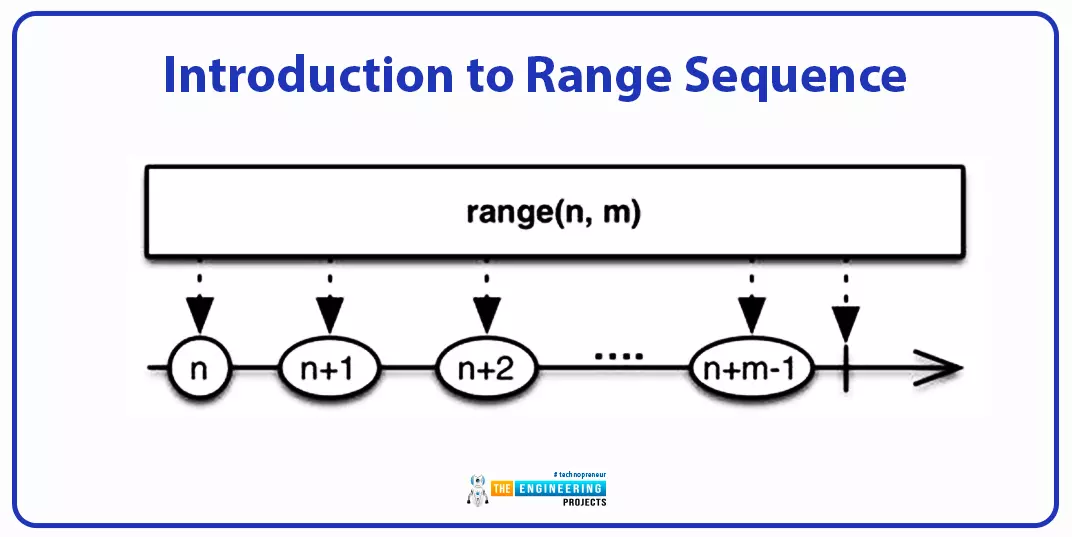
Hey peeps! Welcome to the new lecture on the sequence data type, where we are discussing the range data type. We are interested in working on deep learning, and for this, we are learning the Python programming language from scratch. If we talk about the previous episode, we saw the byte and byte array methods that were amazing for converting the different data types into bytes. The current lecture will discuss the range data type, which is slightly different from the other types of sequences, so students will learn new and interesting concepts in the lecture; however, before we get into the details of our topic, take a look at today's highlights:

  • What is the range function?

  • How can you elaborate on the syntax of the range function in detail?

  • What are the three types of range functions?

  • Give us some examples of range functions in Python.

  • What are some basic questions the answer of which should be kept in mind while using the range function?

The answer to each question above will be provided before the end of this lecture. All the examples will be tried on TensorFlow for better understanding.

Introduction to Range Sequence

The range is a type of sequence in the data type that also represents the group or collection of the items together in different ways, just like other types of sequences. It is also the built-in function in Python, and while using it, the programmer gets the range object. The range is one of my favorite data types because it is easy to use and, in just a few simple steps, it provides us with the sequence of the integers according to our choice. Usually, the loops play an important role while dealing with the range function. Right now, as we have not learned about loops, you will simply have an idea of the workings and output of this data type.

The good thing about using the range function is that, unlike loops, the programmer does not have to use the logic behind the series but just has to put the values in the range function, and the results are great. Keep in mind that the range function is used with the loops, and there is less versatility in the range function when compared with the simple logical loops, but for basic workings, it is important to learn about the range, and this function is great.

Syntax of Range Function

The syntax of the range function is also easy, just like its group mates. You have to know about the three parameters and will determine all of them according to your requirements:

MyRange=range(start,stop,step):

for i in range(MyRange)

print(i)

Here, the semicolon at the end indicates that the syntax of the range function is complete, and the compiler now has to calculate the range arguments. Furthermore, if the programmer wants the result to appear on the same line as the interval, he can add end=" " at the end of the print. In this way, the compiler will not jump to the next line, but the results will be printed on the same line with a space between each element. Of course, the programmer has to save the result of the range function into a variable so that it can be used in the other functions. But here, it is important to mention that all of these parameters are not compulsory, but the range function gives you the independence to use one, two, or three of them. 

For loop in Python

The for loop is the iteration in the programming languages and you will learn them in detail in the coming lectures but for now, keep in mind that the range function alone can not do anything but it is fed into the for loop so that compiler can work on the iterations. The variable (usually i) is used in this loop and the results of the range function are input in this loop.

Types of Range Functions in Python

Another thing that must be mentioned here is the programmer has to choose the number of arguments according to the complexity of the series of numbers he or she wants. So here are the details of each case:

range(stop)

This is the most basic type of range function, in which the programmer simply specifies the point where the compiler has to stop making the range series. In all types of range functions, there is always a need for a stop parameter. Three things are to be mentioned here:

  • By default, the range starts at zero, and if the user does not have any particular choice for the start, the range function can be used with the only stop parameter.

  • Only whole numbers are printed on the screen.

  • The stop number, which is the limit of the range function, will not be printed on the screen. 

  • When you put this value equal to zero, the result will be an empty range and you will get nothing. 

for i in range(3):

   print(i,end=" ")

range(start,stop)

Just think about the case where the default value, which is zero, is not to be used. Instead, the programmer has the option of printing the series of numbers without missing any of them and then specifying the start and stop ranges in the range function. But, as in the previous case, the stop number will not be printed on the screen, so you have to give the range of stops that you do not want on the screen, but the number before it is required there. 

for i in range(3,34):

   print(i,end=" ")

range(start,stop, step)

The third function, as expected, is the complete range function, into which the programmer feeds another step parameter. With the help of this, the programmers are able to get the series of numbers that starts from the point they want and have uniform intervals between the numbers and the ending point that is expected by the number. In short, the whole series is under the control of the programmer, but you have to notice that the steps are always uniform. The step function must not be zero and you will get the reason for this statement soon in this lecture. We can put the step value in the code discussed above and in this way, if 2 is the step value, the programmers will have half of the series as given above. 

 for i in range(3,34,2):

   print(i,end=" ")

Range Function Examples in TensorFlow

Here comes the action because, till now, the examples you have seen are simple examples with a simple series, but now, we are dealing with some exceptional cases that will clear some related concepts in your mind. We have divided the examples into some questions, and we will try to get the answers with the help of codes:

Can we use float in the range function?

Till now, integers are being used in the range function but we know that integers and floats are the two most related data types and will try to attempt the range function with the help of floating values as the parameters.

for i in range(3.5,77):

   print(i,end=" ")

As you can see, the compiler is throwing the error that it is not possible to use the float in the range function because it is designed only for integers. The same program will run when you remove the decimal part from the first value, which is the starting point. 

The Intertool Chain Method

Let me tell you the interesting way to get the range series with the help of inter tool chain method. But before this, you have to look at the basic definition of this tool.

“The iter-tool iterator is the pre-define module in python that provides the complex applications of the iteration in simple ways. The methods are defined in this module, and the programmers have to import them before using them.”

So, the chain method is also saved in this method, and when the programmers need to use them in a different way, they simply use the import keyword and use it in programs. As we are dealing with the range function, the iter-tool chain function is used to connect the results of two or more results in the form of a single series. Have a look at the code given next, and then read this paragraph again to get the point.

#import the chain method from the iter-tool library

from itertools import chain

# Printing two methods in a row

print("Concatenating the result")

MyChain = chain(range(4,7), range(34,55,2))

#using the method in the range

for i in MyChain:

    print(i, end=" ")

The extraction of the concepts used in this program:

  • We can import the chain method from the library of itertools that have the iteration tools in it. 

  • To import the method, we use from and import keywords that are represented with the green bold colour in the program. 

  • Concatenation is the process of connecting two or more data types into a single line.

  • When using concatenation, the for loop is used by making a variable and saving the results of two connected ranges together in the variable.  

  • The independence to use the number of arguments between one to three is the same in the concatenation as in all cases.

  • In the for loop, when using concatenation, only a variable is used.

  • The other way to get the same results is by using both ranges with the for loop, but the code will not be very clear in that case. 

  • If the programmer wants to get the results in column form, he or she can simply delete the “end” part in the code. 

Can we access the Range function with the index value?

The simple answer to the question is yes, and when we go into the details, the range function simply gets the indexes the programmer wants and can provide them with the single values they require. In simple words, the programmer tells the range function its stop value, and it assumes the whole series and picks the one number demanded by the programmer. The stop range is described in parentheses when the index to be picked is mentioned in the square bracelets. 

#Give the range and pick the element through the index 

MyRange = range(5)[2]

print("3rd element out of 5 =", MyRange)

print() 

MyRange = range(3,34)[23]

print("23rd element of this range with start and stop value =", MyRange)

print() 

MyRange = range(28)[5]

print("5th element of this range with start, stop, and step value =", MyRange)

Hence, the programmer can make a range of choices and then pick one element.

What if the step is kept at zero in the range method

During the discussion of step, we saw the basic discussion of the step argument but keep in mind, if the programmer does not want the step function, he can simply ignore it. There is not need to input the step function as zero because, in such cases, the error will be shown on the screen.

for i in range(3,23,0):

   print(i,end=" ")

Hence, from the above code, it is clear that the range of the stop argument is always greater than zero. Moreover, in the same code, if the value of the step argument is greater than the stop argument, it just shows the starting point of the range and does not give the other values or any errors because logically, it is true.

Truss, in this lecture, we saw many interesting concepts about the type of sequence called range function. This is a pre-defined function that is used to represent the group of numbers, and we can control the starting, ending, and interval values between the series of this number according to our wishes. This is always used with the for loop, and different cases of range functions were discussed in this lecture. Stay with us for more Python tutorials.

Syed Zain Nasir

I am Syed Zain Nasir, the founder of <a href=https://www.TheEngineeringProjects.com/>The Engineering Projects</a> (TEP). I am a programmer since 2009 before that I just search things, make small projects and now I am sharing my knowledge through this platform.I also work as a freelancer and did many projects related to programming and electrical circuitry. <a href=https://plus.google.com/+SyedZainNasir/>My Google Profile+</a>

Share
Published by
Syed Zain Nasir