Arduino Mega 2560 Library for Proteus V3.0

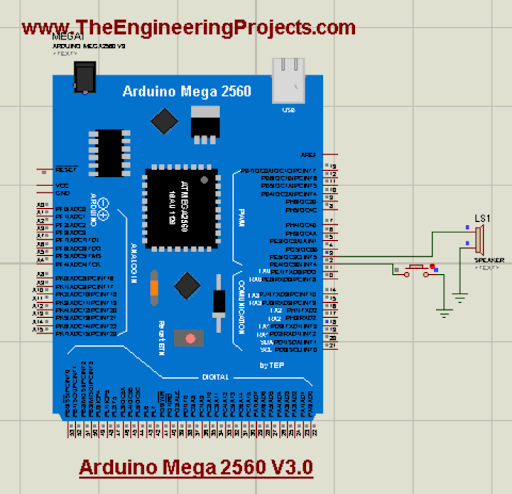
Hello readers! I hope you are doing great. Today, we are discussing the latest library for proteus. In the tutorial, we will look at the Arduino Mega 2560 library for Porteus V 3.0, which is one of the most versatile and useful microcontrollers from the Arduino family. We have shared the previous versions with you before this; these were the Arduino Mega 2560 library for Proteus and the Arduino Mega 2560 library for Proteus V2.0. The current version is better in structure and does not have a link to the website so you may use it in your projects easily. 

Here, I will discuss the detailed specifications of this microcontroller. After that, I will show you the procedure to download and install this library in the Proteus and in the end, we’ll create a mini project using this microcontroller. Here is the introduction to the Arduino Mega 2560:

Where To Buy?
No.ComponentsDistributorLink To Buy
1BuzzerAmazonBuy Now
2Arduino Mega 2560AmazonBuy Now

Introduction to the Arduino Mega 2560 V3.0

The Arduino Mega 2560 belongs to the family of Arduino microcontrollers and is one of the most important devices in embedded systems. Here are some of its specifications:

Specification

Value

Microcontroller

ATmega2560

Operating Voltage

5V

Input Voltage (recommended)

7-12V

Input Voltage (limit)

6-20V

Digital I/O Pins

54 (of which 15 provide PWM output)

Analog Input Pins

16

DC Current per I/O Pin

20 mA

DC Current for 3.3V Pin

50 mA

Flash Memory

256 KB (8 KB used by bootloader)

SRAM

8 KB

EEPROM

4 KB

Clock Speed

16 MHz

LED_BUILTIN

Pin 13

Length

101.52 mm

Width

53.3 mm

Weight

37 g


Now that we know the basic features of this device, we can understand how it works in Proteus. 

Arduino Mega 2560 V3.0 Library for Proteus

This library is not present by default in Porteus. The users have to download and install it in the Porteus library folder. Click on the following link to start the downloading process:

Arduino Mega 2560 V3.0 for Proteus

Adding Proteus Library File

  • If the downloading process is complete, you can see a zip file in the downloading folder of your system. Click on it.

  • Extract the zip folder at the desired location. 

  • Along with some other files, you can see there are two files with the following names in the zip folder:

  • ArduinoMega3TEP.IDX

  • ArduinoMega3TEP.LIB

  • You have to copy these two files only and go to the folder of the given path:
    C>Program files>Lab centre electronics>Proteus 7 Professional>Library

Note: The procedure to install the same package in Proteus Professional 8 is the same.

Arduino Mega 2560 Library V3.0 in Proteus

Now, the Arduino Mega 2560 V3.0 can be run on your Proteus software. Open your Proteus software or if it was already opened, restart it so the libraries may load successfully. 

  • Click on the “P” button on the left side of the screen and it will open a search box for devices in front of you.

  • Here, type “Arduino Mega 2560 V3.0,” and it will show you the following device:

  • Double-click on it to pick it up.

  • Close the search box and click on the name of this microcontroller from the pick library section present on the left side.

  • Place it in the working area to see the structure of the Arduino Mega 2560 V3.0.

If you have seen the previous versions of this microcontroller in Proteus, you can see that the latest version has some changes in it. The design and colour are closer to the real Arduino Mega 2560. Moreover, it does not have a link to the website and the pins are more realistic. 

Arduino Mega 2560 V3.0 Simulation in Proteus

The workings of the Arduino Mega 2560 V3.0 library can be understood with the help of a simple project. Let’s create one. For this, follow the steps given here:

  • Go to the “pick library” again and get the speaker and buttons one after the other.
  • Arrange the speaker with pin 3 of the Arduino Mega 2560 V3.0 placed in the working area.
  • Similarly, place the button on pin 2 of the microcontroller. The screen should look like the following image:

  • Now, go to terminal mode from the leftmost and place the ground terminals with the components.

Now, connect all the components through the connecting wires. Here is the final circuit:

Now, it's time to add code to the simulation.

Code for Arduino Mega 2560 V3.0

  • Start your Arduino IDE.
  • Create a new project by going into sketch>new sketch.
  • Delete the present code from the project.
  • Paste the following code into the project:

const int buttonPin = 2;    // Pin connected to the button

const int speakerPin = 3;   // Pin connected to the speaker

int buttonState = 0;        // Variable to store the button state

boolean isPlaying = false;   // Variable to track whether the speaker is playing

void setup() {

  pinMode(buttonPin, INPUT);

  pinMode(speakerPin, OUTPUT);

}

void loop() {

  // Read the state of the button

  buttonState = digitalRead(buttonPin);

  // Check if the button is pressed

  if (buttonState == HIGH) {

    // Toggle the playing state

    isPlaying = !isPlaying;

    // If playing, start the speaker

    if (isPlaying) {

      digitalWrite(speakerPin, HIGH);

    } else {

      // If not playing, stop the speaker

      digitalWrite(speakerPin, LOW);

    }

    // Add a small delay to debounce the button

    delay(200);

  }

}

  • You can get the same code from the zip file you have downloaded from this tutorial. 

  • Click on the "verify" button present on the above side of the code. 

  • Once the loading is complete, click on the “upload” button present just at the side of the verify button. It will create a hex file in your system. 

  • From the console of loading, search for the address of the file where the code is saved. 

  • In my case, it looks like this:

Copy this path to the clipboard. 

Add the Hex File in Proteus

  • Once again, go to your Proteus software. 

  • Click on the Arduino Mega 2560 to open its control panel. 

  • Paste the path of the hex file in the place of the program file:

  • Hit the “OK” button to close the window.

Arduino Mega 1280 V3.0 Simulation Results

  • Once you have loaded the code into the microcontroller, you can now run the project. 

  • At the bottom left side of the project, you can see different buttons, click on the play button to run the project. 

  • Before clicking on the button of the project, the project looks like the following:

  • Once the button is pressed, you will hear the sound from the speaker. Hence, the speaker works with the button. 

If all the above steps are completed successfully, you will hear the sound of the speaker. I hope all the steps are covered in the tutorial and you have installed and run the Arduino Mega 2560 v3.0 in Proteus, but if you want to know more about this microcontroller, you can ask in the comment section.


Arduino Mega 1280 Library for Proteus V3.0

Hello friends! I hope you are doing great. Today, we are discussing the latest version of the Arduino Mega 1280 library for Proteus. This can be used in both versions (Proteus 7 and Proteus. We have shared the previous versions, which are the Arduino Mega 1280 library for Proteus and the Arduino Mega 1280 library for Proteus V2.0 with you. With the advancement in the version, these microcontrollers have a better structure and the design is closer to the real microcontrollers. 

In this article, I will discuss the introduction of the Arduino Mega 1280 in detail. Here, you will learn the features and functions of this microcontroller. Then, we’ll see how to download and install this library in Proteus. In the end, we’ll see a mini project using the Arduino Mega 1280 V3.0. Let’s move towards our first topic:

Where To Buy?
No.ComponentsDistributorLink To Buy
1Battery 12VAmazonBuy Now
2ResistorAmazonBuy Now
3LCD 20x4AmazonBuy Now

Introduction to the Arduino Mega 1280 V3.0

  • The Arduino Mega is a microcontroller board that is based on the ATmega 1280. It has a large structure and provides more I/O pins.
  • It has the following memory features:
  • 128KB of flash memory to store the programs in it.
  • 8KB of SRAM for dynamic memory allocation
  • 4KB of EEPROM for data storage
  • It has 54 digital pins, of which 14 are used as PWM outputs.
  • It has 16 analogue input pins
  • This microcontroller uses the ATmega16U2 microcontroller for USB-to-serial conversion
  • It has compatibility with Arduino IDE where it is programmed with C++ just like other Arduino boards.
  • One must know that the Arduino Mega 1280 V3.0 is an open-source microcontroller and it is a robust platform for building and experiencing a vast range of electronic projects.

Now, let’s see the Arduino Mega 1280 library V3.0 in Porteus. 

Arduino Mega 1280 V3.0 Library for Proteus

The download and installation process for Arduino Mega 1280 is easy. The Proteus software does not have this library by default. To use it, the first step is to download it from the link given below:

Arduino Mega 1280 V3.0 for Proteus

Adding Proteus Library File

  • The downloading does not take much time. Once it is complete, it can be seen in the download folder on your system.

  • You will see a zip file when it is extracted to a particular path of your choice. 

  • There are two files in the folder named:

    • ArduinoMega3TEP.IDX

    • ArduinoMega3TEP.LIB

  • Copy these files and paste them into the folder with the following path:
    C>Program files>Lab centre electronics>Proteus 7 Professional>Library

Note: The same process is applicable to Proteus 8 professional if you are using that.

Arduino Mega 2560 Library V3.0 in Proteus

  • If all the above steps are completed successfully, the Proteus has to start/restart so that it may load all the files.
  • The Arduino Mega 1280 V3.0 is present in the libraries so click on the “P” button at the left side of the screen to pick it from the libraries. It will open a search box in front of you.
  • Type “Arduino Mega 1280” there and you will see the following options in front of you:

  • Double-click on its name to pick it.
  • Now, click on the picked Arduino Mega and place it on the working area to see its structure:

You can see it has many pins and the structure and design are closer to the real Arduino Mega. There is no link to the website on this microcontroller and it has more details about the pins on it. These points are different from the previous versions. 

Arduino Mega 1280 V3.0 Simulation in Proteus

The Arduino Mega 1280 has many features and it is used in a great number of projects. But, as a beginner, we’ll check the work with the help of a simple project. In this project, we’ll use the LED with Arduino Mega 1280 V3.0 and print the message of our own choice. Follow the steps to perform this example:

  • Go to the pick library once again and write “LCD 20X4 TEP” there. Pick it to use it.
  • Similarly, pick the potentiometer by searching “POT-HG” in the search box.
  • Now, get the “Button” from the same search box.
  • Place the components of the project in the working area by following the pattern given here:

Go to the terminal mode from the left side of the screen, and then choose the default pins for the clean circuit. 

Set and label the pins according to the image given here:

The circuit is fine but it can’t be run without coding.

Code for Arduino Mega 1280 V3.0

  • Fire up your Arduino IDE.

  • Create a new sketch for this project. 

  • The upper side has a drop-down menu, choose Arduino from there. 

  • Delete the default code. 

  • Paste the following code into it:

#include

//Setting the LCD pins

LiquidCrystal lcd(13, 12, 11, 10, 9, 8);

const int buttonPin = 0;

boolean lastButtonState = LOW;

boolean displayMessage = false;


void setup() {

  pinMode(buttonPin, INPUT);

  //Printing the first message

  lcd.begin(20, 4);

  lcd.setCursor(1, 0);

  lcd.print("Press the button to see the message");

}


void loop() {

  int buttonState = digitalRead(buttonPin);

// Using if loop to create the condition

  if (buttonState != lastButtonState) {

    lastButtonState = buttonState;


    if (buttonState == LOW) {

      displayMessage = true;

      lcd.clear();

      lcd.setCursor(1, 0);

      //Printing the message on screen when buttin is pressed

      lcd.print("www.TheEngineering");

      lcd.setCursor(4, 1);

      lcd.print("Projects.com");

    } else {

      displayMessage = false;

      lcd.clear();

      lcd.setCursor(1, 0);

      lcd.print("Press the button to see the message");

    }

  }

}

  • The same code is also present in the zip file of the Arduino Mega 1280 V3.0 library folder you have downloaded. 

  • Click on the tick mark to run the code. It will take some moments to be loaded.

  • Once the loading is complete, click on the upload button to get the hex file address.

  • In the loading process, you have to search for the path to the hex file. In my case, it looks like the following image:

Add the Hex File in Proteus

  • Go to the proteus where we have created our project.

  • Double-click on the Arduino Mega 1280 V3.0 module.  It will open its properties panel in front of you. 

  • Paste the address of the hex file into the section named “Program File.".

  • Hit the “OK” button and close the window.

Arduino Mega 1280 V3.0 Simulation Results

  • There are some buttons at the bottom left corner of the screen. Out of these, you have to click the play button to run the project. 

  • If all the above procedures are completed successfully, you will see the output on the screen. 

  • When the button is opened, the LCD shows the message that you have to push the button to see the message.

  • Click on the button, and now you can see the message on the LCD. 

If all the above steps are completed successfully, you will see that you have used the Arduino Mega 1280 V3.0 to show the required message on the LCD. This microcontroller can be used in different complex projects and can provide the basic working according to the code. Now, you can try different projects on your Proteus. I hope you have installed the microcontroller successfully. Yet, if you are stuck at any point, you can ask in the comment section.

Arduino Pro Mini Library for Proteus V3.0

Hello friends! I hope you are doing great. Today, we are presenting another version of the Arduino Pro mini library. We have seen the Arduino Pro Mini library for Proteus and the Arduino Pro Mini library for Proteus V2.0 with you. As expected, the Arduino Mini Library for Proteus V3.0 has a better structure and size that make it even better than the previous ones. We will go through the details of the features to understand the library. 

In this article, I will briefly discuss the introduction of Arduino Pro Mini V3.0. You will learn the features of this board and see how to download and install this library in Proteus. In the end, I will create and elaborate on a simple project with this library to make things clear. Let’s move towards our first topic:

Where To Buy?
No.ComponentsDistributorLink To Buy
1Battery 12VAmazonBuy Now
2LEDsAmazonBuy Now
3ResistorAmazonBuy Now
4Arduino Pro MiniAmazonBuy Now

Introduction to the Arduino Pro Mini V3.0

In the vast range of microcontrollers, the Arduino Pro mini stands as the most powerful and compact member of the Arduino family. With the advancement in the version, the better functionalities and easy working of this microcontroller have been seen. Here are some important features of this microcontroller:

  • It has a compact size; therefore, it is named so. It has an even smaller size than the Arduino Mini. The minimalist design allows this board to adjust in compact spaces.
  • It has a simple structure and can be used with uncomplicated circuits.
  • The Arduino Pro Mini V3.0 also uses the ATmega328P, as the Arduino UNO does. It is the reason why it is considered a perfect balance between the small size and the powerful structure of the other basic Arduino microcontrollers.

  • It can be operated at different voltage levels, making it versatile for different types of projects. It can be operated at a wide range between 3.35V and 12V. This makes it ideal for battery-oriented projects as well as for large projects.
  • It has a smaller size but it is designed to accommodate 22 pins, which are:
  • 14 digital pins
  • 8 analogue pins
  • It has a large community; therefore, there is a great scope for this board and users can easily get the help of the experts.

Now, let’s see the Arduino Pro Mini library V3.0 in Porteus. 

Arduino Pro Mini Library for Proteus V3.0

By default, the Proteus does not have any Arduino Pro mini library. This can be used in Proteus by installing it manually. For this, download the library through the link given next:

Arduino Pro Mini Library for Proteus V3.0

Adding Proteus Library File

  • Once the downloading process is complete, you can see a zip folder with the same name in your download folder. Double-click on it or extract the file to the current folder with any other method. Remember the path to this extracted file. 

  • Now, go to the required path and open the folder named “Proteus Library Files.”. 

  • Here, you will find the following files:

    • ArduinoProMini3TEP.IDX

    • ArduinoProMini3TEP.LIB

  • These folders have to be placed in the library folder of Proteus so that we can have them in Proteus. 

  • For this, follow the path C>Program files>Lab centre electronics>Proteus 7 Professional>Library. Simply paste both of these into the folders of other libraries.

Note: The procedure to add the same library to Proteus 8 is the same. 

Arduino Pro Mini Library V3.0 in Proteus

  • If you have followed the above procedure successfully, the Arduino Pro mini V3.0 will work in your Proteus. If the software was already open, restart it. Otherwise, open your Proteus software. 

  • Click on the P button on the left side of the screen. This will prompt you to enter the search box.

  • Here, search for “Arduino Pro Mini V.30,” and if you have installed it successfully, you will see it in the options:

  • Click on the name “Arduino Pro Mini V3.0.”. It will be shown in the Pick Library of your Porteus.

  • Click on the name of this microcontroller and double-click on the working area to fix it there.

  • Look at the structure and pinouts of this Arduino board.

You can see this version has a better structure of pins and is similar to the real Arduino Pro Mini. We have removed the link to the website from this library and created an even smaller Arduino Pro Mini so the users can have a better experience with it. 

Arduino Pro Mini V3.0 Simulation in Proteus

It’s time to test the workings of this microcontroller in Porteus.

Fading LED with Arduino Pro Mini V3.0

  • The components are required for the creation of the whole project. For this, go to the “Pick library” through the same “P” button.
  • In the search box, type LED, grab it and repeat the instructions for the resistor.
  • Set the components in the working area. The proteus must look like the following image:

  • Connect one side of the LED to digital pin 2 of the Arduino Mini.
  • Connect the other side of the resistor with the LED terminal.
  • Double-click on the resistor to change its value. I’ll manually set it to 330 ohms.
  • From the leftmost side of the menu, search for terminal mode.
  • Here, search for the ground terminal and choose it.
  • Connect this terminal to the other end of the resistor.
  • Now, the project is ready to be played:

This will not work until we program the Arduino pro Mini in Arduino IDE.

Code for Arduino Pro Mini V3.0

  • Open your Arduino IDE in your system.
  • Create a new sketch for this project.
  • Select the right board and port. You have to select Arduino UNO from the board menu.

  • Delete the existing code and paste the following one there:

int LED = 2;         // the PWM pin the LED is attached to

int brightness = 2;  // how bright the LED is

int fadeAmount = 5;  // how many points to fade the LED by

void setup() {

  // declaring pin 9 to be an output:

  pinMode(LED, OUTPUT);

}

void loop() {

  // setting the brightness of pin 9:

  analogWrite(led, brightness);

  // changing the brightness for next time through the loop:

  brightness = brightness + fadeAmount;

  // reversing the direction of the fading at the ends of the fade:

  if (brightness <= 0 || brightness >= 255) {

    fadeAmount = -fadeAmount;

  }

  // waiting for 30 milliseconds to see the dimming effect

  delay(50);

}

}

  • You can have the same code in the zip file you downloaded before through this article. Click on the tick mark at the above side of the screen. 

  • Wait for the loading to complete. 

  • Click on the “Upload” button next to the tick mark. The loading will start at the bottom and you will see the hex file in the console. 

  • Search for the whole address of the hex file to copy it.

Add the Hex File in Proteus

  • The previous process created a hex file in your system. You have to redirect Prteus to that file. For this, go to the Protwus software where you have created the project.
  • Double-click on the Arduino Pro Mini V3.0. A dialogue box will appear on the screen.
  • Paste the address of the hex file to the empty section named "Program file".

  • Hit the “OK” button to save the settings.

Arduino Mini V3.0 Simulation Results

  • Now, the project is ready to be played. Hit the play button to start the simulation. 

  • If all the components are set up well and the project does not have any errors, the simulation will be started.

If all the steps are accomplished completely, your project will run successfully. I hope you have installed and worked with the Arduino Pro mini V3.0 without any errors and you can now create complex projects with this. Still, if you are stuck at any point, you can ask in the comment section.


Syed Zain Nasir

I am Syed Zain Nasir, the founder of <a href=https://www.TheEngineeringProjects.com/>The Engineering Projects</a> (TEP). I am a programmer since 2009 before that I just search things, make small projects and now I am sharing my knowledge through this platform.I also work as a freelancer and did many projects related to programming and electrical circuitry. <a href=https://plus.google.com/+SyedZainNasir/>My Google Profile+</a>

Share
Published by
Syed Zain Nasir