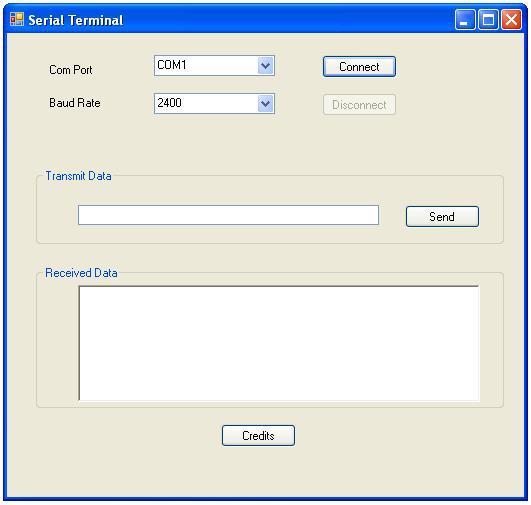
Hello friends, I hope you are doing well. In this tutorial, we will build a simple serial terminal in Visual Basic 2010. The application will detect the COM ports available on a Windows computer, open a selected port, transmit text, receive incoming data and close the connection cleanly.
This article keeps Visual Basic 2010 because that is the environment used in the original project and screenshots. According to the official Microsoft lifecycle record, Visual Studio 2010 reached the end of support in July 2020, so you should use a supported Visual Studio and .NET version for a new production application. However, the serial communication principles explained here still apply to maintenance work, laboratory computers and older engineering projects.
We will begin with the electrical and protocol basics, create the Windows Forms interface, write the complete VB code and then test the terminal with a loopback connection. I will also explain why received data cannot be written directly to a Windows Forms control from the serial event handler.
What Is Serial Communication?
Serial communication transfers bits one after another over a communication channel. In a basic asynchronous UART link, one device transmits on its TX line and the other receives on its RX line. The devices normally share a ground reference. A full-duplex link uses separate TX and RX conductors, so both sides can transmit at the same time.
A COM port is the Windows name for a serial interface. A built-in RS-232 port, a USB-to-UART converter and some Bluetooth serial profiles can all appear as names such as COM3 or COM8. The name identifies the Windows port; it does not tell us the electrical voltage used by the attached hardware.
| Setting | Meaning | Value used here |
|---|---|---|
| Baud rate | Number of symbols transmitted per second | 9600 baud by default |
| Data bits | Payload bits in each frame | 8 |
| Parity | Optional error-detection bit | None |
| Stop bits | Marks the end of a frame | 1 |
| Handshake | Hardware or software flow control | None |
The common notation 9600 8N1 therefore means 9600 baud, eight data bits, no parity and one stop bit. A normal 8N1 character contains one start bit, eight data bits and one stop bit, which gives ten transmitted bits per byte. The ideal maximum payload rate is:
Payload rate = 9600 bits/s / 10 bits per byte = 960 bytes/s
This is a theoretical value before application delays and protocol overhead. Both endpoints must use matching settings. A mismatch may produce unreadable characters, incomplete messages or no useful data.
Check the Electrical Interface Before Connecting Hardware
A microcontroller UART commonly uses 3.3 V or 5 V logic, while a traditional computer RS-232 connector uses inverted positive and negative voltage levels. Do not connect a microcontroller UART directly to a DB9 RS-232 port. Use a suitable level translator, such as a MAX232 circuit, or a USB-to-UART adapter with the correct logic voltage.
For a three-wire UART connection, connect the adapter TX to the device RX, adapter RX to device TX and the grounds together. Check the device documentation before joining grounds when either circuit is mains-powered or otherwise isolated. The software cannot correct an unsafe or incompatible electrical connection.
Controls Used in the Visual Basic Serial Terminal
Our application uses the System.IO.Ports.SerialPort class. Microsoft documents this class as the interface for synchronous and event-driven I/O through a serial port. We will place a SerialPort component on the form so Visual Studio creates and disposes the component with the form.
Create the following controls. The Name property is the identifier used in code, while the Text property is the caption shown to the user.
| Control | Name property | Text or purpose |
|---|---|---|
| Form | frmMain | Serial Terminal |
| ComboBox | cmbPort | Available COM ports |
| ComboBox | cmbBaud | Baud-rate choices |
| Button | btnConnect | Connect |
| Button | btnDisconnect | Disconnect |
| TextBox | txtTransmit | Text to transmit |
| Button | btnSend | Send |
| RichTextBox | rtbReceived | Received text |
| SerialPort | SerialPort1 | Serial connection component |
Step 1: Create a Windows Forms Project
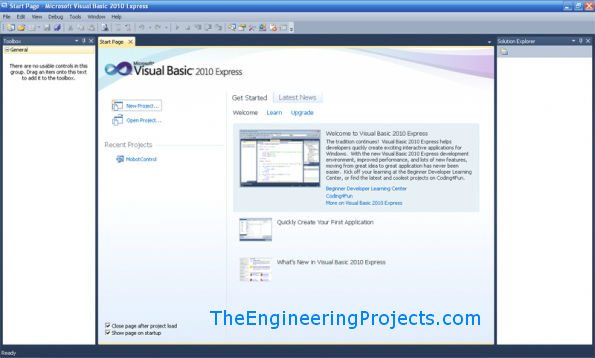
- Open Microsoft Visual Basic 2010 Express or Visual Studio 2010.
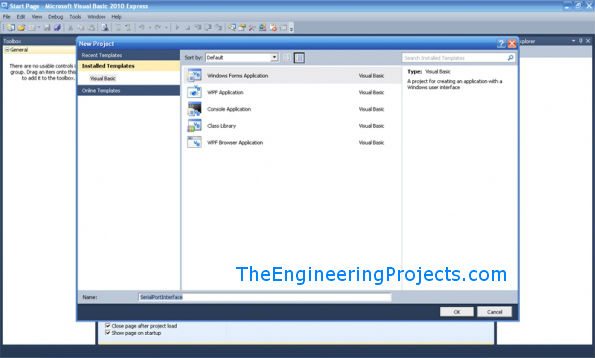
- Select File, New Project.
- Select Windows Forms Application under Visual Basic.
- Name the project SerialPortInterface and select OK.
The New Project dialog in your edition may look slightly different, but the application type must be a Visual Basic Windows Forms application.
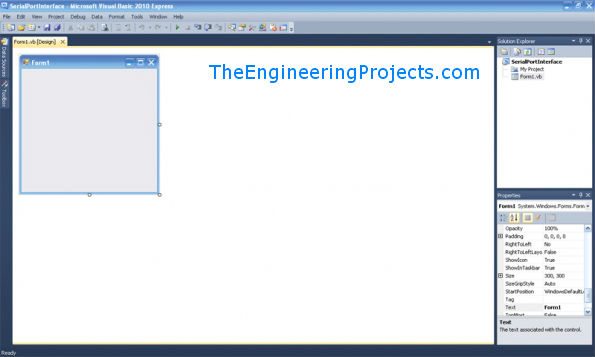
Visual Studio creates a blank form and the files required for the project. The form is the visual surface on which we will place the terminal controls.
Step 2: Configure the Main Form
Select the form and open the Properties window. Change the (Name) property from Form1 to frmMain. Change its Text property to Serial Terminal. The name makes the form easy to identify in code, while the text appears in its title bar.
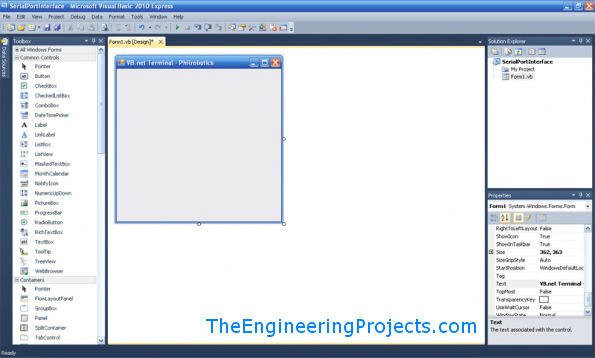
Step 3: Add Port and Baud-Rate Controls
Drag two ComboBox controls, two Button controls and two Label controls from the Toolbox to the form. Arrange them in a clear connection section.
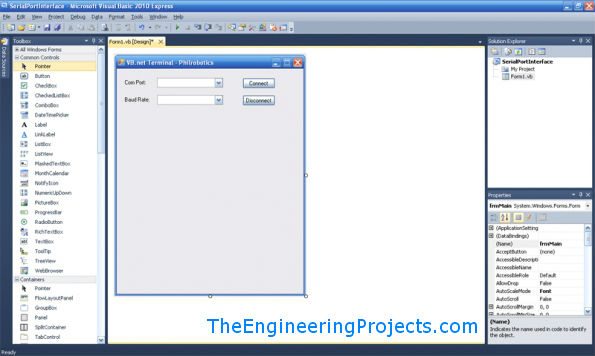
- Name the first ComboBox
cmbPortand label it COM Port. - Name the second ComboBox
cmbBaudand label it Baud Rate. - Name the buttons
btnConnectandbtnDisconnect. Set their Text properties to Connect and Disconnect. - Set each ComboBox
DropDownStyletoDropDownListif you want the user to select only a detected or predefined value.
Visual Basic identifiers are normally case-insensitive, but spelling still matters. Using the exact names in the table ensures that the event handlers and references in our code point to the intended controls.
Step 4: Add Transmit and Receive Controls
Add two GroupBox controls. Set their Text properties to Transmit Data and Received Data. Put a TextBox named txtTransmit and a Button named btnSend inside the transmit group. Set the button text to Send. Put a RichTextBox named rtbReceived inside the receive group.
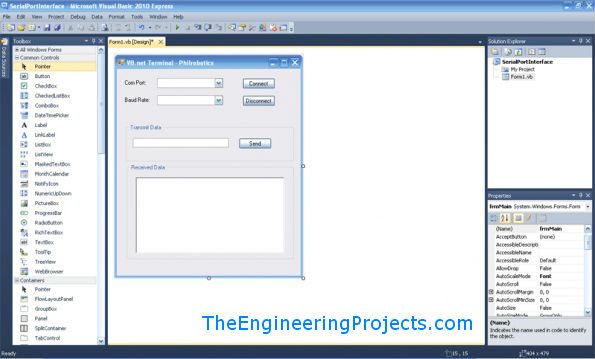
Finally, find SerialPort in the Components section of the Toolbox and drag it onto the form. It appears in the component tray below the designer because it has no visible user interface. Keep its name as SerialPort1. The code will set its communication properties before opening the port.
Step 5: Add the Visual Basic Code
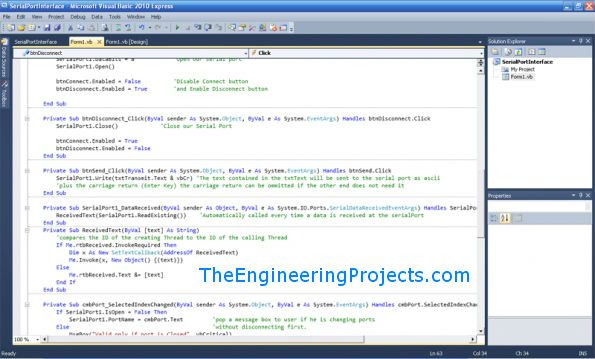
Press F7 or right-click the form and select View Code. The code editor opens as shown below.
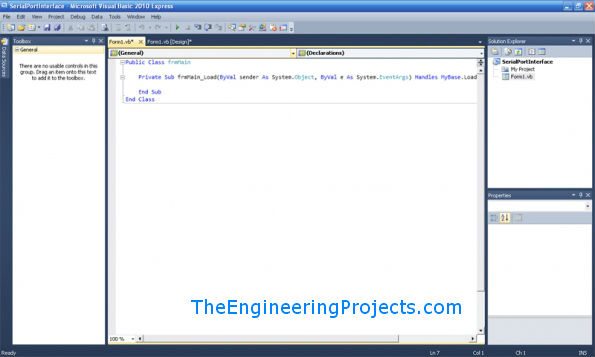
Replace the form class code with the following example. Leave the designer-generated file unchanged. This version handles an empty port list, validates the baud rate, reports common connection errors, marshals received data to the user-interface thread and closes the port when the form exits.
Imports System.IO
Imports System.IO.Ports

Public Class frmMain

    Private Sub frmMain_Load(ByVal sender As System.Object,
                             ByVal e As System.EventArgs) Handles MyBase.Load
        cmbBaud.Items.AddRange(New Object() {"9600", "19200", "38400", "57600", "115200"})
        cmbBaud.SelectedIndex = 0

        RefreshPortList()
        SetConnectedState(False)
    End Sub

    Private Sub RefreshPortList()
        Dim ports() As String = SerialPort.GetPortNames()
        Array.Sort(ports)

        cmbPort.Items.Clear()
        cmbPort.Items.AddRange(ports)

        If cmbPort.Items.Count > 0 Then
            cmbPort.SelectedIndex = 0
        End If
    End Sub

    Private Sub btnConnect_Click(ByVal sender As System.Object,
                                 ByVal e As System.EventArgs) Handles btnConnect.Click
        If cmbPort.SelectedItem Is Nothing Then
            MessageBox.Show("No COM port is available. Connect the adapter and try again.")
            Return
        End If

        Dim selectedBaud As Integer
        If Not Integer.TryParse(cmbBaud.Text, selectedBaud) Then
            MessageBox.Show("Select a valid baud rate.")
            Return
        End If

        Try
            SerialPort1.PortName = cmbPort.Text
            SerialPort1.BaudRate = selectedBaud
            SerialPort1.DataBits = 8
            SerialPort1.Parity = Parity.None
            SerialPort1.StopBits = StopBits.One
            SerialPort1.Handshake = Handshake.None
            SerialPort1.Encoding = System.Text.Encoding.ASCII
            SerialPort1.ReadTimeout = 1000
            SerialPort1.WriteTimeout = 1000
            SerialPort1.Open()

            SetConnectedState(True)
        Catch ex As UnauthorizedAccessException
            MessageBox.Show("The port is already in use or access was denied.")
        Catch ex As IOException
            MessageBox.Show("Windows could not open the selected serial device.")
        Catch ex As ArgumentException
            MessageBox.Show("One or more serial-port settings are invalid.")
        Catch ex As InvalidOperationException
            MessageBox.Show("The serial port is already open.")
        End Try
    End Sub

    Private Sub btnDisconnect_Click(ByVal sender As System.Object,
                                    ByVal e As System.EventArgs) Handles btnDisconnect.Click
        CloseSerialPort()
    End Sub

    Private Sub btnSend_Click(ByVal sender As System.Object,
                              ByVal e As System.EventArgs) Handles btnSend.Click
        If Not SerialPort1.IsOpen Then
            MessageBox.Show("Connect to a COM port before sending data.")
            Return
        End If

        Try
            SerialPort1.Write(txtTransmit.Text)
        Catch ex As TimeoutException
            MessageBox.Show("The serial write operation timed out.")
        Catch ex As InvalidOperationException
            MessageBox.Show("The serial port is closed.")
            SetConnectedState(False)
        End Try
    End Sub

    Private Sub SerialPort1_DataReceived(ByVal sender As Object,
                                         ByVal e As SerialDataReceivedEventArgs) Handles SerialPort1.DataReceived
        Try
            Dim incoming As String = SerialPort1.ReadExisting()
            If incoming.Length > 0 Then
                rtbReceived.BeginInvoke(New Action(Of String)(AddressOf AppendReceivedText), incoming)
            End If
        Catch ex As InvalidOperationException
            'The port may have been closed while the event was being processed.
        End Try
    End Sub

    Private Sub AppendReceivedText(ByVal text As String)
        rtbReceived.AppendText(text)
        rtbReceived.SelectionStart = rtbReceived.TextLength
        rtbReceived.ScrollToCaret()
    End Sub

    Private Sub SetConnectedState(ByVal connected As Boolean)
        btnConnect.Enabled = Not connected
        btnDisconnect.Enabled = connected
        btnSend.Enabled = connected
        cmbPort.Enabled = Not connected
        cmbBaud.Enabled = Not connected
    End Sub

    Private Sub CloseSerialPort()
        Try
            If SerialPort1.IsOpen Then
                SerialPort1.Close()
            End If
        Finally
            SetConnectedState(False)
        End Try
    End Sub

    Private Sub frmMain_FormClosing(ByVal sender As Object,
                                    ByVal e As FormClosingEventArgs) Handles MyBase.FormClosing
        CloseSerialPort()
    End Sub

End Class
The completed code editor should resemble the original project view below.
How the Serial Port Code Works
Discovering COM Ports
SerialPort.GetPortNames() returns the serial port names known to Windows. The order is not guaranteed, so the example sorts the array before placing it in cmbPort. It also checks whether the list contains an item. This avoids the out-of-range error that occurs when code selects item zero on a computer with no detected serial port.
Opening the Connection
The Connect handler copies the selected port name and baud rate to SerialPort1, explicitly sets the remaining 8N1 parameters and calls Open(). A serial port is an exclusive resource in most normal desktop use. If another terminal, programmer or instance of this application already owns it, Windows may reject the request with an access error.
Once the port opens, the program disables the port settings. Changing PortName, BaudRate or related properties while the port is open can raise an exception, and it can also make the interface state misleading.
Sending Text
SerialPort1.Write(txtTransmit.Text) transmits the entered characters without automatically appending a line ending. If the receiving device expects a command terminated by carriage return and line feed, set SerialPort1.NewLine = vbCrLf and use SerialPort1.WriteLine(txtTransmit.Text). Choose the terminator required by your protocol rather than assuming every device uses the same one.
The example uses ASCII encoding because it is common in simple embedded command protocols. If you need characters outside ASCII, both endpoints must agree on an encoding and on how message boundaries are identified. Binary protocols should use byte arrays and explicit lengths rather than converting arbitrary bytes to text.
Receiving Data on the Correct Thread
The DataReceived event runs on a secondary thread. Windows Forms controls belong to the thread that created them, so writing directly to rtbReceived from that event can cause a cross-thread exception. Microsoft therefore requires the update to be marshalled to the form thread through Invoke or BeginInvoke.
Our event handler reads the characters currently available through ReadExisting() and passes the resulting string to AppendReceivedText with BeginInvoke. The helper then runs on the user-interface thread and safely appends the text. The event is not guaranteed to occur once for every complete message or every byte, so a real protocol must accumulate data until it finds a delimiter, fixed length or another complete-frame condition.
Step 6: Build and Run the Project
- Select Build, Build SerialPortInterface.
- Correct any compiler errors, paying close attention to control names.
- Press F5 to start the application under the debugger.
- Select the correct COM port and the same baud rate used by the attached device.
- Select Connect, enter a short test message and select Send.
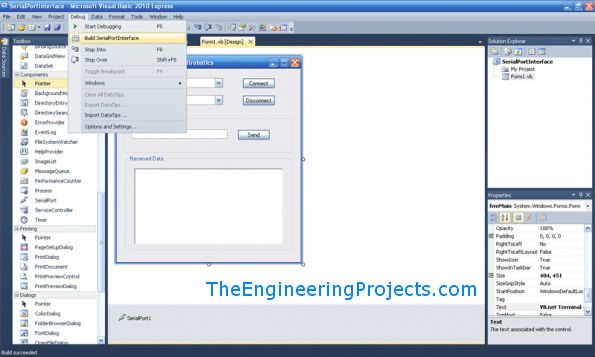
The build command creates the executable as part of the project output. During development, you normally run the Debug build from a path similar to bin\Debug. A deployment package is a separate concern; copying only the executable may be insufficient if an application has additional files or framework requirements.
Test the Terminal with a Loopback
A loopback test is the simplest way to separate a PC software problem from a remote-device problem. On a compatible USB-to-UART adapter, disconnect external circuitry and join the adapter TX pin to its RX pin. Do not short a conventional RS-232 connector until you have identified the correct pins and interface type.
- Insert the adapter and note the COM port assigned by Windows Device Manager.
- Start the application and select that port.
- Select 9600 baud and connect.
- Enter a distinctive message such as
Loopback 123. - Select Send. The same text should appear in the received-data box.
If the text returns correctly, Windows, the adapter, the COM-port settings and the main send/receive path are working together. Remove the loopback wire before connecting the target device.
Common Serial Port Problems
| Symptom | Likely cause | What to check |
|---|---|---|
| No COM ports appear | Adapter is disconnected or its driver is unavailable | Check Device Manager, reconnect the adapter, then restart or add a refresh-port button |
| Access denied when connecting | Another program has opened the port | Close other terminals, debuggers and duplicate application instances |
| Unreadable characters | Baud rate, parity, data bits or stop bits do not match | Set both endpoints to the same complete frame format |
| Transmission works only one way | TX and RX wiring is incorrect or a common ground is missing | Cross TX with RX and verify the electrical interface |
| Received text arrives in pieces | Serial data is a stream and event boundaries are not message boundaries | Buffer data and parse it using the protocol delimiter or expected length |
| Device ignores a typed command | Required line ending was not sent | Use the documented terminator and WriteLine when appropriate |
| Cross-thread operation error | The receive event updated a form control directly | Use Invoke or BeginInvoke to update the UI |
| Application remains connected after closing | The port was not closed during shutdown | Close it in the form-closing event as shown above |
Practical Review
We created a Visual Basic Windows Forms serial terminal that enumerates COM ports, configures an 8N1 link, transmits text and displays received data. The most important design detail is the separation between the serial receive thread and the user-interface thread. Once you understand that boundary, you can extend this project with timestamps, a clear button, hexadecimal display, file logging or a protocol parser.
Keep the protocol separate from the graphical interface as the project grows. For example, a line-oriented sensor can buffer characters until it receives a newline, while a binary device may use a header, length field, payload and checksum. A visible chunk in DataReceived should never be assumed to equal one complete application message.
Frequently Asked Questions
Can I use this code with Visual Studio 2022 or a newer release?
The same concepts apply, but the project target and package requirements may differ. For a new application, create a supported Visual Basic Windows Forms project and consult the current System.IO.Ports documentation. The screenshots and designer workflow in this tutorial specifically show Visual Studio 2010.
Why does my COM port number change?
Windows assigns COM-port names to detected devices and interfaces. Moving some USB adapters to another socket, reinstalling a driver or using a different adapter can produce a different number. Select the port shown for your device in Device Manager rather than hard-coding COM1.
Should I use Write or WriteLine?
Use Write when the protocol expects exactly the supplied characters or bytes. Use WriteLine when the receiver expects a line terminator, and set the NewLine property to the required sequence. The choice belongs to the device protocol.
Why does DataReceived return only part of a message?
A serial port delivers a byte stream. Operating-system buffering, device timing and event scheduling determine how many characters are available during a particular event. Store incoming data in a buffer and extract messages only after the protocol's completion condition is present.
Can this terminal receive binary data?
Yes, but ReadExisting() is intended for decoded text. For binary communication, read bytes, preserve their exact values and implement the framing rules defined by the device protocol. Avoid mixing text and binary reads without a clear boundary.
Do I need hardware flow control?
Not for the simple three-wire example. Some modems and high-throughput devices require RTS/CTS hardware control or XON/XOFF software control. Set the Handshake property to match the equipment documentation; enabling it on only one side can stop transmission.
Why should the port be closed when the form exits?
Closing releases the Windows handle and allows another program to use the device. It also reduces the chance that a late receive event will try to interact with controls while the form is being destroyed.
You now have a useful foundation for PC-to-microcontroller communication in Visual Basic. Test the software with a loopback first, match all serial settings at both ends and then add your device-specific commands one step at a time.