How to Structure Blog Post URL - Best Practices Tips and Techniques

Hey Guys! Hope you are doing well. I am back to give you a daily dose of useful information. Today, I'll uncover How to Structure Blog Post URL - Best Practices Tips and Techniques. This is the fourth article covering a complete SEO series. You can check my previous article about Meta description where you learn the tips and techniques required to write a compelling meta description. When you are writing a blog post, you must be considering a lot of factors that help you stay on the top of search results. You cannot write a blog post without any proper SEO strategy in place and pray for the post go viral. The URL is the web address specifically allocated to every webpage. No one can find your data on the web without a URL. Does it affect ranking factor? Everyone is concerned about this question. The answer is yes it affects, but not as much as you consider it to be. You must be giving attention to other parts of SEO without obsessing too much with URL structure. If you know how to structure your URL, only a few minutes are enough to do it a right way. Getting a top spot on the search results is more like a science which requires proper planning. Proper optimization of a blog is divided into several steps, if every step is done a right way, even if it brings 1% value, they all add up and help your data appear in front of the relevant visitors. Similarly, making your post URL optimized and readable brings more value and help you convey the main idea without much effort. Before we move on, you can also have a look at an ultimate guide of SEO tutorials where I have combined all articles pertaining to On Page SEO and Off Page SEO on a single page. In today's tutorial, I'll cover each and everything related to optimizing URL, benefits, best practices and everything you need to know. Let's get started.

How to Structure Blog Post URL

Before we move on and learn the best practices to structure URL, let's define it first. What is URL? The URL stands for Uniform Resource Locator, is a specific web address allocated to the certain web page. Every webpage is created with a unique URL. The URL of the page is no different than the physical address of any house. Every place on the earth comes with specific address i.e. its location, area, street number house number which is different for every place on the earth. Similarly, every webpage is created with a unique URL which is actually a virtual address of the webpage that helps you find the relevant data on the internet.
  • Question is how do you optimize your URL? Or is it okay and allow WordPress picks up and selects it according to the title of the blog post?
Stay with me, I'll help you step by step on how to structure your URL and make it easy to read and easy to digest. Following are the main points you must be considering before you intend to structure URL of the blog post.
Add Keyword
Until now, you must have heard the importance of keywords and how they can help you stand out of others. You must add the main keyword in the URL of the post. It is okay to place it anywhere in the URL, however, it is preferred to place it in the begging of URL so It conveys the right idea about the nature of the blog post.
  • Brian Dean from Backlinko and John Lincoln (CEO of Ignite Visibility) advised picking one or two keywords per URL.
Avoid Keyword Repetition No need to repeat the keyword in the URL. Keyword repetition is pointless as it carries no weight for search engines. It is considered as a keyword stuffing where you add keyword more than once to manipulate the search engines and allow them to prefer and find your data quickly across the web. This practice was useful before Google's new algorithm named Panda and Penguin came into place.
Number of words
Choosing a right URL for lengthy blog post titles is a little bit tricky and requires sometimes to make it sweet and short so it conveys the right idea using less number of words. Before I suggest you choose the right number of words, check the words by Matt Cutts about the URL of the post. In this interview with Matt Cutts, Matt mentions the following regarding the length of your slug:

"If you can make your title four- or five-words long – and it is pretty natural. If you have got a three, four or five words in your URL, that can be perfectly normal. As it gets a little longer, then it starts to look a little worse. Now, our algorithms typically will just weight those words less and just not give you as much credit."

So, make it short and try to deliver the main idea using less number of words.
Must be Specific
Making URL generic is practiced by a number of bloggers, however making it specific is a right approach to structure URL. Suppose you have written a post about On Page SEO, There are two ways to structure URL for this Post
  • www.domain.com/seo
  • www.domain/on-page-seo
Former is quite relevant but doesn't make URL unique and specific to the blog topic. Later is a better way to pick URL that conveys the right idea that post is mainly addressing On Page SEO.
Adding Categories
Allocate one category to the post and then (if needed) place subcategory further to make it more specific
  • www.domain.com/cricket
If you are talking about the certain team then you can add subcategory further
  • www.domain.com/cricket/teams
Make it more specific if you are talking about a certain team
  • www.domain.com/cricket/teams/england
And if you are talking about any player then you can do this way
  • www.domain.com/cricket/teams/england/players
The more you make URL specific, the more it is easy for the visitors to hunt down and reach a specific content.
Adding Numbers in URL
Some people add numbers in the URL. It is okay to add numbers but not preferred. Let's have a look at the following example. You may struggle, if later, you come up with an idea of modifying your post and create a better version of it and stay alive in search engines. In the example above, you want to add 5 more ways to save time and make it valuable and productive, then your post title won't match with the URL once you modify the title and make it "20 Ways to Make Your Time Productive". I hope you get an idea. As an added note: There is no harm of adding numbers in the post unless you are sure, you are not going to edit and modify the title in the future.
Long vs Short
Shorter is better in terms of structuring URL. Google prefers posts that are in-depth and come with more number of worlds, however, it is acceptable for written content only. In terms of SEO, short URL comes with more value and delivers the right idea more precisely. Picking long URL can put the visitors in difficulty where they feel skeptical about the main idea of the post. The more you specific using less number of words, the better. We can see the following example. The first method is not preferred. If you see the second example, it conveys the main idea quite impressively without using "how to". and "home based jobs" because when you have already mentioned in the URL that post is about online earning, then no need to make it longer by adding "home based jobs", as it's pretty obvious when you are referring to online, you are making it clear, it can be approached anywhere in the world i.e.home, office or any remote location.
Avoid Stop Words
Stops words are not preferred in the URL. These words are just used to connect the two words and indicate if a subject is singular or plural.
  • A
  • An
  • The
  • But
  • Or
  • So
The above words are known as stop words. These words are necessary to make the content grammatically correct however, they are not preferred to be added in the URL. Google won't be giving any warning if you use these words, however, these words hold no weight in terms of page ranking or SEO. Search engines prefer URL that is short. You must remember two things
  • It is preferred to skip these words if the URL makes sense and conveys the right idea
  • With that being said, if you think skipping these words would make URL weird and senseless, then there is no harm including these words in the URL.
You may feel difficulty in structuring the URL at the start of blogging, however, with practice, you will grow and able to make clinical URL structures that make sense with a minimum number of words. It is all about practice and how quickly you learn and make yourself adaptable with the SEO protocols and practices that help you stay ahead of your competitors.
Avoid Special Characters
You must avoid adding special characters in the URL. Search engines don't prefer them in the URL, as they are not SEO friendly. Following symbols are considered as special characters ? <, > " ! / When you are creating a web post, you are focusing on the best SEO practices to make your content stand out and appear in front of maximum potential visitors. In terms of SEO, adding special characters is not a good practice and strictly prohibited by the search engines.
Include Hyphen, Avoid Underscore
Adding hyphens in the URL is acceptable and common practice by most of the bloggers. In fact, when you create the URL, the words appearing in the URL are already separated by the hyphens. If you search for something on Google, it automatically splits your query with a hyphen in each word and can better understand your problem and pull up the most relevant information. Same works for structuring URL i.e. when you add hyphens in the URL, you are making your words clear and specific and quite in line with the best practices for SEO.

Final Thought

The URL of the post is very handy when it delivers the right idea with a minimum number of words. Make it short, sweet and readable. Adding more words would make your URL weird and difficult to digest. Avoid special characters in the URL. No need to repeat the main keyword more than once. Adding one or two keywords in the URL is good practice. Include hyphens and avoid underscore. No need to add numbers in the URL. If you do, you won't be able to edit and modify the number in future. That's all for today. I hope you have got a clear idea about the structuring of URL. In the next article, we discuss how to write SEO optimized content that helps you attract a number of visitors. If you are unsure or have any question, you can ask me in the comment section below. I'd love to help you in any way I can. You are most welcome to share your thought about structuring URL of the post. Thanks for reading the article.

How to Organize and Manage Final Year Project?

Hey Friends! Hope you are doing well. This is a platform where we keep you updated with a major development in engineering and technology. Today, I'll uncover the details on How to Organize and Manage Final Year Project? You get rolled in the first semester of engineering, and within no time, you will be attending your final semester. Each semester helps you make a better version of yourself and allows you to convert your knowledge and expertise into reality. When you reach the final year, you need to develop a final year project. This word looks quite intimidating for some students and they feel quite overwhelmed before planning and managing their project. However, if you have a proper plan in place and work with consistency, there is no need to worry about the completion and execution of a project. In this tutorial, I'll help you step by step how you can stay organized and manage your final year project pretty well. Yes, hard work is the key to success as long as you are doing it smartly. If you dive in with no proper plan in mind, your success would be on shaky grounds. Let's get started.

How to Organize and Manage Final Year Project?

There are many factors affecting the final year project. You must be considering some points before you intend to work on your final year project.
  • What is the scope of the project?
  • Deadline
  • What can you achieve?
  • Report Writing
Final year project starts with the proposal. If you give relevant proposal pertaining to the scope and advancement in the field, there is no chance your proposal gets rejected. Yes, you may fail plenty of times before you succeed in giving a practical proposal that you can deliver within time. No need to worry if you fail as long as you learn from it.
Allocation of Tasks
Most probably, three to four students are included in each project. If you are a leader of the project, it is your duty to allocate each task pertaining to the expertise of each student. It is quite obvious not every student comes with similar knowledge and expertise. Some are good in circuits, while some are pretty nifty about mechanical work. At the very least, some don't take interest in technical work and love writing and other stuff in this regard.
Keep Supervisor in Touch
Keep your supervisor in touch with each and every development in the project. This is the best way to keep supervisor updated so he doesn't feel he is left out in the process. You are going to develop the whole project, supervisor will just put you in the right direction. Don't get into the illusion that he will do each and everything for your project.
Time Management
Time management plays a vital role to develop the whole project within the due date. When you break down a big mountain into small steps, this would make things quite easy and hassle-free. Don't fall a prey to starting project 2 or 3 months before the due date. Most of the students don't give much attention and think they will complete a project in the last couple of months. This is not the right approach. If you work this way, you are not going to learn much and there is a possibility you can't complete the project within the given time period. Key to success is start working on a project right after your proposal gets accepted. Don't rush in, just go with the flow, step by step and work consistently. This will make your work easy where you can test and drive innovation in your project.
Selection of Components
Selection of right and relevant components is a prerequisite for making a dynamic project. As per time limitation, you cannot test a number of components for your project. Do your proper research and select the most relevant components that resonate with your project. If you are related to electrical engineering, then PCB development plays a vital role to put your whole project in a running condition. PCB is used to connect the number of components on the board. You cannot put your whole project at risk for the sake of getting low-quality PCBs. If you intend to get accurate and precise PCB, your first preference must be PCBWay. This company keeps students' demands on the top and provides quality PCB. We have personally tested them and they didn't fail to satisfy us every single time. Each PCB comes with accurate layer placement. There are no broken layers that weaken the connection between the components.
Don't Worry if Things go Worse
You are working very hard in every aspect for making your project on time. The time comes when nothing works and every step you take and every move you make pertaining to the project goes worse. Don't panic if you fail. If things don't work in the same way, you can test a different way to approach the same thing. You must keep your supervisor in a loop and keep him updated with each and every development in the project.
Report Writing
Report writing is essential to turn your hard work and each development in the project into words. You can start report writing at the start of the project. However, some students prefer report writing at the verge of project completion. You can pick any method that suits you best. Which method you pick, don't forget to write the main points along the course of the whole project execution. You may forget some points at the end of the project i.e. the difficulties you faced, things that didn't work. It is wise to write main points and difficulties you face as your project goes, and then add all these points in your final report in a descriptive way. That's all for today. I hope you have got a clear idea about project management. However, if you are unsure or have any question you can ask me in the comment section below. I'd love to assist you according to the best of my knowledge. Thanks for reading the article.

How to Create a Jet Fighter Model in AutoCAD

Hey Guys! Hope you are doing well. Today, I'll unlock the details on How to Create a Jet Fighter Model In AutoCAD.  
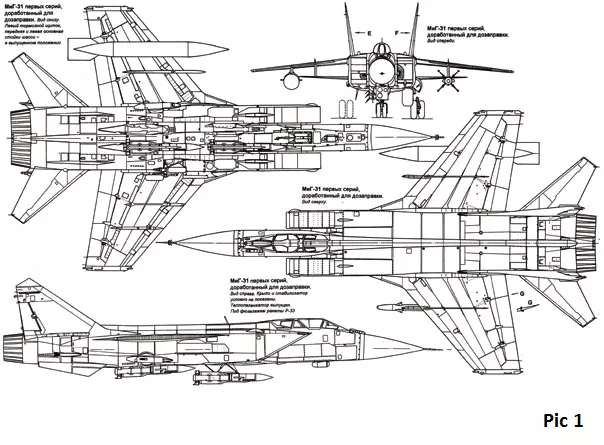
The drawings were published on the Internet * and represent several types, 22 cross sections (fuselage forming elements) perpendicular to the longitudinal axis of the fuselage, and a number of additional sections (Figures 1 and 2). The accuracy of the drawings, of course, is not high, because these are just data for the modelers. We will have to believe this data, take them for truth in the first instance and start creating a digital prototype.

How to Create a Jet Fighter Model in AutoCAD

Where to begin? From converting JPEG to DWG (to increase their self-esteem, this tedious process can be called manual vectorization of vector graphics). One of the stages of work is shown in the pic. 3. Question marks indicate that the decision to choose the accuracy remains for the author of the model creation. Pic. 4 shows how the orthogonal sections and the top view look, the visual style of the 2D framework. Some sections are not shown, so as not to frighten the unsophisticated reader with the apparent complexity of the proposed construction. Nevertheless, this part of the work should be done very carefully, repeatedly checking all the dimensions, because what will be laid now, we get at the output. Each of the sections is a closed polyline (pic 5). The pic shows that the new version of AutoCAD 2011 has new handles for editing the polyline. I want to say many thanks to the developers for this tool. When solving such problems, using pens and a convenient context menu saves a lot of time.
Creating 3D geometry
Of course, it is tempting to apply the method of lofting to all sections - from the tail to the cut of the nozzle. The most important thing is that the system will helpfully do it. The 3D body created as a result of this procedure will be very complex and beautiful, it can be used to create alien ships in fantastic cartoons, but to our task, this, alas, will not work. Therefore, it is necessary to break the fuselage into several structural parts: the nose, the bow with the cockpit, the middle part, the tail part, the nozzles. Wings, horizontal plumage, and keels were modeled separately. Pic. 6 shows the results of one of the stages of work. It is worth paying attention to the following innovation of AutoCAD 2011 - when creating a body or surface by the method of lofting, you can change the law of lofting after creating a body (surface). In previous versions of this possibility was not, and to predict the result with a complex geometry of the cross sections is often quite difficult. Pic. 7 shows the highlighted 3D created by the method of lofting, and a drop-down menu, the points of which allow us to choose the law of changing the loft for an already constructed body. Another new feature of AutoCAD 2011 is the improved choice of sub-objects. To create the next section of the fuselage, the first section is the last section of the previous section. You can select this section by holding down the Ctrl key while selecting the subobject selection (pic 8). We transform the primitives from which the section is made into a polyline or region (depending on the task), and we continue to create the next section of the fuselage. In previous versions of the system, you had to use the Extract Ribs command, and then long to clean the drawing from the heap of fragments formed - arcs, segments, splines. The Quick Selection command had to be applied repeatedly, so this procedure was by no means fast. However, even more, effective work to create complex geometry is provided for the first time in AutoCAD 2011 new objects - NURBS surfaces. What do NURBS surfaces "know"? Here is not the most complete list:
  • create a very complex geometry of objects, while they obey the laws of Boolean algebra (union, intersection, subtraction);
  • create transitions between surfaces;
  • Create transitions between 3D objects using surfaces;
  • close the surface and create a 3D body;
  • cut one surface of the other;
  • edit control vertices;
  • assign materials to surfaces;
  • convert surfaces to 3D and vice versa (with the geometric possibility of this operation).
Pic. 9 illustrates the work with surfaces when creating the nose of the fuselage. A quite legitimate question may arise: where are the surfaces, because until now we modeled the aircraft with 3D bodies? The answer is simple: this site was too complicated for solid modeling and we turned it into a surface. Wings, horizontal tail, and keels were modeled again by the method of lofting. The exact wing profiles in the initial data did not appear, so in all cases, a conditional, so-called chest-shaped profile, characteristic of supersonic flow was created. Nasal endings of profiles, arcs of small diameter. The nozzles are simple enough to model with surfaces. Pic 10 and 11 are almost complete work - together with the result they demonstrate another new feature of AutoCAD 2011 - visual styles. Pic. 10 shows the Sketch style, Pic. 11 - Tinted with edges. The multicolor in Pic. 11 are temporary layers created in order to better distinguish the desired objects. By the way, about the layers. Finally, the seemingly eternal system error, the problem of the letter "b" in the name of the layer, was eliminated. Now, this is a story, with which I congratulate all users of AutoCAD!
Creating a cockpit
This is one of the most difficult stages in modeling. Its complexity lies in the fact that it is necessary to cut the model created by planes tilted at very intricate angles, then use logical operations to recreate the rest of the model. Pic. 13 shows the result of this procedure. It remains to convert the necessary parts to the surface and assign a transparent material, but this is the next stage of the work - visualization.
Visualization
In AutoCAD 2011 there are quite a lot of new features, including a material browser containing thousands of professionally produced materials. This browser is unified, that is, it is exactly the same as in programs 3ds max, AutoCAD Inventor, and AutoCAD Revit. Of course, there was the opportunity to create your own materials from the template and from scratch. In order not to do this, we assign the material to the fuselage aluminum, the lantern to the glass, and the LDPE tube to the chrome steel. Pic. 14 shows the assignment of materials to the lantern, Pic. 15 - the resulting picture as a whole. Pic. 16 - one of the options for visualization (render) in sunlight.
Conclusion
  • This article demonstrates the possibility of creating a model aircraft in AutoCAD 2011. Why do it? What to do about it?
  • Calculation of distributed characteristics by the finite element method (FEM)
  • Get rid of the materials. Using the Unification command, we create a single 3D object, which we immediately turn into a surface.
  • With the help of the available tools, we change the number of partitioning panels, we match the boundaries and send them to the corresponding calculation program.
  • Calculation of dynamic characteristics, a creation of the model for wind tunnel
  • Get rid of the materials. Using the Unify command, we create a single 3D object.
  • We extract the data. Insert the average density, calculate the integral dynamic coefficients.
  • To make a model for purging in a wind tunnel using standard tools AutoCAD we will create project documentation and transfer it to production.
  • There are a lot different airplane 3D models on FlatPyramid https://www.flatpyramid.com/aircraft-3d-models/. Choose the one you like!
That's all for today. I hope you have got a clear idea about creating jet fighter model in AutoCAD. If you are unsure or have any question, you can approach in the comment section below. I'd love to help you in any way I can. Thanks for reading the article.
Syed Zain Nasir

I am Syed Zain Nasir, the founder of <a href=https://www.TheEngineeringProjects.com/>The Engineering Projects</a> (TEP). I am a programmer since 2009 before that I just search things, make small projects and now I am sharing my knowledge through this platform.I also work as a freelancer and did many projects related to programming and electrical circuitry. <a href=https://plus.google.com/+SyedZainNasir/>My Google Profile+</a>

Share
Published by
Syed Zain Nasir