


Interfacing PIR sensor with Arduino


PIR sensors are widely used in motion detection projects now a days. Since my today's tutorial is about interfacing of PIR sensor with Arduino micro controller. Before going to that it is necessary that we should first understand the construction and working principle of PIR sensor. So i am going to divide my tutorial into different blocks and i will describe PIR sensor from its construction to practical applications. So first of all, lets see the construction and operating principle of PIR sensor.
Construction of PIR sensor
The construction of PIR sensor is very simple and easy to understand. In the bottom or you can say in the core of the PIR sensor we have a set of sensors which are made of pyro-electric materials. The properties of this material is that when this material is exposed to heat then, it generates energy. Different methods are used to to measure this energy generated by PIR sensor. On the top of the PIR sensor and above the internal sensors we have a small screen through which infrared radiations enters into sensor. When these radiations falls on the pyro-electric material then it generates energy. Generally the size of this sensor is very small and it is available in the form of thin film in market. Many other materials are also used in collaboration with pyro-electric material like galliam nitrite and cesium nitrate and all these materials take the form of an small integrated circuit.
Operating Principle of PIR sensor
The modern studies in the field of quantum physics tells us the fact each and every object when it is placed at a temperature above absolute zero, emits some energy in the form of heat and this heat energy is in fact the form of infrared radiations. So an other question comes into mind that why our eyes can't see these waves? It is because that these waves have infrared wavelengths and his wavelength is invisible to human eyes. if you want to detect these waves then, you have to design a proper electronic circuit.
If you see closely the name of PIR sensor which is Passive Infrared Sensor. Passive elements are those elements that don't generate their own voltages or energy. They just only measures things. So we can say that this sensor is a passive infrared sensor and it doesn't generate anything by itself. It is only capable to measure the rediations emitted by other objects around it. It measures those raditions and do some desired calculations on them.
Interfacing of PIR Sensor with Arduino
PIR sensor have total 3 pins. The configuration of each pin is shown in the image given below:- Pin#1 is of supply pin and it is used to connect +5 DC voltages.
- Pin#2 is of output pin and this pin is used to collect the output signal which is collected by PIR sensor.
- Pin#3 is marked as GND pin. This pin is used to provide ground to internal circuit of PIR sensor.

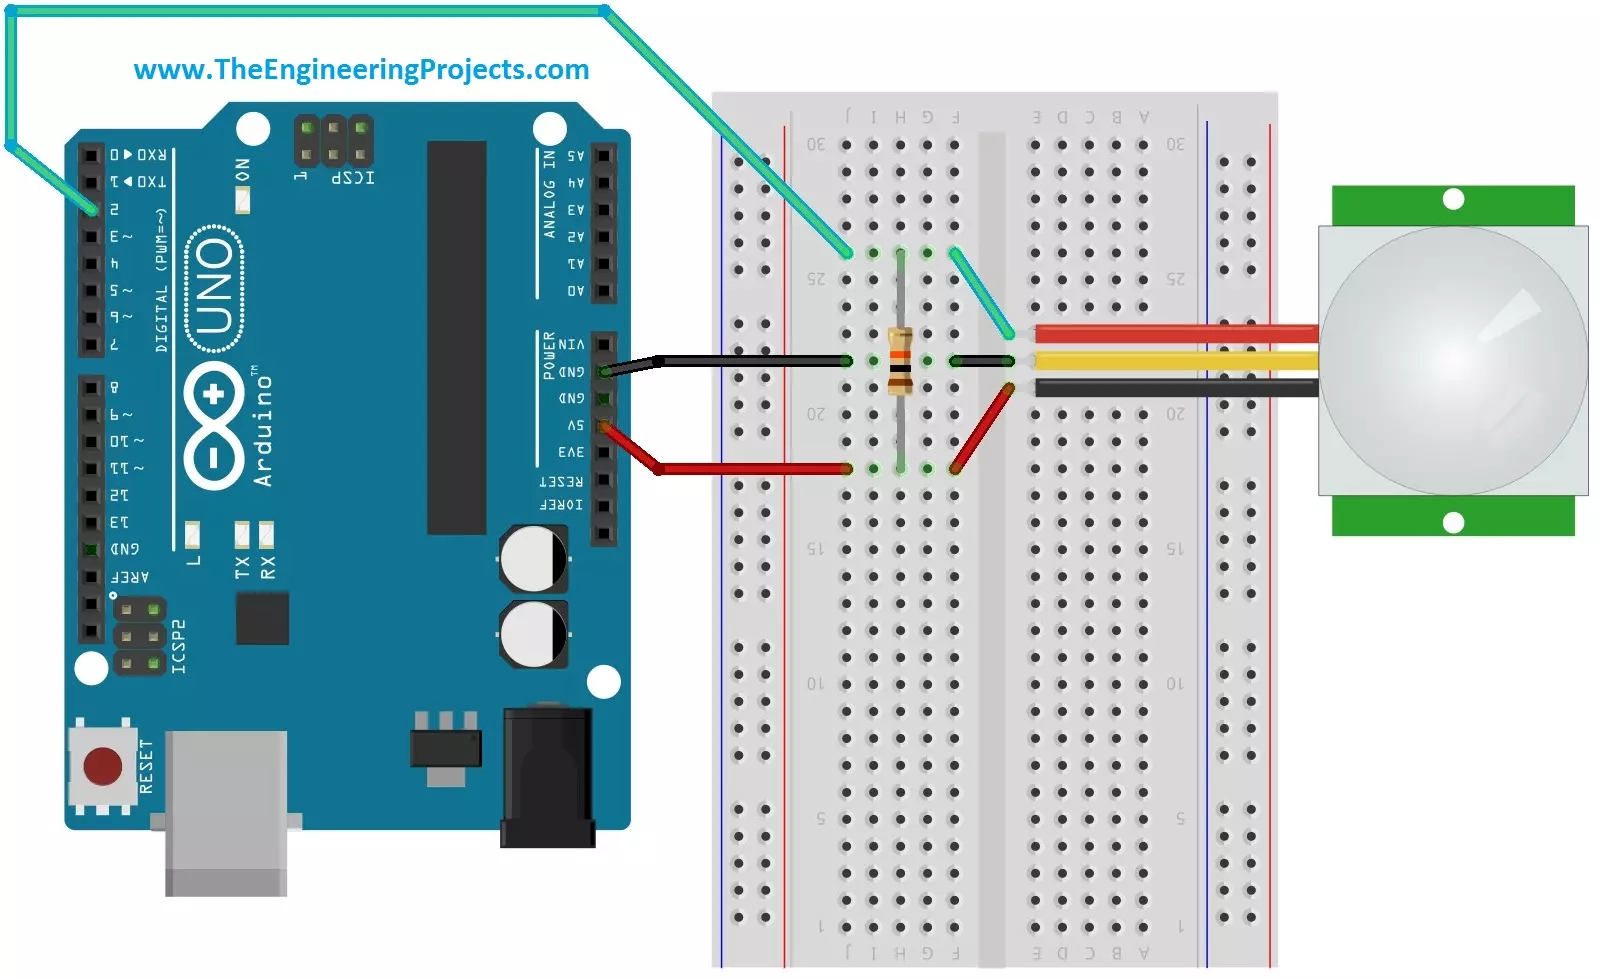
The pin configuration of a PIR sensor is shown in the image given above. Since we have to interface the PIR sensor with Arduino micro controller. The image showing the interfacing of PIR sensor with Arduino is shown below as:
Interfacing Code
The code for interfacing Arduino micro controller with PIR sensor is given below as: #define pirPin 2
int calibrationTime = 30;
long unsigned int lowIn;
long unsigned int pause = 5000;
boolean lockLow = true;
boolean takeLowTime;
int PIRValue = 0;
void setup()
{
Serial.begin(9600);
pinMode(pirPin, INPUT);
}
void loop()
{
PIRSensor();
}
void PIRSensor()
{
if(digitalRead(pirPin) == HIGH)
{
if(lockLow)
{
PIRValue = 1;
lockLow = false;
Serial.println("Motion detected.");
delay(50);
}
takeLowTime = true;
}
if(digitalRead(pirPin) == LOW)
{
if(takeLowTime){lowIn = millis();takeLowTime = false;}
if(!lockLow && millis() - lowIn > pause)
{
PIRValue = 0;
lockLow = true;
Serial.println("Motion ended.");
delay(50);
}
}
}
Applications of PIR sensor
PIR sensors possess a no of applications and due to their low cost and much advanced features they are the main focus of different projects being made now a days. Some of their features and practical applications are listed below as:
- They are able to sense the detection of people and other objects.
- PIR sensors are also used in automatic lightening systems. In these type of systems, when a person comes in the vicinity of the sensor then, the lights are automatically turned ON.
- They are used in outdoor lightening systems and also in some lift lobbies. You may have observed that when a person comes in front of the lift and if the doors are being closed then, the doors are opened again. This is all due to PIR sensors.
- They are widely used in underground car parking system. At every parking position a PIR sensor is installed and when that position is vacant then, a green light glows over that place which means you can park here. And if that position has been occupied then, a red light will glow, representing that this position is already occupied.
- PIR sensor is much compatible sensor and it has the ability to detect a particular motion and the output of this system is very sensitive and doesn't have any kind of noise in it.


