In modern electronics, the ability to monitor and control current flow is essential for maintaining the efficiency and safety of electrical systems. Engineers often rely on current sensors to observe how much current passes through a circuit, helping them analyze system behavior under different conditions. In this project, we simulate the interfacing of a current sensor with an Arduino using the Proteus software environment.
The aim of this simulation is to demonstrate how Arduino can read both the analog and digital outputs of the current sensor to identify the presence and level of current in a circuit. The system also displays the voltage reading and current status on a 20x4 LCD while controlling an LED indicator to represent current detection visually. By the end of this tutorial, you ...
In this tutorial, we will walk through the process of interfacing a pH sensor with an Arduino UNO in Proteus. To make the project more practical and user-friendly, an LCD is included so that both the sensor’s voltage output and the calculated pH value can be displayed clearly in real time. This allows the user to easily monitor the readings without needing additional software or serial monitoring tools.
The term pH, short for “potential of Hydrogen,” indicates the concentration of hydrogen ions (H⁺) in a solution and is used to determine whether it is acidic, neutral, or alkaline. A pH of 7 represents neutrality, values below 7 indicate acidity, and values above 7 represent alkalinity. Monitoring pH is essential in several fields—such as water quality testing, agriculture, food processing ...
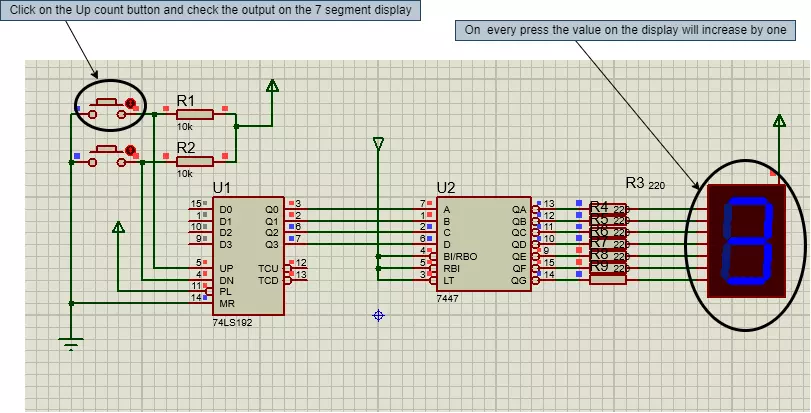
Hello geeks, welcome to our new project. In this project, we are going to make a very interesting project. I think most of us have seen the scoreboards in sports, after looking at that, have you ever wondered about the working of it. Therefore, this time, we will be making something like that only with some extra features. So basically that score board is nothing but a counter which counts the scores. Most of the geeks who have an electronics background or have ever studied digital electronics must have heard about the counter.
Here, in this project, we are going to make an Up-Down counter. A simple counter counts in increasing or decreasing order but the Up-Down counter counts in increasing and decreasing order, both depending upon the input it h ...
Hello geeks, welcome to our new project. In this project, we are going to make a very interesting project which is an Up-Down counter. Most of us who have an electronics background or studied digital electronics must know the counter. Counter is a simple device which counts numbers. As per the digital electronics, there are two types of counter, the Up counter which counts in increasing order and another is Down counter which counts in decreasing order. And every counter has a reset limit, on which the counter resets to its initial value and starts the counting again. The limit of every counter depends on the bits of counter. For example, we have a 8 bit Up counter which means it will count upto 255 and afterwards it will reset and will start agai ...
Hello geeks, welcome to our new project. Here, we are going to make a very useful project which we can use for ourselves or we can use this as a product as well on an industry level.
In this project, we are going to make a water level indicator. We all know it is one of the most essential products because there are many water tanks in every house or office, and most of them are not easily accessible to check the level of water in it and I think most of us faced the problem such as shortage of water as we do not have anything to monitor the exact amount of water available in the tank and this causes many problems on our daily lives.
Software to install
As we are going to make this project in the simulation first, for that, we will use the Proteus ...
Hello geeks, welcome to our new project. We are going to make an important project which will be very useful for us in our daily life which is a variable DC power supply. As engineers who work with electronics need different voltage ranges of DC power supply for different electronic projects and components. It becomes very clumsy and hard to manage different power supplies because of wires which are connected to it and each power supply consumes an extra power socket as well.
So in this project, we will overcome this issue and learn to make an adjustable DC power supply, in which we will get a wide range of voltages.
Software to install
We will make this project in the simulation, as it is a good practice to make any project in the simulation fir ...
Hello Geeks, I hope you all are doing great and enjoying your festive seasons. This time, we have come up with a new project which will make your festival a bit brighter so here comes a Christmas tree.
It is said that Christmas is the center of all the celebrations. Did you guys know the scientist who discovered the light bulb, Thomas Edison and his friends were the first to put up the light bulbs on the Christmas tree, and here we are going to keep that tradition forward? Well, it’s time to gear up for the next season of Christmas being tech-savvy. Hence we have decided to brighten up a Christmas tree with the usage of Arduino Uno and LEDs in real life.
Software to Install:
To make our festival a little safer, we will first make our Christmas tree in the simulation and for that, we will ...
Hello geeks, welcome to our new project. In this project, we are going to make a very useful and interesting electronics tool that we as engineers or tinkers need in everyday life. We use the capacitor in most of our projects for various purposes such as filters or power supplies. Most of the time, we do not have a provision to measure the capacitor value in our digital multimeter. So, this time we came up with the solution. Hence, we will make our own capacitance measurement tool using Arduino.
Rather than investing in new electronic equipment, we will use an Arduino board and some basic components to measure the capacitance. To make this project, we should have some working knowledge about the capacitor. Here, we will not discuss the in-depth wo ...
Hello geeks, I hope you all are doing well and looking forward to making something new yet interesting. So, today we have come up with our new project which is a calculator using Arduino.
We all use calculators in our daily life, whether you are working in an office or counting money at the bank, you are buying your daily grocery or doing shopping online, you will find calculators in different forms everywhere. In fact, the computer was initially considered a giant calculator. So if it is that common, why do we not make our own calculator?
Before going into the details of the project, it is good to know some history of that, let’s know some facts about the calculator. So the first known device for calculation is Abacus. And the first digital calcu ...
Hello guys! I hope you’re all in a good mood today because we are going to review the design of an interesting project today. We’ll be looking to design 4-way traffic lights in such a way that their delay is variable and is dependent upon the traffic density. This project is of intermediate difficulty level for people studying in undergrad engineering school with electronics, electrical and mechatronics as their major. It is also for the people learning Arduino and basic circuit design on their own or through some course. We have already designed a Simple 4-Way Traffic Light Control using Arduino and today we will make it smart by adding a variable delay.
Variable 4 Way Traffic Light:
As you all already know the importance of traffic lights and t ...