


Getting Started with PIC Microcontrollers


In the last tutorial, we discussed Getting Started with Microcontrollers and how they work and now we are gonna have a look at Getting Started with PIC Microcontrollers. PIC microcontrollers, as I mentioned before, are manufactured by Microchip. There are many types of microcontrollers but here I am concerned with PIC18F452.So let's have a small review of PIC18F452 PIC microcontrollers.
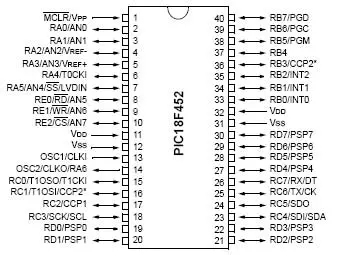
PIC18F452 is a 40-pin microcontroller each pin has its functionality, which we will see in our next classes one by one. suppose I want to create a project on LED blinking, a simple project on PIC so what do I have to do? First of all, I need the following things so that I may use them to work with PIC. I have discussed the Functions available in the PIC18F452 Microcontroller in the next post.
Important Points
- MPLAB ---> MPLAB is a software which you can download easily from the official website of Microsoft as it's an open source software. In MPLAB you will do programming in Assembly & C Language. We will learn Assembly & C Language in our next classes.
NOTE: We will learn the Assembly & C language in our next classes. This software has already been sent to all the registered users. If you need it, then Subscribe to our Email Notification and this will be forwarded to you. Thanks.
- PIC Programmer ----> There are many PIC Programmers available in the market. You have to attach this Programmer to the PC through a serial port (Parallel Port & USB Port PIC Programmer are also available). Now Put your PIC in the 40-pin socket of the Programmer.
- PICpgm Software / PICKit software ----> This software is used to burn the program in the PIC. It's just the same as burning a movie on DVD. Now open this software and browse to your program which you have made in MPLAB and then click on program PIC and your Program will be burnt on your PIC.
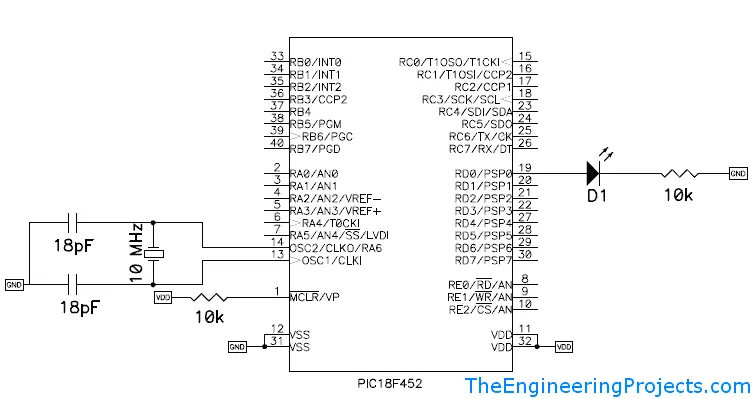
- PIC Basic Circuit ---->PIC alone never works, we have to add a simple circuitry to make it work Below figure shows the simple PIC circuit. It is not very difficult and you can make it on a simple vero board with soldering. I have given its circuit below :
Now remove your PIC microcontrollers from the Programmer and add them to the hardware circuit and you will check that your PIC will give you the same results as you have programmed in it. In this tutorial, we have just taken an overview of PIC Microcontrollers. Next, we will check its Ports and the purpose of these ports. Till then take care ALLAH HAFIZ .... :))


