Functions Available in PIC18F452 Microcontroller


In the previous tutorial, I explained Getting Started with PIC microcontrollers and the software etc. Today, I am going to explain the hardware of PIC18F452 i.e. the functions available in PIC18F452. In other words, working of pins. We have a total of 40 pins in 18F452 microcontroller. Different PIC microcontrollers have different pins and different functions. Some of the PIC Microcontrollers lack the below functions and some of them have much more functions than these. So, here I am just discussing the PIC Microcontroller 18F452 because it is a moderate one and is mostly used in engineering projects. It's an 8-bit microcontroller. So now we are gonna have a look at the functions available in the PIC18F452 microcontroller. In the next tutorial, I have discussed How to install MPLAB software in Windows and have also discussed How to Install MPLAB C18 Compiler.
Ports
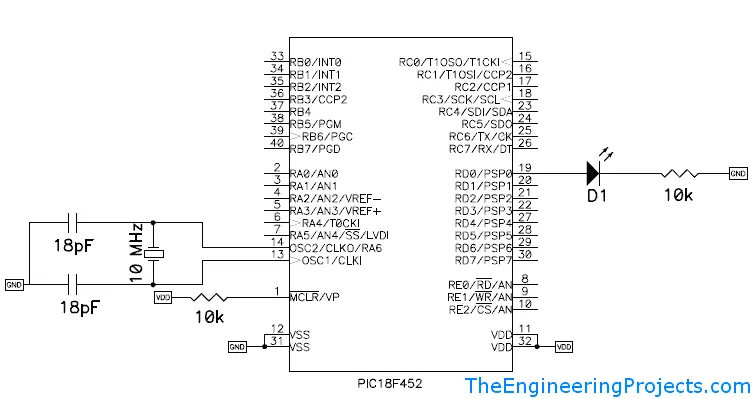
There are a total of five ports in PIC18F452. Each port is 1 byte (8 bits) and so each port has 8 pins of microcontroller except the portE which has 3 pins. These ports are named as:
- PORTA ( Pin # 2 to Pin # 10 )
- PORTB ( Pin # 33 to Pin # 40 )
- PORTC ( Pin # 15 to Pin # 18 & Pin # 23 to Pin # 26 )
- PORTD ( Pin # 19 to Pin # 22 & Pin # 27 to Pin # 30 )
- PORTE ( Pin # 8 to Pin # 10 )
You can access any pin of any port. Ports' pins are assigned as 0,1,2,3,4,5,6,7 and 7 being the most significant bit and 0 the least so suppose I want to use PIN 3 of port B then I will write RB2. We will see it in more detail in the coding section and as it's just the hardware section I am not going into detail about this.
Timers in PIC18F452
We have a total of four built-in timers in the PIC18F452. These timers are also used as counters. We can set them to count anything or to set delays etc. For example, we want to make a digital watch on LCD using PIC, in that case, we will use timers to count. Four timers used in PIC18F452 are:
- Timer0
- Timer1
- Timer2
- Timer3
Serial Port Interfacing
PIC18F452 also supports serial interfacing using TX & RX pins. Suppose we are using any sensor and want to make a graph of its output on the PC, then we will attach the sensor to any of the input pins and then send its data to the computer using TX and RX pins. In PIC18F452:
- TX pin is pin # 25
- RX pin is pin # 26
We use the TX pin of the PIC when we want to transmit data from the PIC to the computer and RX when we want to receive data into the PIC.
Some Other Functions
These are some advanced-level functions that I will explain in the advanced section but interested readers can ask in comments or can contact me. However, sooner or later, I will post about all of them in detail.
- Interrupts in PIC18F452
- A/D converter
- EEPROM storage
- CCP and ECCP Programming
- SPI Protocol
- I2C Protocol