


How to Install MPLAB Software in Windows


Hello friends! Today, we will install MPLAB software in Windows and prepare it for a PIC development project. In the previous lesson, we studied the PIC18F452 ports and peripherals. We now need a development environment in which to organize the source, select the device and build its firmware.
The original screenshots in this article show MPLAB IDE 8.56. That is a legacy environment, while MPLAB X IDE has a different interface and installation workflow. We will explain both contexts clearly so you can reproduce an old project without mistaking its screenshots for a current installation guide.
For a new setup, choose an MPLAB X release compatible with your Windows version, PIC device and programming tool. Install a suitable C compiler separately. The IDE provides the workspace, but it does not automatically replace every compiler or device-support component needed by a project.
What MPLAB Does
MPLAB is Microchip's development environment. It brings together source editing, project configuration, build commands and supported programming or debugging tools. A compiler translates C source, an assembler translates assembly source, and a linker combines the resulting pieces into an executable image for the target.
These roles matter during installation. If the IDE opens but no suitable compiler appears in a project, the editor may be installed correctly while the toolchain is missing. Reinstalling the editor repeatedly will not necessarily solve that separate problem.
| Component | Why it is needed |
|---|---|
| MPLAB X IDE | Project management, editing and development workflow |
| Compatible language tools | Compilation, assembly and linking |
| Device support | Target-specific definitions and development-tool information |
| Programmer or debugger support | Communication with supported hardware tools |
| Project source and configuration | Defines the firmware you intend to build |
Choose Between a New Setup and a Legacy Reproduction
If you are beginning a new PIC project, start with the supported tools listed on Microchip's MPLAB X page. Read its system requirements and tool-support notes before downloading. A newer installer is not automatically the right choice for every old programmer.
For example, Microchip identifies MPLAB X 6.20 as the final release supporting PICkit 3, MPLAB ICD 3 and REAL ICE. If one of those tools is essential to an existing setup, that support boundary affects the version you choose. Do not interpret a missing legacy tool in a later IDE as proof that the USB cable is faulty.
If your objective is to reproduce a project originally built with MPLAB IDE 8 and C18, obtain the relevant installers from Microchip's MPLAB ecosystem archive. Keep the old project intact while testing it in a compatible environment. Migration to a newer toolchain should be a separate, deliberate step.
Prepare Windows Before Installation
- Identify the Windows version and architecture on the development computer.
- Check the selected IDE release's requirements.
- Record the PIC part number and programming hardware you intend to use.
- Download the installer from Microchip's official site.
- Save existing projects and close development sessions before running the installer.
- Keep the downloaded installer and its version information for reproducibility.
Microchip's installation requirements are the appropriate place to check supported operating systems. Avoid assuming that an old executable is supported on a new Windows release simply because its first dialog opens.
Choose a project directory where your normal user account can write files. Program installation directories and source-project directories serve different purposes. Keeping source files inside a protected application folder can create avoidable permission problems when the build generates intermediate files.
For the first project, a short local directory path is easy to inspect. Once the basic workflow works, organize the projects according to your normal backup and version-control arrangements. Do not move a working compiler folder manually after installation and expect every project reference to update itself.
Install MPLAB X IDE
Microchip provides an official installation walkthrough for the supported platforms. The precise pages can change between releases, but the decisions remain recognizable: license terms, installation location, selected components and completion.
- Launch the downloaded Windows installer.
- Read the displayed license and installation information.
- Choose an installation location, retaining the default unless you have a reason to change it.
- Select the development components required for your target workflow.
- Allow the installer to finish and review any reported failure.
- Start the IDE from its installed shortcut and confirm the version shown.
If Windows requests elevation for installation, use the normal installation process. Running the development environment permanently with elevated privileges is a separate decision and should not be used to hide a project-folder permission problem.
Do not interrupt a functioning installation merely because one stage takes longer than another. If the installer reports an error, record its exact wording and the component involved. “Installation failed” is too broad to distinguish a damaged download from a permissions issue or an unsupported host.
IDE and Programming Environment
Some distributions include a separate programming environment used to load an existing firmware image. That can be useful for programming tasks, but it is different from the IDE workflow used to create and build the source project.
Open the development environment when following a source-code tutorial. If the window mainly asks for a device, tool and HEX file, you may be in a programming workflow rather than the editor and project manager shown in the lesson.
Understand the Original MPLAB IDE 8 Screenshots
The following screenshot belongs to the older installer used in the original article. It shows a maintenance-style selection rather than a universal first-installation step.
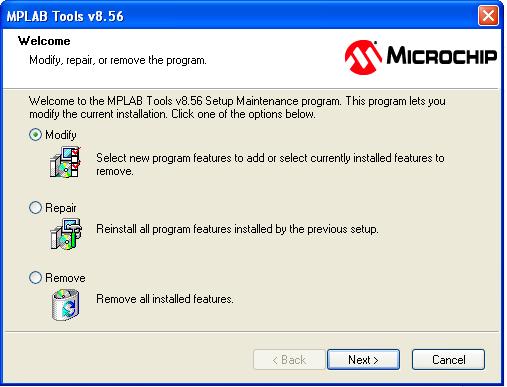
The original instruction said to choose Modify. That choice is appropriate only when changing an installation that already exists and when it matches your intention. A fresh installation may present a different path. Read whether the installer is offering installation, modification, repair or removal before proceeding.
The next image shows the historical component-selection stage. It is retained for readers maintaining an older MPLAB IDE 8 project.
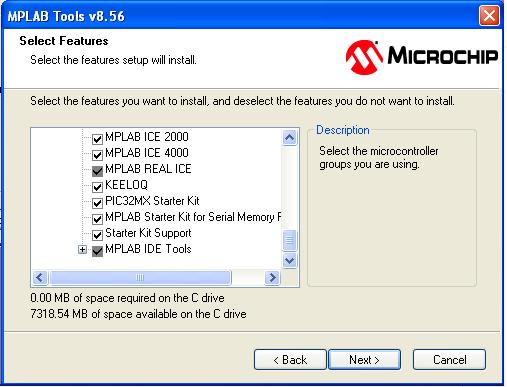
Select components from the requirements of that legacy project and the installer's descriptions. Do not disable or enable options simply to make the page look identical to a screenshot from another machine. Previously installed components can change what the wizard displays.
After completion, launch the intended IDE version explicitly. When several versions are installed, similar shortcuts can make it easy to open the wrong environment and then wonder why the menus or tool lists differ.
Install the Compiler Separately
For C development on a supported 8-bit PIC, select a compatible MPLAB XC8 compiler. Follow the next lesson on installing the MPLAB C compiler. A historical C18 project requires its own compatibility or migration review.
Do not assume assembly support is identical across all IDE releases either. Microchip's compiler requirements explain that MPASM is no longer installed with MPLAB X starting with version 5.40. An old assembly tutorial may therefore depend on tools not present in a newer installation.
The practical approach is to identify the project language and target first, then install the corresponding toolchain. Installing every compiler does not help a beginner understand which one a particular project actually uses.
Check Device and Toolchain Discovery
Create a small test project and select the exact device, such as PIC18F452 for this series. Check that the intended compiler appears as an available toolchain. If several compiler versions are installed, choose deliberately and record the version in the project notes.
The IDE normally discovers tools from supported installation locations. If a compiler was installed in a custom directory, inspect the IDE's build-tool settings and add the actual toolchain location if necessary. Do not point the IDE at an unrelated compiler merely to make a missing-tool warning disappear.
Device support and compiler support are related but distinct. Seeing a part in one selection list does not establish that every attached programmer and compiler combination supports it. Inspect the selections together before investing time in an application project.
| Check | What it establishes | What it does not establish |
|---|---|---|
| IDE starts | The application launches on the computer | A C toolchain is installed |
| Device can be selected | The environment recognizes the target name | The chosen programmer supports every operation |
| Compiler appears | The IDE can locate that toolchain | The existing source is compatible with it |
| Small project builds | The basic build path works | The physical circuit is powered and wired correctly |
| Target programs successfully | The programming stage completes | The application's clock and behavior are correct |
Build a Minimal Project Before Importing a Large One
A small build is a useful installation check. Create a C source file containing a minimal main function, add it to the selected project and build it using the intended compiler. At this stage, you are checking the build environment, not claiming that the program is ready to operate a real board.
void main(void) {
    while (1) {
        // Installation check only; no hardware is initialized.
    }
}
Read the build output from the first error downward. Later errors may be consequences of the first missing header, incorrect device selection or failed compiler invocation. The final “build failed” line tells you the outcome, but the earlier diagnostic usually explains the cause.
For an actual hardware program, add the required configuration settings and initialization before programming the device. A minimal empty loop confirms less than an LED demonstration, and an LED demonstration confirms less than a complete application. Keeping those levels distinct makes test results more useful.
Connect the Programmer After the Software Baseline Works
Once the small project builds, connect a supported programmer and follow its driver and target-connection instructions. Select the actual tool instance if several are attached. A compiler error does not normally depend on whether a target board is connected, while a programming error does.
Check the target power arrangement before asking the programmer to operate. Decide whether the tool supplies the board or only senses an external supply. The software installation does not establish that the target voltage is correct.
If an older programmer is not listed, revisit the IDE's support notes before changing Windows drivers. If it is listed but cannot communicate with the target, investigate the target selection, voltage and programming wires. This order prevents a hardware wiring problem from turning into repeated software reinstalls.
Common Windows Installation Problems
| Problem | Likely area to inspect | Useful action |
|---|---|---|
| Installer does not start | Download integrity or host compatibility | Check the official package and release requirements |
| IDE opens but C compiler is missing | Separate toolchain installation | Install or register the compatible compiler |
| Project cannot create build files | Project-folder permissions | Use a writable source directory |
| Old programmer is absent | IDE support boundary | Choose a release documented to support that tool |
| Legacy source reports many errors | Compiler dialect or project migration | Identify its original compiler before editing the source |
| Menus differ from this article's images | MPLAB X versus legacy MPLAB IDE | Follow the workflow for the environment actually installed |
Keep error messages intact when seeking help. Include the installer version, Windows version, target device, compiler version and whether the failure occurs during installation, compilation or programming. Those details define the problem far more clearly than a screenshot of the last dialog alone.
Preserve a Working Setup
Once the small project builds and your tool connection works, record that combination. Save the project source and configuration with the IDE, compiler and device-support versions. The next person opening the project should not need to guess which toolchain produced the working firmware.
Keep a copy of the original project before opening it in a different environment that may update its metadata. Work on a separate migration copy, compare build output and test the resulting firmware. A newer IDE opening a project successfully does not prove that the generated program is unchanged.
Do not use the source directory as a dumping ground for several indistinguishable HEX files. Give release artifacts a clear relationship to the project revision and build configuration. That prevents accidentally programming a stale image after successfully rebuilding the source.
Distinguish Required Updates from Optional Changes
If a working project needs a new supported device, an IDE or device-support update may be necessary. If the goal is to reproduce an old firmware image, retaining the known tool versions may be more appropriate. Decide from the task rather than upgrading every component simultaneously.
Change one major part of the toolchain at a time when diagnosing compatibility. Updating the IDE, compiler, device pack and source libraries together makes a new build failure difficult to attribute. Keep the previous working configuration available while assessing the change.
Locate the Failure Before Repairing an Installation
Use a simple comparison when one project fails. Create a fresh minimal project with the same device and compiler. If both fail before the compiler starts, inspect the tool path or installation. If the fresh project builds while the old one fails, inspect that project's source list, include paths and configuration first.
Likewise, try the build without requesting a hardware programming operation. A compilation that succeeds followed by a target connection failure points to a different stage than a missing compiler executable. Keep the complete output visible so those stages do not collapse into one vague “run failed” report.
Repair or reinstall the specific component when the evidence indicates that it is missing or damaged. Preserve source files and project settings separately from that process. Reinstalling the IDE should not be treated as permission to delete projects, erase a target or replace working tool versions without recording them.
Review of the Installation Workflow
The useful outcome is a development environment that can build a project for your exact PIC and communicate with the intended programming tool. Downloading an installer is only the beginning. Version compatibility, compiler discovery and a small reproducible build establish that the environment is ready for the next lesson.
Continue with compiler installation, followed by creating and understanding an MPLAB project. We will then connect the project settings to the PIC hardware introduced earlier.
Frequently Asked Questions
Is MPLAB the same program as the C compiler?
No. The IDE coordinates the project and invokes compatible language tools. Install and select the compiler required by the target and source language.
Should I install MPLAB IDE 8.56 because it appears in the screenshots?
Only when reproducing a legacy setup that requires it and using a compatible environment. The screenshots document the original lesson; a new project should use tools chosen from current official support information.
Why does the installer show Modify instead of Install?
It may have detected an existing installation and entered maintenance mode. Read the available actions carefully. Modify changes selected components; it is not a universal instruction for every installation.
Do I need a PIC board connected to install the IDE?
No. You can install the environment and perform a basic compile without a physical target. Programming and hardware debugging require the corresponding supported tool and circuit.
Can I keep multiple tool versions?
Where the installers support it, separate versions can be useful for maintaining older projects. Keep their paths distinct and select the intended version explicitly in each project. Do not merge installation folders manually.
Does a successful build mean the PIC will run?
It establishes that the selected tools produced an image. Correct configuration bits, power, reset, clock and programming are still required before the physical device can execute that image as intended.

Tags


I m sabari from Madurai - Tamilnadu.
working embedded hardware Er .
now I would like become pic programmer & learning c.
I want 2 know how to write codeing of embedded c tutorial details
kksabariraj@gmail.com
1 reply
I have not received MPLAB software, will you please share this?
how to install mplab plese sir give the link
Comments
3