We all know about automation which is originated from automate or automatic. In automation the task is done automatically and you don't need to control it. In normal Home automation project, there are few sensors which are displayed wirelessly to user and there are few controls like user can ON or OFF Lights, Fans etc via remote or mobile App.
In this Project, I have used Arduino UNO board and I have designed its complete working simulation in Proteus software, so that users got sure that its working perfectly. Because we have to work a lot in designing this complete working simulation of home Automation Project that's why its not free but you can buy it for a small price of $50. In this price, you will get the compelte Arduino code along with the working Proteus Simulation. But before buying this project, must have a look at the details below so that you are sure what you are buying. So, let's get started with Home Automation Project using XBee & Arduino.
Home Automation Project using XBee & Arduino
- You can buy the complete working Proteus Simulation along with the Arduino Programming Code by clicking the below button.
- You can pay via Paypal and the download link will be instantly available to you and if you don't have the PayPal account then use our Contact Us Form and we will find some other way for you.
1: Overview
- First of all, let's have an overview of this Home Automation Project.
- In this Project, I have designed two simulations, one simulation is for Remote using which we are gonna control our appliances and the second simulation is for the controlling of these appliances.
- So, when you press buttons from your remote section, a wireless command will be sent to the control board and it will turn ON or OFF the respective load.
- Moreover, there's an LCD on the Remote on which you will also check the values of the sensors.
- So, in simple words, the remote will be in your hand and using this remote you can easily turn ON or OFF your appliances and can also check the status of your different sensors wirelessly.
- Let's first have a look at the remote section:
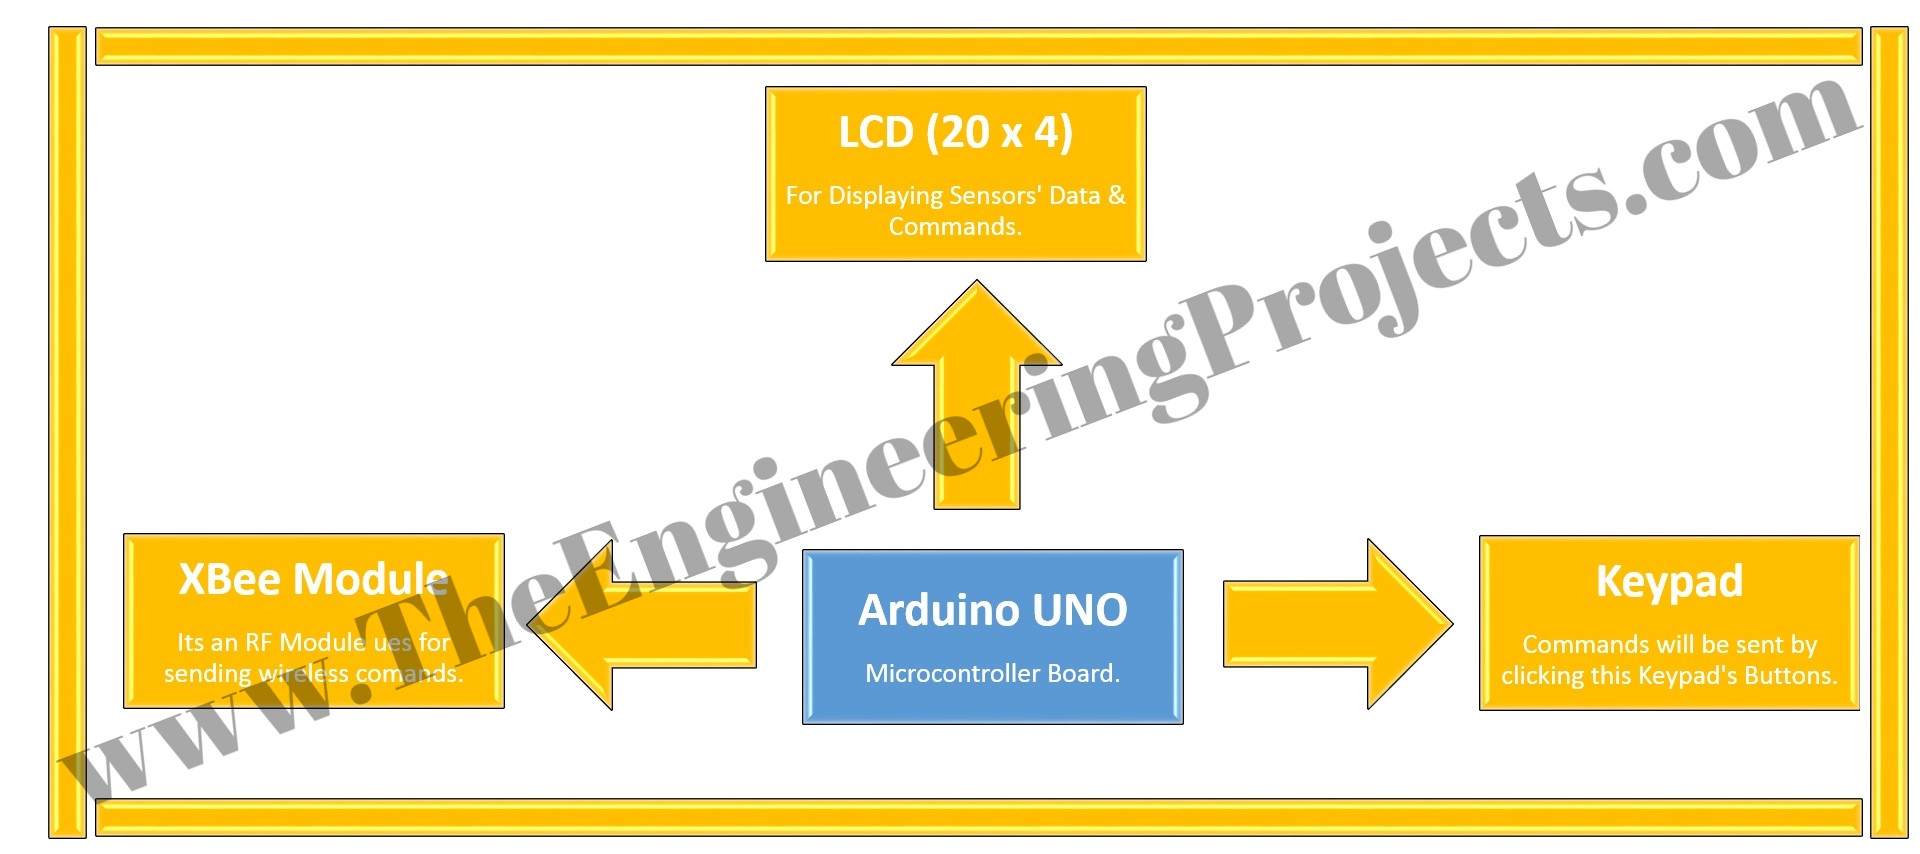
- In Remote Control Section, I have used the below main modules:
- Arduino UNO: Microcontroller Board.
- KeyPad: Commands will be sent by clicking this Keypad's buttons.
- LCD (20 x 4): For Displaying Sensor's Data & Commands.
- XBee Module: It's an RF Module used for sending wireless commands.
- Now when you click any button on your Keypad, a command is sent from Arduino to XBee Module and the XBee module then forwards that command to other XBee on the Control Unit.
- Moreover, when the Control Unit sends the Sensors' data on xbee then Arduino receives that data and then displayed that data on LCD.
- Here's the block diagram of Remote control section which will give you a better idea of its working:
- Here's the Proteus Diagram of our Remote Section:
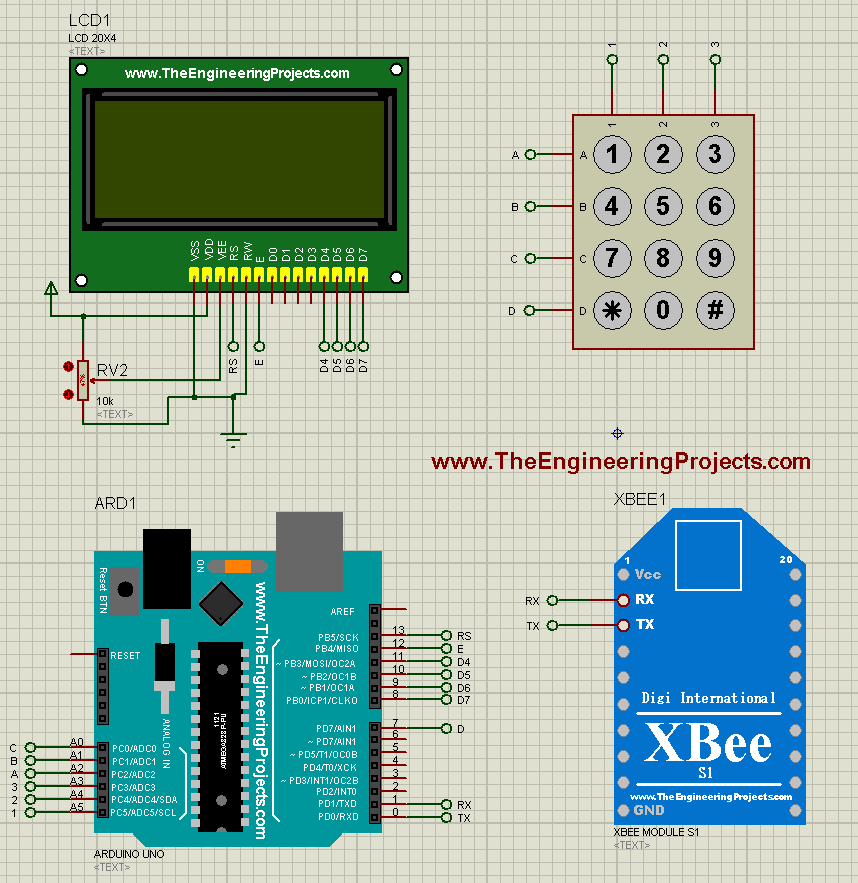
- In the above Proteus Simulation of Remote Control, you can see that we have Arduino UNO board which is connected with LCD, KeyPad and XBee Module.
- Working of this Remote section will be discussed in the later section.
- Now let's have a look at the Control Unit Side of Home Automation Project.
- In the previous section, we had an overview of the Remote section, now let's have a look at the Control Unit.
- The Control Unit is the Unit which is being controlled by the Remote Control.
- The Main components of Control Unit are:
- Arduino UNO: Microcontroller Board.
- Relays: Used to control the appliances. I have added eight relays so you can control eight appliances.
- Lamps: Indicating the Bulbs.
- DC Motors: Indicating the Fans.
- Smoke Sensor: Used to detect the Smoke.
- Flame Sensor: Used for Fire detection.
- DS18B20: Used to measure atmospheric temperature.
- In the simulation, I have used Lamps and DC Motors as appliances but if you are designing it on hardware then you can use any 220V appliance.
- But before adding it, you must understand the working of relays.So, have a look at below tutorials:
- What is relay and How to use it ?
- Interfacing of Relay with Microcontroller.
- On this Control unit, the Arduino UNO is getting the data from the smoke sensors and then sending this data via XBee to Remote Control.
- We have seen in the previous section that this data is then displayed over LCD.
- Moreover, when any button is pressed from the Remote Control, the command is received by this Arduino via XBee.
- On receiving this command, Arduino UNO then turns ON or OFF the respective relay which in turn ON or OFF the respective appliance.
- Here's the block diagram of this control unit:
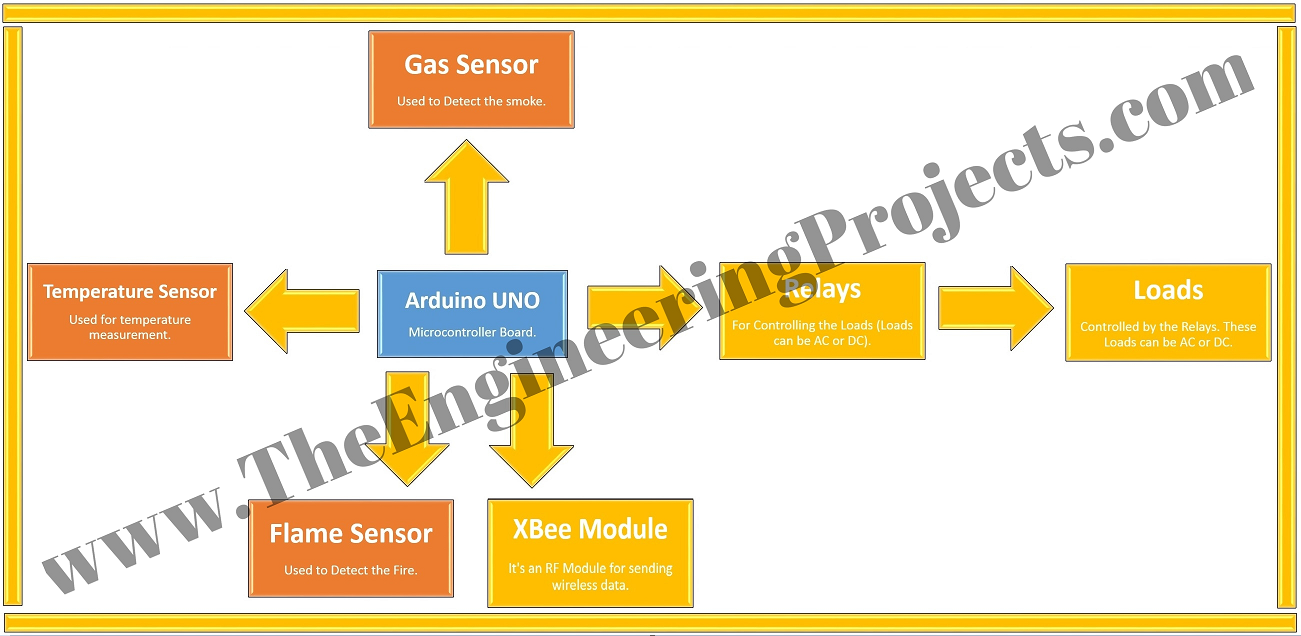
- You can see in the above block diagram that I have connected three sensors with Arduino and Arduino is receving their values and then sending these values to the remote control via XBee.
- Moreover Relays are also connected to Arduino and then loads are further connected to these Relays.
- So, Arduino is controlling these Relays which in turn are controlling the loads.
- I have used eight relays and hence eight loads.
- The Loads I have used are all DC loads because Proteus doesn't have AC active loads in it but you can place AC loads as well.
- Here's the Proteus Simulation of Control Unit:
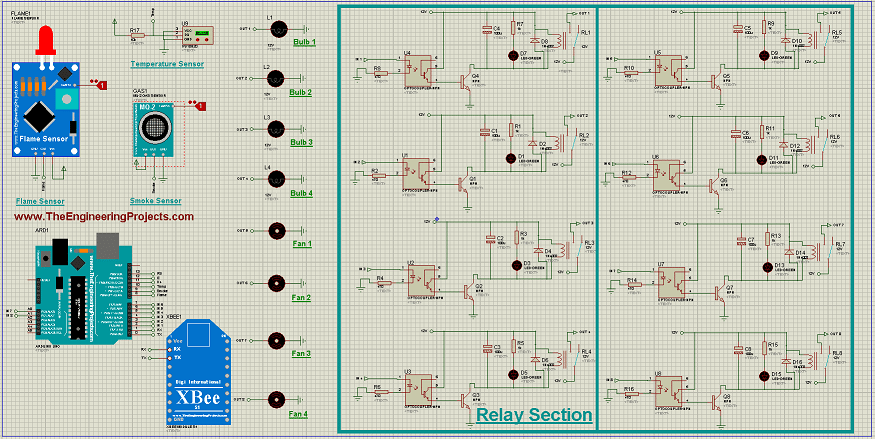
- You can see all the modules are present in it.
- Eight relays are present on the right side and their outputs are going into the loads.
- I have used four lamps and four DC Motors.
- Now let's have a look at their operation.
- Gas Sensor Library For Proteus.
- Flame Sensor Library for Proteus.
- Interfacing of Flame sensor with Arduino.
- Interfacing of Temperature Sensor 18B20 with Arduino.
2: Operation
- I have already mentioned their operation in above section so I am not gonna discuss it in detail.
- But let's have a little talk about their operation.
- First I am gonna discuss the operation of Remote Control:
- The remote Control has an XBee module which is used for wireless communication.
- The Keypad has buttons on it so now when you press button "1" on the keypad then the Signal is sent via XBee to Control Unit.
- The control unit will automatically turn on the first load when it will receive the command from button "1" of Remote Control.
- When you press "1" for the first time then the first load will turn ON but when you press button "1" again then the first load will go off.
- So, its like if you want to turn it ON then press it and if you want to turn it OFF then press again. (Quite simple :P)
- As there are eigth loads, so button "1" to "8" are working for loads "1" to "8" respectively.
- Moreover, when sensor's data come from control unit then it is updated in the LCD of Remote Control.
- Now let's have a look at the operation of Control Unit:
- As the Control Unit is concerned, it keeps on waiting for the command from remote and whenever a command is received from the Remote Control, it turns ON or OFF the respective load.
- Moreover, it also sends the data of sensors continuously to the Remote Control.
- For this wireless communication, XBee is used here.
3: Working
- This is the last section of this project where will will have a look at the working of the project.
- I haven't divided this section in parts instead I have create a video which will explain the working in detail.
- Here's the First look of Remote section image while working:
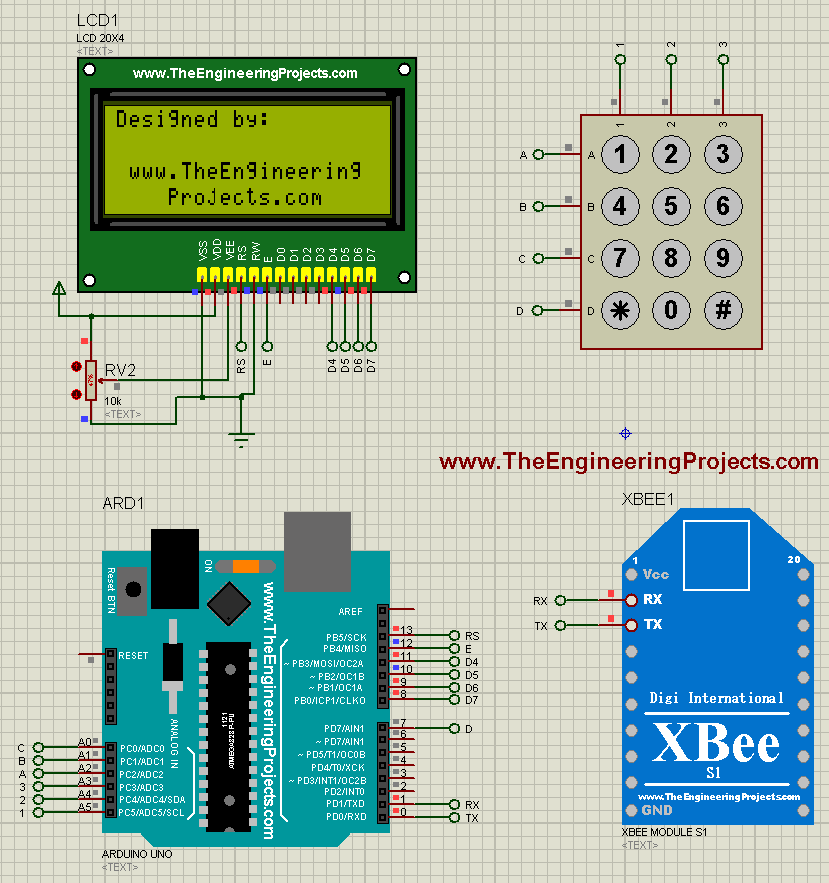
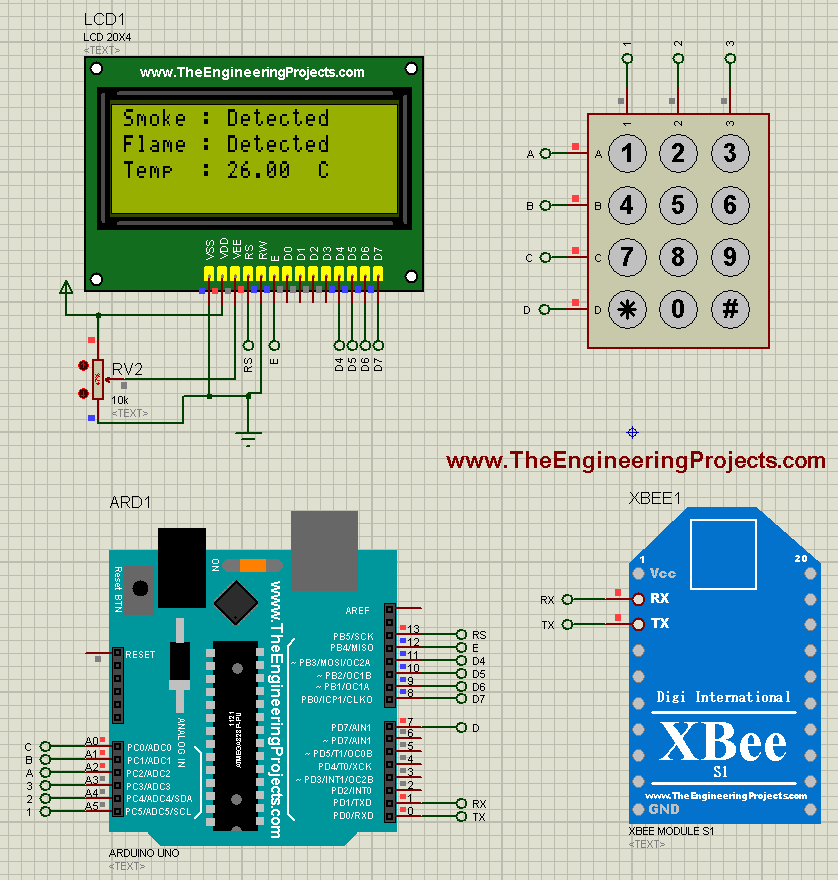
- Now when the Sensor's data come from the remote Section then it will be displayed in the LCD as shown in below figure:

- You can see in the above figure that both sensors are detecting and the temperature is also displayed in the LCD.
- Now the complete working of this project is shown in the below video which will give you complete idea of this project:
- If you buy this project and you are unable to run it properly then we will provide you free service and will make it work on your laptop perfectly. :)


