So, the next thing came to my mind is to upload the Getting Started example from the RF24 library which I have also given in my previous post Interfacing of NRF24L01 with Arduino, and now when I checked the serial terminal, I got this error:
- Failed, response timed out.
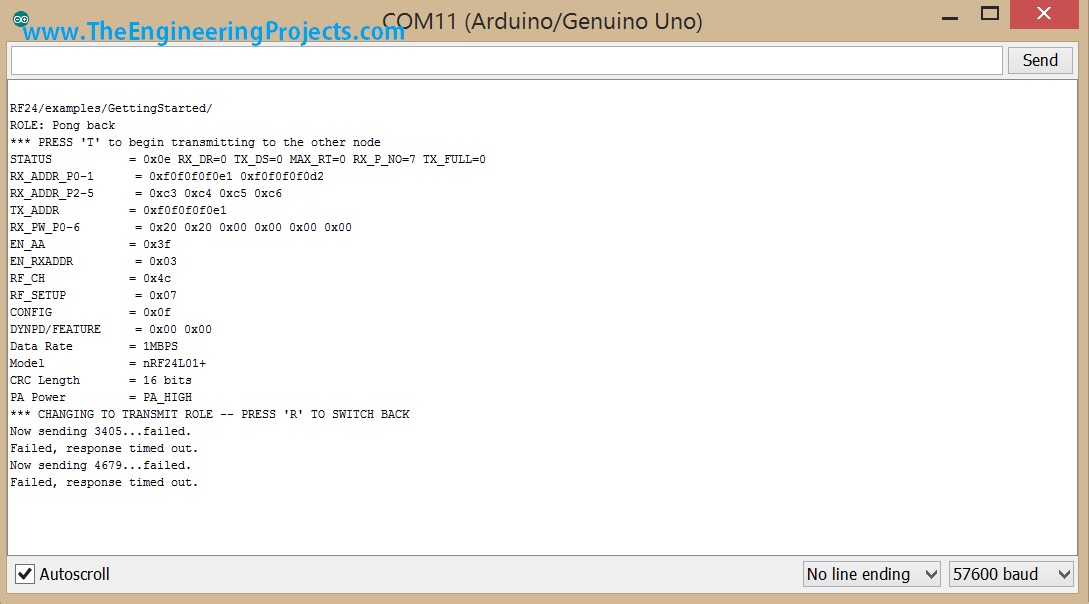
The screenshot of this response is as follows:

As you can see in the above figure, in the last lines we are getting error that "Now sending 4679...failed. Failed, response timed out." So, that was the problem which I encountered almost for half an hour and then I finally realized what I am missing and how to solve it. Before going to the solution, let me first tell you the types of this modules.
Types of NRF24L01 Module
- When I encountered this problem, and instead of lot of efforts and not being able to resolve it, I finally thought of using the old module, so I searched for it and luckily I found one of them.
- So, now I plugged this new module with another Arduino and I checked the properties of both these modules (i.e. the old one and the new one) and for that I simple uploaded the below sketch in both of my Arduino boards and opened the serial terminal.
#include <SPI.h>
#include "nRF24L01.h"
#include "RF24.h"
#include "printf.h"

RF24 radio(9,10);

const uint64_t pipes[2] = { 0xF0F0F0F0E1LL, 0xF0F0F0F0D2LL };

typedef enum { role_ping_out = 1, role_pong_back } role_e;

const char* role_friendly_name[] = { "invalid", "Ping out", "Pong back"};

role_e role = role_pong_back;

void setup(void)
{

    Serial.begin(57600);
    printf_begin();

    radio.begin();
    radio.setRetries(15,15);

    radio.openReadingPipe(1,pipes[1]);

    radio.startListening();

    radio.printDetails();
}

void loop(void)
{
}
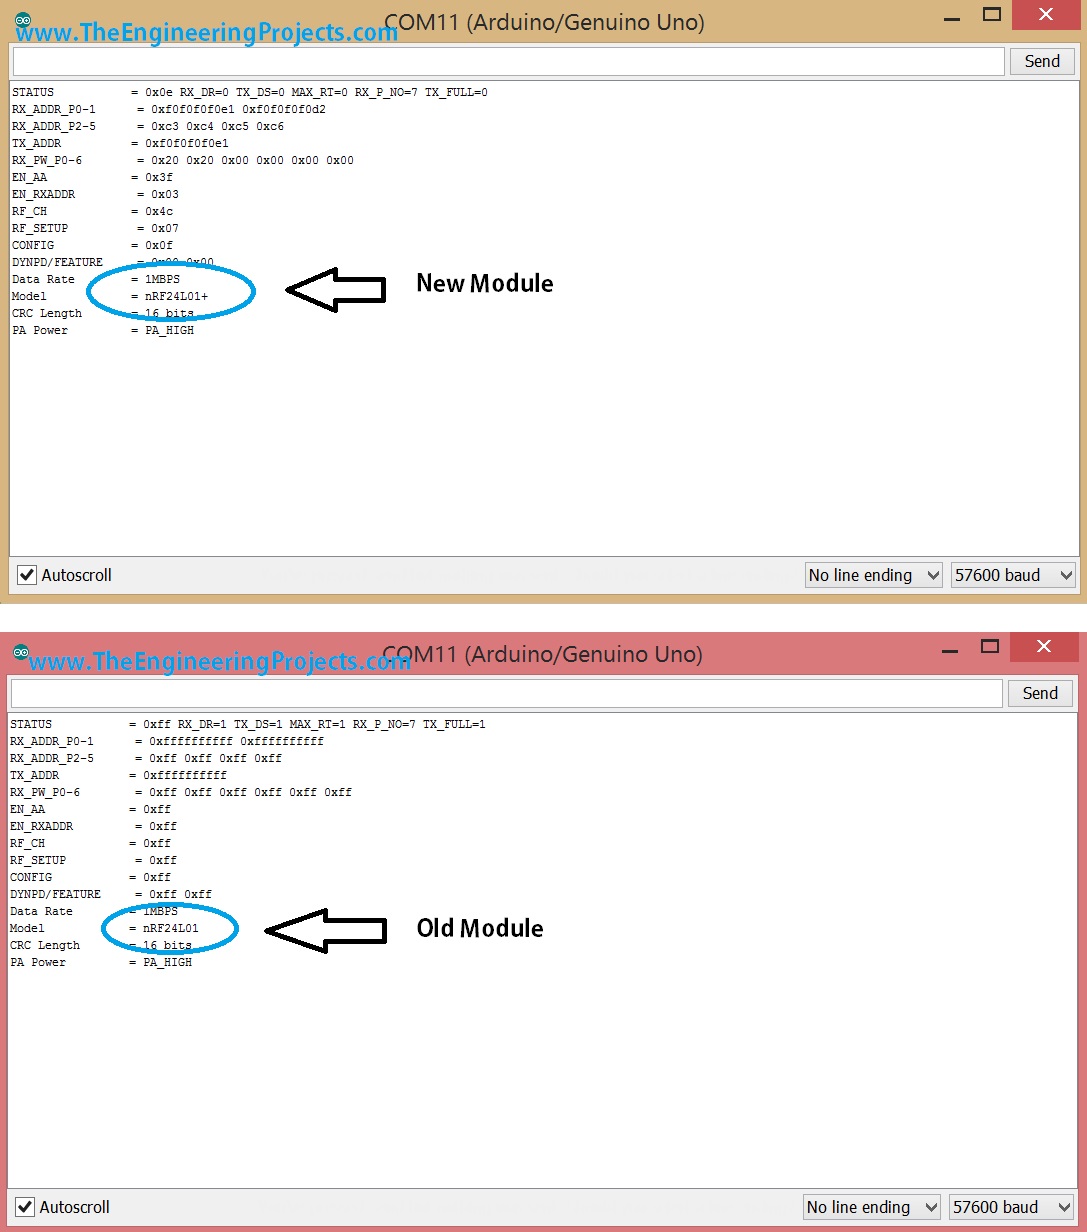
- In this sketch, I simple print the details of NR24L01 module, so I uploaded the above sketch in both the Arduinos, one with old NRF24L01 module and the one with new NRF24L01 module, and I got the below response.

- Now I got the reason that why I am not getting the response for the same code, which worked on the old one, because the old module model was NRF24L01 while this new module is NRF24L01+ which is slightly different from NRF24L01.
- So that's the reson why I was constantly getting the Failed, response timed out error for this module. So, now lets have a look on how to resolve this issue.
How to resolve "Failed, response timed out" for NRF 24L01+ with Arduino
- So, now one thing I knew that my module is NRF24L01+ and not NRF24L01 so I need to interface NRF24L01+ with Arduino. :)
- So, I started looking online and get its datasheet which helped a lot and finally I got the thing.
- NRF24L01+ draws more current than NRF24L01 while starting up and Arduino couldn't provide that required current to it. That's the reason NRF24L01+ failed to initialize and couldn't send or receive the response.
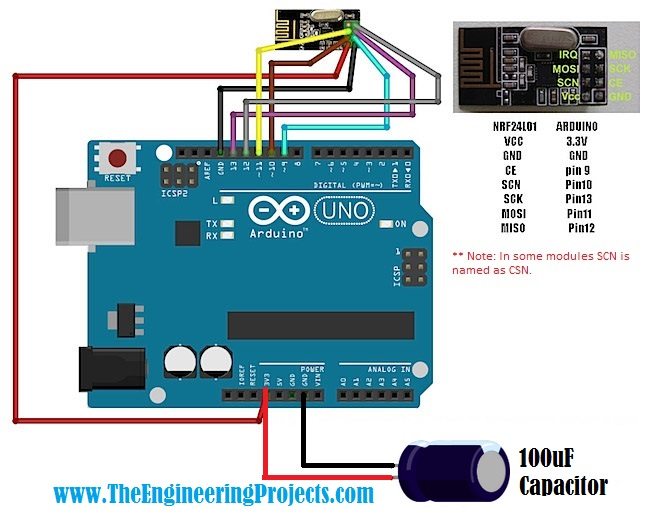
- So, in order to remove this issue, I simply placed a Capacitor of 100uF between 3.3V and GND of Arduino and it did the magic. :)
- Detailed circuit diagram is as follows:

- So, that's the simple solution which kept me on for around an hour and then I finally got it.
- As you can see in above figure, its exactly the same circuit diagram and the only addition is the capacitor placed between 3.3V and the GND.
- After that I uploaded both the codes for receiver and transmitter which I have already posted in my old post Interfacing of NRF24L01 with Arduino and it worked like charm. :)
That's all for today, will meet you guys in the next tutorial soon. Take care!!! :)


 Arduino
 syedzainnasir
 4 Comments


 2.3k
2.3k
 953
953
 921
921
 2.1K
2.1K


