


How to get Hex File from Arduino


Hello friends! Today we will learn how to get the compiled HEX file from an Arduino sketch. This is useful when you want to load firmware into a Proteus model, program a compatible AVR microcontroller or keep a specific compiled version of a project.
Libraries used in this tutorial
Arduino Library for Proteus: V1.0 (2015, used in this tutorial) · latest version: V4.0 (October 2026)
Arduino UNO Library for Proteus: V1.0 (2015, used in this tutorial) · latest version: V4.0 (October 2026)
Helping Tools
- Serial Monitor Advance: a serial terminal window for the UART of your board
- Serial Monitor Expert: the serial monitor with extra debugging tools
- LCD Library for Proteus V3.0: 16x2, 20x4 and I2C LCDs to show your readings
Arduino does generate compiled firmware during its normal build process. The IDE simply handles much of that work for you when you click Verify or Upload. You do not need to find a temporary folder manually every time you want to keep the result.
We will use the classic Arduino Uno with its ATmega328P as the main example. Other Arduino boards can produce different output formats, so a missing .hex extension does not necessarily mean compilation failed.
The Easiest Method: Export Compiled Binary
Open and save your sketch, select the correct board and any relevant processor options, then choose Sketch, Export Compiled Binary. The IDE builds the sketch and exports the platform's firmware output to the sketch's export location.
- Open the project you want to compile.
- Save it in a clearly named sketch folder.
- Select Arduino Uno for this example.
- Check any board-specific menu settings before building.
- Choose Export Compiled Binary from the Sketch menu.
- Wait for successful compilation.
- Open the sketch folder and inspect its exported files or build subfolder.
The exact subfolder and filenames depend on the IDE and selected board platform. Use the export result and folder contents from your current installation rather than assuming that an old temporary path shown in a screenshot exists on your computer.
A physical board does not have to be connected just to compile and export. You do need the correct board package and any required libraries installed. A serial-port selection becomes relevant when uploading to hardware, not when the compiler is generating an output file.
What Is Inside a HEX File?
For the classic AVR workflow, the output is commonly an Intel HEX file. It is a text representation of memory data with address information and record checksums. It is not the original Arduino source code saved under another extension.
The compiler translates source into object code, the linker combines the necessary parts, and an output tool produces the firmware representation used by the uploader. Arduino's official sketch build-process documentation describes this AVR workflow.
Renaming Sketch.ino to Sketch.hex does not compile anything. Likewise, changing a .bin extension to .hex does not convert the file format. The contents and addressing rules must match what the target programmer or simulator expects.
| File type | Typical role |
|---|---|
| .ino | Arduino sketch source |
| .cpp and .h | C++ implementation and declarations |
| .elf | Linked executable with sections and potentially symbols |
| .hex | Addressed firmware data in Intel HEX format |
| .bin | Binary image used by some platforms and upload tools |
| .eep | EEPROM image in workflows that generate one |
The file size displayed by Windows is not the number of flash bytes used by the program. Intel HEX stores data as printable characters and includes record overhead. Use the compiler's memory report and the target's memory limits when assessing whether a program fits.
Choose the Correct Board Before Exporting
The compiled output is specific to the selected processor architecture, clock assumptions, core and board settings. A HEX file for an Uno is not a universal program for every Arduino model.
Even closely related AVR boards can differ in clock speed, pin mapping, bootloader arrangement and upload behavior. A file built for a 16 MHz target may have incorrect timing if used on a target running at 8 MHz without matching build settings.
For a standalone ATmega328-family microcontroller, identify the exact device and intended configuration. An ATmega328 and ATmega328P are not interchangeable selections merely because their names look similar. Use the corresponding board definition and programmer support.
The program image also does not necessarily set fuse bits, clock selection or bootloader settings. Those belong to the target-programming workflow. Keeping a HEX file is useful, but it is not a complete specification of the hardware configuration.
Application HEX Versus Bootloader-Inclusive HEX
Some AVR exports produce both an application-only image and a file whose name includes “with_bootloader.” The latter combines application and bootloader data for an appropriate full-programming workflow.
For an ordinary Proteus model of the target microcontroller, the application-only HEX is usually the relevant starting point. Check that model's documentation and reset behavior. Do not select the larger file automatically because it sounds more complete.
For hardware, the correct image depends on whether you are using an existing serial bootloader or an external programmer. Normal serial upload and ISP programming have different effects and configuration requirements. A bootloader-inclusive image does not by itself establish the right fuses.
Keep both files if the export generates them, but label their intended use. Sending someone a folder containing several nearly identical filenames without explaining the target and programming method makes mistakes much more likely.
The Historical Verbose-Output Method
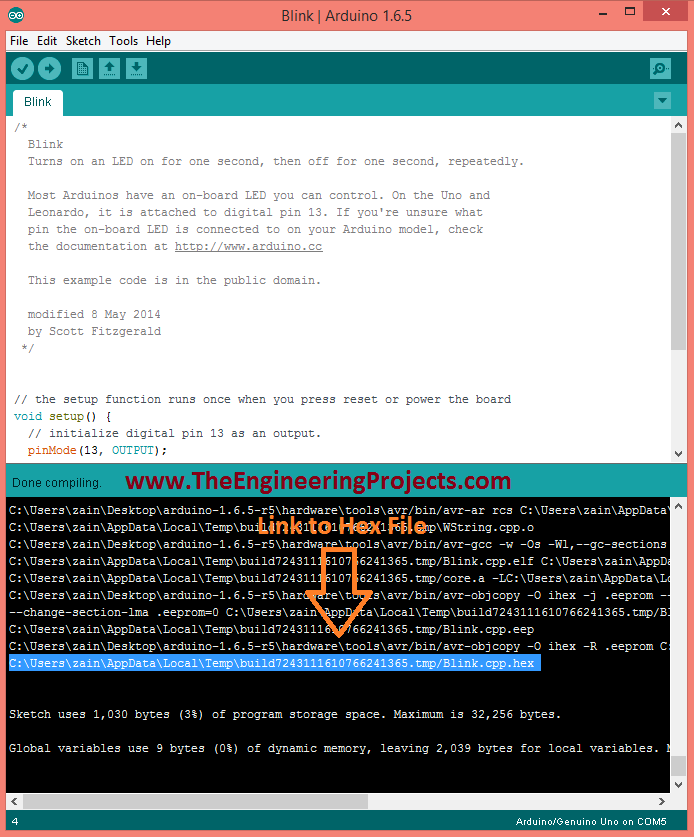
The original tutorial located the HEX file through verbose compilation output. That remains useful when diagnosing a build, even though Export Compiled Binary is generally the more convenient way to keep the firmware.
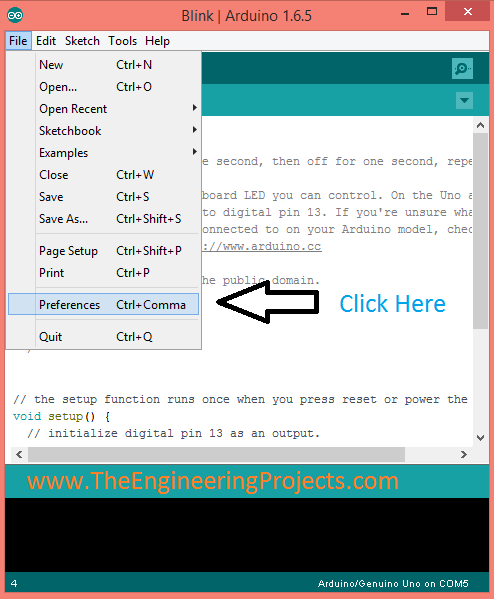
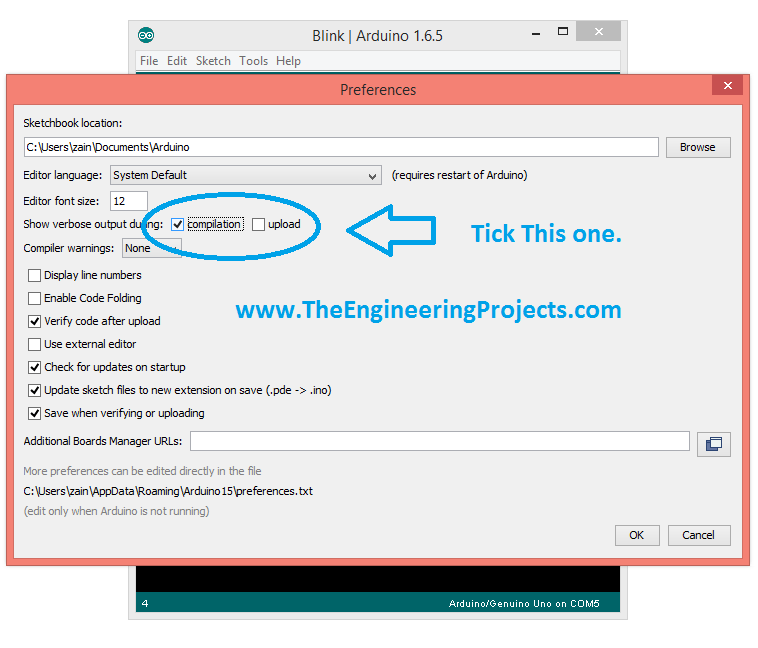
Open the IDE's preferences and enable verbose output during compilation. The exact dialog appearance differs between versions. The retained screenshot shows the older IDE menu rather than a promise that your current interface looks identical.
Compile the sketch successfully, then inspect the output panel for the generated firmware path. Look for the relevant output-tool command or file path ending in .hex for the AVR target. Do not assume that the last visible line always contains it.
A path in that output may point to a temporary or cached build directory. Copy the complete path carefully, including drive letter and directory separators. For example, C:\BuildOutput\Blink\Blink.ino.hex identifies a file, while C:\BuildOutput\Blink identifies its containing folder.
The old screenshot's generated directory belongs to that earlier build on that machine. Temporary and cache locations can change between sessions, versions and operating systems. They are not a reliable permanent location for a firmware release.
Do not assume that the IDE deletes the HEX immediately after every upload. Build-cache lifetime is an implementation detail. Export the result to a location you control instead of depending on how long a temporary file happens to remain.
Compile to a Chosen Folder with Arduino CLI
For a repeatable command-line workflow, Arduino CLI can compile for a named board and write the outputs to a specified directory. The following is an illustrative Windows command; replace the sketch and output paths with your own.
arduino-cli compile --fqbn arduino:avr:uno --output-dir "C:\ArduinoBuild\Blink" "C:\ArduinoProjects\Blink"The FQBN is the fully qualified board name. Here arduino:avr:uno selects the classic Uno from the Arduino AVR platform. The command assumes that platform and the project's libraries are already installed.
The input path is the sketch directory, not a randomly selected temporary source file. The output directory should be distinct and easy to identify. Do not point an automated cleanup operation at your only copy of the source project.
Consult the Arduino CLI compile reference for the supported options. Export naming is governed by the board platform's recipes, described in the Arduino platform specification.
For repeatable releases, record the CLI version, board-package version, library versions and board options. The same source can compile differently after a dependency or compiler update. A filename alone does not identify all those inputs.
Load the HEX File into Proteus
Use a model that matches the intended processor and board behavior. Our Arduino Library for Proteus tutorial covers the related library setup, and the Uno model tutorial focuses on that board.
- Compile for the processor represented by the simulation model.
- Export the application image to a stable folder.
- Open the model's properties and select the appropriate program file.
- Set the model clock consistently with the compiled target.
- Check the circuit's power, ground and peripheral connections.
- Run the simulation and observe the intended behavior.
If you edit the source afterward, rebuild and refresh the selected output file. The simulator loads compiled instructions; it does not read your unsaved Arduino editor buffer. A stale HEX is often the reason an apparently corrected program still behaves like the old version.
A matching processor is necessary but not sufficient. A simulation model may omit USB behavior, particular peripherals or electrical effects. Successful program loading does not prove that every physical feature of the board is represented.
Keep a Useful Firmware Record
Store the firmware together with a short record of its source revision, target board, clock, build settings and expected behavior. If the program uses a serial terminal, include its baud rate and message format. If external pins have special startup requirements, document them.
A practical release folder can contain the application HEX, any separately identified bootloader image, a build-information text file and the source snapshot where appropriate. Keep debug and release variants distinguishable.
You can calculate a SHA-256 hash to identify an exact file. On Windows, an illustrative command is:
Get-FileHash -Algorithm SHA256 -LiteralPath 'C:\ArduinoBuild\Blink\Blink.ino.hex'A matching hash establishes that two copies have identical file bytes. It does not prove that the firmware is correct, compatible or tested. Use it for version identity and transfer checks, alongside the build record.
Also retain the source and dependencies needed for future changes. A compiled file normally does not preserve the original comments and project structure. Recovering source-level intent from firmware is not equivalent to keeping the original project.
Common Problems and Fixes
| Problem | Likely explanation | What to do |
|---|---|---|
| No exported file appears | Compilation failed or the export is in a subfolder | Read the build result and inspect the current sketch directory |
| The output is .bin rather than .hex | The selected platform uses another format | Use the target's supported firmware format |
| Proteus runs old code | Stale output or wrong program-file path | Rebuild and select the intended exported file |
| Delays or serial timing are wrong | Clock or target mismatch | Compare board settings with the simulated processor |
| Programmer rejects the chip | Wrong target or programming configuration | Identify the actual device and use its supported settings |
| Several HEX files are present | Application and combined images or multiple target exports | Identify each file's target and purpose before using it |
Review and Frequently Asked Questions
Export Compiled Binary is the practical first choice for keeping an Arduino firmware image. Verbose output is useful for understanding the build, while Arduino CLI offers explicit target and output-directory control. Choose the workflow that fits your project without confusing compilation with uploading.
The retained video demonstrates the older verbose-output method. Its temporary paths and interface details are historical; use the current export workflow above when you simply need a saved firmware file.
Do I have to upload to a board before getting a HEX file?
No. A successful compile and export can produce the firmware without a connected board.
Can the HEX file be used on every Arduino?
No. It is built for a specific target and configuration. Select the correct platform and clock assumptions.
Does the HEX file include EEPROM settings?
Not necessarily. EEPROM output and programming depend on the platform and workflow. Check the generated files and programmer instructions rather than assuming all memory areas are combined.
Is a HEX file a secure way to hide a program?
It omits the original source presentation, but is not encryption. Treat it as executable firmware, not a guarantee that the program's behavior or machine instructions cannot be examined.
Will changing the filename change the target processor?
No. The target is determined during compilation. Rebuild with the appropriate board configuration when the hardware changes.

Tags


When did the IDE start deleting the hex file? I am using 1.0.6 and they are not deleted.
1 reply
You are using a very old version of Arduino software, and I have no idea about it, but in newer versions Arduino deletes the hex file. :)
1 reply
1.8.5
hex file can be saved.
Dear theengineeringprojects
Hello, ArduinoUno is with error compiling,, Project DS1307 and RTC_Clock.
Message: "error compiling for board arduino/genuino uno"
Please how fix this problems ?
My windows 10, Arduino v.1.6.9.
Let me know please,
1 reply
Hi,
I think you are trying to upload the code of Arduino Mega in Arduino UNO that's why its creating such error. Normally its about Pins, if you have mentioned some pin higher than 13 than this error generates. So check your code please.
Thanks.
Sorry, but the title is somewhat misleading. It should be "How to Get Hex File from Arduino IDE" or "How to Get Hex File FOR Arduino". This way it looks like you are downloading hex file from Arduino itself to the PC.
1 reply
Hi,
I think the title is perfect and yeah it's not fulfilling your search, and by the way it's unethical to steal someone's work.
Have a good day. :)
2 replies
Well, I think Igor is right here. With this title you are actually riding on peoples interest in something, that is much harder to perform than what you do, ethical or not. Your suspicion, that the only reason is to steal someone else's work tells a lot about your self. There may be tons of ethical reasons for getting the hex file out of the chip. Ever misplaced your source code, crashed your HDD, found that an updated library is not working anymore the way you used it etc?
Hi,
If you are actually a developer then there's no reason for getting the hex file from microcontroller. Because you have the code and if there's some changes in the library etc then you can do these changes in the code easily. Let's say you get the hex file still it can't be changed or upgraded. Hex file is always used as it is. :P
Thanks.
Please send me the library for SG3524
Thanks and regards.
1 reply
Hi I tried this on the Mac (OS X) IDE and it did not work. I can see an Elf file but not a hex file
code is not compiling as it is getting error-
Arduino: 1.8.5 (Windows 7), Board: "Arduino/Genuino Uno"
D:\Arduiono\sketch_apr17a_rrttcc_lcd_ardd\sketch_apr17a_rrttcc_lcd_ardd.ino: In function 'void setup()':
sketch_apr17a_rrttcc_lcd_ardd:15: error: expected unqualified-id before '.' token
DS1307.begin();
^
sketch_apr17a_rrttcc_lcd_ardd:16: error: expected unqualified-id before '.' token
DS1307.setDate(16,4,7,0,17,50,04);//ano,mes,dia,semana,horas,minutos,segundos
^
D:\Arduiono\sketch_apr17a_rrttcc_lcd_ardd\sketch_apr17a_rrttcc_lcd_ardd.ino: In function 'void loop()':
sketch_apr17a_rrttcc_lcd_ardd:20: error: expected unqualified-id before '.' token
DS1307.getDate(clock);
^
sketch_apr17a_rrttcc_lcd_ardd:41: error: expected unqualified-id before '.' token
DS1307.setDate(clock[0],clock[1],clock[2],0,clock[4],clock[5],clock[6]);
^
sketch_apr17a_rrttcc_lcd_ardd:48: error: expected unqualified-id before '.' token
DS1307.setDate(clock[0],clock[1],clock[2],0,clock[4],clock[5],clock[6]);
^
sketch_apr17a_rrttcc_lcd_ardd:55: error: expected unqualified-id before '.' token
DS1307.setDate(clock[0],clock[1],clock[2],0,clock[4],clock[5],clock[6]);
^
sketch_apr17a_rrttcc_lcd_ardd:62: error: expected unqualified-id before '.' token
DS1307.setDate(clock[0],clock[1],clock[2],0,clock[4],clock[5],clock[6]);
^
sketch_apr17a_rrttcc_lcd_ardd:69: error: expected unqualified-id before '.' token
DS1307.setDate(clock[0],clock[1],clock[2],0,clock[4],clock[5],clock[6]);
^
exit status 1
expected unqualified-id before '.' token
This report would have more information with
"Show verbose output during compilation"
option enabled in File -> Preferences.
1 reply
Hi,
That's your code's error, it has nothing to do with getting hex file. First remove errors of your code and then try to get the hex file. If you need help in running this code then you can add us on Skype and we will help you out.
Thanks.
hi I did all these thing but when i run the program it can't run and give me fatal simulation error
hi I did all these things but when i ran the program it can't and gave me fatal simulation error
Hi,There is a fatal error during the Protues simulation,"Internal Exception:access vilation in module 'UNKNOWN'..."
Dear,
Instead of .cpp.hex i am getting .ino.hex, Will this work ?
I have uploaded ino.hex to arduino in proteus but it's not working, Not sure due to this or any other reason.
Hello sir,
I followed the steps to get the hex file but when I paste the link in the computer address bar, a dialog box open up stating that Windows can't find the link "C:\\Users\\EM\\AppData\\Local\\Temp\\arduino_build_871333"
help me please my project is due soon.
Thank you.
Comments
19