How to use Arduino Serial Monitor ?


How to open Arduino Serial Monitor ?
- There are two ways to open Arduino Serial Monitor, so let's discuss both of them one by one:
First way
- Open your Arduino Software and then click on the small box in the right top corner as shown in the below figure:

- Your Arduino must be connected to your computer when you click this Serial Monitor.
- If Arduino is not connected then it will create error but if Arduino is connected and configured then it will open a new window as shown in below figure:

- This new window is called Arduino Serial Monitor, we are gonna discuss how to use it in the next section, let's have a look at the second way of opening it:
Second Way
- You can also open it by clicking on the Tools in the Top Menu and then click Serial Monitor and same Serial Monitor will open up as shown in below figure:

- You can also use the short keys Ctrl+Shift+M to open Arduino Serial Monitor.
- So, that's all about How to open Arduino Serial Monitor. So, now let's have a look at How to use it and why to use it ? :)
What is Arduino Serial Monitor ?
- Arduino Serial Monitor is a simple tool available in Arduino software.
- Arduino Serial Monitor is used in Serial communication and it prints data, whatever you send through the serial port of Arduino will also be view able on this Serial Monitor.
- In Windows XP, we have a Hyper Terminal which is used for Serial communication and this Arduino Serial Monitor is just a replica of that Hyper Terminal.
- So, using this Arduino Serial Monitor you can check what you are sending and you can also place checks in your code.
- For example, I want to check the status f any digital Pin then I can simply Serial print it that when some button is pressed then I will be notified.
- I am gonna discuss it in detail further. but first let's have a simple data sending on Serial Monitor.
- So, connect your Arduino and then upload the below code in it:
void setup() {
  Serial.begin(9600);
  Serial.print("www.TheEngineeringProjects.com");
}

void loop() {
  // put your main code here, to run repeatedly:

}
- Now you can see in the above code that I just begin my serial port and then I have used the command Serial.print to print some data on the Serial Port.
- So, now upload this code in your Arduino board which must be connected to your computer in order to work this Serial Monitor.
- After uploading the code, now open your Serial Monitor and you will get this data in your Serial Monitor which means this data has been sent Serially as shown in below figure:
- Now you can see that our data has been sent serially.
- Serial Monitor is using the Serial Port so that's why its directly connected to Pin # 0 and Pin # 1 of Arduino.
- When you open your Serial Monitor then your Arduino resets.
- You can change the baud rate from lower right corner so because we have begin our Serial port with baud rate 9600 that's why I have selected 9600 in Serial Monitor.
- Now if you manually want to send some data on the Serial Port of your Arduino (RX) then you can type in above bar and then click Send.
- So, let's design a small code in which we will send the data on the Serial Port which will be received on it.
- So, upload the below code in your Arduino and open your Serial Monitor.
void setup()
{
    Serial.begin(9600);
    Serial.println("www.TheEngineeringProjects.com");
}

void loop()
{
    if(Serial.available())
    {
        char data = Serial.read();
        Serial.print(data);
    }
}
- Now, open your Serial Monitor and type something in it and it will be printed on your Serial Monitor as shown in below figure:
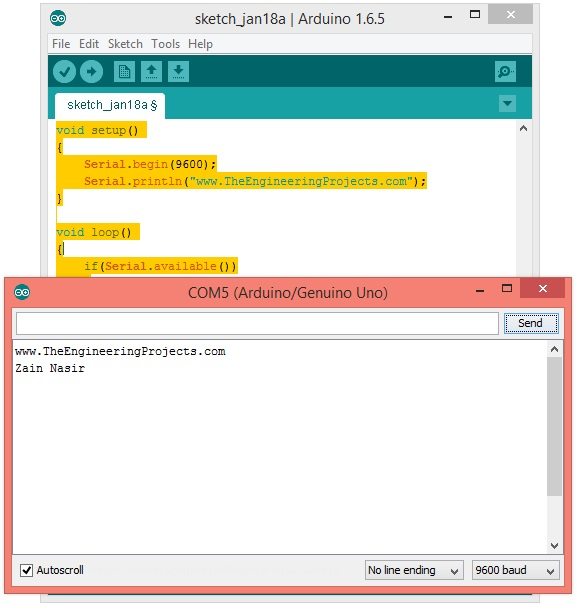

- So, I have printed my name and then Send it and it is printed on the Serial Monitor.
- Now, you know both ways of How to use Arduino Serial Monitor, now let me tell you where you can use it.
Serial Monitor as a Debugging Tool
- Serial Monitor is a great debugging tool.
- You can place checks in your code like you wanna see how many lines are working.
- So, if your code is of like 500 lines then you can place check in between like after 100 lines to see if its working or not.
- Similarly, if you are dealing with some GPS module then you can receive its data via the Software Serial and then can print it on the Serial Monitor to see that you are getting the data correctly.
- For having a look at Serial Data Receive you should check Send SMS using Sim900 and Arduino because in that post I have sent data over Serial Port and received data and then printed it on Serial Monitor.
- Here's an awesome video in which one of our team members has shown how to use Arduino Serial Monitor:
×
![]()