Hello everyone, I hope you all are fine and having fun with your lives. In today's tutorial, I am going to share How to do Arduino Serial Communication in detail. Recently, I have shared a lot of tutorial on Arduino Serial Communication which contains everything you need for Arduino Serial Communication. So, in today's tutorial, I am actually gonna combine them all and give you a whole picture of How you can easily do the Arduino Serial Communication. I hope you guys are gonna enjoy this. You should also have a look at DC Motor Speed Control using Arduino in which I have controlled the DC Motor via Arduino Serial Communication.
I will also share some more tutorials on Arduino Serial Communication in the near future so I will also add their links in today's tutorial. If you guys have any questions then ask in the comments and we will try our best to resolve your queries. Moreover, most of these codes are testing on Proteus and the simulations are given for download so you can download them from respective link but as a suggestion try to design them on your own. So, let's get started with How to do Arduino Serial Communication:
How to do Arduino Serial Communication ???
Arduino boards contain Serial Port in it. If we talk about Arduino UNO then it has the Serial Port at Pin # 0 and Pin # 1 as shown in below figure:
These are the Arduino UNO Serial Pins and you can see it has only two pins so which means we can add only one serial device with it. We can use software serial, i am gonna discuss that later.
Now Arduino Mega has four Serial Ports on it as shown in below figure:
You can see in the above figure that Arduino Mega has:
Serial: Pin # 0(RX) and Pin # 1(TX).
Serial1: Pin # 19(RX1) and Pin # 18(TX1).
Serial2: Pin # 17(RX2) and Pin # 16(TX2).
Serial3: Pin # 15(RX3) and Pin # 14(TX3).
So, these are pins through which we can do the Arduino Serial Communication.
Now let's have a look at them step by step:
1. How to use Arduino Serial Write
First of all you should read How to use Serial Write in Arduino in which I have explained in detail How to send data through Serial Port.
In this tutorial I have used Arduino UNO so I have used Pin # 1 which is the TX pin and I am transmitting data Serially.
For sending data we use below two commands:
Serial.write("a");
Serial.print("b");
You should read the above tutorial because I have explained everything in it.
2. How to use Arduino Serial Read
Next tutorial, you need to read is How to use Serial Read in Arduino in which I have explained How you can read data coming through Serial Port and then displayed it on LCD.
It's an interesting tutorial and you must read that out. It will help you in understanding How you can receive data through serial port and then use that data.
This data could be coming from GPS or GSM or some other serial sensor or device.
For reading data though Serial Port you need to use below command:
char data = Serial.read();
You must read the above tutorial to have a strong grip on it.
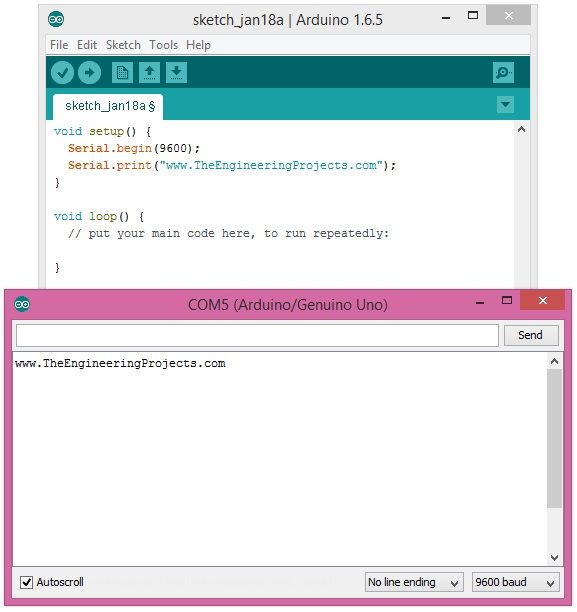
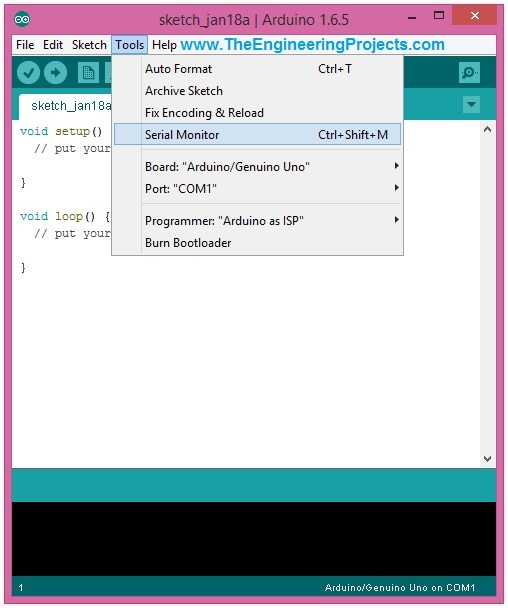
3. How to use Arduino Serial Monitor
Once you got the detailed concept of How to read and write data to Serial Port the next thing you need to do is to read about How to use Serial Monitor in Arduino.
Arduino Serial Monitor is a great tool needed for Arduino Serial Communication.
It works as a debugging tool and I have explained in detail in this tutorial How to use it and do your Arduino Serial Communication.
4. How to use Arduino Serial Flush
Flushing Serial data is important if you wanna do a smooth Serial Communication.
Serial Flush is not that necessary when you are working on small projects but if you are doing big projects in which you need to deal with a lot of data like GPS then you must consider it.
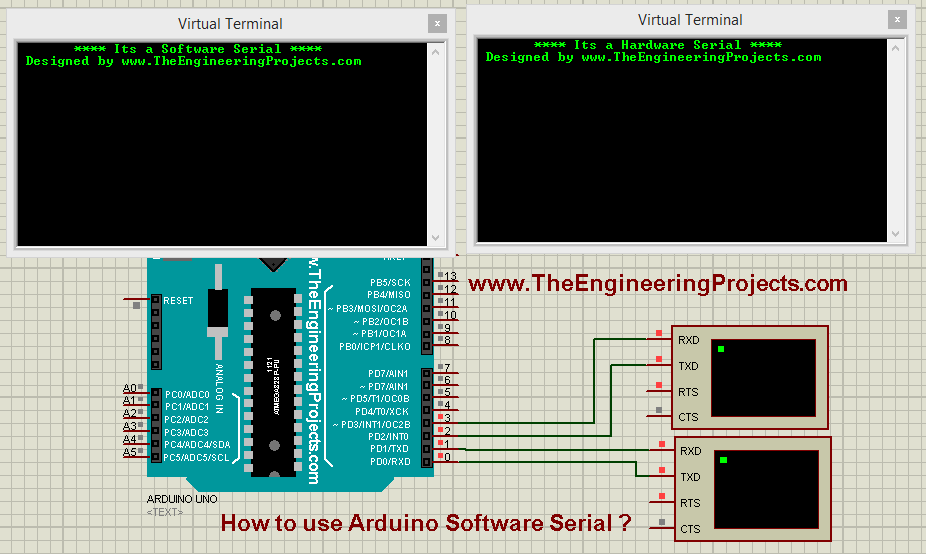
5. How to use Arduino Software Serial
As I have told in the start that Arduino UNO has just one Serial Port so you can only connect one Serial device with Arduino UNO.
So, what if you want to do more than one serial device with Arduino UNO then there's you need to know How to use Arduino Software Serial.
So you guys must read this tutorial becuase we have to use it a lot in Arduino Projects.
So, that's all for today. I hope you have enjoyed this tutorial. I am gonna add more tutorial in it when I post them on our blog. So till next tutorial take care and have fun !!! :)