I recently get a chance to work on a project in which I have to use RFID reader to scan cards. In this project I have used it for for student attendance so I thought to share it on our blog so that other engineers could get benefit out it.
Let's first have a little introduction of RFID and then we will look into how to interface RC522 with Arduino. RFID is the abbreviation of Radio frequency identification. RFID modules use electromagnetic fields to transfer data between card and the reader. Different tags are attached to objects and when we place that object in front of the reader, the reader reads that tags.Another benefit of RFID is that it doesn't require to be in a line of sight to get detected. As in barcode, the reader has to be in the line of sight to the tag and then it can scan but in RFID there's no such restriction. So, let's get started with Interfacing of RFID RC522 with Arduino.
You should also read:
- Interfacing of XBee Module with Arduino.
- Interfacing of EasyVR with Arduino.
- Interfacing of GPS Module with Arduino.
Interfacing of RFID RC522 with Arduino.
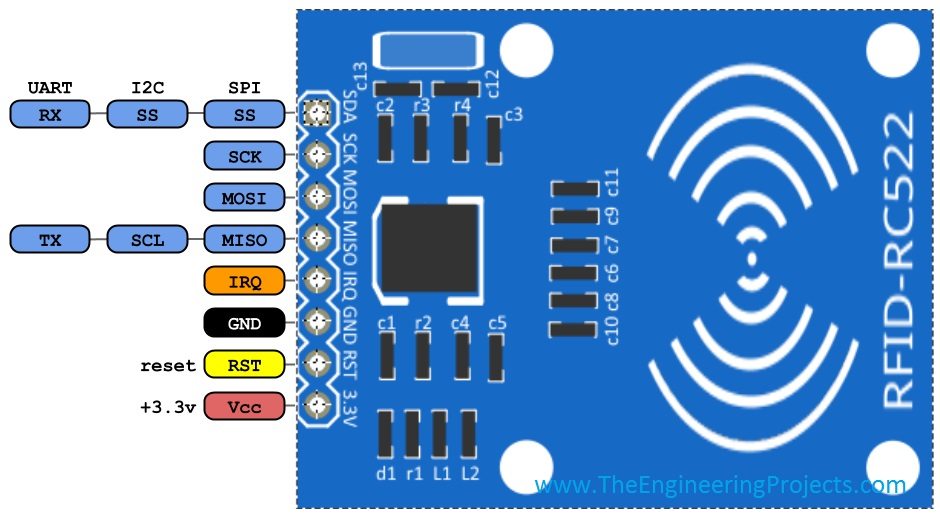
Now let's start with the interfacing of RFID RC522 with Arduino. There are many different RFID modules available in the market. The RFID module, which I am gonna use in this project, is RFID-RC522. Its quite easy to interface and works pretty fine. This module has total 8 pins as shown in the below figure:

- SDA
- SCK
- MOSI
- MISO
- IRQ
- GND
- RST
- 3.3V

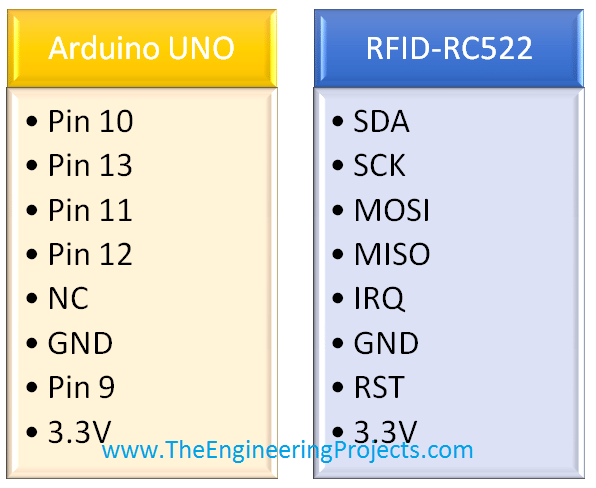
- The pin configuration is as follows:

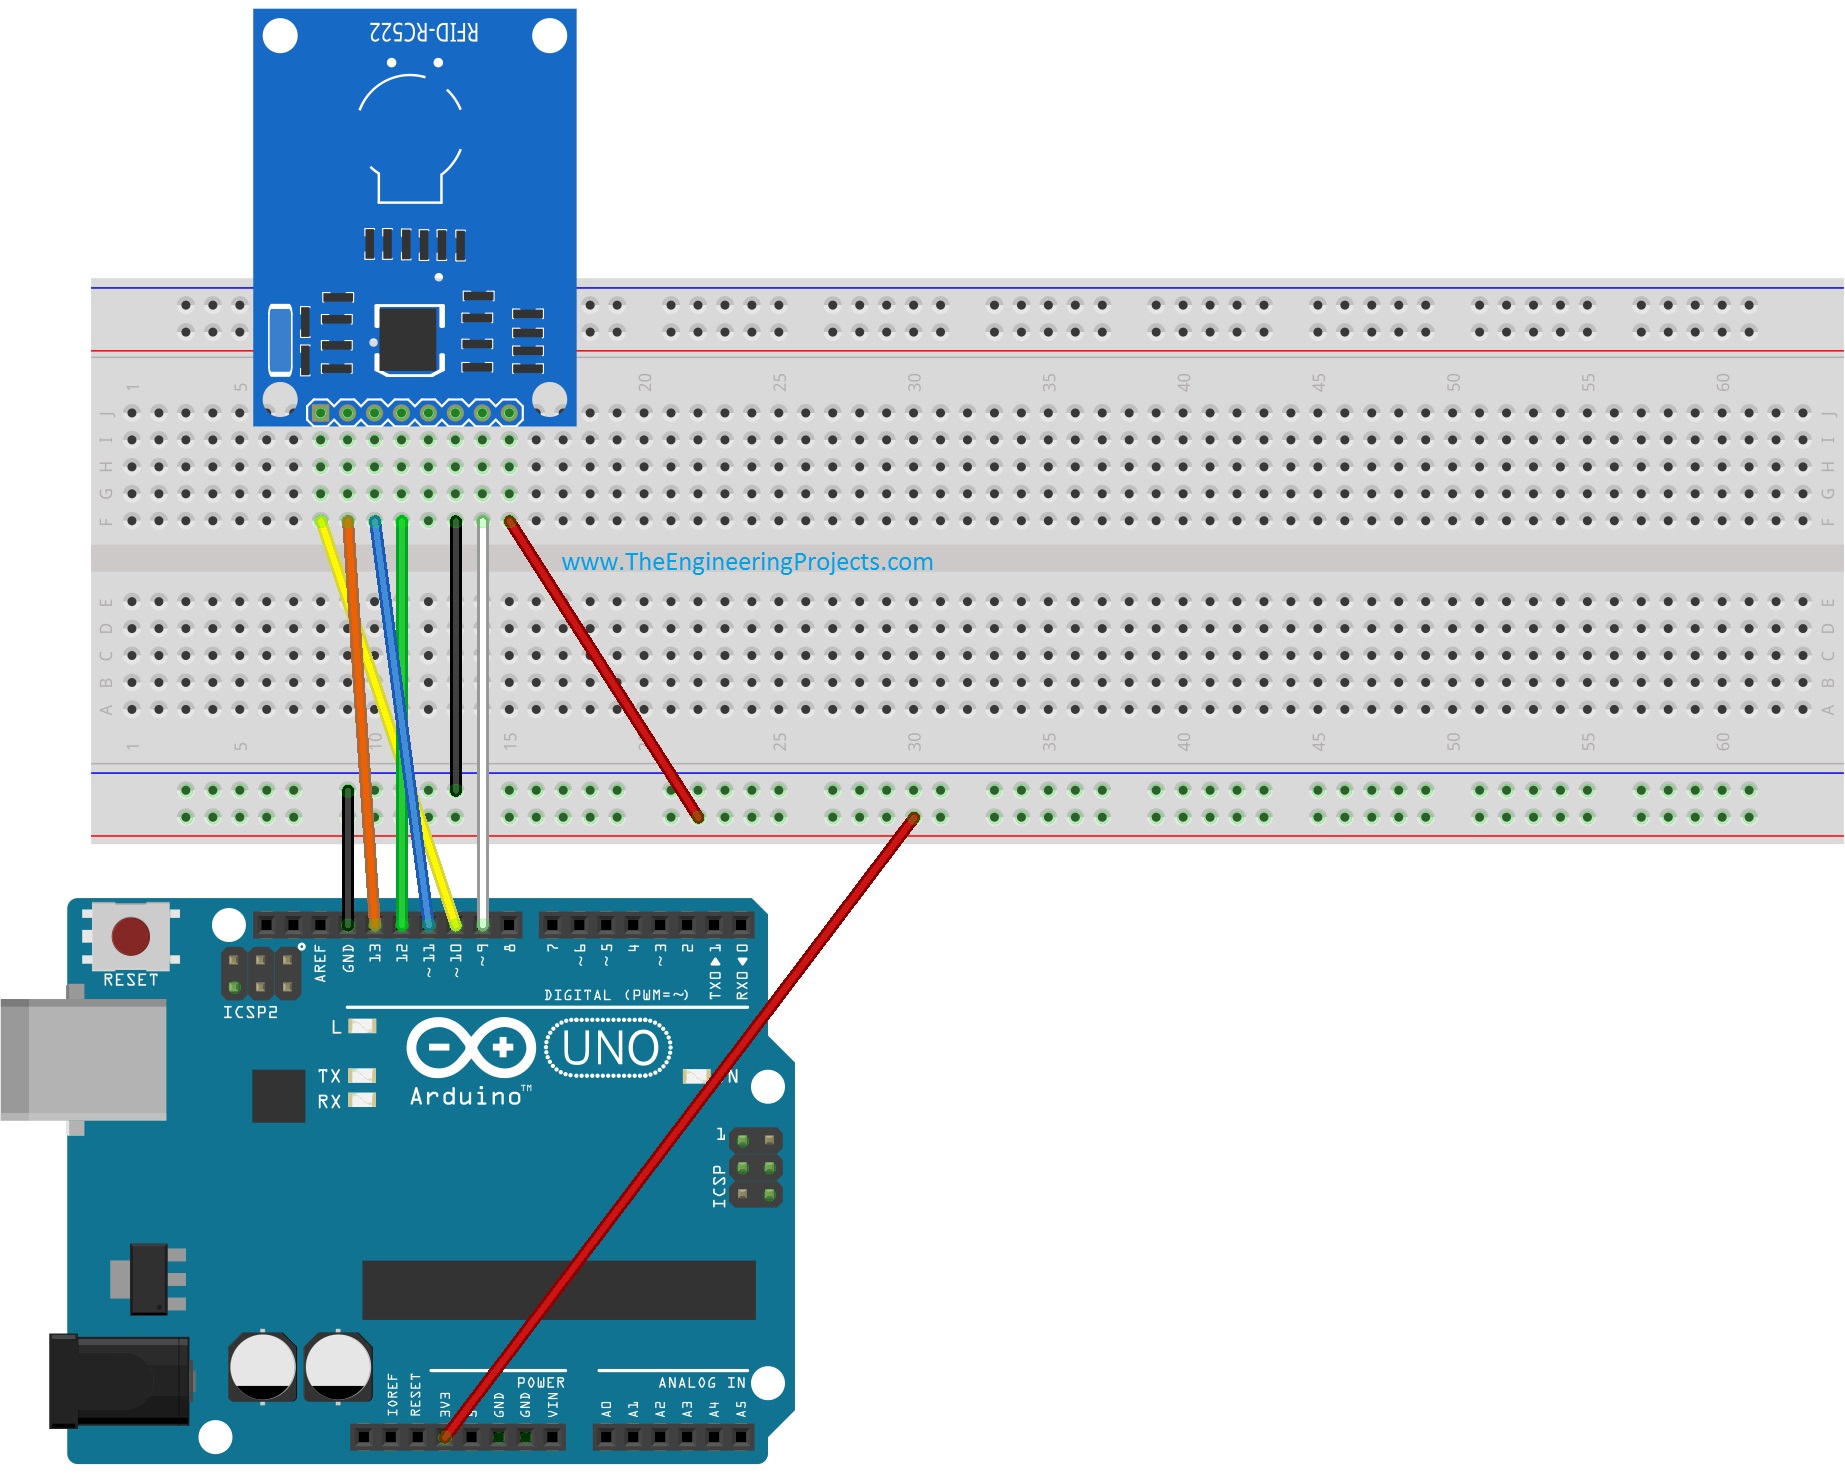
- Now, I suppose that you have connected your RFID module with Arduino as shown in above figure and table, which is quite simple. You just need to connect total 7 pins, IRQ is not connected in our case.
- Now next step is the coding, so first of all, download this Arduino library for RFID RC522 module.
- Its a third party library, we haven't designed it, we are just sharing it for the engineers.
- Now coming to the final step. Upload the below code into your Arduino UNO.
#include <SPI.h> #include <MFRC522.h> #define RST_PIN 9 #define SS_PIN 10 MFRC522 mfrc522(SS_PIN, RST_PIN); void setup() { SPI.begin(); mfrc522.PCD_Init(); } void loop() { RfidScan(); } void dump_byte_array(byte *buffer, byte bufferSize) { for (byte i = 0; i < bufferSize; i++) { Serial.print(buffer[i] < 0x10 ? " 0" : " "); Serial.print(buffer[i], HEX); } } void RfidScan() { if ( ! mfrc522.PICC_IsNewCardPresent()) return; if ( ! mfrc522.PICC_ReadCardSerial()) return; dump_byte_array(mfrc522.uid.uidByte, mfrc522.uid.size); }
- Now using this code, you can read the RFID no of your card quite easily. Now the main task is to use that number and distinguish them so for that I changed the dump_byte_array function a little, which is given below:
#include <SPI.h> #include <MFRC522.h> #define RST_PIN 9 #define SS_PIN 10 MFRC522 mfrc522(SS_PIN, RST_PIN); int RfidNo = 0; void setup() { SPI.begin(); mfrc522.PCD_Init(); } void loop() { RfidScan(); } void dump_byte_array(byte *buffer, byte bufferSize) { Serial.print("~"); if(buffer[0] == 160){RfidNo = 1;Serial.print(RfidNo);} if(buffer[0] == 176){RfidNo = 2;Serial.print(RfidNo);} if(buffer[0] == 208){RfidNo = 3;Serial.print(RfidNo);} if(buffer[0] == 224){RfidNo = 4;Serial.print(RfidNo);} if(buffer[0] == 240){RfidNo = 5;Serial.print(RfidNo);} Serial.print("!"); while(1){getFingerprintIDez();} } void RfidScan() { if ( ! mfrc522.PICC_IsNewCardPresent()) return; if ( ! mfrc522.PICC_ReadCardSerial()) return; dump_byte_array(mfrc522.uid.uidByte, mfrc522.uid.size); }
- Now using the first code I get the card number for all RFID cards and then in second code I used these numbers and place the check now when first card will be placed it will show 1 on the serial port and so on for other cards.
- So, what you need to do is to use the first code and get your card number and then place them in second code and finally distinguish your cards.
- Quite simple and easy to work.
- Hope I have explained it properly but still if you get any problem ask me in comments.


 Arduino
 syedzainnasir
 41 Comments


 2.3k
2.3k
 953
953
 921
921
 2.1K
2.1K


