LM335 is another temperature sensor and to understand today's post more properly, you should also go through Introduction to LM335. DHT11 is a low cost sensor and is easily available in the market now a days. This property makes it more popular among the similar type of sensors. It provide precise results with the higher efficiency. It has a small size and low power consumption. It can transmit the signal up to 20 meters. It has four pins whose detail will be explained later. DHT11 has a lot of features including low cost, long term stability, fast response time, excellent quality, long distance signal transmission and many more. In real life DHT11 can be used at several different places e.g. home appliances, weather stations, consumer goods etc. the further detail about DHT11 Arduino Interfacing will be given later in this tutorial.
- I have shared the Interfacing of LM35 with Arduino in Proteus ISIS in my previous tutorial.
- I have also shared a complete detailed article about How to use 18B20 in Proteus ISIS.
- In my previous tutorial, I have shared Interfacing of LM35 with PIC Microcontroller, so you should first need to go through this article.
- I have also written detailed tutorial on Interfacing of Temperature Sensor 18B20 with Arduino, so you should have a look at this article.
- You can also design a complete project on interfacing of more than one temperature sensors by taking help from Interfacing of Multiple DS18B20 Arduino.
What is DHT11 Sensor?
- DHT11 is an electronic sensor, consists of 4 pins and is used to measure the temperature and humidity of the surroundings.
- DHT Pinout is as follows:
- Pin#1: Vcc (+5V)
- Pin#2: Out (digital)
- Pin#3: NC (Not Connected)
- Pin#4: GND (Ground)
- It has both a capacitive humidity sensor and a thermistor embedded in it.
- It is a low-cost sensor but provides precise results and it gives value once every 2 seconds.
- DHT11 measures the relative humidity of the surrounding.
- It is used in home appliances, weather stations, medical humidity control, data loggers, HVAC and at several security places.
- DHT11 along with its pinout is shown in the figure given below.
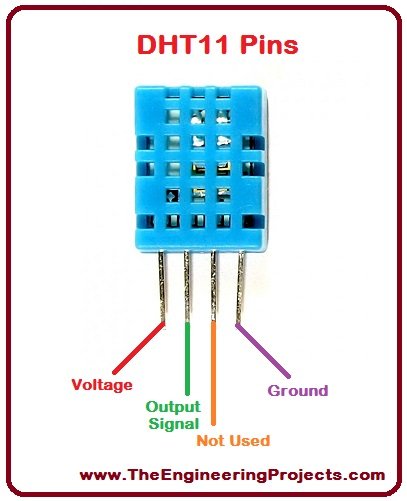
DHT11 Pinout
- Before using any electronic device we must know about the functions of its all pins.
- DHT Pinout is as follows:
- Pin#1: Vcc: We need to provide +5V to this pin.
- Pin#2: Out: Output Pin for reading DHT11 data.
- Pin#3: NC: It's an open pin and is not connected to anything(For future use).
- Pin#4: GND: Need to provide ground to this pin.
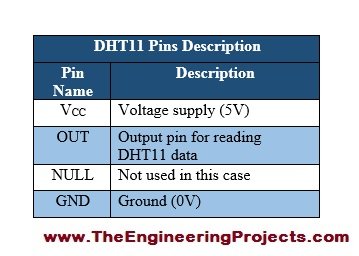
- DHT11 pin description is provided in the below table:
DHT11 Working Principle
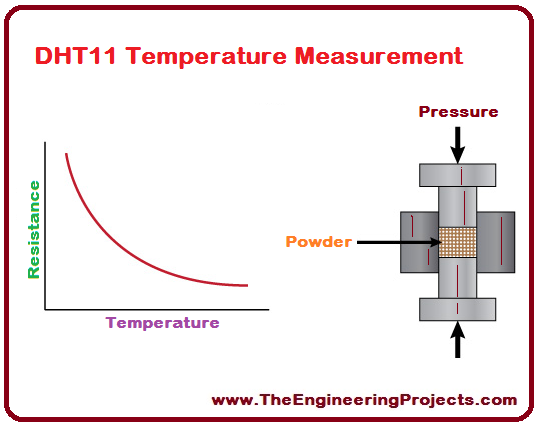
- In order to measure temperature, DHT11 uses a thermistor also known as NTC (Negative Temperature Coefficient) temperature sensor.
- A thermistor is simply a variable resistor, which changes its resistance with respect to the temperature.
- A thermistor is made up of sintering of semiconductors in order to provide a large change in its resistance with the small changes in temperature.
- NTC means the resistance decrease with the increase in temperature.
- I have provided a visual display of the relation between temperature and resistance for the DHT11 sensor, shown in the below figure:
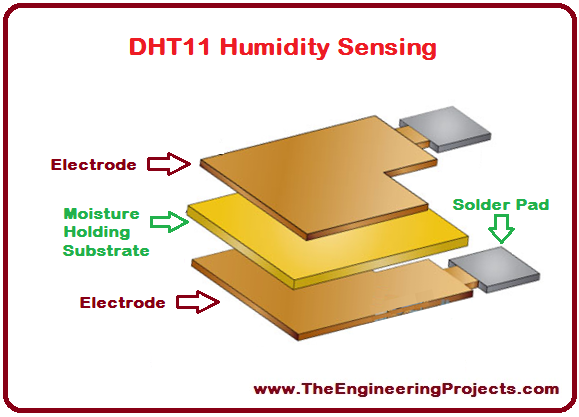
- For humidity sensing, DHT11 uses a capacitive humidity sensor.
- The humidity part consists of two electrodes having moisture-holding substrates in between them.
- As the humidity level changes, the resistance between both of the electrodes or conductivity also changes correspondingly.
- This change in conductivity or resistance is estimated and processed by an internal IC.
- I have also provided the visual description of humidity sensing using DHT11 sensor, as given in the figure shown below.
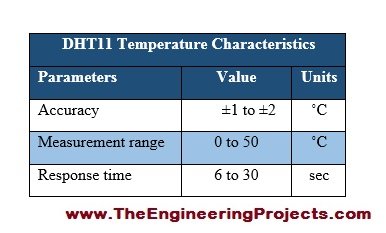
DHT11 Temperature Sensing Characteristics
- The temperature sensing characteristics of the DHT11 sensor are listed in the below table:
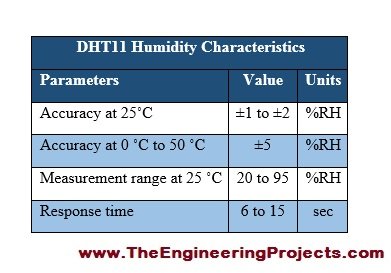
DHT11 Humidity Sensing Characteristics
- The humidity sensing characteristics of the DHT11 sensor are listed in the below table:
Components Required for DHT11 Arduino Interfacing
As its a simple project, so we are going to need few components, listed below:
- DHT11 Sensor (Temperature and humidity sensor)
- Arduino UNO (Microcontroller Board)
- Jumper wires (Male to Female)
DHT11 Arduino Interfacing
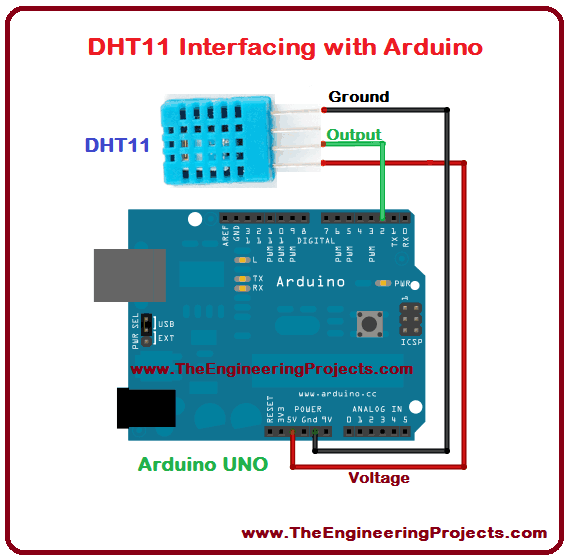
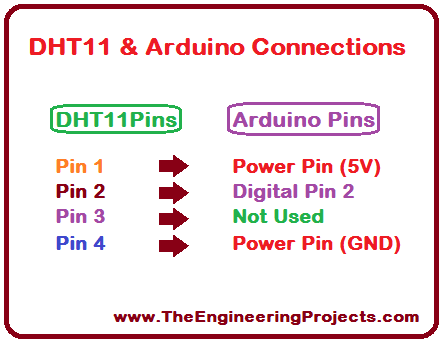
- The connections between Arduino and DHT11 pins are shown in the figure given below.
- The circuit diagram for DHT11 Arduino Interfacing is given in the below figure:

Arduino Code
- If you have not written Arduino code before, you must have a look at How to Write Arduino Code.
- You just need to copy and paste the source code given below into your Arduino software.
- After that just upload the code into your Arduino board to test the results.
#include<dht.h>// DHT11 humidity sensor library
dht DHT; //Creating sensor object
#define DHT11_PIN 2 // Sensor is connected to Arduino pin 2
void setup()
{
  Serial.begin(9600); //setting baud rate
  Serial.println("   =====================================================");
  Serial.println("   ||   Welcome to Temperarue and Humidity Detector   ||");
  Serial.println("   =====================================================");
  Serial.println("");
  }
void loop()//method used to run the code repeatedly
{
  int chk = DHT.read11(DHT11_PIN); //Reading data from sensor
  Serial.print(" Humidity = ");//prints on the serial monitor
  Serial.print(DHT.humidity);// prints obtained humidity on serial port
  Serial.print(" g/m^3");
  Serial.print("    \tTemperature = ");//prints on the serial monitor
  Serial.print(DHT.temperature, 1);//prints obtained temperature on serial port
  Serial.println(" degrees");

  delay(2000);//adding the delay of 2 seconds
  }
- First of all, I have defined the library for the DHT11 sensor.
- After that, I have read the humidity and temperature values from DHT11 sensor in digital form.
- Then I have printed the digital values of both humidity and temperature on the Arduino Serial Monitor.
- We can print the values obtained from the sensor on the serial monitor using Serial Communication.
- So that was the brief description about DHT11 interfacing with Arduino.
- You can download DHT11 library, wiring diagram and complete Arduino source code here by clicking on the button below.
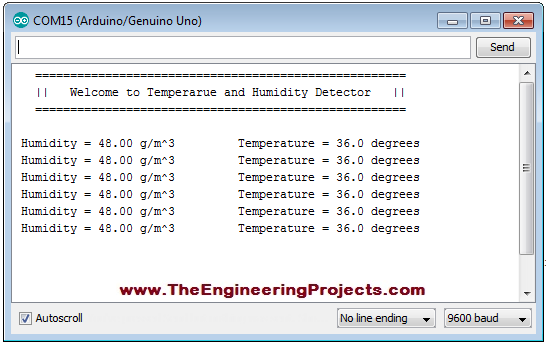
Temperature & Humidity Results on Serial Monitor
- I have printed the digital values obtained from DHT11 sensors.
- Both temperature and humidity digital values are given in the figure shown below.
DHT11 Sensor Interfacing with Arduino Circuit Diagram
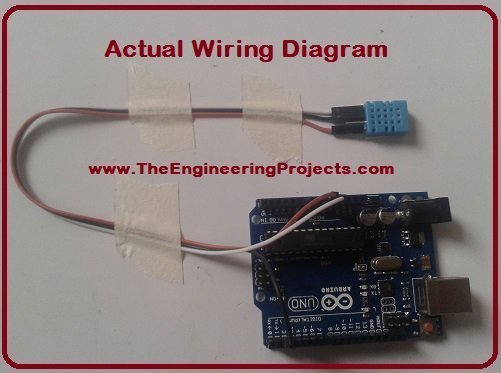
- I have provided an actual circuit diagram for DHT11 sensor interfacing with Arduino.
- Actual circuit diagram is given in the figure shown below.
DHT11 Features
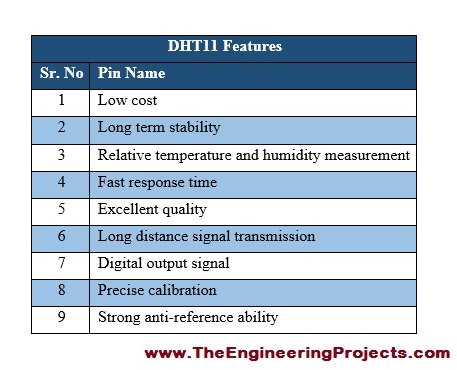
- The features are such parameters depending upon which a device can flop as well as features that can make a device more popular due to their uniqueness.
- DHT11's major features are provided in the table given in the figure shown below.
DHT11 Applications
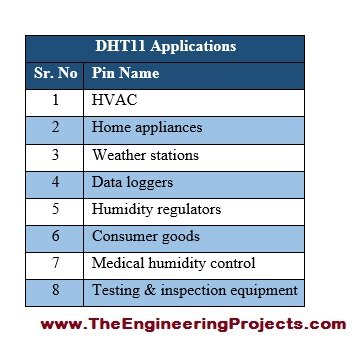
- Most of the devices are usually known by their range of applications.
- DHT11 sensor applications are given in the table shown in the figure below.
That is all from today's tutorial. If you have any problem you can ask me in comments any time you want. Till my next tutorial bye :)


 Arduino
 syedzainnasir
 1 Comments


 2.3k
2.3k
 953
953
 921
921
 2.1K
2.1K


