Introduction to Arduino MKR NB 1500


Introduction to Arduino MKR NB 1500
- The Arduino MKR NB 1500 is an Arduino board based on the SAMD21 Cortex-M0+ 32bit microcontroller that is mainly developed for applications in remote areas with no power or internet connection. On-field monitoring systems use these Arduino boards.
- These are 22 digital I/O pins incorporated on the board. 7 analog and 12 PWM pins are also included in the chip.
- The Rx and Tx pins are added to the board for the UART serial communication where Rx is used to receive the serial data and Tx is used to transmit the serial data.
- Moreover, I2C and SPI communication protocols are also included in the device.
- The power delivered to the board by USB is 5V. Plus, the board also incorporates a Li-Po charging circuit that makes the board run in two ways: either from the external 5V source or from battery power.
- The clock speed of the oscillator is 32.768 kHz (RTC), 48 MHz which is required for the synchronization of the internal functions.

- You can also interface the micro-sim with the board, however, micro-sim is not provided with the board. You need to purchase it separately.
- You can interface breadboard with this board, giving you the ability to actually test and run your project on a breadboard before switching to the PCB design of the electrical circuit.
- The board’s flash memory is 256KB. And it doesn’t incorporate EEPROM memory while the SRAM memory is 32KB.
- The Arduino Program (sketch) is stored in the flash memory and SRAM memory is used to generate and manipulate variables when it runs.
Arduino MKR NB 1500 Datasheet
Before you apply this device to your electrical project it’s better to scan through the datasheet of the device that features the main characteristics of the board. You can download the datasheet of Arduino MKR NB 1500 by clicking the link below.Arduino MKR NB 1500 Pinout
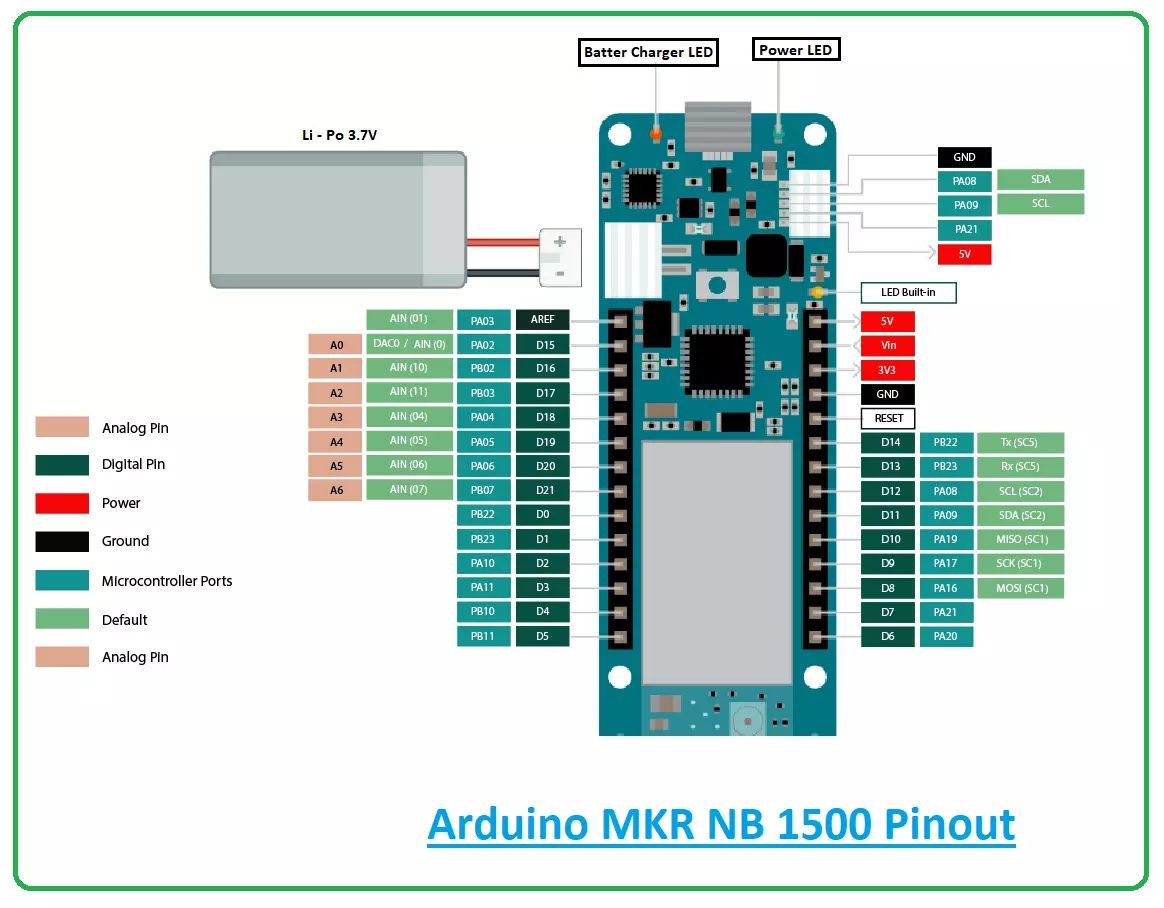
The following figure shows the pinout diagram of Arduino MKR NB 1500.
Arduino MKR NB 1500 Pin Configuration
Hope you’ve got a brief idea about this board. In this section, we’ll discuss the pin description of the pins incorporated on the board.Digital I/O Pins
There are total 8 digital I/O pins integrated on the board which you can use as an input or output according to the requirements. They remain either HIGH or LOW. When they are HIGH they receive 5V and when they are LOW they receive 0V.Analog Pins
There are total 7 analog pins incorporated on the board. As they are analog pins, they can get any number of values in opposed to Digital pins that only get two values i.e. HIGH or LOWPWM Pins
The board comes with 12 PWM pins on board. When these pins are activated, the board generates analog result with digital means.SPI Pins
This board incorporates SPI (serial peripheral interface) pins that are mainly employed to develop the communication between the controller and other peripheral devices such as sensors or shift registers.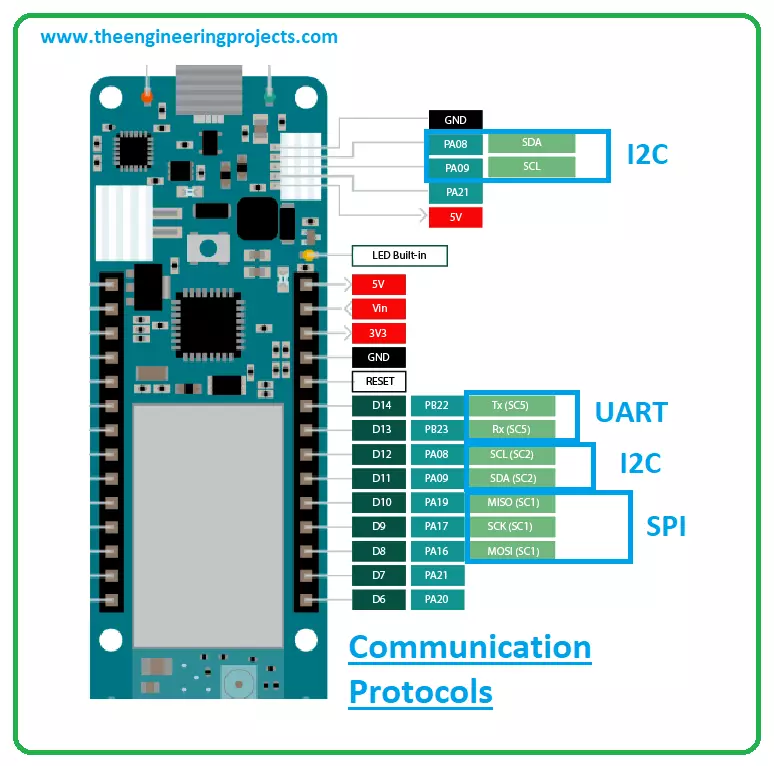
I2C Pins
I2C is a two-wire communication protocol. That uses two lines i.e. SDA and SCL. The SDA is a serial data line mainly used to carry the data while SCL is a serial clock line mainly used for the synchronization of all data transfer through the I2C bus.UART Pins
This device supports UART serial communication. Two pins Rx and Tx are used for the transmission and receiving of serial data.Battery Connector
If you want to power up the board with the battery be sure to find the female 2 pin JST PHR2 Type connector. Polarity: while you look at the board connector pins… Polarity is Left = Positive and Right = GND Vcc – This pin generates 3.3V using the on-board voltage regulator. 5V – This pin generates 5V when powered from the Vin pin of the board or from the USB connector. Vin – This pin provides power to the board using a regulated 5V source. If you supply power using this pin, the power through the USB port will be disconnected. This way you can power the board not using USB.Arduino MKR NB 1500 Features
Microcontroller = SAMD21 Cortex®-M0+ 32bit low power ARM MCU Power Supply (USB/Vin) = 5V Operating voltage = 3.3V Digital I/O Pins = 22 Analog Pins = 7 PWM Pins = 12 I2C = 1 SPI = 1 UART = 1 DC current per I/O pin = 7mA EEPROM = no SRAM = 32KB Flash Memory = 256KB Supported Battery = Li-Po Single Cell, 3.7V, 1500mAh Minimum External Interrupts = 10 (0, 1, 4, 5, 6, 7, 8, 9, 16 / A1, 17 / A2) Size = 25 x 67 mm Weight = 32grArduino MKR NB 1500 Programming
- You can program this board using Arduino IDE (integrated development environment) software. This software is launched by Arduino.cc you can get this software by going to their site.
- This board comes with a built-in Bootloader where you can burn the internal program, setting free from the hassle of burning and testing the program with the external burner.
- This tiny device incorporates a USB port through which you can connect this device with the computer and run and test the program directly from the computer.
Arduino MKR NB 1500 Applications
This tiny little beast is used for a range of applications. Following are some major applications of this device.- Automatic Pill Dispenser
- USB Joystick
- USB Trackpad
- Creating a wireless keyboard
- Water Level Meter
- Electric Bike
×
![]()