


Interfacing of Multiple Ultrasonic Sensor With Arduino


I have posted about the basics of Ultrasonic sensor and how it works in my previous post so I am not gonna go into that detail. If you haven't read it then I recommend that you should first read Interfacing of Ultrasonic sensor with Arduino. Now, let's get started with Interfacing of multiple ultrasonic sensor with arduino, which isn't that difficult. :)
Note:- Other Proteus Libraries are as follows:
- I have also posted more examples on Ultrasonic Sensor Simulation in Proteus, have a look at them and you will get complete understanding of this sensor.
- Moreover, for hardware implementation of Ultrasonic Sensor with Arduino, check below posts:
Interfacing of Multiple Ultrasonic Sensor With Arduino
- Let me first summarize the working of ultrasonic sensor again. With ultrasonic sensor, what we need to do is to generate a trigger signal on its trigger pin for around 10 microsecond.
- As soon as the ultrasonic sensor gets this trigger signal, it sends out an ultrasonic signal.
- This ultrasonic signal then hits something and bounced back.
- Now, in order to check this bouncing signal, we have to read the Echo pin and check for how long it remains HIGH, and on the basis of this duration we calculate our distance with the object.
- This is the process for single ultrasonic sensor and when we are using multiple ultrasonic sensors, what we need to do is simply repeat the whole procedure for all the sensors one by one.
- First of all, we will generate the trigger pulse for first sensor and the read its echo pin and get the distance, then we generate the trigger pulse for second sensor and read its echo pin and so on for the third.
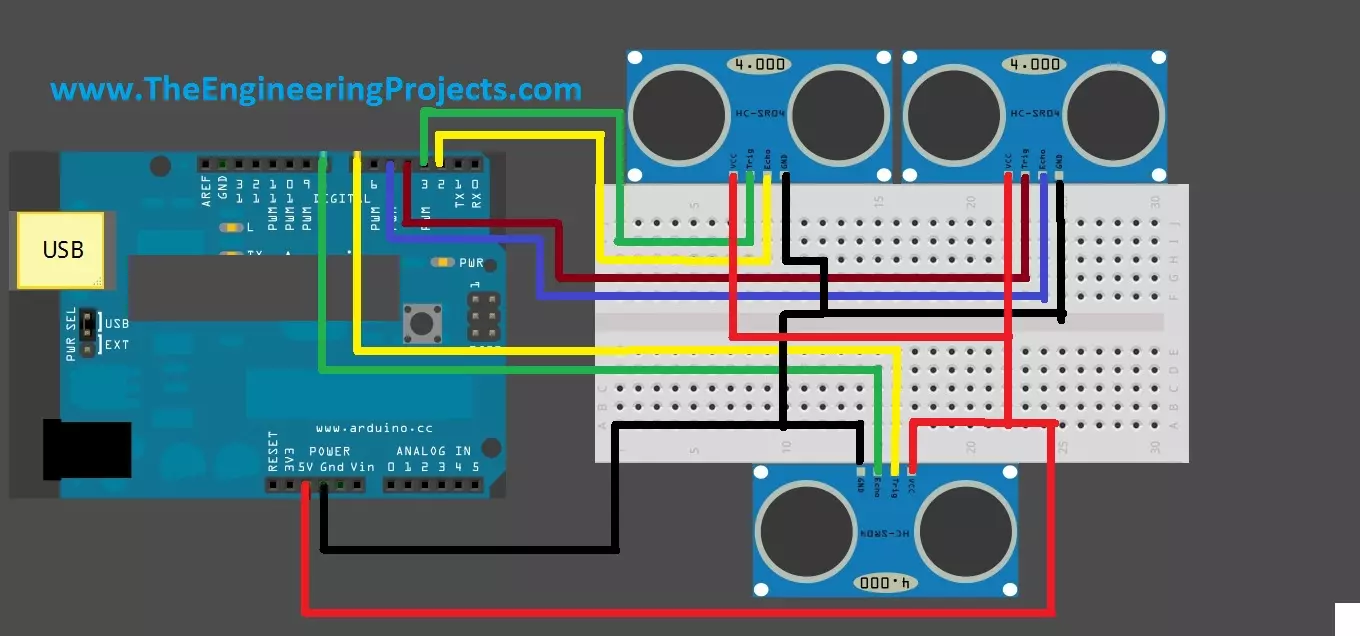
- So, here I am gonna use three ultrasonic sensor and the circuit diagram is shown below:
- I have tried my best while designing this image to make it simple but as there are too much wires so it has become a little complex.
- I am pointing out the pin configuration here so it will be easy for you to interface your sensors with arduino. The pin configuration is as follows:
- Vcc of all sensors will go into +5V of Arduino.
- GND of all sensors will go into GND of Arduino.
- Trig Pin of first sensor into Pin # 3 of Arduino.
- Echho Pin of first sensor into Pin # 2 of Arduino.
- Trig Pin of second sensor into Pin # 4 of Arduino.
- Echo pin of second sensor into Pin # 5 of Arduino.
- Trig Pin of third sensor into Pin # 7 of Arduino.
- Echo pin of third sensor into Pin # 8 of Arduino.
- After connecting the pins as discussed above, now copy the below code and upload it in your arduino board.
- After uploading the code in your arduino, open the Serial Terminal of Arduino software and you will start receiving the distances for all the three sensors.
#define trigPin1 3
#define echoPin1 2
#define trigPin2 4
#define echoPin2 5
#define trigPin3 7
#define echoPin3 8

long duration, distance, RightSensor,BackSensor,FrontSensor,LeftSensor;

void setup()
{
Serial.begin (9600);
pinMode(trigPin1, OUTPUT);
pinMode(echoPin1, INPUT);
pinMode(trigPin2, OUTPUT);
pinMode(echoPin2, INPUT);
pinMode(trigPin3, OUTPUT);
pinMode(echoPin3, INPUT);
}

void loop() {
SonarSensor(trigPin1, echoPin1);
RightSensor = distance;
SonarSensor(trigPin2, echoPin2);
LeftSensor = distance;
SonarSensor(trigPin3, echoPin3);
FrontSensor = distance;

Serial.print(LeftSensor);
Serial.print(" - ");
Serial.print(FrontSensor);
Serial.print(" - ");
Serial.println(RightSensor);
}

void SonarSensor(int trigPin,int echoPin)
{
digitalWrite(trigPin, LOW);
delayMicroseconds(2);
digitalWrite(trigPin, HIGH);
delayMicroseconds(10);
digitalWrite(trigPin, LOW);
duration = pulseIn(echoPin, HIGH);
distance = (duration/2) / 29.1;

}
- The code is quite similar to the one we used while interfacing single ultrasonic sensor with arduino, the only thing we changed here is the repetition.
- Before, we were using the same function SonarSensor() but calling it only once for our single sensor interfaced with arduino but now we are calling it three times for all the three sensors.
- Its kind of a generic code, you can interface more sensors with it if you want and what you need to do is only calling this function for the next interfaced sensor.


