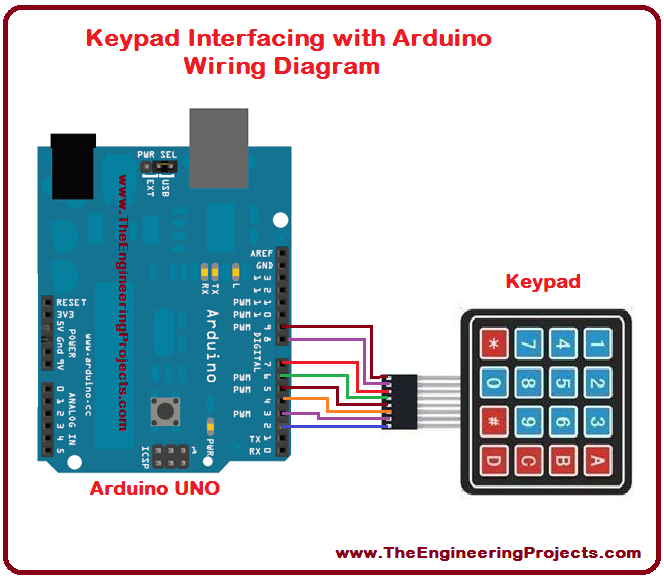
In this tutorial, I am going to use a 4×4 keypad. It has sixteen buttons having four alphabetic characters. Let's have a look at the Arduino Keypad Interfacing:
What is Keypad?
- The keypad consists of multiple buttons, arranged in the form of a matrix(rows & columns) and is used in embedded projects.
- They are cost-efficient and are easily available from online electronic stores.
- Keypads are normally available in a 3×3, 4×3 and 4×4 format.
- Keypad has several applications in real life based projects e.g. mobile phones, calculators, laptops, personal computers, television remote, toy remote, microwave oven, photocopy machine, bank’s ATM machine, tablets and a lot more.
- A simple 4x4 Keypad is shown in the figure given below:
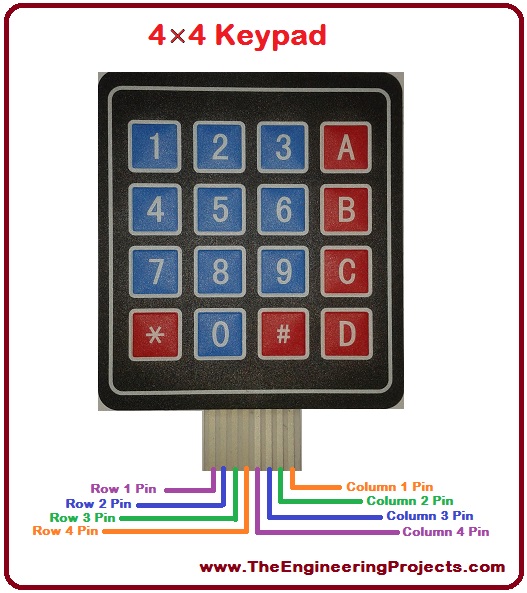
Keypad Pinout
- I am using a 4×4 keypad in this tutorial, it has total of eight (8) pins.
- All of these pins are provided in the table shown in the figure below:
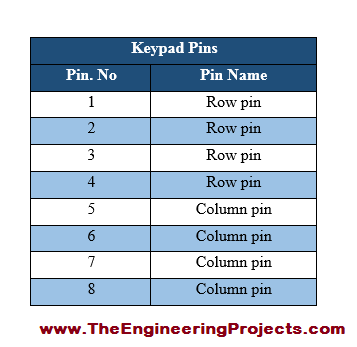
- From the above table, we can see that keypad’s first four pins are associated with its four rows.
- The last four pins are assigned to the four columns of the keypad.
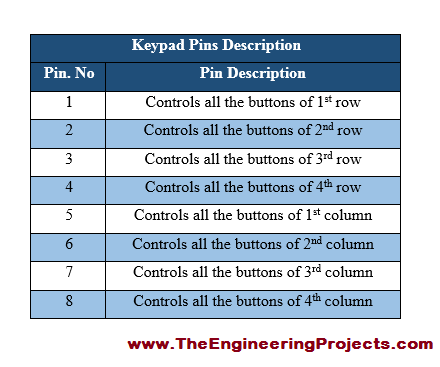
- 4×4 Keypad’s pins functions are listed in the table provided in the figure given below.
Components Required for Arduino Keypad Interfacing
- Components required for this project are:
- Arduino UNO.
- 4x4 Keypad.
- Jumper Wires(Male to Female).
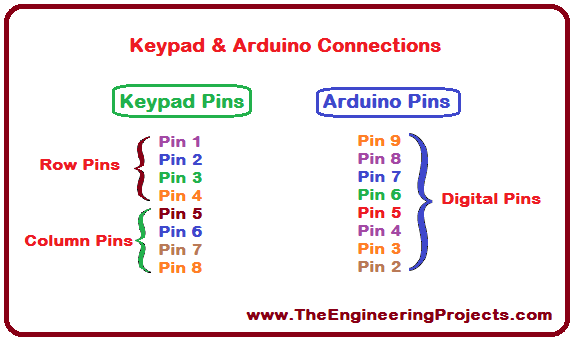
Keypad & Arduino Connections
- The connections between the keypad and Arduino are provided in the figure given below:
Circuit Diagram of Keypad Arduino Interfacing
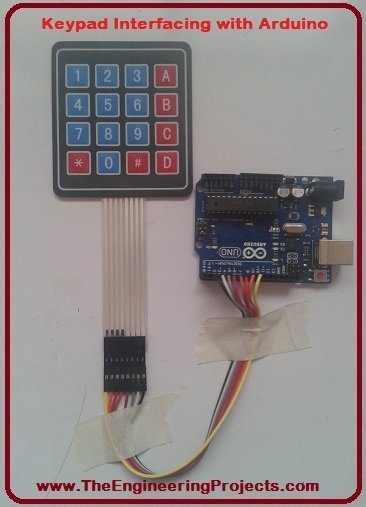
- I have made a circuit diagram for keypad interfacing with Arduino.
- A complete labeled circuit diagram is given in the figure shown below:

- You can make a similar diagram and can easily test & verify your results on the serial monitor.
Arduino Code
- You just need to copy this code into your Arduino software.
- After successfully uploading the code to your Arduino board you will be able to verify the results.
#include <Keypad.h>

const byte ROWS = 4; //four rows
const byte COLS = 4; //four columns
//define the cymbols on the buttons of the keypads
char hexaKeys[ROWS][COLS] = {
  {'1','2','3','A'},
  {'4','5','6','B'},
  {'7','8','9','C'},
  {'*','0','#','D'}
};
byte rowPins[ROWS] = {9, 8, 7, 6}; //connect to the row pinouts of the keypad
byte colPins[COLS] = {5, 4, 3, 2}; //connect to the column pinouts of the keypad

//initialize an instance of class NewKeypad
Keypad customKeypad = Keypad( makeKeymap(hexaKeys), rowPins, colPins, ROWS, COLS);

void setup(){
  Serial.begin(9600);
}

void loop(){
  char customKey = customKeypad.getKey();

  if (customKey){
    Serial.println(customKey);
  }
}
- First of all, I have defined the number of rows and columns of the keypad.
- Then I have declared the complete keypad characters in terms of rows and columns.
- After that, I have defined the row and column pin of the keypad attached to the Arduino pins.
- Then I have simply read the data sent from the keypad and displayed it on the serial monitor.
- You can download a completely labeled wiring diagram and Arduino source code here by clicking on the below button:
In the tutorial Keypad Interfacing with Arduino, I have explained the basics of the keypad as well as the keypad interfacing with Arduino UNO. I have tried my level best to cover up all the necessary information. If you found something missing, please let me know then. I will update my tutorial correspondingly as soon as possible. I hope you have enjoyed the complete tutorial and I am hoping for your positive response. If you have any problem you can freely ask as in comments anytime. I will share different topics in my upcoming tutorials. Take care and bye till the next tutorial :)


 Arduino
 syedzainnasir
 0 Comments


 2.3k
2.3k
 953
953
 921
921
 2.1K
2.1K

