


Control Servo Motor with Arduino in Proteus


For example, suppose I want to move an antenna at a precise angle of 47.5 degrees then if I use DC Motor, I have to use an encoder. So, in such cases instead of using a DC motor, I will prefer Servo Motor.
I have already posted Angle Control of Servo Motor using 555 Timer in which I have controlled servo motor using 555 timer and another tutorial about Controlling of Servo Motor using PIC Microcontroller in which I have controlled it with PIC16F877a. And today we are going to Control Servo Motor with Arduino and will design the simulation in Proteus ISIS.
First of all, we will have a look at simple control of servo motor with Arduino in Proteus ISIS and then we will check the control of the servo motor with Arduino using buttons in which we will move the servo motor to precise angles using buttons. So, let's get started with it. :)
Simple Control of Servo Motor with Arduino in Proteus
- First of all, open your Proteus ISIS software and design the below simple circuit.
- You should also have a look at these Proteus Libraries of Components.

- Servo Motor has three pins:
- First Pin is Vcc.
- Second Pin is Control Pin.
- Third Pin is GND.
- The center pin is the controlling pin and goes to any digital pin of Arduino. I have connected the control pin to pin # 4 of Arduino.
Arduino Code for Servo Motor Control
- The next thing we need to do is to design the code for Arduino. So, open your Arduino software and copy paste the below code in it.
#include <Servo.h>

Servo myservo;
int pos = 0;

void setup()
{
  myservo.attach(4);
}

void loop()
{
  for(pos = 0; pos <= 180; pos += 1)
  {
    myservo.write(pos);
    delay(15);
  }
  for(pos = 180; pos>=0; pos-=1)
  {
    myservo.write(pos);
    delay(15);
  }
}
- Now compile this code and get your hex file.
- It's the same code as given in the Servo folder of Examples in Arduino software.
- Upload your hex file to your Proteus Arduino board.
- You should read How to get Hex File from Arduino if you don't know already.
Proteus Simulation Results
- Now, run your simulation and you will see that your Servo motor will start moving from 90 degrees to -90 degrees and then back to 90 degrees and will keep on going like this, as shown in the below figures:

- Now when you start it, first of all, it will show Position A in the above figure then will move anticlockwise and pass the position B and finally will stop at Position C and then it will move clockwise and comes back to Position A after passing Position B.
- In this way, it will keep on moving between Position A and C.
- Till now we have seen a simple control of Servo Motor with Arduino in Proteus ISIS, now let's have a look at a bit complex control of servo motor with Arduino.
Control Servo Motor with Arduino using Push Buttons
- In the previous section, we have seen a simple Control of Servo Motor with Arduino in which we simply moved Servo motor from 90 degrees to -90 degrees and vice versa.
- Now I am going to control Servo motor using five push buttons and each push button will move the Servo motor to a precise angle.
- So, first of all, design a small design as shown in the below figure:

- I have added five buttons with Arduino and now with these five buttons, I will move the Servo motor to 90, 45, 0, -45 and -90 degrees. So, each button has its precise angle and it will move the motor to that angle only.
Arduino Code
- So, now the next thing is the code, copy paste the below code in your Arduino software and get the hex file:
#include <Servo.h>

Servo myservo;

int degree90 = 8;
int degree45 = 9;
int degree0 = 10;
int degree_45 = 11;
int degree_90 = 12;

void setup()
{
  myservo.attach(4);
  pinMode(degree90, INPUT_PULLUP);
  pinMode(degree45, INPUT_PULLUP);
  pinMode(degree0, INPUT_PULLUP);
  pinMode(degree_45, INPUT_PULLUP);
  pinMode(degree_90, INPUT_PULLUP);
}

void loop()
{
  if(digitalRead(degree90) == LOW)
  {
    myservo.write(180);
  }

  if(digitalRead(degree45) == LOW)
  {
    myservo.write(117);
  }

  if(digitalRead(degree0) == LOW)
  {
    myservo.write(93);
  }

  if(digitalRead(degree_45) == LOW)
  {
    myservo.write(68);
  }

  if(digitalRead(degree_90) == LOW)
  {
    myservo.write(3);
  }
}
- Upload this hex file to your Arduino board in Proteus and run the simulation.
Proteus Simulation Results
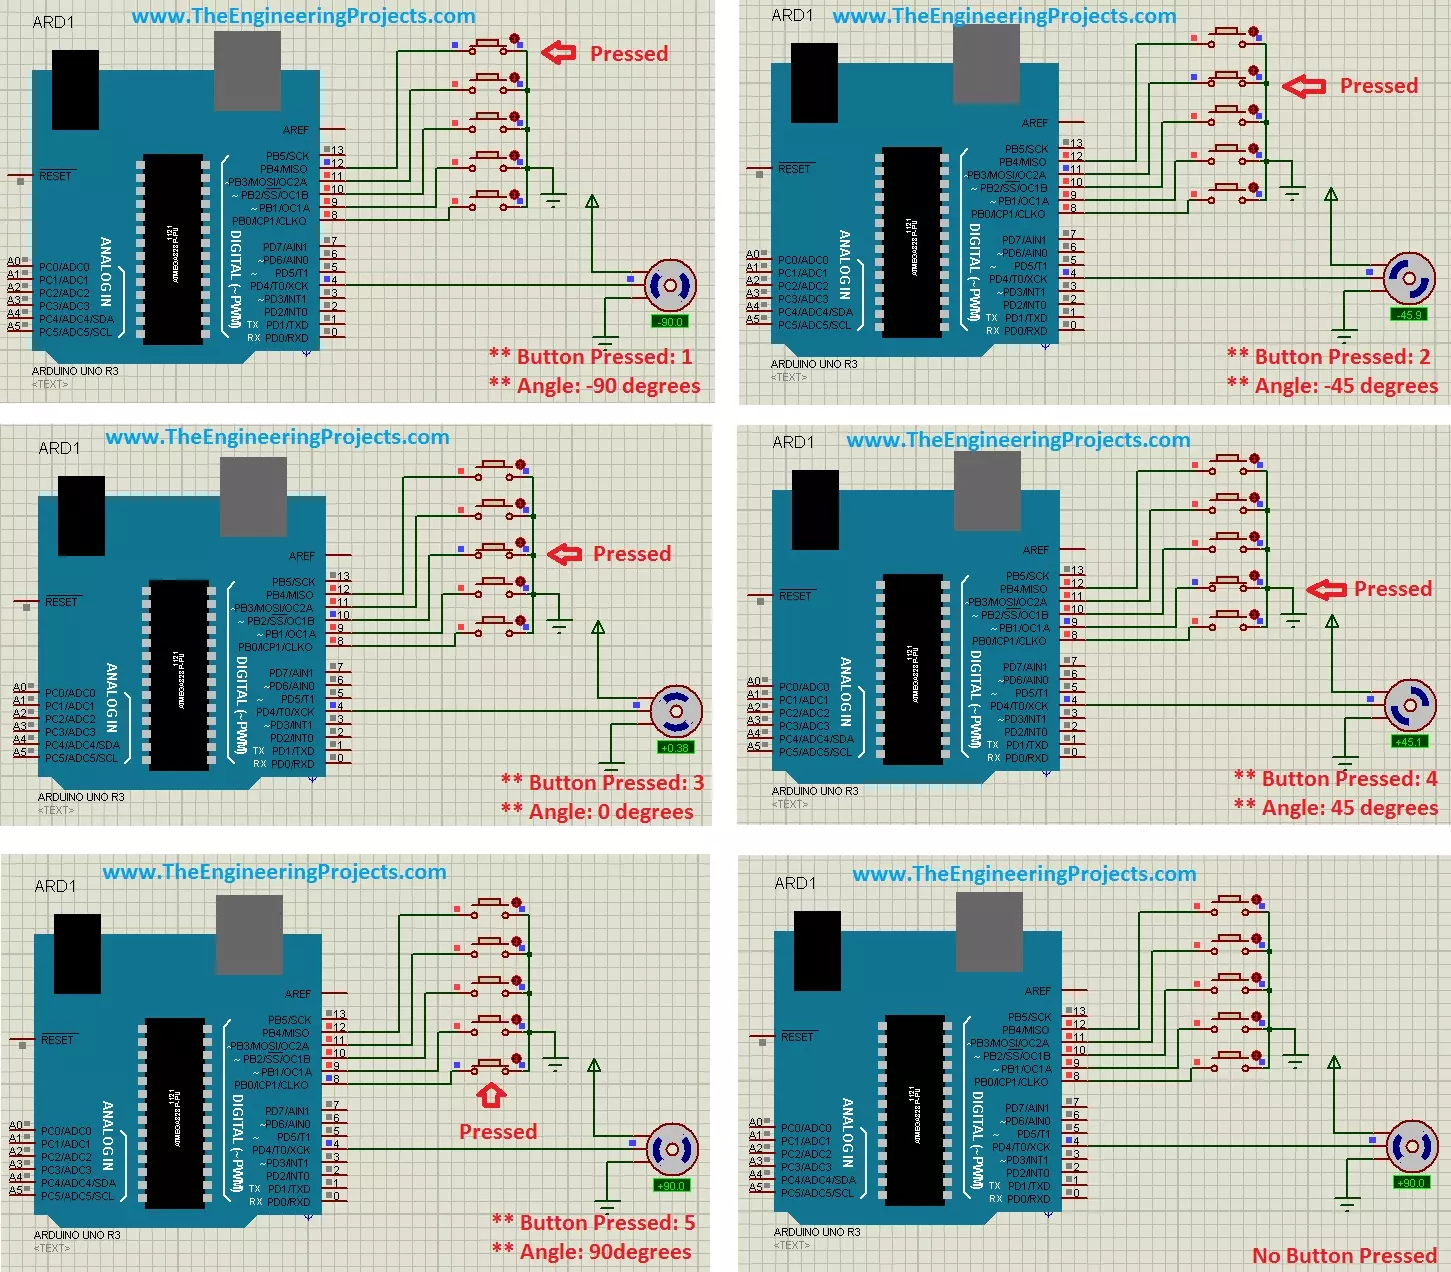
- Now press these buttons from top to bottom and you will get the below results:
- The above figure is quite self-explanatory but still, I explain a little.
- In the first figure, I pressed the first button and the motor moved to -90 degrees.
- In the second figure, I pressed the second button and the motor moved to -45 degrees.
- In the third figure, I pressed the third button and the motor moved to 0 degrees.
- In the fourth figure, I pressed the fourth button and the motor moved to 45 degrees.
- In the fifth figure, I pressed the fifth button and the motor moved to 90 degrees.
- In the sixth figure, all buttons are unpressed and the motor remained at the last position.
It was quite simple and hope I explained it properly. If you still have any questions then ask in the comments and I will try to resolve them. That's all for today, will see you guys in the next tutorial. Take care !!! :)


