So, if you are new to GPS and you haven't yet installed the GPS Library for Proteus, then you must first download that library and install it. I am using Arduino board in today's tutorial but you can use any other microcontroller as well like PIC Microcontroller or 8051 Microcontroller. So, let's get started with the Interfacing of GPS Module with Arduino in Proteus ISIS. I have explained this project in detail in the below video:
Interfacing of GPS Module with Arduino in Proteus ISIS
- You can download the complete Simulation along with Arduino Code by clicking the below button, but as I always suggest, design it on your own so that you learn the most out of it.
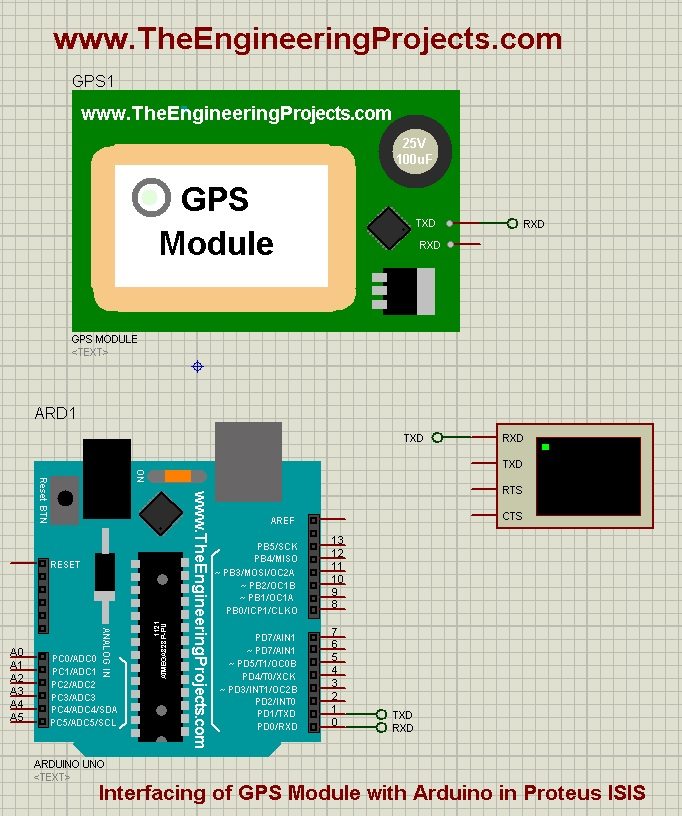
- So, design a simulation in your Proteus software as shown in the below figure:

- As shown in the above figure, I have used Arduino UNO along with GPS Module.
- I have used a Virtual terminal to show values getting from the GPS Module.
- So, I am getting data from the GPS Module via the RX pin of Arduino and then sending this data to Serial Terminal via TX pin.
- Now, the next thing you need to do is to upload the below code to your Arduino board:
#include <TinyGPS.h>

TinyGPS gps;  //Creates a new instance of the TinyGPS object


void setup()
{
  Serial.begin(9600);
  Serial.print("Simple TinyGPS library v. "); Serial.println(TinyGPS::library_version());
  Serial.println("Testing GPS");
  Serial.println("Designed by: www.TheEngineeringProjects.com");
  Serial.println();
}

void loop()
{
  bool newData = false;
  unsigned long chars;
  unsigned short sentences, failed;

  // For one second we parse GPS data and report some key values
  for (unsigned long start = millis(); millis() - start < 1000;)
  {
    while (Serial.available())
    {
      char c = Serial.read();
      //Serial.print(c);
      if (gps.encode(c))
        newData = true;
    }
  }

  if (newData)      //If newData is true
  {
    float flat, flon;
    unsigned long age;
    gps.f_get_position(&flat, &flon, &age);
    Serial.print("Latitude = ");
    Serial.print(flat == TinyGPS::GPS_INVALID_F_ANGLE ? 0.0 : flat, 6);
    Serial.print(" Longitude = ");
    Serial.print(flon == TinyGPS::GPS_INVALID_F_ANGLE ? 0.0 : flon, 6);

  }

  Serial.println(failed);
 // if (chars == 0)
   // Serial.println("** No characters received from GPS: check wiring **");
}
- Now Get the Hex File from Arduino software, and upload it to your Arduino board.
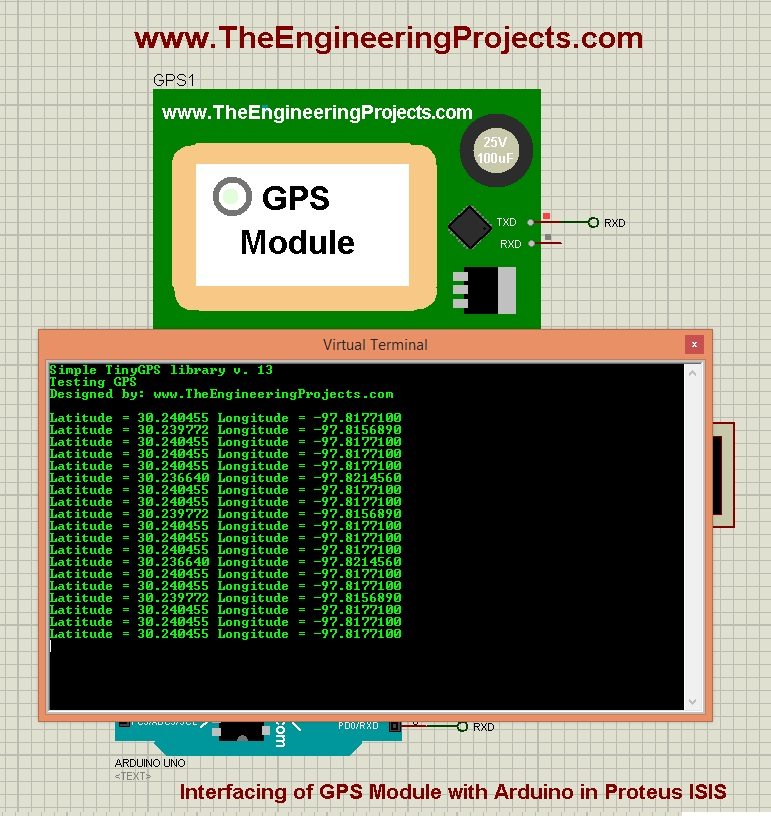
- Now run your simulation and if everything goes fine then you will get results, as shown in the below figure:

- Now you can see in the above figure that we have our Latitude and Longitude.
- This Latitude and Longitude will not change because we have added the dummy values in our GPS module.
- So, that's how you can quite easily simulate your GPS module with Arduino in Proteus ISIS.
If you have any questions then ask in the comments and I will try to resolve them. Take care. :)


 Arduino
 syedzainnasir
 8 Comments


 2.3k
2.3k
 953
953
 921
921
 2.1K
2.1K


