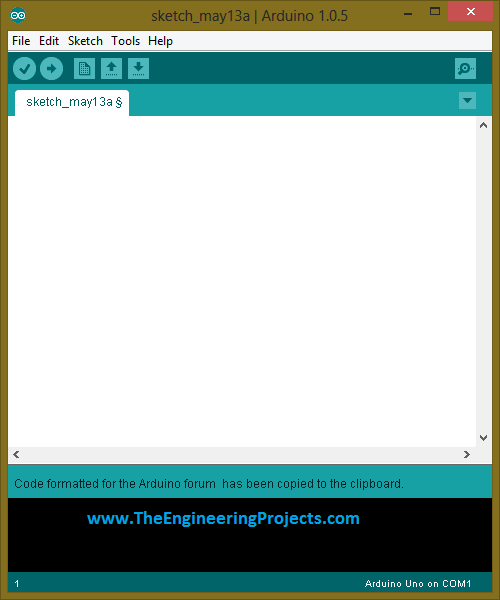
To get started with Arduino microcontroller, we first need to learn the operating software of Arduino microcontroller. This tutorial is very informative and i will be using Arduino software 1.0.5. It is a very basic level software and very easy to learn. IF you have already worked on Arduino software then you don't need to go through it. This tutorial is only for begineers who have just bought the Arduino board and don't know wht to do with it. :)
This software is very user friendly. There are two versions of Arduino software available on theArduino official site. One isexe file which you need to install in your computer. While the second version is a simple rar file and you don't have to install the 'exe' file in your computer. You only copy the software at a particular folder and when you double click on it, it automatically starts to run. I will be explaining this tutorial in various parts. We will see all the options available in main menu and their functioning. Now i think we should move towards the actual working of the software and see how it woks and what are its control parameters.
Getting Started with Arduino Software
- First of all copy the Arduino software folder where you can easily access it. For example, copy the folder on desktop of your computer.
- Double click the folder and the next window will show all the sub-folders, which contains the libraries, hardware tools, references and all other things.
- If you haven't bought your Arduino UNO yet, then you can buy it from this reliable source:
- That window is also shown in the image given below:
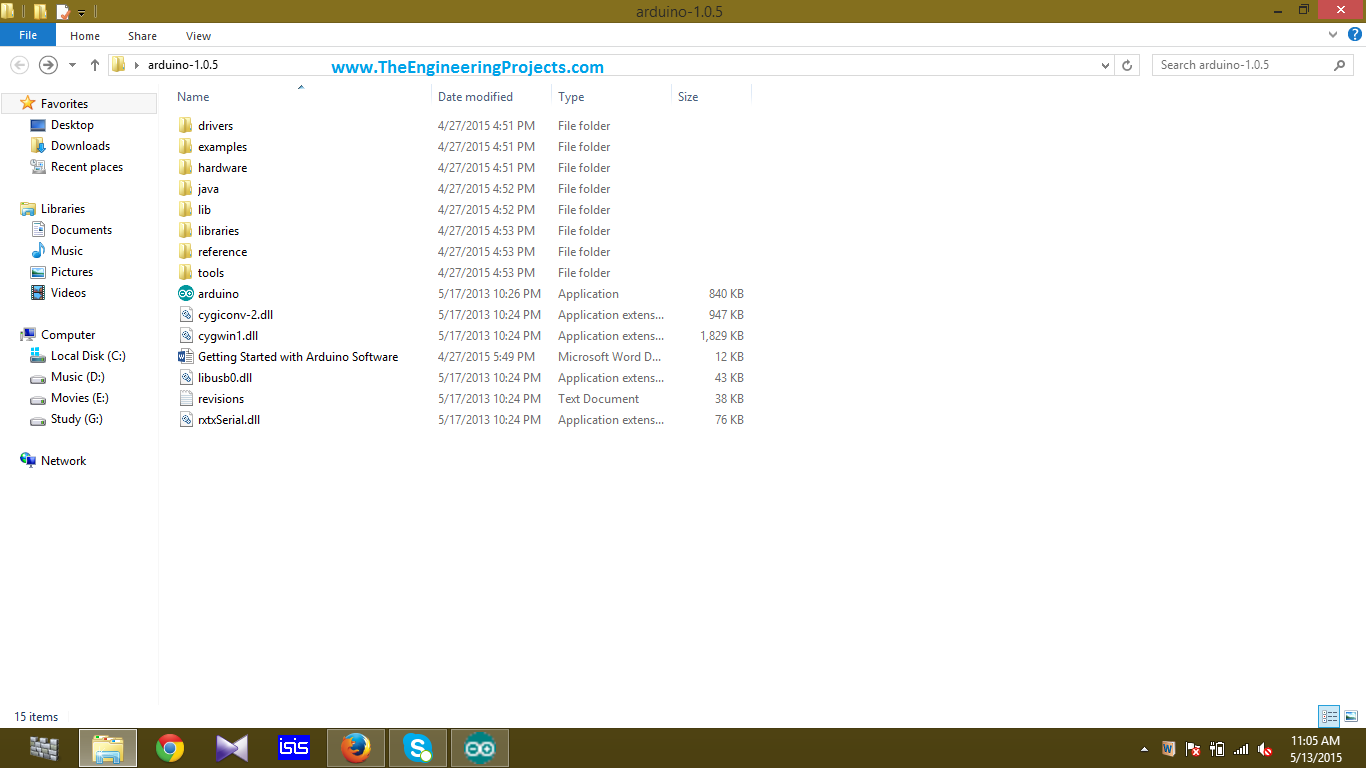
- The above image is showing all the sub-folders and and the Ardunio running application.
- The above folder is showing the examples, drives, hardware, libraries, references, tools of the Arduino software.
- When you will double click on the icon named as 'ardunio' then arduino software will start to run.
- The next window which will open is shown in the image given below:
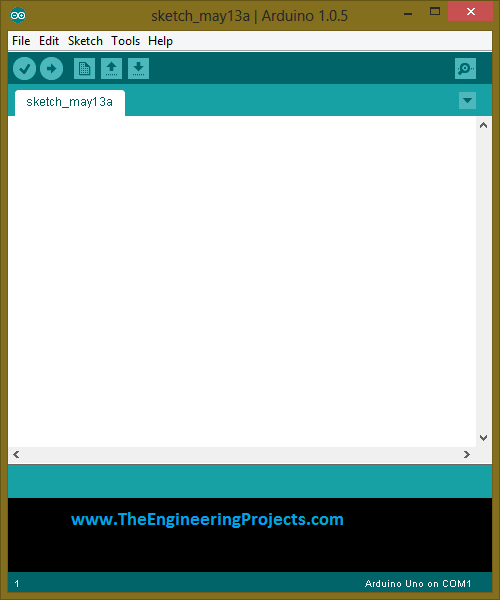
- A very important thing to note is that when we write code in Arduino software window then, it is called a sketch.
- This software automatically gives the name to the code, which you are going to write.
- For example i have open the command window of Arduino software, then it saves every sketch with that particular date on which you are gonna write that sketch.
- Since today is May 13, 2015 and this software has automatically saved the sketch with today's date.
- Now coming towards menu bar, we have 5 options. I will explain all of them one by one.
File Menu Description
- When you will single click the 'File' button then, a new window will open which is shown in the image given below:
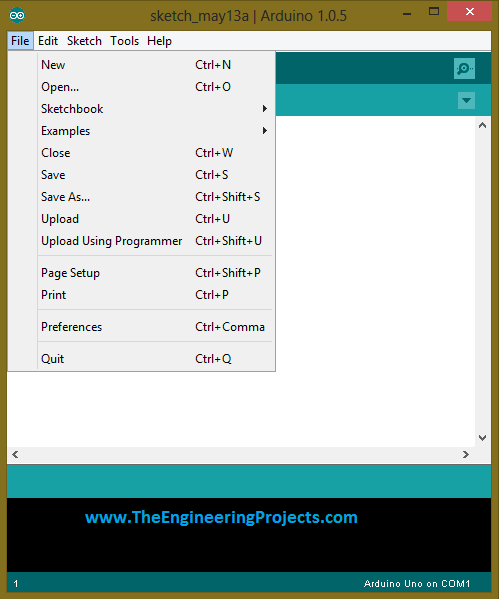
- This list is showing all the components which are encoded in 'File' button.
- First option is 'new' and it will open a new window or new sketch. Next is 'open' and it will open the file or sketch which you will select and will try to open in Arduino software.
- Next options are 'sketch book' and 'examples'. When you will click the examples button then it will open the Arduino libraries.
- The Arduino libraries are shown in the inage given below:
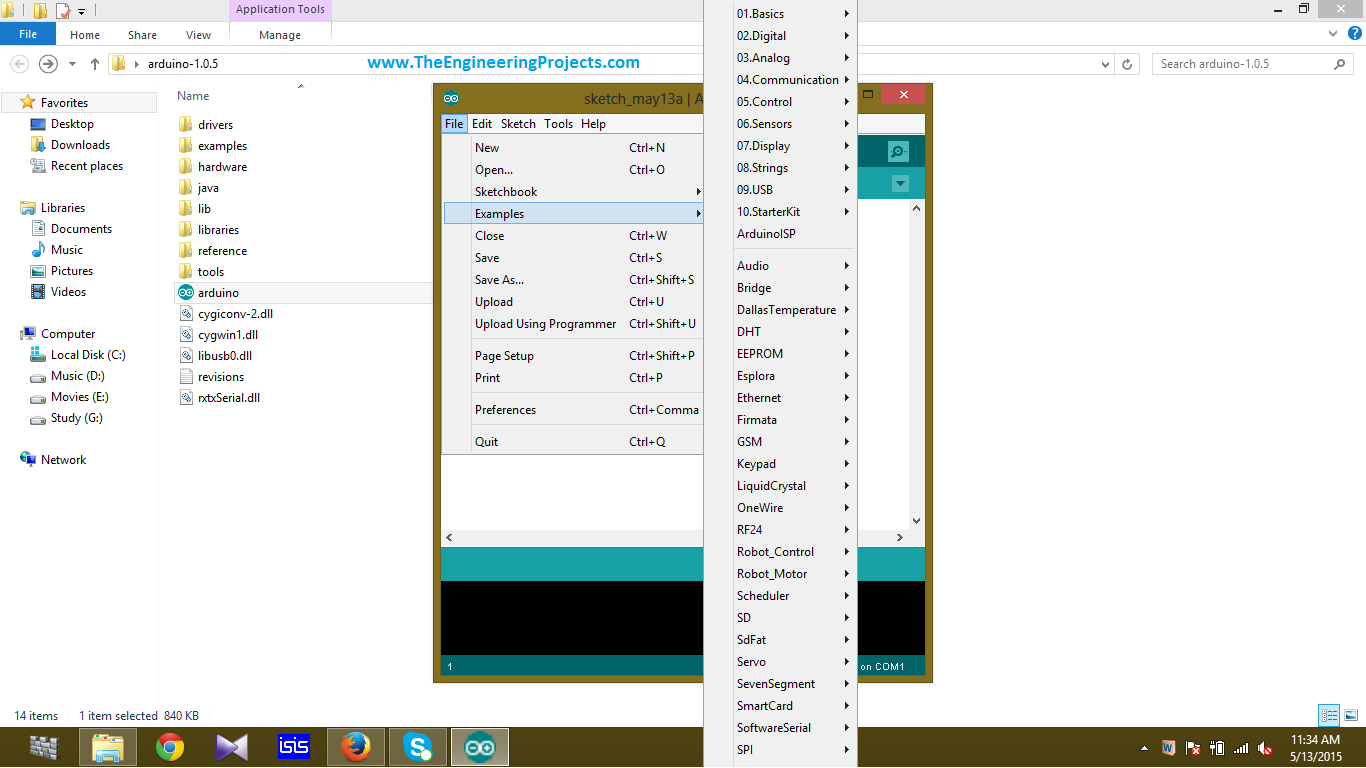
- This option will give all of the Arduino libraries. Arduino libraries are very useful in learning the basic code of Arduino.
- For starters, you can go to the first option which is, '01. Basics' and it will give you some libraries of that projects which are very easy to understand.
- You can simply click on any option and the code will automatically load into Arduino software.
- Next options are 'close', 'save' , 'save as'. These options are very simple and every user is aware of these options.
- Next option is 'upload'. It is very important option and it will load the particular code into Arduino sketch file.
- Next option is of 'upload using programmer'. This option uploads the code into Arduino sketch which is written in some other software.
- Next option is of 'page setup'. It gives you the options about alignment of the page and what size of sketch you want to keep.
- Then comes the 'print' option and 'preferences'. When you will click on 'Preference' option then a new window will open and this window is shown in the image given below:
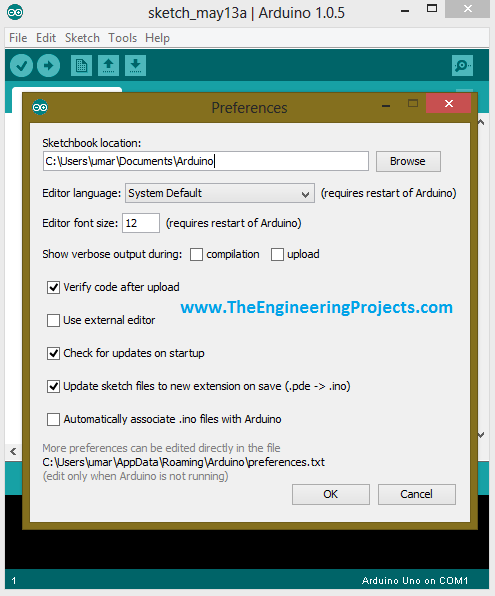
- This window will open and it will be showing sketckbook location. where you wish to save all your sketches. We will give it location only once and afterwards it will automatically save the file at that particular location.
- You can also select the language, in which Arduino sketch will be written and the font size can also be selected.
- This option also gives the check flag. For example either you want to update or Arduino software version or you tends to use the existing software and many other options.
- The last option in file menu is 'Quit'. By clicking on this option, Arduino software will close and the sketch which is running at that particular time will stop.
Edit Menu Description
- After file menu then comes the 'Edit' menu. When you will single click on that icon then, a new window will open, containing all the options which are ancoded in 'Edit' menu.
- That new window is shown in the image given below:
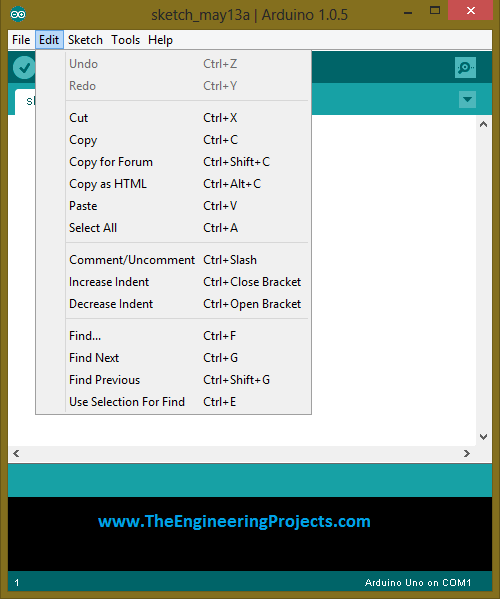
- The first 2 options in Edit menu are 'Undo' and 'Redo'. If accidentally something goes wrong then, you will press undo button and problem will be eliminated.
- Redo is the opposite of Undo option.
- Next options are 'cut' and 'copy'. Nearly all users are aware of their functions.
- The next option is 'copy from forum'. It will copy the sketch from a particular forum and will automatically save it into sketch window of Arduino software.
- The very option is 'copy as HTML'. This option is used at that place where, you want to upload your sketch or code.
- After writing you sketch, you just single click on this button and it will automatically convert the sketch language into HTML language and then you can easily upload it.
- Next option is of 'paste'. You copy the sketch from some other folder and you can 'paste' it in this sketch menu. and you can easily compile it.
- Next to paste option we have 'select all' option. Once you click on this option and the whole sketch will be selected. It's upto you either you want to copy it or whatever you want to do with the sketch.
- The next option is very important which is 'comment/un-comment'. For those people who have done the coding before and are aware of the basics it is a simple options.
- You bring the curser to any particular line and when you will first click on this button then, it will be commented. Which means physically this line is written in the code but logically it has no importance anymore.
- to avail this particular line, you will again click on that particular line and then it will be 'un-comment'.
- After un-commenting the line, now you can use it in code.
- Next option is 'increase indent', by single clicking on this option you will observe that the width of blinking curser has been increased.
- This is also very interesting feature in looking and also very beneficial for those people who have a little weak eye-side.
- And if you are not comfortable with this feature then, don't worry we also have a secondary feature for it.
- Then you will click on the next option named as 'Decrease indent' and it will automatically decrease the width of the curser and it will start to look like as before.
- The next option is very interesting and it is to find anything within your sketch.
- When you will click on that option, a new window will open which is shown in the image given below:
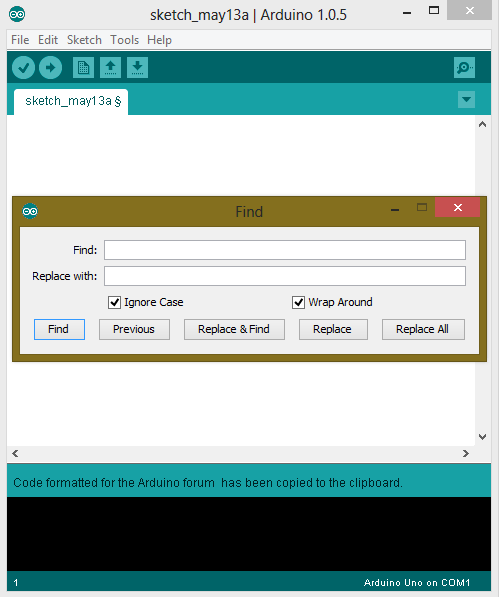
- In this window you can see that we have no of options. First bar is of find.
- Write in the first bar whats actually you want to find.
- And if you think something has gone wrong and you want to make changes in your code, you just simply write that things in 'replace with' menu and the whole code will be changed accordingly.
- Next options in the edit menu are 'find next' and 'find previous'. When you write something in find menu and the software finds it for you.
- Now if you want to find what's written next to those lines, you just simply click on that options and it will show whats next to that thing in sketch.
- Similarly you can also find whats written previous to that thing in our sketch.
Sketch Menu Description
- After edit menu we have 'Sketch Menu' in the list. When you will click on that option then, a new window will open which is shown in the image given below:
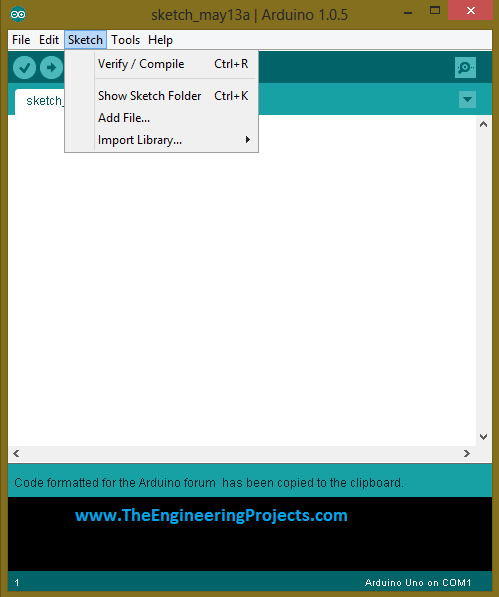
- In sketch menu we have total 4 options.
- The first option is 'verify/compile'. If you have written a code and when you will click on this option, it will verify the whole code and it will compile it and if there is no error then, the sketch will start running.
- Next option is of show sketch folder. By clicking on that icon, we will access that particular folder in which sketch has been saved.
- Next option is of 'Add file' and if you want to add any particular file in your sketch, you just simply click on that option and that file will be added in your sketch.
- The last option in sketch menu is very very important and it will enables you to 'import library' into your sketch.
- When you will click on that button then, a new window will open which is shown in the image given below:
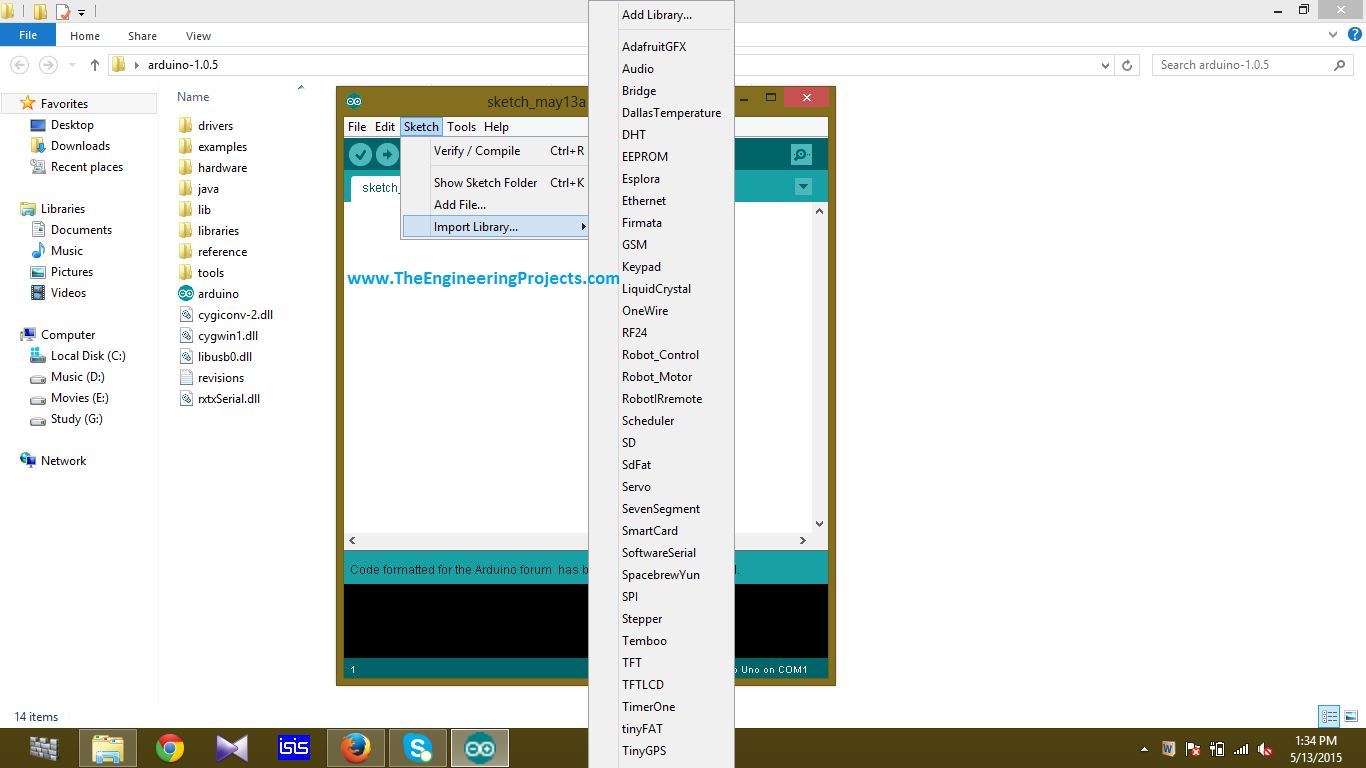
- As you can see in the above shown image that in this software there are a large no of built in libraries and if you need to import any library in your sketch then, you can easily import it.
Tools Menu Description
- The next option in the main menu is 'Tools'. In order to explore it you just simply click on it and a new window will open, which is shown in the image given below:
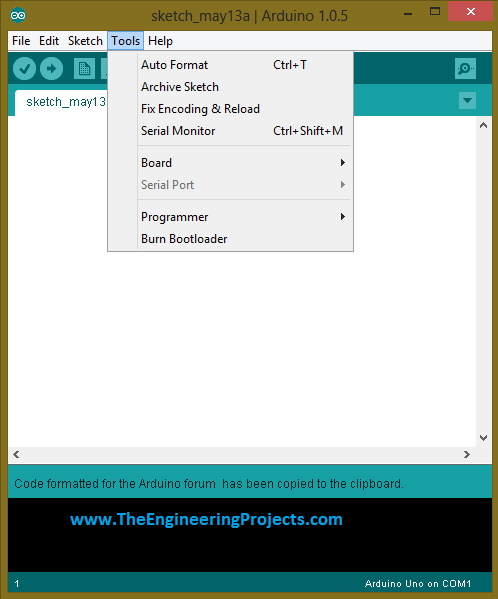
- The very first option in 'sketch menu' is auto format and it will automatically give format to the sketch.
- Next are Archive Sketch, Fix encoding and reload.
- The most important option in tools menu is 'select board'. By clicking on this option a new window will open which is shown in the image given below:
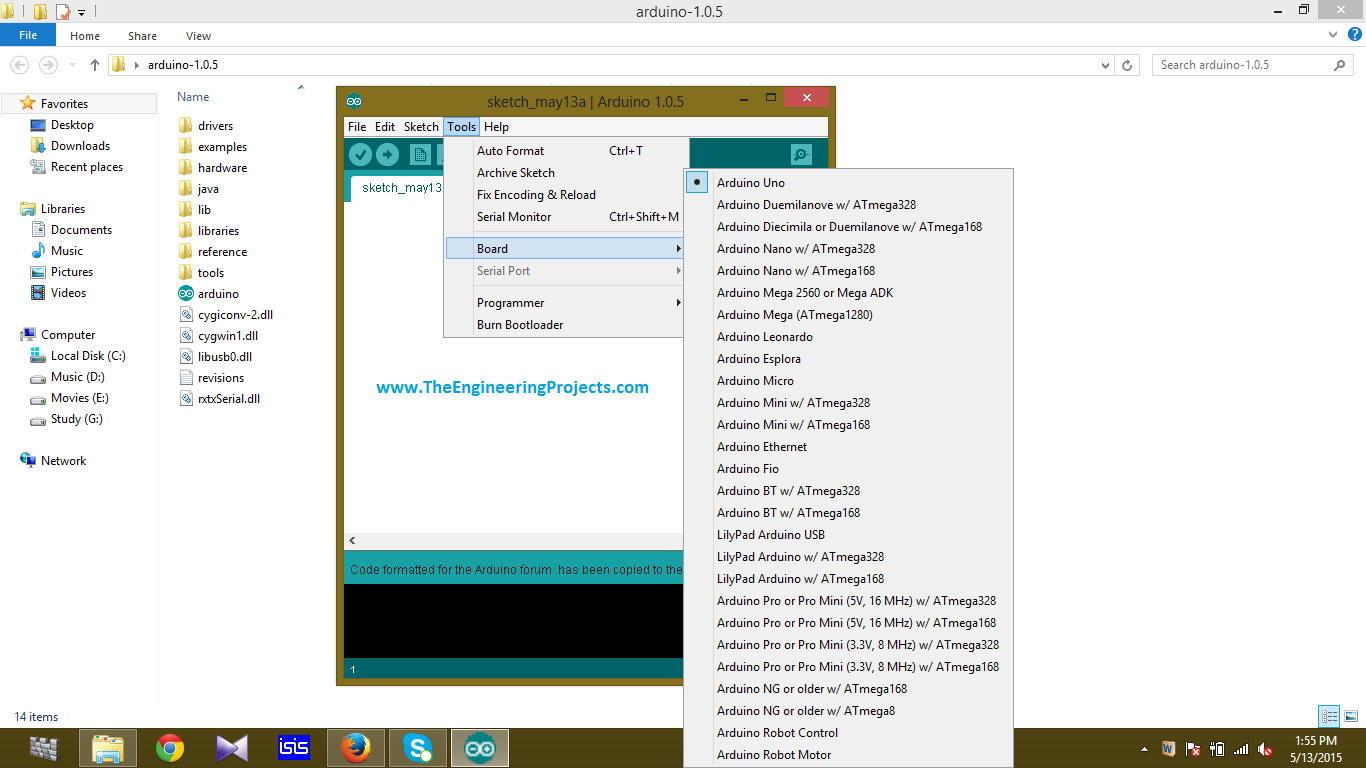
- You can see that we have a large no of options available here .
- Its your choice to choose that Arduino board which you are going to use in your project.
- Next option is of programmer and when you will click on this button then a new window will open, which is shown in the image given below:
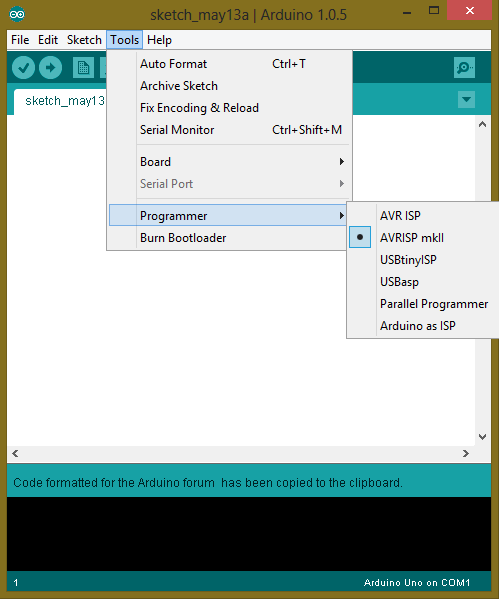
- You can see from here we can select that which type of programmer we are going to use in our project.
- The default setting for this version is AVRISP, as shown in the above image.
- The last option in tools menu is Burn Boothloader and the beauty of Arduino software is that it is capable to burn the code into its micro controller itself and no external burner is required for this purpose.
Help Menu Description
- This is the last option in menu and when you will click on it then a new window will open which is shown in the image given below:
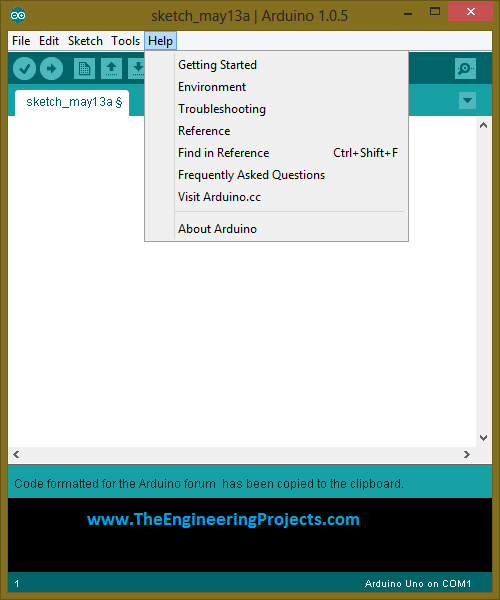
- The help menu of Arduino software is very user friendly and it gives you ease to learn the software and to do something new.
- You can see that the very first option is 'getting started' and when you will click this option it will guide you about the features of the Arduino software. How we are going to use it and what are its basics?
- Other options are also related to help and are much informative, if you are writing a particular sketch and at any stage if you don't know what to do the next then, don't worry, Help will guide at every step.
- Now coming towards next menu, which is below the main menu, it has 5 major icons, which are shown in the image given below:
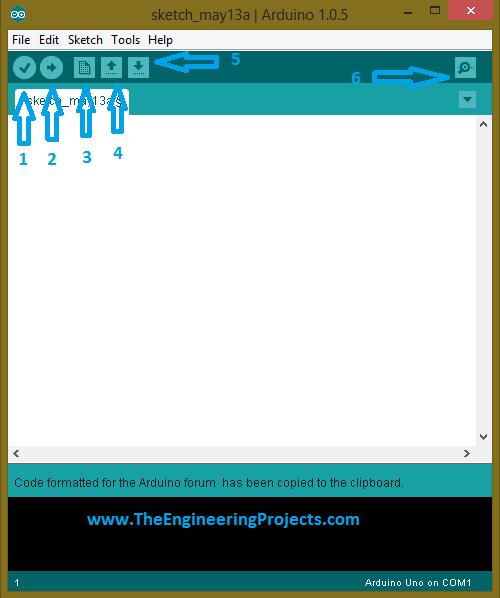
- In the above image you can see that, we have 5 major icons.
- The icon numbered a '1' is of 'verify'. After writing the whole code, you just simply click on that icon and it will verify the whole sketch and if there is any error then it will also generate error.
- The icon numbered as '2' is to upload the sketch into your micro controller.
- The icon numbered as '3' is of 'New'. By clicking on that icon a new menu will open and it will allow you to write a new sketch in it.
- The icon numbered as '4' is of 'open'. When you wish to open a existing file in your present code, you just simply click on that.
- The icon numbered as '5' is of 'save'. When you have written a particular sketch, you simply click on that and that sketch will be saved automatically.
- The last icon which is numbered s '6' is of serial monitor and after writing the whole code you just simply click on that and it will monitors the whole sketch thoroughly step by step.
- if any error will present at any stage then it will generate error.
Alright friends, that was all from today's post. Today's tutorial was very informative so i conclude that you hve learned something new today. Till next tutorial Take Care !!! :)


 Arduino
 syedzainnasir
 1 Comments


 2.3k
2.3k
 953
953
 921
921
 2.1K
2.1K


