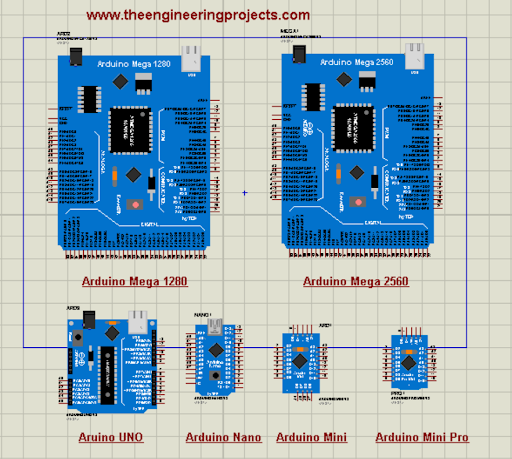
Hello friends! I hope you are having a good day. Today, I am sharing a new version of Arduino Library for Proteus(V3.0). I have already shared the previous versions of this library i.e. Arduino Library for Proteus(V1.0) and Arduino Library for Proteus(V2.0). This newer version is way better than previous versions because of its realistic design and better performance. I will discuss the comparison in detail in just a bit. This Proteus Library zip file has the following types of Arduino microcontrollers in it:
- Arduino UNO
- Arduino Mega 1280
- Arduino Mega 2560
- Arduino Mini
- Arduino Pro Mini
- Arduino Nano
We will move towards the installation, but before this, let me share the basic introduction of Arduino.
What is Arduino?
- Arduino is an open-source family of microcontroller boards that is designed mainly for interactive projects by engineers.
- It was presented to hobbyists, students, professionals, and developers for the experimentation of electronic and embedded systems.
- Multiple sensors are interfaced with Arduino microcontrollers, and they can also drive the motors and switches for different circuits.
- These are flexible, provide the platform for many types of embedded elements, and work as the heart of a project to control the work and automate the flow of the project.
Now, have a look at how to download and install this library in Proteus.
Comparing Arduino V3.0 with Other Versions
The latest version of Arduino is different from the previous ones because of the following reasons:
- We have removed the website's link from these Arduino boards, as we received a lot of complaints from engineering students regarding it.
- Reduced the boards' size to fit more components in the space.
- We have used the original color for these Arduino boards to make them look more realistic and identical to real-world Arduino boards.
- We have improved the layout of the pins for better wiring/routing.
- Removed the unnecessary pins i.e. Power Pins & Reset Pin.
- We have placed the Arduino logo on the boards.
Here are all the V3.0 Arduino boards:

Arduino Library for Proteus V3.0
The first step is to download the Proteus library for Arduino. For this, click the below link:
Adding Proteus Library Files
- Once the download of the zip file is complete, extract the files from the zip folder.
- Go to the “Library Files” folder, where you will find the following files:
- ArduinoV3TEP.IDX
- ArduinoV3TEP.LIB
- Copy these files and paste them into the folder by following the path C>Program files>Lab centre electronics>Proteus 7 Professional>Library.
In case you don't know how to install the library, you can see How to Install the New Library in Proteus. Moreover, the installation process of this library in Proteus 8 is the same; you simply have to paste the files into the library folder of Proteus 8.
Arduino V3.0 in Proteus
Open your Proteus software, and if it was already opened, restart it. Now your Proteus can read the library files.
Click on the P button to pick the library from the system and the search bar, and type “Arduino V3.0 TEP”. All six libraries in Arduino V3.0 that you have just installed will be shown to you on the screen.
Choose all of these by clicking them and closing the search window.
Now, if you want to see the design of all of these, click on the name of the library, and then click on the working sheet to place the board.
Here is a simple view of all the files in the Arduino V3.0 folder.
Arduino V3.0 Simulation in Proteus
Now, let us make a simple project with the Arduino UNO V3.0 to show you the workings of these libraries. All other boards can be connected to the components in the same way. So follow the steps to learn the workings:
LCD with Arduino V3.0
Let us create a simulation where the LCD display is controlled using Arduino V3.0. For this, we are using the LCD for Proteus V2.0. If you do not have this, you have to download and install the New LCD library for Proteus V2.0. Follow the instructions below to design the simulation:
Go to the pick library and get the following components:
LCD TEP V2.0 (20X4)POT-HG
Button
Set all the components on the working sheet.
Go to Terminal mode>Default pin and set them with the components.
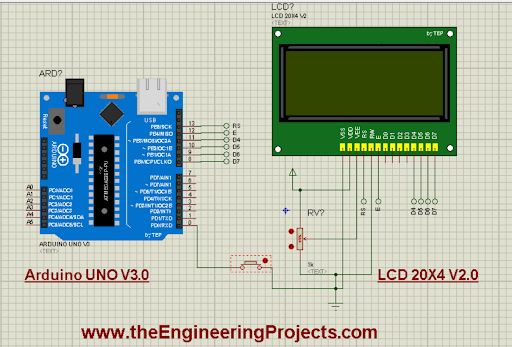
Choose the ground and power terminals and connect all the components according to the image:

Code for Arduino V3.0
Open your Arduino IDE and paste the code given next into the Arduino. I have added the same code to the zip file.
#include
//Setting the LCD pins
LiquidCrystal lcd(13, 12, 11, 10, 9, 8);
const int buttonPin = 0;
boolean lastButtonState = LOW;
boolean displayMessage = false;
void setup() {
pinMode(buttonPin, INPUT);
//Printing the first message
lcd.begin(20, 4);
lcd.setCursor(1, 0);
lcd.print("Press the button to see the message");
}
void loop() {
int buttonState = digitalRead(buttonPin);
// Using if loop to create the condition
if (buttonState != lastButtonState) {
lastButtonState = buttonState;
if (buttonState == LOW) {
displayMessage = true;
lcd.clear();
lcd.setCursor(1, 0);
//Printing the message on screen when button is pressed
lcd.print("www.TheEngineering");
lcd.setCursor(4, 1);
lcd.print("Projects.com");
} else {
displayMessage = false;
lcd.clear();
lcd.setCursor(1, 0);
lcd.print("Press the button to see the message");
}
}
}
Add HEX file in Proteus
When the code is verified in the Arduino IDE, it will provide the hex file. Simply copy the main path of the hex file.
Go to the Proteus and double-click the Arduino. It will open the properties panel.
Paste the path to the hex file in the program file and click OK.
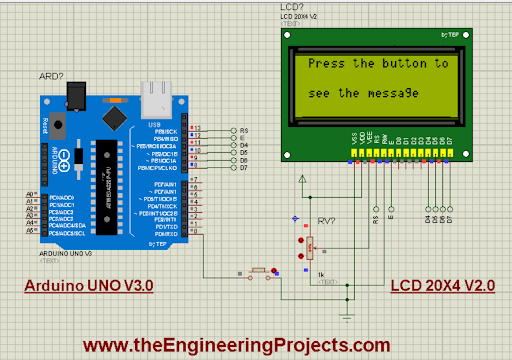
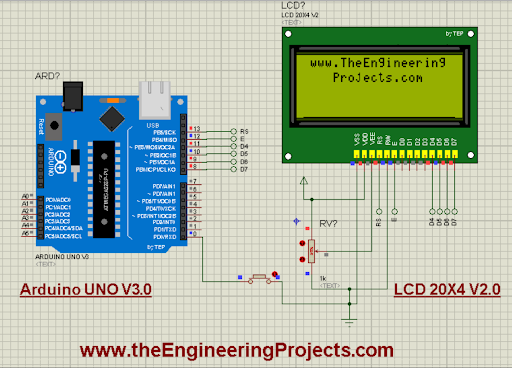
Arduino with LCD Output
The code prints the link to the website on it. You can see the LCD gets power only when the button is pressed.
When the button is unpressed:

When the button is pressed:

I hope you found this article useful. The Arduino library for Proteus V3.0 is more stylish, error-free, and easy to use. I have created other libraries, such as the Raspberry Pi 4, that are useful for embedded engineers. Feel free to ask any questions if you have any confusion.


 Proteus
 syedzainnasir
 0 Comments


 2.3k
2.3k
 953
953
 921
921
 2.1K
2.1K

