Arduino UNO Library for Proteus V3.0


Hi friends! I hope you are having a good day. Today, I am presenting the Arduino UNO library for Proteus V3.0. You should have a look at the previous versions of this library i.e. Arduino UNO library for Proteus(V2.0) and the Arduino UNO library for Proteus(V1.0). The warm response of the students to these libraries has motivated them to upgrade the library. The latest version of this library has better design and functionality, which I will discuss in detail with you.
In this article, we will discuss the basic introduction to the Arduino UNO library, its simulation, and its working. Moreover, we will discuss a small project to show you the functionality of this library. Here is the introduction to the library:
What is the Arduino UNO?
- The Arduino UNO was released in 2010 by Arduino. cc and it is a microcontroller board that is mostly used in embedded systems.
- This board is baked on a Microchip ATmega328P and is equipped with digital and analog input/output pins.
- This board has 14 digital and 6 analog I/O pins, a type B USB cable, and can be programmed with the Arduino IDE.

Now, let’s see the Arduino UNO library in Porteus.
Arduino UNO Library for Proteus V3.0
The Arduino UNO library for Proteus V3.0 can be easily installed by following these simple steps. First of all, download the library by clicking on the following link:
Arduino UNO Library for Proteus V3.0
Adding Proteus Library File
- The file will be downloaded in the zip folder. Extract the file and open the folder named “Proteus Library Files”.
- There, you will find the following files:
- ArduinoUNO3TEP.IDX
- ArduinoUNO3TEP.LIB
- Copy these files and paste them into the library folder of Proteus software. For this, follow the path C>Program files>Labcenter electronics>Proteus 7 professional>Library
- If you are facing any issues with the installation, you can read How to Add a New Library File in Proteus .
Note: The procedure to use this library in Proteus 8 Professional is the same.
Arduino UNO Library in Proteus
- Once the library is installed, if your Porteus software is open, restart it to read the functionality of the library.
- Click on the “P” button of the library and search for "Arduino UNO V3.0 TEP,” and it will show you the library. The screen will look like the following image:

- Pick the Arduino UNO V3.0 by double-clicking on it.
- From the component window, click on the name of Arduino and then place it on the working sheet to check the look and pinouts of this Arduino UNO V3.0.
Arduino UNO V3.0 Simulation in Proteus
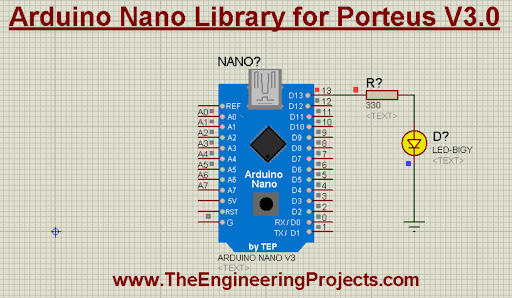
It is time to check the workings of the Arduino library. Here, we will create the simple project of blinking the LED with an Arduino. It is a basic project and the best example of Arduino working for beginners. Follow the steps to create the project:
LED with Arduino UNO V3.0
- Go to the “Pick library” button and choose LED and resistor.
- Connect one side of the resistor to pin 13 (or any) of the Arduino.
- Connect the LED to the other end of the resistor.
- Double-click on the resistor and change its value to 330 ohms.
- Go to the terminal mode from the left side of the screen and choose the “Ground” terminal.
- Connect this terminal to the end of the LED.

Code for Arduino UNO V3.0
- Open your Arduino IDE to write the code in it.
- Select the Arduino board from the drop-down menu of the boards.
- Create your own code or simply paste the following code into it:
void setup() {
// initialize digital pin LED_BUILTIN as an output.
pinMode(LED_BUILTIN, OUTPUT);
}
//The loop function runs over and over again forever
void loop() {
digitalWrite(LED_BUILTIN, HIGH); // turn the LED on (HIGH is the voltage level)
delay(1000); // wait for a second
digitalWrite(LED_BUILTIN, LOW); // turn the LED off by making the voltage LOW
delay(1000); // wait for a second
}
- Compile the code by clicking on the tick mark. The loading will start at the bottom of the screen.
- Copy the address of the hex file from the bottom of the screen.

Add Hex File in Proteus
- There is a need to create a connection between Arduino in Proteus and the Arduino IDE.
- Double-click on the Arduino UNO V3.0 in Proteus to open the properties panel.
- Paste the address of the hex file copied from the Arduino IDE.

Arduino UNO V3.0 Simulation Results
- Click on the run button to get the results of the simulation.
- If you have correctly followed all the instructions, then the LED will start blinking.

I hope your project is working fine. This is the most basic project, and you can see the Arduino UNO library for Proteus V3.0 has perfect functionality. If you are facing any issues regarding this library, you can ask in the comment section.