Arduino Nano Library for Proteus V3.0


Hello friends! I hope you are doing great. In this tutorial, we are discussing the upgraded version of the Arduino Nano. Before this, we discussed the Arduino Nano library for Proteus and the Arduino Nano library for Proteus V2.0. The new version of the Arduino Nano library for Proteus V3.0 has a better structure and is working better. We will discuss it in detail in just a bit.
In this article, I will discuss the basic introduction of Arduino Nano. We will learn how to download and install this library in Proteus and will create a simple project with this library. Let’s move towards our first topic:
What is the Arduino Nano?
- The Arduino Nano was released in 2008 by Arduino. cc and it is an open-source microcontroller board that has a great scope in the embedded industry.
- This board is baked on a Microchip ATmega328P and is famous for its low power consumption and versatile working.
- It is equipped with digital and analog input/output pins and its specifications make it suitable for the IoT and related industries.
- This board has different types of pins that include:
- 22 digital pins
- 8 analogue I/O pins
- Power pins, including 5V, 3.3V, and VIN (voltage in)
- Ground pin GND (ground)

Now, let’s see the Arduino Nano library V3.0 in Porteus.
Arduino Nano Library for Proteus V3.0
The Arduino Nano library for Proteus V3.0 is not present in Proteus by default, but it can be easily installed by following these simple steps.
First of all, download the library by clicking on the following link:
Arduino Nano Library for Proteus V3.0
Adding Proteus Library File
- The file will be downloaded in the zip folder. Extract the file to your desired location.
- Once extracted, go to the relevant location and open the folder named “Proteus Library Files”.
- Here, you will find the following files:
- ArduinoNano3TEP.IDX
- ArduinoNano3TEP.LIB
- Now, copy these files and simply paste them into the library folder of Proteus software, where other libraries are already present.
- For this, follow the path C>Program files>Labcenter electronics>Proteus 7 professional>Library
- If you are facing any issues with the installation, you can get help from How to Add a New Library File in Proteus.
Note: The procedure to use this library in Proteus 8 Professional is the same.
Arduino Nano Library in Proteus
- Once the library is installed, if your Porteus software is already open, you have to restart it so that Proteus may read the functionality of the library.
- Now, Arduino Nano V3.0 is present in your Proteus software.
- Click on the “P” button of the library from the left side of the Proteus screen and search for "Arduino Nano V3.0 TEP,” and it will show you the library.
- The screen will look like the following image:
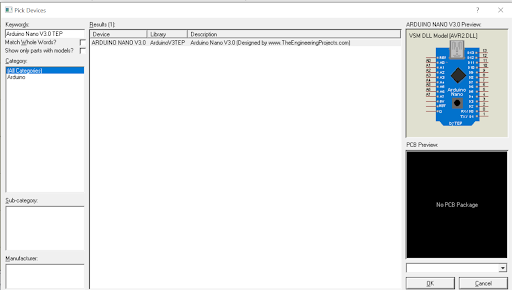
- Double-click on the Arduino Nano V3.0 to add it to your component window.
- Click on the name of the Arduino and then place it on the working sheet to check the look and pinouts of this Arduino Nano V3.0.
This library has a better design than the previous versions. It has better pinouts and its color is nearer to the real Arduino Nano microcontroller board. It is smaller than the previous versions and most important, it does not have the link to our website on its face. I hope you like it.
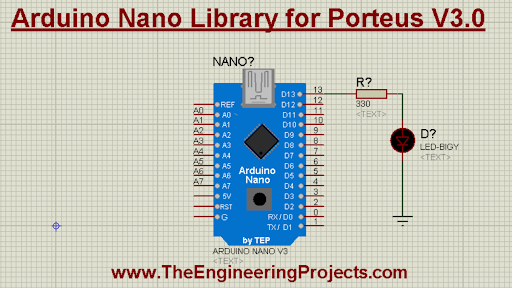
Arduino Nano V3.0 Simulation in Proteus
Once you have seen the pinouts, let’s design the simulation using this board. Here, we will create a basic mini-project where we will see the blinking LED on this board. It is one of the best examples of Arduino working for beginners. Follow the steps to create the project:
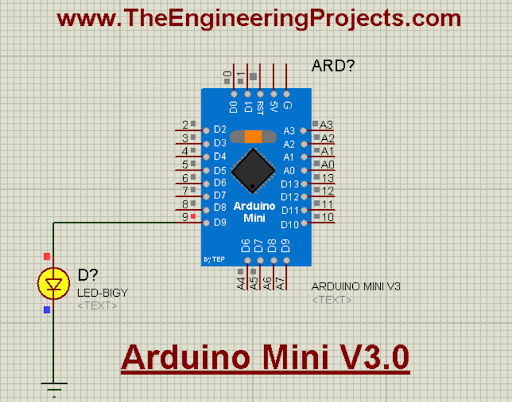
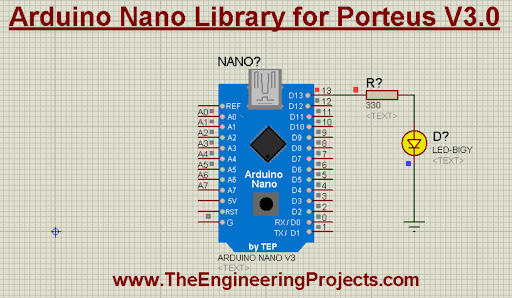
LED with Arduino Nano V3.0
- Once again, go to the “Pick library” button and choose LED and resistor.
- Connect one side of the resistor to any digital pin of Arduino Nano. I am using pin 13.
- Connect the LED to the other end of the resistor with the help of connecting wires.
- Double-click on the resistor to change its value to 330 ohms by simply writing the value manually.
- Go to terminal mode from the left side of the screen. You will see different components; choose the “Ground” terminal.
- Connect this terminal to the other end of the LED.
Code for Arduino UNO V3.0
- The code for this board will be written in the Arduino IDE. Start your Arduino IDE and create a new project.
- If no board is selected, click on the “Board” section and select the Arduino board from the drop-down menu of the boards.
- Remove the present code in the file and paste the following code into it:
void setup() {
// initialize digital pin LED_BUILTIN as an output.
pinMode(LED_BUILTIN, OUTPUT);
}
//The loop function runs over and over again forever
void loop() {
digitalWrite(LED_BUILTIN, HIGH); // turn the LED on (HIGH is the voltage level)
delay(1000); // wait for a second
digitalWrite(LED_BUILTIN, LOW); // turn the LED off by making the voltage LOW
delay(1000); // wait for a second
}
- The same code is also present in the zip file you downloaded before.
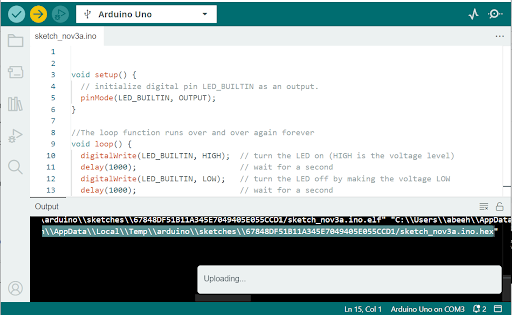
- Compile the code through the “Verify” button. The loading will start at the bottom of the screen in the console window.
- Now, click on the “Upload” button to get the hex file.
- Search for the address of the hex file at the bottom of the screen and copy it.
Add the Hex File in Proteus
- Double-click on the Arduino Nano V3.0 in Proteus to open its properties panel.
- Paste the address of the hex file you have just copied from the console of your Arduino IDE.

- Click on the “OK” button to close the window.
Arduino Nano V3.0 Simulation Results
- Click on the play button at the bottom of the screen to get the results of the simulation.
- I am sure your LED will start blinking If you have correctly followed all the instructions.
I hope your project is working fine. You can change the timing of the blinking through the code of the Arduino IDE. As I have said earlier, this is the most basic project. If you are facing any issues regarding this library, you can ask in the comment section.