Arduino Mini Library for Proteus V3.0


Hello friends! I hope you are doing great. Today, we are discussing the most upgraded version of the Arduino Mini in Porteus. Before this, we have shared the Arduino Mini library for Proteus and the Arduino Mini library for Proteus V2.0 with you. The Arduino Mini Library for Proteus V3.0 has a better structure and has some other changes that make it even better than the previous ones. This will be clear when you see the details of this library.
In this article, I will briefly discuss the introduction of Arduino Mini. You will learn the features of this board and see how to download and install this library in Proteus. In the end, I will create and elaborate a simple project with this library to make things clear. Let’s move towards our first topic:
Introduction to the Arduino Mini
The Arduino Mini is a compact board created under the umbrella of Arduino.cc specially designed for projects where the space is limited.
It was introduced in 2007 and it has multiple variants since then.
This board is equipped with the Atmel AVR microcontroller such as ATmega328P. and is famous for its low power consumption.
It has limited digital and analogue input/output pins and its specifications make it suitable for the IoT, robotics, embedded systems and related industries.
This board has different types of pins that include:
14 digital pins
8 analogue I/O pins
Power pins, including 5V, 3.3V, and VIN (voltage in)
Ground pin GND (ground)
Just like other Arduino boards, the Arduino mini is also programmed in Arduino IDE.
Now, let’s see the Arduino Mini library V3.0 in Porteus.
Arduino Mini Library for Proteus V3.0
You will not see the Arduino Mini library for Proteus V3.0 in Proteus by default. We have designed these libraries and they can be easily installed by following these simple steps.
- First of all, click on the below link and download the library.
Arduino Nano Library for Proteus V3.0
Adding Proteus Library File
- Once the file is downloaded, you will see its zip folder in the download folder.
- Extract the file to the current folder or to your desired location.
- Now, go to the location of the folder and open the folder named “Proteus Library Files”.
- Here, you will find the following files:
- ArduinoMini3TEP.IDX
- ArduinoMini3TEP.LIB
- These files have all the required functionalities but we have to paste them in the library folder of the Porteus software.
- For this, follow the path C>Program files>Lab centre electronics>Proteus 7 Professional>Library and paste both of these with other libraries.
- If you want the details of this process, you must see How to Add a New Library File in Proteus.
Note: I am using Proteus Professional 7 in this tutorial but users of Proteus Professional 8 can use the same process for the installation of the library.
Arduino Mini Library V3.0 in Proteus
- Once the library is successfully installed in the folder if your Porteus software is already open, restart it to successfully load all the packages.
- Now, Arduino Mini V3.0 is present in your proteus library folder.
- Click on the “P” button on the left side of the Proteus screen.
- Now search for "Arduino Mini V3.0 TEP”.
- The microcontroller will appear in the search bar.
- The screen will look like the following image:

- Click on the Arduino Mini V3.0 and add it to your component window on the left side of the screen.
- Here, on the component window, click on “Arduino mini V3.0” and drop it on the working area.
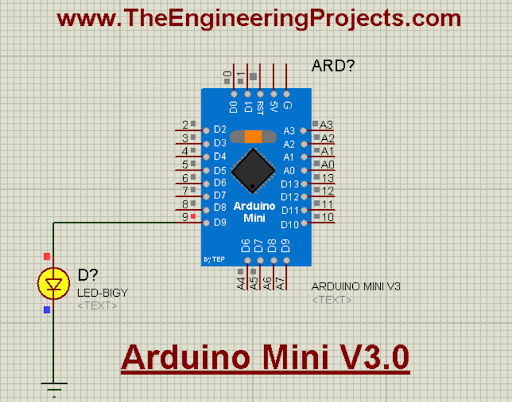
- Look at the structure and pinouts of this Arduino board.

This library has a better design than the previous versions of Arduino Mini. You can see its better pinouts & reduced size. The color of this board is nearer to the real Arduino Mini microcontroller board. I have made it even smaller to accommodate in the complex projects easily. This board does not have the link to our website on its face.
Arduino Mini V3.0 Simulation in Proteus
Now, let’s design the simulation using this updated Arduino Mini.
Fading LED with Arduino Mini V3.0
- Go to the “Pick library” button.
- Search for LED and resistor one after the other.
- Connect one side of the resistor to digital pin 9 of the Arduino Mini.
- Connect the other side of the resistor with the LED terminal.
- Double-click on the resistor to change its value to 330 ohms. You have to do it manually.
- Search for the terminal mode on the left side of the screen.
- Click on it and you will see different components.
- Choose the “Ground” terminal.
- Connect this terminal to the other end of the LED.
- The project must look like this:

Code for Arduino Mini V3.0
- Open the Arduino IDE.
- Click on the “Board” section and select the Arduino board from the drop-down menu.
- Delete the present code of the screen.
- Paste the following code into it:
int LED = 9; // the PWM pin the LED is attached to
int brightness = 2; // how bright the LED is
int fadeAmount = 5; // how many points to fade the LED by
void setup() {
// declaring pin 9 to be an output:
pinMode(LED, OUTPUT);
}
void loop() {
// setting the brightness of pin 9:
analogWrite(led, brightness);
// changing the brightness for next time through the loop:
brightness = brightness + fadeAmount;
// reversing the direction of the fading at the ends of the fade:
if (brightness <= 0 || brightness >= 255) {
fadeAmount = -fadeAmount;
}
// waiting for 30 milliseconds to see the dimming effect
delay(50);
}
}
- I will add the same code to the zip file of the library. Now, compile the code through the “Verify” button.
- Wait for the loading process to complete.
- Click on the “Upload” button. The loading will start at the bottom and you will see the hex file in the console.
- Search for the whole address of the hex file to copy it.

Add the Hex File in Proteus
- Double-click on the Arduino Mini V3.0 module in Proteus and the properties window will appear in front of you.
- Paste the hex file of the project in the empty section named “Program file”.
- Hit the “OK” button and close the window.

Arduino Mini V3.0 Simulation Results
- The play button on the lower left side of the screen is used to start the simulation of the project.
- If all the components are set well and the project does not have any errors, the simulation will be started.
If you follow all the steps accurately, your project will work fine. You can make the changes in the project with the help of code in the Arduino IDE. As I just want to show you the working of Arduino Mini here, I have chosen one of the most basic projects. But, Arduino Mini can be used for complex projects as well. If you want to ask any questions, you can use the comment box to connect with us.