Hey Friends! Hope you are doing well. Today, I'll discuss the details on How to use digitalWrite Arduino Command. The digitalWrite command in Arduino is used for writing the status of the digital Pin. The Pin assigned to this command must be an OUTPUT pin so that it can transfer data to other components like LEDs, motors, and actuators and use them as per your needs and requirements.
Arduino boards have always been a great choice for both experts and newbies, as they come with built-in peripheral functions, and no need of external components is required to drive automation and develop some basic functions on the relevant project.
Basic Arduino Software is used as a compiler and no separate burner is required to burn the required code into the boa ...
[vc_row][vc_column][vc_column_text]
Hello friends, hope you are fine and having fun with your lives. Till now we have seen two tutorials on Pixy Camera module, in the first tutorial we have seen How to Get started with Pixy Camera and after that we have seen How to Install Pixy Camera software which is named as PixyMon. So, now I hope that you have installed the Pixy camera software and have the Pixy Camera module in hand along with USB to Mini USB cable. Because in this tutorial we are gonna plug our Pixy Camera module with moduter and will upload the latest firmware in our Pixy Camera Module, which isn't much difficult and would be a piece of cake if you followed all the instructions carefully.
Pixy Camera comes with some old firmware which is up ...
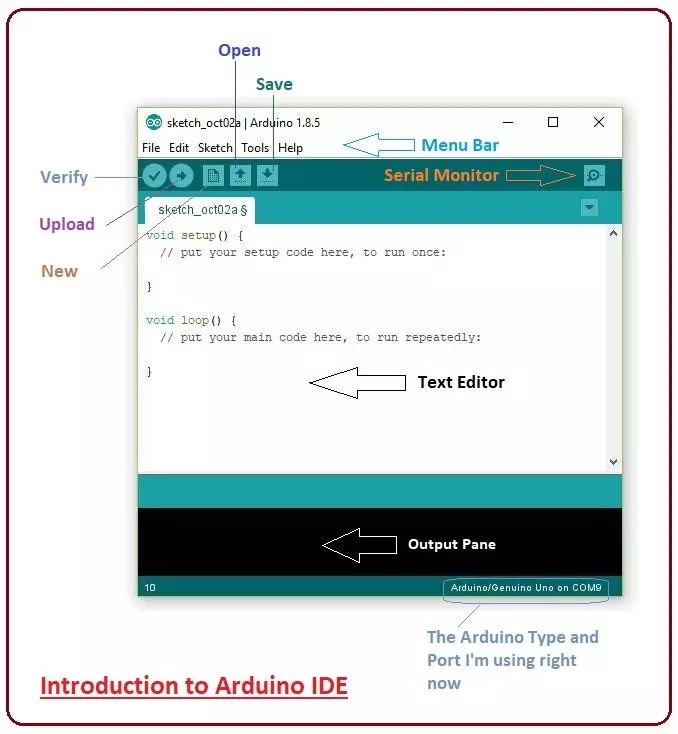
Hey Guys! Hope you are doing well. Today, I'll discuss the detailed Introduction to Arduino IDE, where IDE stands for Integrated Development Environment - An official software introduced by Arduino.cc, that is mainly used for writing, compiling and uploading the code in almost all Arduino modules/boards. Arduino IDE is open-source software and is easily available to download & install from Arduino's Official Site.
In this post, I'll take you through the brief Introduction of the Software, how you can install it, and make it ready for your required Arduino module. Let's dive in and get down to the nitty-gritty of this Software.
Introduction to Arduino IDE
Arduino IDE is an open-source software, designed by Arduino.cc and mainly used for wri ...
Hello friends, I hope you all are fine and having fun with your lives. Today, I am going to share a very quick and basic tutorial in which I will show you How to use Arduino Serial Flush. I hope you guys are going to like it. We have seen How to use Arduino Serial Write? In that tutorial, we have sent some data over the Serial Port so you must recall that tutorial because we are going to use the same example today. Moreover, it's also good if you have a look at How to use Arduino Serial Monitor because that's also related.
Moreover, I hope that's going to be my last lecture on Arduino Serial Port because I have covered it in full detail. Although I am going to summarize all the Arduino Serial Post Commands in a single Post. You should also have a l ...
Hello friends, I hope you all are fine and having fun with your lives. In today's tutorial, I am going to show you the Interfacing of XBee with Computer. In the previous part of this tutorial, I have given the Introduction to XBee Module. Hope you guys have read it and if not then go visit it so that you may have some idea about XBee module.
Now come to the second part about how to interface xbee with computer because its important as if you cant interface the xbee with computer then you cant interface it with any microcontroller and later I will tell you its interfacing with microcontroller. You should also check this XBee Library for Proteus which will help you to simulate XBee module in Proteus.
We will cover arduino with more detail as its ...
Hello friends,hope you are fine and enjoying your lives. In today's tutorial, we will know How to Upload Bootloader in Atmega328 using Arduino UNO, which is quite simple and easy and a basic level tutorial. We all know that, Arduino UNO uses Atmega328 as a microcontroller and have you ever thought of using ATmega328 alone instead of using complete Arduino UNO. If you haven't thought yet then think now :) Yes we can use Atmega328 alone instead of using it as a whole with Arduino board. But that's not the topic of today's tutorial and I am gonna cover it soon that How can we use Atmega328 alone.
So now the questions arises that what we are gonna do with the rest of the Arduino board? As we have taken the Atmega328 out of it now there's no use of res ...
Hi Friends! Hope you are doing well. I am back to give you a daily dose of useful information so you can excel and improve as per your technical needs and requirements. Today, I'll uncover the details on the Introduction to ATmega8. It is an 8-bit AVR microcontroller that is based on RISC CMOS technology and comes with a 28-pin interface for the PDIP package. The Program memory is 8K Flash while RAM and EEPROM are 1K and 512 bytes respectively.
Microchip has been the main source for producing PIC and AVR microcontrollers that are mainly used in embedded and industrial automation systems. These modules can perform a number of functions on a tiny chip, preventing you from spending too much and purchasing external components for laying out automation ...
Hey Friends! Hope you are doing well. Today, I am going to give you a detailed Introduction to Arduino Pro Mini. It's a microcontroller board developed by Arduino.cc and is based on the Atmega328 microcontroller.
Arduino Pro Mini is quite similar to Arduino UNO in overall functionality however the main difference lies in its size and built-in programmer. Arduino Pro Mini is very small in size & it lacks a built-in programmer & USB Port. Arduino Uno comes with two onboard voltage regulators (i.e. 5V and 3.3V) while Arduino Pro Mini comes with a single voltage regulator.
There are two versions of Arduino Pro Mini available, first one operates at 5V & runs at 16MHz while the second one is of 3.3V runs at 8MHz.
Arduino boards are mainly u ...
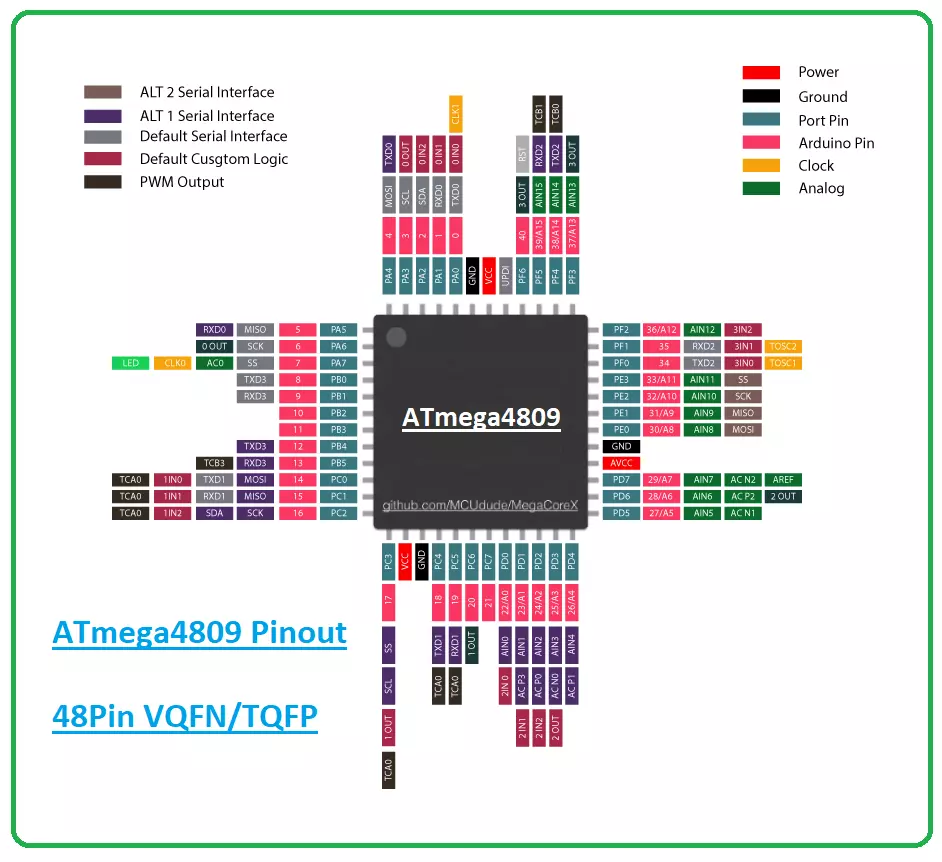
Hi Guys! I welcome you on board. Happy to see you around. In this post today, I’ll walk you through the Introduction to ATmega4809.
The ATmega4809 is a type of microcontroller that belongs to the megaAVR® 0-series. It features an AVR® processor with a clock speed running at up to 20 MHz. It comes with a Flash memory size up to 48 KB, 256 bytes of EEPROM, and 6 KB of SRAM. It is available in 28-, 32-, 40-, or 48-pin packages.
I suggest you buckle up as I’ll detail the complete Introduction to ATmega4809 covering datasheet, pinout, features, power ratings, and applications.
Let’s get started.
Introduction to ATmega4809
The ATmega4809 microcontroller belongs to the megaAVR® 0-series that contains an AVR processor.
The series carries low power ...
Hello geeks, welcome to our new project. We are going to make an important project which will be very useful for us in our daily life which is a variable DC power supply. As engineers who work with electronics need different voltage ranges of DC power supply for different electronic projects and components. It becomes very clumsy and hard to manage different power supplies because of wires which are connected to it and each power supply consumes an extra power socket as well.
So in this project, we will overcome this issue and learn to make an adjustable DC power supply, in which we will get a wide range of voltages.
Software to install
We will make this project in the simulation, as it is a good practice to make any project in the simulation fir ...