Hello readers, I hope you are all doing great. Welcome to the 2nd lecture of Section 5(ESP32 Sensors) in the ESP32 Programming Series. In the previous tutorial, we discussed the built-in ESP32 Hall Effect Sensor. In this tutorial, we will discuss another inbuilt sensor of the ESP32 i.e. Capacitive Touch Sensor.
ESP32 Board has 10 built-in capacitive touch pins, which generate an electrical signal when someone touches these pins. These ESP32 touch pins are normally used to wake up the board from deep sleep mode. These touch pins are also used to replace the normal mechanical buttons with touch pads, improving the presentation of the IoT projects.
Here's the video demonstration of the ESP32 Capacitive Touch Sensor:
Before going forward, let's first understand how this touch sens ...
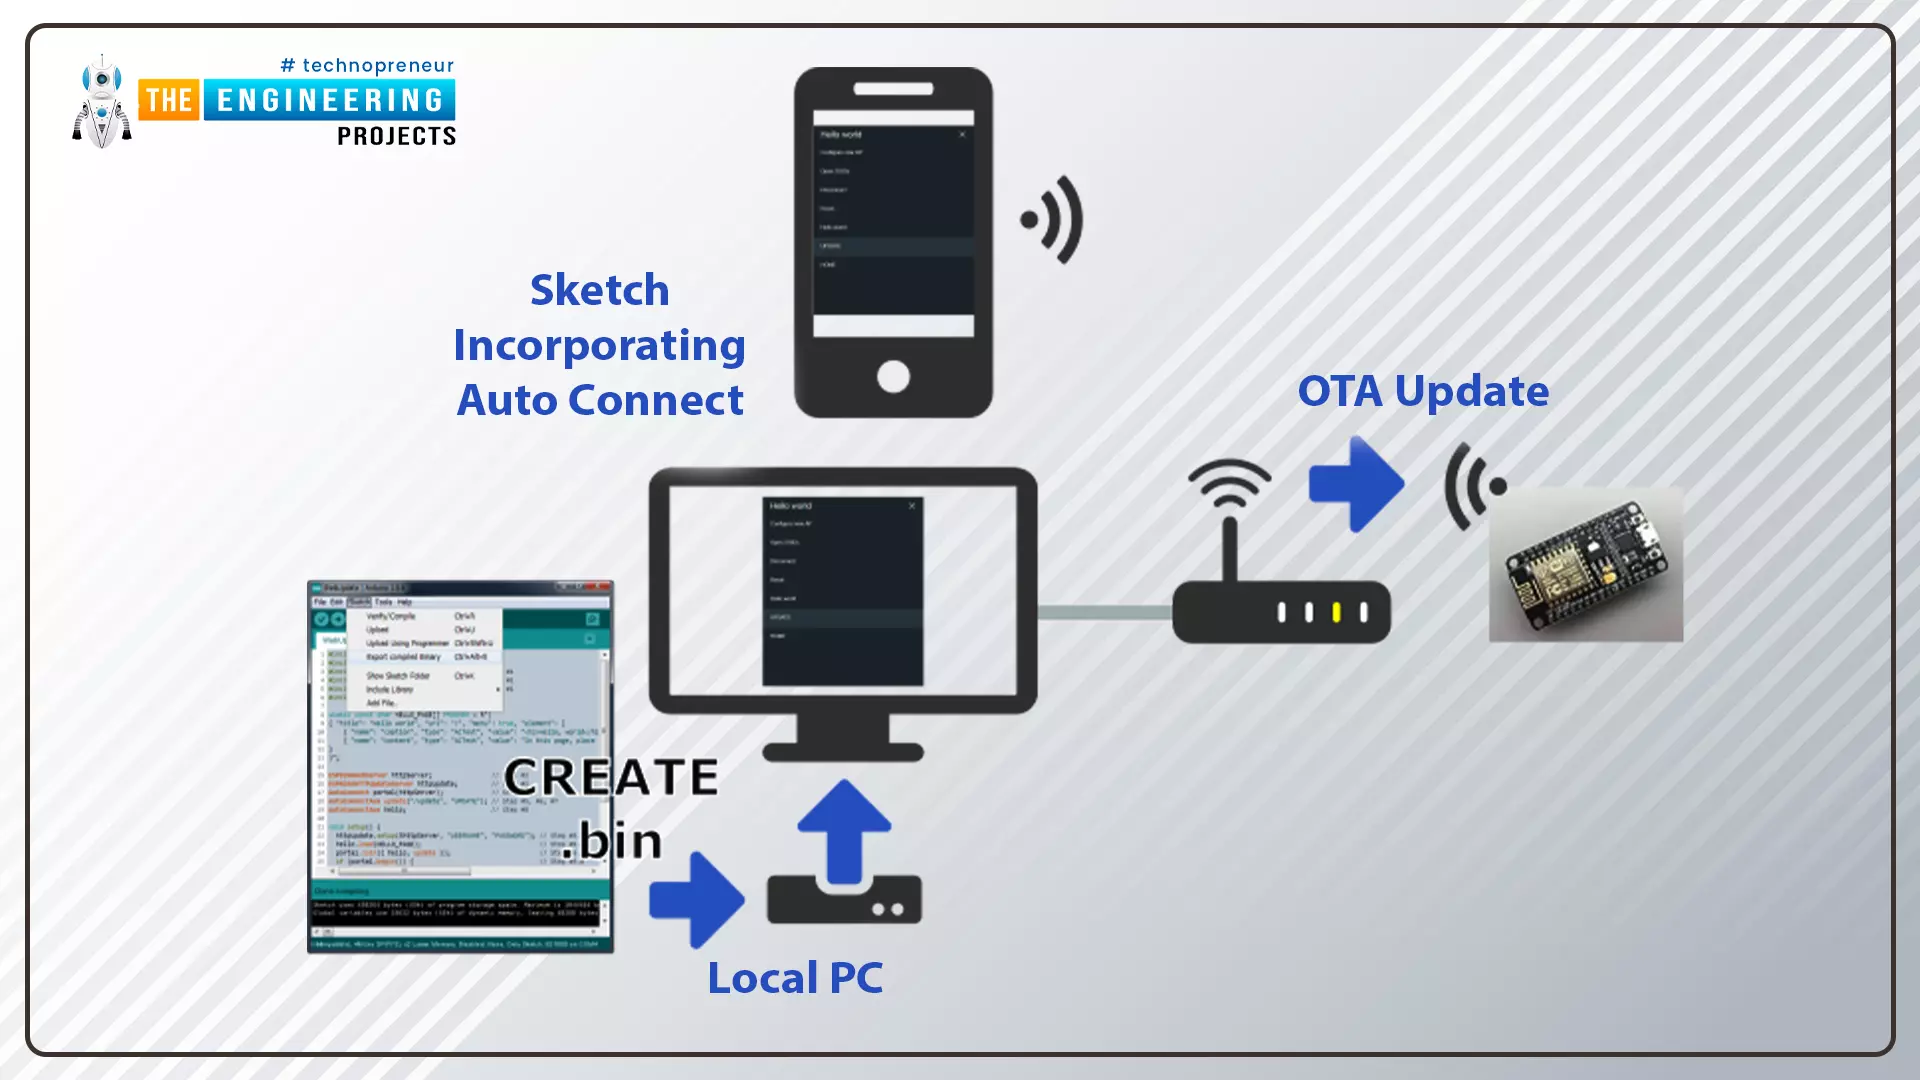
Hello readers, I hope you are all doing great. In this tutorial, we are going to discuss the OTA web updater on the ESP32.
We already covered the fundamentals of OTA programming in ESP32, in our previous tutorial where we used the Arduino IDE to upload OTA code into the ESP32 module using the network port.
In the OTA web updater, you need to create a web server page for OTA programming.
[caption id="attachment_166886" align="aligncenter" width="1920"]
ESP32 OTA web updater[/caption]
Fig.1 ESP32 OTA web updater
Over the Air Web Updater
"Over-the-air" refers to the ability to wirelessly download an application, configuration, or firmware to internet-enabled devices, also known as IoT. (OTA). It functions similarly to our computers, laptops, tab ...
Today we will talk about an extremely powerful tool in the use of microcontrollers. The Serial communication, specifically the USART (Universal Synchronous Asynchronous Receiver Transmitter) standard.
The system works using two wires. RX (Receiver) and TX (Transmitter), connecting two devices. The RX of one is connected to the TX of the other. If the choice is for a synchronous connection, it may be necessary to add one or two more pins to operate as a “traffic light”. But most current microcontrollers can operate asynchronously, which saves us the expense of pins. Data is sent, as the name implies, in a series of bits.
ESP8266 provides us with two ports, one of them converted to USB in the NodeMCU module.
Applications
The range of uses of se ...
Hello friends, I hope you all are fine and having fun with your lives. Today, I am going to share a very quick and basic tutorial in which I will show you How to use Arduino Serial Flush. I hope you guys are going to like it. We have seen How to use Arduino Serial Write? In that tutorial, we have sent some data over the Serial Port so you must recall that tutorial because we are going to use the same example today. Moreover, it's also good if you have a look at How to use Arduino Serial Monitor because that's also related.
Moreover, I hope that's going to be my last lecture on Arduino Serial Port because I have covered it in full detail. Although I am going to summarize all the Arduino Serial Post Commands in a single Post. You should also have a l ...
Hello friends, I hope you all are fine and having fun with your lives. In today's tutorial, I am going to show you How to use Arduino Serial Monitor. It's not gonna be a very big post but its really very essential if you wanna learn Arduino coding. Because Arduino Serial Monitor is a great debugging tool and it helps a lot in Arduino Projects. In the previous post we have seen How to use digitalRead in Arduino and if you recall that tutorial then you must remember that in it we have used some Serial printing. So that's what we are gonna cover in today's tutorial.
Before going into the details, I must suggest you to first read these two posts because in those tutorials I have shown the serial communication which is essential for Serial Monitor Work ...