Today we will talk about an extremely powerful tool in the use of microcontrollers. The Serial communication, specifically the USART (Universal Synchronous Asynchronous Receiver Transmitter) standard.
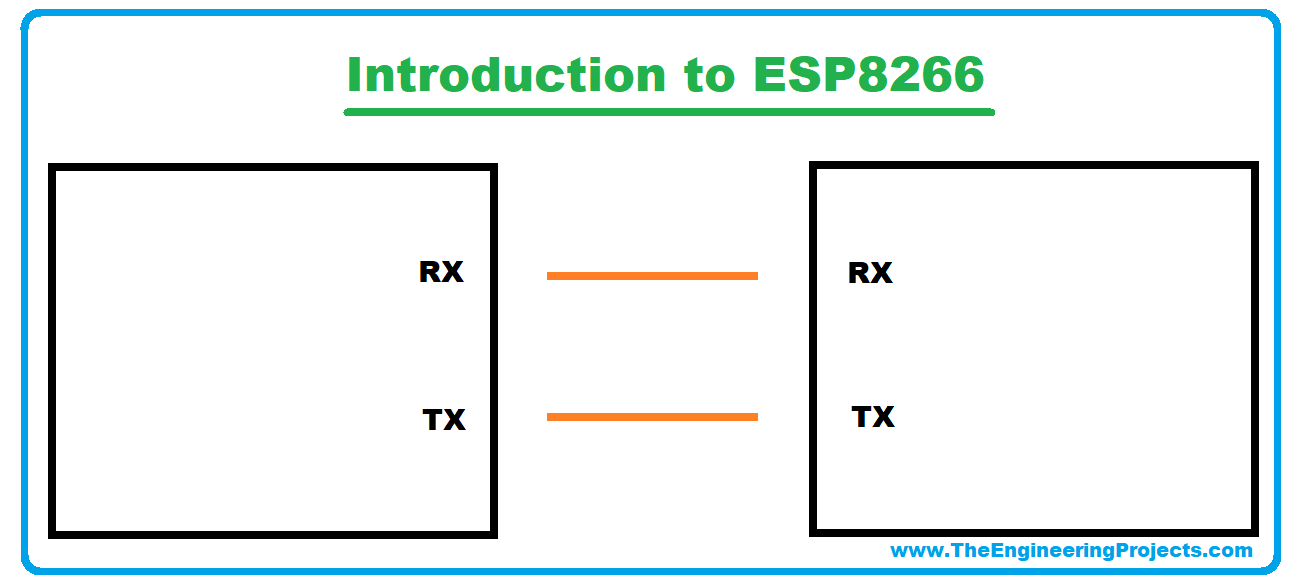
The system works using two wires. RX (Receiver) and TX (Transmitter), connecting two devices. The RX of one is connected to the TX of the other. If the choice is for a synchronous connection, it may be necessary to add one or two more pins to operate as a “traffic light”. But most current microcontrollers can operate asynchronously, which saves us the expense of pins. Data is sent, as the name implies, in a series of bits.
ESP8266 provides us with two ports, one of them converted to USB in the NodeMCU module.
Applications
The range of uses of serial communication is limited only by creativity. Here I will mention three more general scenarios and detail some applications within them.
1. Communicating with computers
With a USB cable, we were able to connect the NodeMCU with a computer via Serial.
Arduino IDE already gives us the first use. With Serial Monitor, we can send commands or debug the functioning of our code.
But the integration with other software is pretty powerful. Imagine, for example, access control in which a circuit with ESP8266 reads an RFID card and sends it via Serial to a Permission Validation System. Or even an LED panel that receives a software display text.
2. Communicating with microcontrollers
Probably the most common application. Whether to integrate into a preexisting circuit or to distribute functionality between microcontrollers.
This integration can be done between different microcontrollers. As long as they operate with the same voltage (3.3V) or use a level converter.
An application example is to integrate the ESP8266 wifi with the analog ports of an ATMEGA328 to build an IoT toxic gas sensor. We already know that the ESP8266's analog port is quite inefficient. Then it is possible to perform the analog reading on the ATMEGA328 and send the information to ESP8266 by Serial.
3. Communicating with industrial machines
This, without a doubt, is the most interesting way to integrate industrial machinery with WEB systems. The older industrial equipment that allows some automation, provides RS232 or RS485 ports for integration with PLCs.
In these cases, the commands are pretty plastered, but hopefully, well documented. The voltage level is 12V or 24V, but there are converters and logic levels to solve this.
The industry 4.0 paradigm has been operating to make this kind of integration. Some PLCs are already developed with wifi modules. And on that account, circuits with the ESP8266 have the immense advantage of low cost.
The vision behind this is to be able to remotely monitor or control an entire industrial plant. Tracking KPIs for predictive maintenance, doing recalibrations, and managing production.
Main Functions
The Serial library has a good variety of functions for Serial communication, but most are for very specific uses. We will discuss the most common ones and may return to others in the future as needed by the projects.
Serial.begin()
The first function to be used. It initializes Serial communication informing the data transfer speed (in bits per second) and, optionally, a configuration parameter.
By default, Serial is configured to send data in 8-bit packets plus a terminator, not including parity. The best way to imagine this communication is to imagine a train, where each byte (8 bits) sent is a car, and the terminator is the connection between them. This standard is used in most devices, but if you need to integrate a device with another standard, the config parameter allows you to change the number of bits in the packet (from 5 to 8), the number of stop bits (1 or 2 ) and enable or disable parity (a packet integrity check).
The speed uses some preset values. The fastest that remains stable for the ESP8266 is 115200 changes per second.
So we could start with:
Serial.begin(155200)
The function below presents the same result, making the config parameter explicit.
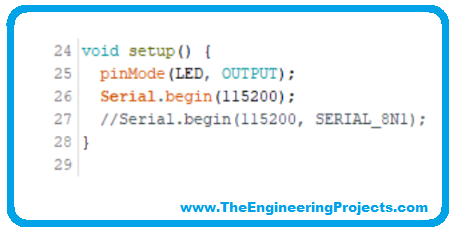
Serial.begin(115200, SERIAL_8N1)
Serial.available()
The function returns an integer with the number of bytes available in the read buffer. The maximum of bytes in the buffer is 64.
This function is very useful for monitoring incoming information.
Value = Serial.available()
Serial.read()
The function returns the most recent byte in the input buffer and removes it from the buffer. It is ideal if your communication is byte-to-byte. For example, if you are receiving input from a keyboard, the function would return the key you typed.
It returns an integer with byte or -1 if no data is available.
Serail.readString()
This function is best suited for reading strings. Like words. It is the equivalent of calling the read() function continuously until it reads all the information from the buffer. The function returns a string with the data.
Serial.print() and Serial.println()
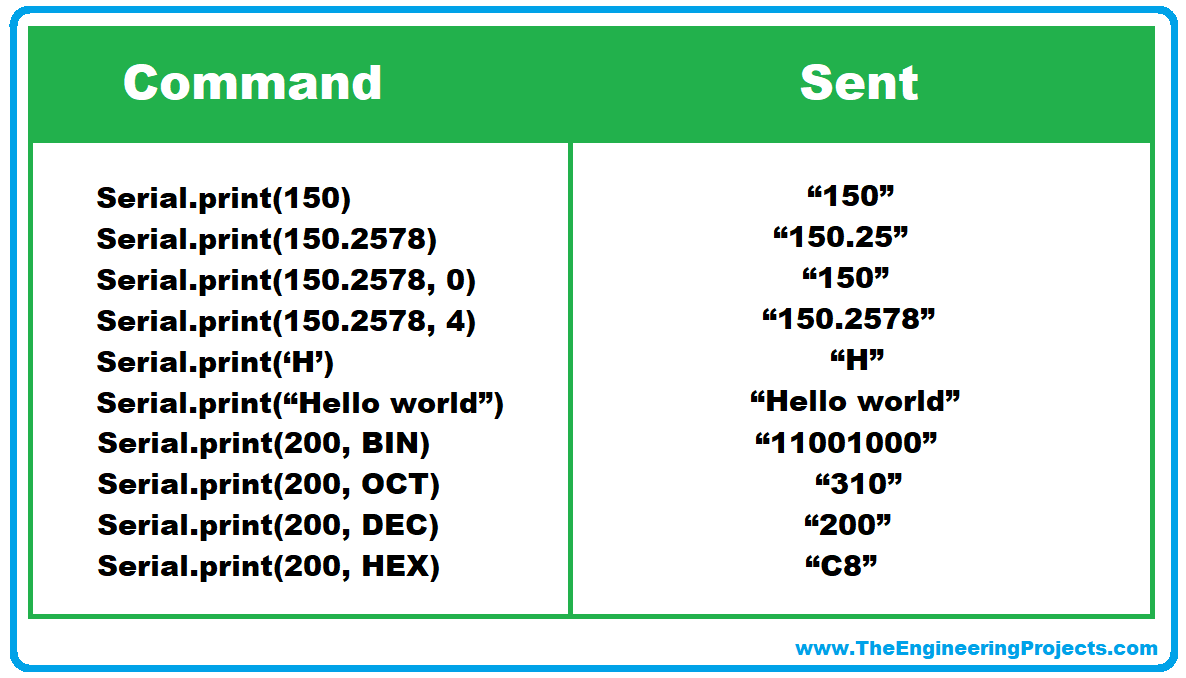
The two functions are very similar. It takes a value and sends it serially in ASCII format. It is also possible to define the numerical base before sending (binary, decimal...) and the number of decimal places.
The function can be used either in the format:
Serial.print(value)
And the format:
Serial.print(value, format)
The table below presents some usage examples.
The println function works pretty much the same, but it adds the return character ‘\r’ and newline ‘n’ at the end of the packet. It's the equivalent of typing in a text editor and pressing the "Enter" key.
Serial Monitor
The Arduino IDE provides a very powerful tool for debugging and testing Serial communication. The Serial Monitor.
The tool is pretty intuitive, but let's take a look at its fields.
Sending data: This allows us to send commands directly to the microcontroller
Autoscroll: Very useful when we've already received enough information to fill the screen
and don't want to move it down manually.
Terminator: Choose whether or not to include the new line and carry return characters at the end of the message before
BaudRate: Defines the communication It must be the same as the microcontroller, or
packet loss or character misreading problems will occur.
Controlling and monitoring an LED
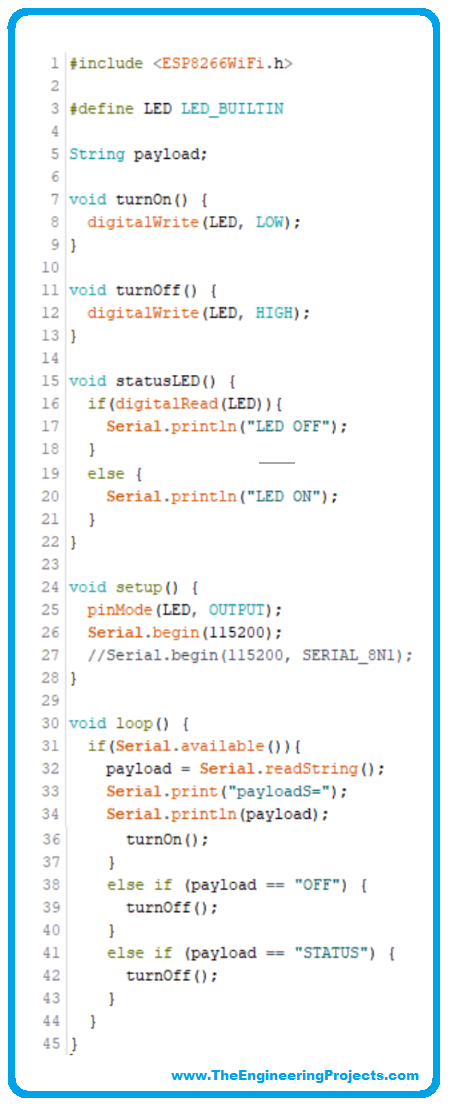
Let's make a simple code to control and monitor the NodeMCU LED from the Serial monitor.
The code will monitor the Serial, and each time it receives the command “ON”, it will turn on the LED, when it receives “OFF”, it will turn off the LED when it receives “STATUS”, it will return the status of the LED in the Serial.
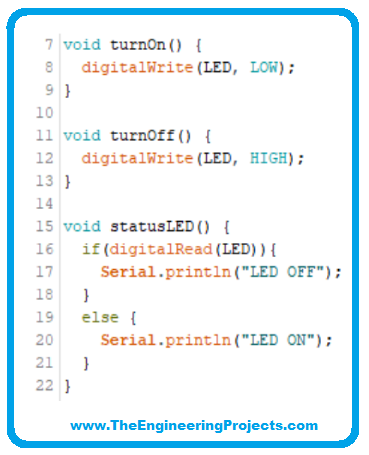
We will create three functions to perform the actions.
turnOn() : To turn on the
turnOff() : To turn off the
statusLED() : To read the pin status and return information in the serial.
We initialize the Serial in the Setup function.
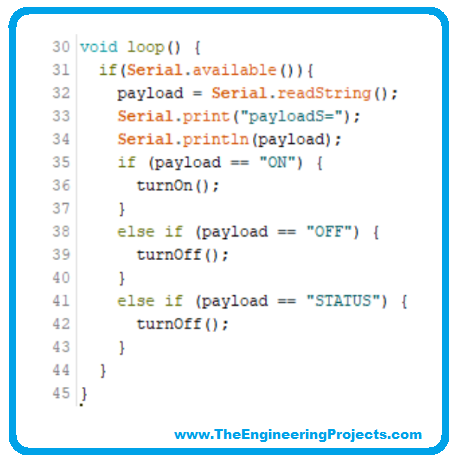
In the loop() function, we check if there is any data in the input buffer of the serial, if there is, it saves the buffer values in the variable “payload”.
Finally, we check the payload value to decide the action.
Here it is important to note that we use an equality comparison and that “ON” is different from “ON “. For this reason, when sending the information through the Serial Monitor, we choose the “No line ending” option.
And so is our final code. Compiled, written to nodeMCU. Open the Serial Monitor, remember to put the correct baud rate and the "No Line ending" and send one of our 3 commands.
This is simple code, but very powerful.
So, that was all for today. I hope you have enjoyed today's tutorial. If you have any questions, please ask in the comments. Thanks for reading.