In this tutorial, we will walk through the process of interfacing a pH sensor with an Arduino UNO in Proteus. To make the project more practical and user-friendly, an LCD is included so that both the sensor’s voltage output and the calculated pH value can be displayed clearly in real time. This allows the user to easily monitor the readings without needing additional software or serial monitoring tools.
The term pH, short for “potential of Hydrogen,” indicates the concentration of hydrogen ions (H⁺) in a solution and is used to determine whether it is acidic, neutral, or alkaline. A pH of 7 represents neutrality, values below 7 indicate acidity, and values above 7 represent alkalinity. Monitoring pH is essential in several fields—such as water quality testing, agriculture, food processing, and chemical industries—making it one of the most widely measured parameters in scientific and engineering applications.
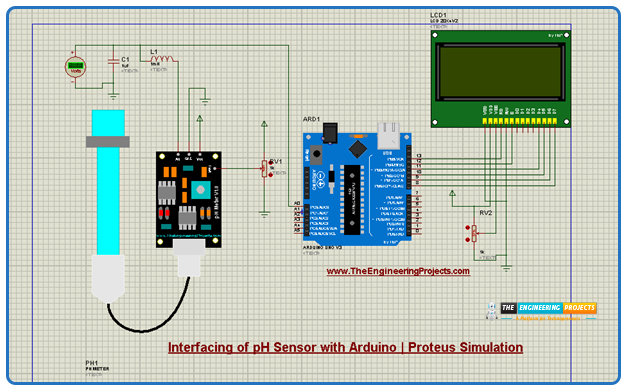
By building this project in Proteus, we can simulate how a digital pH meter works before implementing it in real hardware. This tutorial will cover every step, starting from setting up the required pH sensor library in Proteus, wiring the Arduino UNO with the sensor and LCD, and writing the Arduino code to process the analog values. Finally, we will run the simulation to observe how the raw voltage values provided by the sensor are converted into readable digital pH values and displayed directly on the LCD. This hands-on approach not only explains the technical process but also highlights the importance of integrating sensors with microcontrollers to design reliable measurement systems.
pH Sensor Library in Proteus
A pH meter is an electronic device that is used for the purpose of measuring the acidity or alkalinity of liquids. In general, the real pH meter module consists of a simple structure:
The glass electrode probe detects the hydrogen ion concentration
The BNC connector ensures stable transmission
The signal conditioning circuit board amplifies the weak or noisy signals that are sent to the microcontroller, like Arduino, for further processing.
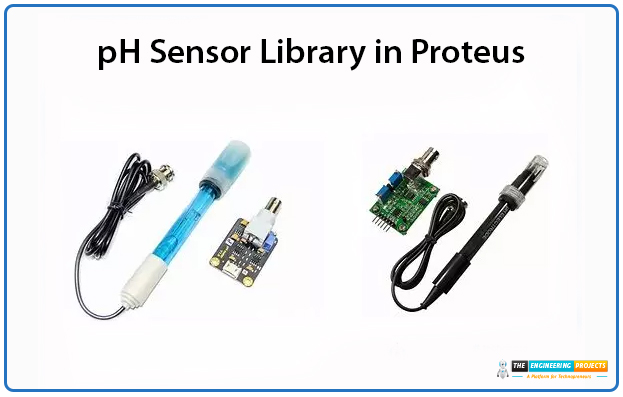
In Proteus, we have created four types of sensors differentiated by colors so that the user requiring more than one pH meter in their projects may use them at different places. For convenience, we have named these meters as:
pH meter
pH meter 2
pH meter 3
pH meter 4
The concept of pH is most commonly associated with liquids; however, since liquids cannot be directly represented in a Proteus simulation, the pH sensor model in this project is tested using a potentiometer. By connecting the test pins of the sensor to the potentiometer, users can vary the resistance and observe how the simulated pH values respond to these changes.
In this setup, the potentiometer provides values in the range of 0 to 1023, which correspond to the Arduino’s analog input scale. These raw values are then converted through the Arduino code into a pH scale ranging from 0 to 14, representing the full span from highly acidic to highly alkaline. This approach makes it possible to replicate the behavior of a real pH sensor in a virtual environment, allowing users to test, observe, and understand the relationship between voltage, analog values, and pH readings.
For clarity, the following table illustrates the nature of a solution based on its pH value, helping you interpret whether a reading indicates acidity, neutrality, or alkalinity.
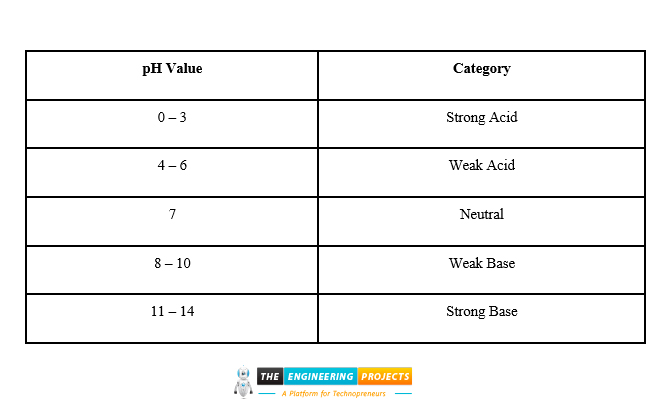
pH Value |
Category |
0 – 3 |
Strong Acid |
4 – 6 |
Weak Acid |
7 |
Neutral |
8 – 10 |
Weak Base |
11 – 14 |
Strong Base |
In a real pH sensor, the probe immersed in the solution detects the concentration of hydrogen ions (H⁺) and generates a corresponding voltage signal. This voltage varies depending on whether the solution is acidic or alkaline. In our Proteus simulation, however, the physical probe is replaced by a potentiometer that mimics this voltage output. By adjusting the potentiometer, the voltage fed to the Arduino changes, and the microcontroller then calculates the equivalent pH value using the programmed formula.
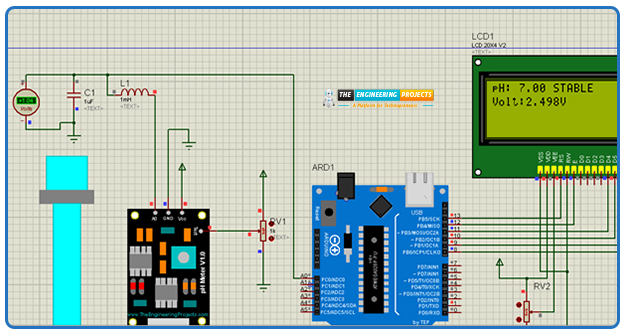
For example, in a typical setup, a voltage of around 2.5 V would represent a neutral solution with a pH of 7. If the voltage decreases toward 0 V, it indicates stronger acidity (lower pH values, closer to 0). On the other hand, as the voltage increases toward 5 V, it represents stronger alkalinity (higher pH values, closer to 14). This simple mapping allows us to simulate how a real pH probe would behave in different solutions, making it easier to understand the relationship between voltage and pH levels.
Interfacing pH Sensor with Arduino | Project Overview
In this project, the user simulates the behavior of a pH sensor by varying the resistance of a potentiometer connected to the pH meter’s test pin. The potentiometer generates analog voltage values that are fed into the analog input of the Arduino microcontroller. The Arduino then processes these inputs, converts them into corresponding digital values, and displays both the voltage and calculated pH readings on the attached LCD.
To build this simulation, two key software tools are used:
Proteus Professional – for designing and simulating the electronic circuit virtually.
Arduino IDE – for writing, compiling, and uploading the control code to the Arduino module.
By combining these tools, you can design, test, and validate the entire system in a virtual environment before moving on to a real-time hardware implementation. This not only saves time but also provides a clear understanding of how the pH sensor works in practice.
Interfacing pH Sensor with Arduino | Proteus Library Installation
To make the simulation possible, we use an additional library package that introduces the pH sensor component into Proteus. Once integrated, this module works just like other built-in components, allowing you to connect it with Arduino and the LCD for testing. The best part is that setting up the library is quick, and you only need to do it once. After that, the pH sensor model will always be available in your Proteus library for future projects.
The installation process of all of these is the same, and once you have installed them, you can use them in multiple projects. Once all is done, you can move to the practical implementation of the project in the Proteus simulation.
Interfacing pH Sensor with Arduino | Proteus Simulation
The aim of creating the Proteus simulation is to test if the circuit works fine, and it is a critical step before moving into the practical implementation. Here are the steps to do so:
Start Proteus software.
Open a new project with the desired name.
Go to the pick library button.
In the search box, type “pH meter TEP”. If the library is successfully installed, you’ll see the following result:

Choose any of them, I am going with the first one.
Delete the text and now search for the “Arduino UNO TEP”. The latest version is Arduino V3.0, so I am choosing it.

Repeat the above step for the LCD library and get the 20x4 V2.0

After these major components, get the inductor, capacitor, and POT HG (potentiometer) through the pick library one after the other.
Place the components on the working area.
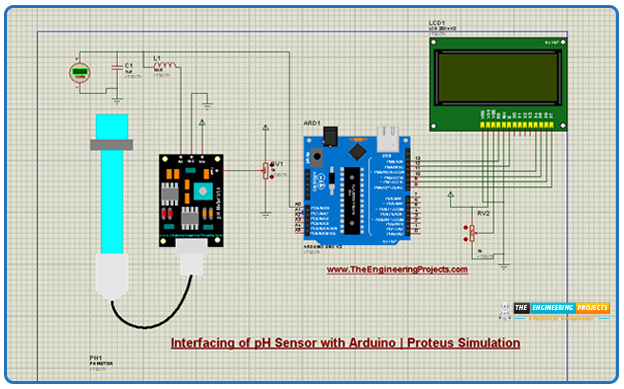
In Proteus, the sensor output appears as peak-to-peak values, but we don’t need such output, so to obtain a smooth and accurate reading, we convert the signal into Vrms using an LC circuit, as shown in the image:
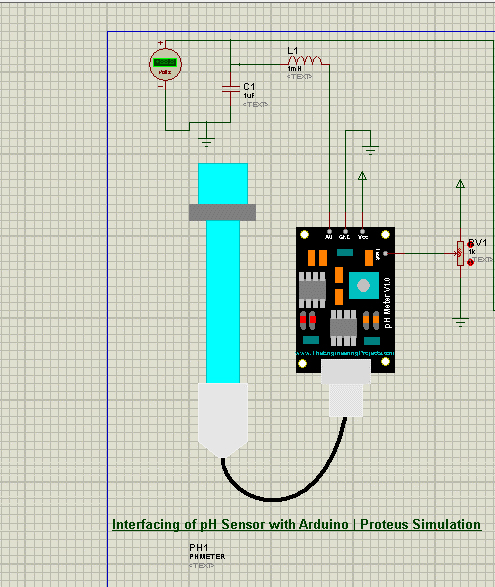
When the user provides the analog values to its test pins, these must be attached to the Arduino UNO for the conversion into digital values. I am connecting the pH meter output to the A0, and all this information is vital to write the right code.
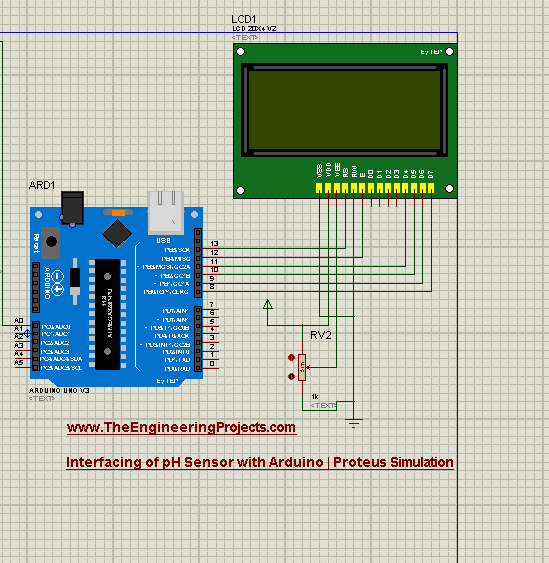
Just like the real LCD, the Proteus library also has 14 pins. A potentiometer attached to VEE will help to maintain the LCD contrast. Create the pin connection of Arduino with LCD as shown in the image:
Connect all these components so the final circuit must look like the following:
Interfacing pH Sensor with Arduino | Arduino Code
Once the simulation is complete, it's time to use Arduino IDE to create the code that controls the simulation. For the ease of the student, I am sharing the code here:
#include
// LCD Pins: RS, E, D4, D5, D6, D7
LiquidCrystal lcd(13, 12, 11, 10, 9, 8);
#define SensorPin A0
#define NUM_SAMPLES 20
#define SAMPLE_DELAY 5
// --- Calibration Data ---
const float CAL_PH_LOW = 4.0; // First calibration point (pH 4 buffer)
const float CAL_VOLT_LOW = 3.0; // Voltage you measured at pH 4
const float CAL_PH_HIGH = 7.0; // Second calibration point (pH 7 buffer)
const float CAL_VOLT_HIGH = 2.5; // Voltage you measured at pH 7
// --- Derived Calibration Constants ---
float slope, offset;
// --- Filters ---
float smoothedPH = 7.0;
float alpha = 0.3;
void setup() {
Serial.begin(9600);
analogReference(DEFAULT);
// Calculate slope & offset from calibration
slope = (CAL_PH_HIGH - CAL_PH_LOW) / (CAL_VOLT_HIGH - CAL_VOLT_LOW);
offset = CAL_PH_HIGH - (slope * CAL_VOLT_HIGH);
lcd.begin(16, 2);
lcd.print("pH Meter Calib");
lcd.setCursor(0, 1);
lcd.print("Initializing...");
delay(3000);
lcd.clear();
}
void loop() {
// 1. Average multiple readings
long sum = 0;
for (int i = 0; i < NUM_SAMPLES; i++) {
sum += analogRead(SensorPin);
delay(SAMPLE_DELAY);
}
int avgValue = sum / NUM_SAMPLES;
// 2. Convert ADC to Voltage
float voltage = (float)avgValue * (5.0 / 1023.0);
// 3. Calculate pH from calibration
float rawPH = (slope * voltage) + offset;
// 4. Apply smoothing
smoothedPH = (alpha * rawPH) + ((1.0 - alpha) * smoothedPH);
// 5. Clamp values to a valid range
if (smoothedPH < 0) smoothedPH = 0;
if (smoothedPH > 14) smoothedPH = 14;
// 6. LCD Display
lcd.clear();
lcd.setCursor(0, 0);
lcd.print("pH: ");
lcd.print(smoothedPH, 2);
if (abs(rawPH - smoothedPH) < 0.1) {
lcd.print(" STABLE");
} else {
lcd.print(" BUSY");
}
lcd.setCursor(0, 1);
lcd.print("Volt:");
lcd.print(voltage, 3);
lcd.print("V");
delay(500);
}
Interfacing pH Sensor with Arduino | Arduino Code Explanation
The code in Arduino IDE is always in C++, and to understand it clearly, I am dividing it into parts according to their functionality. Here is he explanation of each of them:
#include
LiquidCrystal lcd(13, 12, 11, 10, 9, 8);
This part is called the library and LCD set. The first line includes all the features of the LCD we are using in our project. This is the critical lie without which the code throws the error.
In the second line, the Arduino UNO pins are defined and attached to the LCD in Proteus. Changing any of them will result in no display on the LCD.
#define SensorPin A0
#define NUM_SAMPLES 20
#define SAMPLE_DELAY 5
The first line defines the pin of the Arduino UNO attached to the output of the pH meter.
The voltage values from the pH meter are very weak, so to avoid the additional noise, the number of ADC readings is defined here. You can change them, but I found 20 the perfect number for this purpose.
The sample delay is taken 5 here, and by default, its unit is meters per second.
const float CAL_PH_LOW = 4.0;
const float CAL_VOLT_LOW = 3.0;
const float CAL_PH_HIGH = 7.0;
const float CAL_VOLT_HIGH = 2.5;
float slope, offset;
float smoothedPH = 7.0;
float alpha = 0.3;
This part is for the calibration of the data the user provides through the potentiometer and to drive the calibration constant. These constants will be used in a later section of this code in the equation.
In the last two lines, the float variables are defined so as to get the stable output; otherwise, the change in the voltage caused by the potentiometer is slowly converted into the perfect pH output, affecting the project's performance.
slope = (CAL_PH_HIGH - CAL_PH_LOW) / (CAL_VOLT_HIGH - CAL_VOLT_LOW);
offset = CAL_PH_HIGH - (slope * CAL_VOLT_HIGH);
In Arduino code, the setup is the part that runs for a single time only once. Therefore, I have placed the formulas to calculate the slope and offset here.
long sum = 0;
for (int i = 0; i < NUM_SAMPLES; i++) {
sum += analogRead(SensorPin);
delay(SAMPLE_DELAY);
}
int avgValue = sum / NUM_SAMPLES;
In Arduino IDE, the loop() is the part where the code runs indefinitely, so I've placed the code for the sensor’s reading here. Arduino UNO continuously reads the sensor’s data here, and the last line is responsible for getting the average value of the changes made by the user in the sensor’s data through the test pin.
float voltage = (float)avgValue * (5.0 / 1023.0);
float rawPH = (slope * voltage) + offset;
if (smoothedPH < 0) smoothedPH = 0;
if (smoothedPH > 14) smoothedPH = 14;
Here, the calculation and clamping occur. The first two lines finally provide the calculated values of the pH and voltage according to the user’s input, utilizing the variables defined before. In the last two lines, the if loop is used for smoothing the pH values according to the results.
If these two lines are not present in the code, the calculation may result in the pH values out of the real-time range (more than 14 or less than 0).
lcd.clear();
lcd.setCursor(0, 0);
lcd.print("pH: ");
lcd.print(smoothedPH, 2);
if (abs(rawPH - smoothedPH) < 0.1) {
lcd.print(" STABLE");
} else {
lcd.print(" BUSY");
}
lcd.setCursor(0, 1);
lcd.print("Volt:");
lcd.print(voltage, 3);
lcd.print("V");
Finally, the calculated results are displayed on the LCD. Before writing any new output, the Arduino first clears the LCD screen to avoid overlapping or leftover text from previous readings. The display then shows two pieces of information: the calculated pH value and the current status of the measurement.
The status helps the user know whether the readings are reliable:
If the voltage-to-pH conversion is steady and not fluctuating, the LCD displays the message "STABLE" along with the pH value.
If the readings are changing rapidly due to adjustments in the potentiometer (or noise in real sensors), the LCD shows "BUSY", indicating that the output is still fluctuating and the user should wait for it to settle.
This approach simulates how a real pH meter works, where readings often need a few moments to stabilize before being considered accurate. Additionally, the text messages (e.g., "STABLE", "BUSY", or even custom labels like "pH Value:") can easily be customized in the Arduino code to match project requirements.
Interfacing pH Sensor with Arduino | HEX File Connection
The final step before we get the output is to connect the Arduino IDE code with the Arduino microcontroller in Proteus simulation. When the user runs code in the Arduino IDE, a special kind of file is created in the system called the HEX file. Here is the procedure to create the connection between these software through that file.
Run the code in the Arduino IDE using the tick mark button present in the upper left corner.
Once the code runs successfully, you’ll see this kind of loading in the output console window:
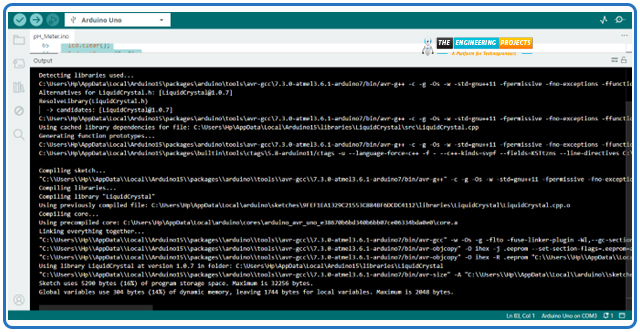
Search for the HEX file address in this data usually present in almost the last part of the screen. In my case, it is as follows:

Copy this path.
Go to the ready simulation of the project in Proteus.
Double-click the Arduino UNO microcontroller; it will open the “Edit component” window:
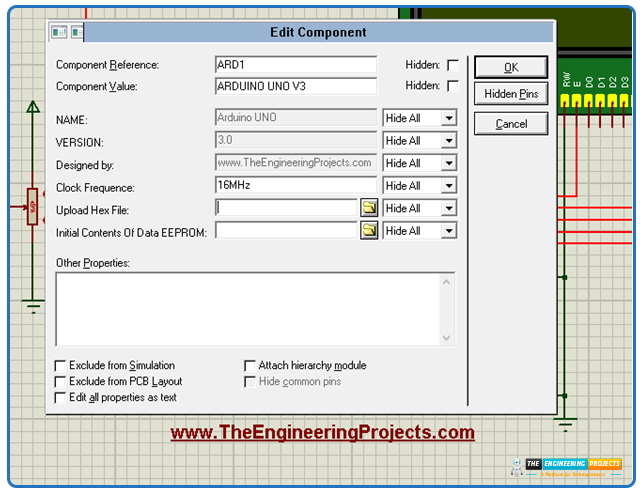
Paste the HEX file address (copied through the Arduino IDE) in the upload hex file section.
Click“Okay”.
Hit the play button present in the lower left corner of Proteus.
If all the steps are completed successfully, your project will show the output. Change the values of the potentiometer of the pH sensor to see the change in the voltage and pH values.
Note: In some cases, the Pprteus may show the error “AVR program property is not defined”; you have to double-click the pH sensor and provide the path of the HEX file of the pH sensor (downloaded with the pH sensor library).
Interfacing pH Sensor with Arduino | Testing the Project
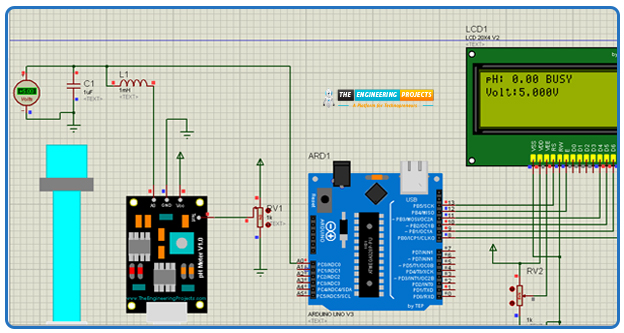
Once the circuit design is complete, we can test its performance in Proteus. By adjusting the potentiometer, the voltage at the pH meter’s test pin changes, and the Arduino converts this into a corresponding pH value displayed on the LCD. In this simulation setup, a higher voltage corresponds to a higher pH (more alkaline), while a lower voltage indicates a lower pH (more acidic).
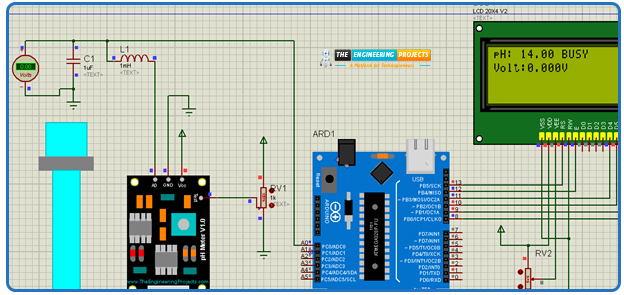
For example, when the potentiometer is set to 0% resistance, the voltage is at its maximum (close to 5V), which the code interprets as a strong alkaline condition (around pH 14). On the other hand, when the potentiometer is adjusted to increase resistance, the voltage drops, and the pH value shifts toward acidity (closer to pH 0).
This behavior mirrors the principle of real pH sensors, where the probe generates a voltage signal depending on the hydrogen ion concentration in the solution—lower voltages for acidic conditions and higher voltages for alkaline conditions.
Keeping the 50% potentiometer value, the liquid seems to be neutral with 7 pH value
Similarly, on 100% resistance through the potentiometer results in the maximum pH and the least voltage value.
Conclusion
In this project, we have interfaced the pH meter with Arduino UNO in Proteus, and the output is displayed on the LCD. Two software, Proteus and Arduino IDE, are used in this project, and the code is integrated into the Arduino microcontroller in the simulation through the HEX file attachment.
In the code, filtration, smoothing, and calibration techniques are applied for the smooth output. This is the base of the advanced projects like water quality monitoring, laboratory experiments, and industrial automation. I hope your project runs fine as mine, but if you have any issues related to the project, you can directly contact us.


 Arduino
 xeohacker
 0 Comments


