C# CheckBox Control


C# CheckBox Control
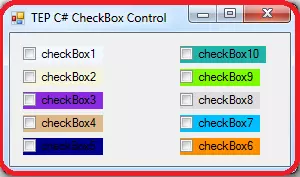
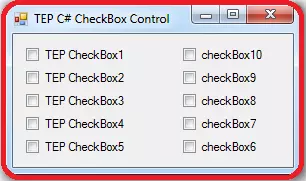
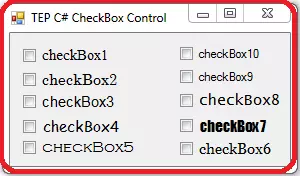
C# CheckBox is a simple checkbox along with the text which is the name of the checkbox. It will allow a user to make a multiple and specific selection. If the user will click first time on the checkbox then the small tick sign is marked on a checkbox. When user will click again on the checkbox it will get uncheck. Its mean user can select and deselect the checkbox. If you want to add the checkbox into your desktop application then you have to simply search for it from a toolbox, available in Visual Studio. Then drag the checkbox to your desktop application. Now you are able to use this checkbox. In the following image, you can observe that we have used 15 checkboxes. We just drag one instance of checkbox and replicate that to 14 Times.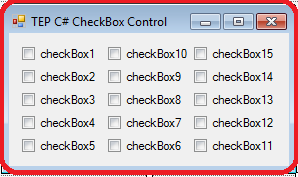
using System;
using System.Drawing;
using System.Windows.Forms;

namespace TEP
{
    public partial class Form1 : Form
    {
        public Form1()
        {
            InitializeComponent();
            checkBox1.Text = "TEP CheckBox1";
            checkBox2.Text = "TEP CheckBox2";
            checkBox3.Text = "TEP CheckBox3";
            checkBox4.Text = "TEP CheckBox4";
            checkBox5.Text = "TEP CheckBox5";
        }
    }
}
In the above code, you have observed that we have used text property right after initializecomponent() method. Because we are setting checkbox text dynamically and it will only happen when we will declare this code in the initialization phase of a desktop application. In the following image, you can observe the output of above code.
C# CheckBox Properties
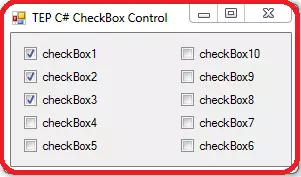
There are several propertie are available, which you can override. In this section, we will discuss all those properties which we can be used to customize C# CheckBox. Such as the Text Color, Text Size, Text Font family etc. The default tools are looks very simple and common. To increase the interactivity of the user we have to create attractive applications and forms. For this purpose, we have to override the default properties. Supposed that you are wanted, if the program is executed Checkbox is by default marked checked. Then we will use the Checked property to mark it true. In the following code, you can observe that we have used three checkboxes to marked them true.using System;
using System.Drawing;
using System.Windows.Forms;
namespace TEP
{
public partial class Form1 : Form
{
public Form1()
{
InitializeComponent();
checkBox1.Checked = true;
checkBox2.Checked = true;
checkBox3.Checked = true;
}
}
}
In the above code, we only marked check first three checkboxes. By this, you can mark check and uncheck the checkboxes by default. In the following image, you can observe the output of above code.
using System;
using System.Drawing;
using System.Windows.Forms;

namespace TEP
{
    public partial class Form1 : Form
    {
        public Form1()
        {
            InitializeComponent();
            checkBox1.BackColor = Color.AliceBlue;
            checkBox2.BackColor = Color.Beige;
            checkBox3.BackColor = Color.BlueViolet;

            checkBox4.BackColor = Color.BurlyWood;
            checkBox5.BackColor = Color.DarkBlue;
            checkBox6.BackColor = Color.DarkOrange;

            checkBox7.BackColor = Color.DeepSkyBlue;
            checkBox8.BackColor = Color.Gainsboro;
            checkBox9.BackColor = Color.LawnGreen;
            checkBox10.BackColor = Color.LightSeaGreen;
        }
    }
}
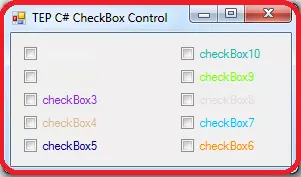
There are ten checkboxes in the above code, each checkbox has a unique color. Color combination is the major part of designing phase. The client basically focused on the front end of the desktop app that's why coloring matters a lot. In the following image, you can be observed that what right color mean to the eye and whats the wrong color means to an eye, its the output of above code.
using System;
using System.Drawing;
using System.Windows.Forms;

namespace TEP
{
    public partial class Form1 : Form
    {
        public Form1()
        {
            InitializeComponent();
            checkBox1.ForeColor = Color.AliceBlue;
            checkBox2.ForeColor = Color.Beige;
            checkBox3.ForeColor = Color.BlueViolet;

            checkBox4.ForeColor = Color.BurlyWood;
            checkBox5.ForeColor = Color.DarkBlue;
            checkBox6.ForeColor = Color.DarkOrange;

            checkBox7.ForeColor = Color.DeepSkyBlue;
            checkBox8.ForeColor = Color.Gainsboro;
            checkBox9.ForeColor = Color.LawnGreen;
            checkBox10.ForeColor = Color.LightSeaGreen;
        }
    }
}
In the above code, some colors are very light in shade and some are dark. We can't judge the color by their names. Because there are many colors to be used. If you want to select any color then you can to try all the color first. In the following image, you can observe the output of the above code. Some colors are the light that's why you can't clearly saw the output.
using System;
using System.Drawing;
using System.Windows.Forms;
namespace TEP
{
public partial class Form1 : Form
{
public Form1()
{
InitializeComponent();
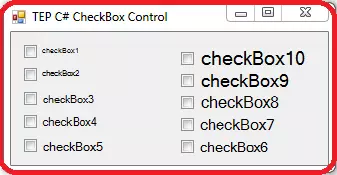
checkBox1.Font = new Font(Font.FontFamily, 5);
checkBox2.Font = new Font(Font.FontFamily, 6);
checkBox3.Font = new Font(Font.FontFamily, 7);
checkBox4.Font = new Font(Font.FontFamily, 8);
checkBox5.Font = new Font(Font.FontFamily, 9);
checkBox6.Font = new Font(Font.FontFamily, 10);
checkBox7.Font = new Font(Font.FontFamily, 11);
checkBox8.Font = new Font(Font.FontFamily, 12);
checkBox9.Font = new Font(Font.FontFamily, 13);
checkBox10.Font = new Font(Font.FontFamily, 14);
}
}
}
We have used Font.FontFamily as the prototype and integer value as the size of the font. You can also change the font family by using the font constructor. In the following image, you can observe the output of above code. You will also observe that as much integer value is small the size gets decreased and as much the value is incremented the size get increased.
using System;
using System.Drawing;
using System.Windows.Forms;

namespace TEP
{
    public partial class Form1 : Form
    {
        public Form1()
        {
            InitializeComponent();

            checkBox1.Font = new Font("Times New Roman", 11);
            checkBox2.Font = new Font("Century", 11);
            checkBox3.Font = new Font("Arial", 11);
            checkBox4.Font = new Font("Comic Sans MS", 11);
            checkBox5.Font = new Font("Copperplate Gothic Light", 11);
            checkBox6.Font = new Font("Georgia", 11);
            checkBox7.Font = new Font("Impact", 11);
            checkBox8.Font = new Font("Lucida Console", 11);
        }
    }
}
All the above font family names are the default fonts which are available in the windows. If you want to use the special kind of font then you have to install that first before use. You have also mentioned the size along with the font family name. In the following image, you can be observed the output of the above code, and what font effects on the desktop application.
using System;
using System.Drawing;
using System.Windows.Forms;

namespace TEP
{
    public partial class Form1 : Form
    {
        public Form1()
        {
            InitializeComponent();


        }

        private void button1_Click(object sender, EventArgs e)
        {
            if (checkBox1.Checked == true)
            {
                MessageBox.Show(checkBox1.Text);
            }
            if (checkBox2.Checked == true)
            {
                MessageBox.Show(checkBox2.Text);
            }
            if (checkBox3.Checked == true)
            {
                MessageBox.Show(checkBox3.Text);
            }
            if (checkBox4.Checked == true)
            {
                MessageBox.Show(checkBox4.Text);
            }
            if (checkBox5.Checked == true)
            {
                MessageBox.Show(checkBox5.Text);
            }
            if (checkBox6.Checked == true)
            {
                MessageBox.Show(checkBox6.Text);
            }
            if (checkBox7.Checked == true)
            {
                MessageBox.Show(checkBox7.Text);
            }
            if (checkBox8.Checked == true)
            {
                MessageBox.Show(checkBox8.Text);
            }
            if (checkBox9.Checked == true)
            {
                MessageBox.Show(checkBox9.Text);
            }
            if (checkBox10.Checked == true)
            {
                MessageBox.Show(checkBox10.Text);
            }
        }
    }
}
You can observe the output of the above code in the following image. In which we have to click the button after the selection of checkbox3 and it returns the message box with its name.

using System;
using System.Drawing;
using System.Windows.Forms;

namespace TEP
{
    public partial class Form1 : Form
    {
        public Form1()
        {
            InitializeComponent();
            checkBox1.Image = Image.FromFile("C:\\Users\\Jade\\Pictures\\brownImage.jpg");
        }
    }
}
C# CheckBox Event
C# provides many built-in functions which get executed on certain condition. Each condition is nominated as the event. Such as the TextChange Event. When user will change the text of any tool this event is getting executed. We can create a user define functions and assign them to event handlers. There are many events which we can use to enhance the interaction of C# CheckBox. Following are the basic C# CheckBox Events which we will use in a further section of this tutorial.- C# CheckBox BackColorChanged Event
- C# CheckBox CheckedChanged Event
- C# CheckBox Click Event
- C# CheckBox ForeColorChanged Event
- C# CheckBox MouseHover Event
- C# CheckBox MouseLeave Event
- C# CheckBox TextChanged Event
C# CheckBox BackColorChanged Event
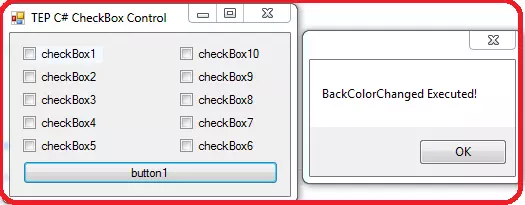
This event raised when someone changed the background color of Checkbox or change color by any sort of code. The main thing behind the execution of this event is changing the background color. If we create a program in which we first change the color of the background and used this event then it will get executed right after background color gets changed. In the following code, you can get the idea. We have used the button click event handler in which we declared the background color for C# CheckBox. Then we have declared the BackColorChanged Event for C# CheckBox. When user will click on the button, background color gets changed and BackColorChanged Event gets executed.using System;
using System.Drawing;
using System.Windows.Forms;
namespace TEP
{
public partial class Form1 : Form
{
public Form1()
{
InitializeComponent();
}
private void button1_Click(object sender, EventArgs e)
{
checkBox1.BackColor = Color.AliceBlue;
}
private void checkBox1_BackColorChanged(object sender, EventArgs e)
{
MessageBox.Show("BackColorChanged Executed!");
}
}
}
We have used AliceBlue color for the background. You can use other colors too, there are varieties of colors are available. In the following image, you can observe the output of above code. We have executed just message box when the color changed, you can perform any kind of functionality.
C# CheckBox CheckedChanged Event
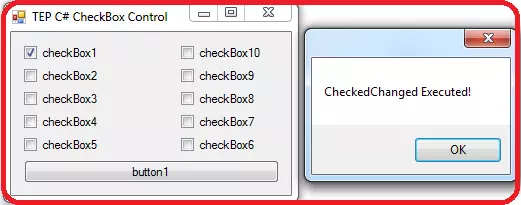
This event is get executed when user will be changed the selection. Supposed you have marked check any checkbox and if you uncheck that CheckedChanged event is get executed. Every time you change the selection it will get executed. In the following code, you can observe that we have used CheckedChanged Event just of the checkBox1. So if a user will change the selection of checkbox1 then only it's get executed.using System;
using System.Drawing;
using System.Windows.Forms;
namespace TEP
{
public partial class Form1 : Form
{
public Form1()
{
InitializeComponent();
}
private void checkBox1_CheckedChanged(object sender, EventArgs e)
{
MessageBox.Show("CheckedChanged Executed!");
}
}
}
You have to create a CheckedChange event for each of the C# CheckBox. We have just created for the first checkBox. In the following image, you can observe that we only mark checked the first checkbox and it returns the message popup.
C# CheckBox Click Event
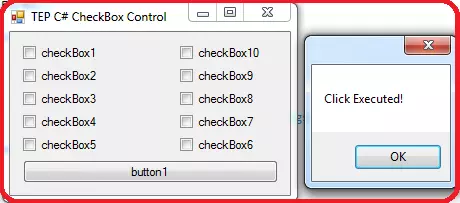
This event will be executed when user will click on the text or on the checkbox. Supposed that you are wanted to perform any functionality when user will click any specific checkbox then you will be used the Click Event. This event is mostly used with buttons. In the following code you can be observed that we have added this event with the first checkbox so when user will click on the text of the first checkbox or click on the checkbox it will get executed.using System;
using System.Drawing;
using System.Windows.Forms;
namespace TEP
{
public partial class Form1 : Form
{
public Form1()
{
InitializeComponent();
}
private void checkBox1_Click(object sender, EventArgs e)
{
MessageBox.Show("Click Executed!");
}
}
}
In the above code, we just declare click event for checkbox1 only, if you will copy paste it multiple times and rename as checkbox2 and checkbox3 then it would not work. Because you have also assigned the event to the event property which is on the right bottom of visual studio. In the following image, you can be observed the output after execution of the code.
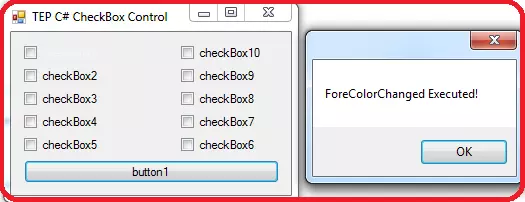
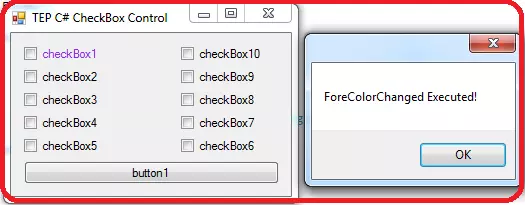
C# CheckBox ForeColorChanged Event
This event is executed when user will change the ForeColor or foreColor is get changed. Supposed if you have created the button click event and declare the foreColor for any specific C# Checkbox and used ForeColorChanged Event just for that specific CheckBox. Then we can execute this event properly. Because on the click of user ForeColor get changed and the ForeColorChanged event gets executed. In the following code, you have observed the above scenario.using System;
using System.Drawing;
using System.Windows.Forms;
namespace TEP
{
public partial class Form1 : Form
{
public Form1()
{
InitializeComponent();
}
private void button1_Click(object sender, EventArgs e)
{
checkBox1.ForeColor = Color.AliceBlue;
}
private void checkBox1_ForeColorChanged(object sender, EventArgs e)
{
MessageBox.Show("ForeColorChanged Executed!");
}
}
}
When user will click the button, ForeColor of first C# CheckBox is get changed from Black to AliceBlue. After color get changed ForeColorChanged event get executed the return the message popup. In the following image, you can be observed the output that C# CheckBox1 foreColor gets changed.
C# CheckBox MouseHover Event
This event is executed when user will hover the mouse on C# CheckBox. Supposed you are wanted to perform any kind of functionality when user will hover the mouse on CheckBox then you have to use the CheckBox MouseHover event. In the following code, we have used ForeColor to be changed when user will hover the mouse on CheckBox.using System;
using System.Drawing;
using System.Windows.Forms;
namespace TEP
{
public partial class Form1 : Form
{
public Form1()
{
InitializeComponent();
}
private void checkBox1_MouseHover(object sender, EventArgs e)
{
checkBox1.ForeColor = Color.BlueViolet;
MessageBox.Show("ForeColorChanged Executed!");
}
}
}
This is a quite good example to demonstrate the MouseHover event. When user will hover the mouse cursor on the CheckBox1 then ForeColor is get changed into Blue Violet. In the following image, you can get the main idea how it looks after the execution.
C# CheckBox MouseLeave Event
This event is executed when user will hover the mouse and then left the mouse cursor from the boundaries of CheckBox. In short, this event is the inverse of MouseHover event. Now we are going to create animation via MouseLeave and MouseHover event. We will declare the BlueVoilet color for the font when user will hover the mouse and Black color for the font when user will leave the checkBox. Let's have a look at the code and observe its flow of execution.using System;
using System.Drawing;
using System.Windows.Forms;
namespace strnull
{
public partial class Form1 : Form
{
public Form1()
{
InitializeComponent();
}
private void checkBox1_MouseHover(object sender, EventArgs e)
{
checkBox1.ForeColor = Color.BlueViolet;
}
private void checkBox1_MouseLeave(object sender, EventArgs e)
{
checkBox1.ForeColor = Color.Black;
}
}
}
If you want to execute the above code, then you have to drag one checkbox on your windows form. Then add mouse leave and mouse hover event. Copy the above code and inserted into your compiler and executed. When you will hover the mouse on the checkbox1 its font color gets changed and when leaving the checkbox then fore color get to default.
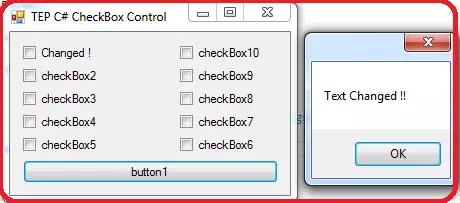
C# CheckBox TextChanged Event
This event is get executed when Text of checkbox is get changed. You can change the text simply write a code. Its depend on your logic and condition of the program. We simply going to change the text when user will click the button. We have used the simple message box to show the prompt that TextChanged event is get executed. In the following code, you can be observed the above scenario.using System;
using System.Drawing;
using System.Windows.Forms;
namespace TEP
{
public partial class Form1 : Form
{
public Form1()
{
InitializeComponent();
}
private void button1_Click(object sender, EventArgs e)
{
checkBox1.Text = "Changed !";
}
private void checkBox1_TextChanged(object sender, EventArgs e)
{
MessageBox.Show("Text Changed !!");
}
}
}
For each checkbox, you have to declare the separate TextChanged event handler. In the above code, we declared it just for the checkbox1. So when the default text of checkbox1 is get changed, TextChanged event get raised. In the following image, you can be observed the output.
×
![]()