C# TextBox Control


C# TextBox is used to get input from users or it can also be used to display some values to the user. The textbox is a container for text blocks, you can take inputs or show the text as you required in the form of paragraphs. If you used TextBox as the input field then you can only take one line of text as the input but if you want multiple line input then you have to activate the multiple line property of C# TextBox.
You can also change your input field as the password field if you are using the TextBox for password. A user can write input in the textbox and the even user can simply paste the data too in the field. You can also add some advance features like grabbing the copied data automatically when user hover the mouse on the input field, it will be done by accessing the clipboard where the copied data is saved temporarily, but this is the advance feature which we will cover after the basics. So, now let me show you how to use C# TextBox:
C# TextBox Control
- First of all, you have to drag the TextBox from the toolbox and adjust it on your application form as you wanted.
- The Default Name of textbox is 'textbox1' which you can change from the right panel under the property tab.
- You can also change the Text Property inside of the textbox from the property panel, but if you want to change the text runtime or dynamically then you have to code like below.
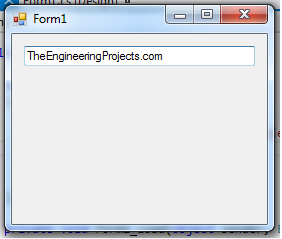
textBox1.Text = "TheEngineeringProjects.com";
- In the above code, it's clearly mentioned that I have declared the Text property as "TheEngineeringProjects.com".
- Now when you will execute the code, a textbox will appear with the text automatically, as shown in below figure:
- You can also give the value of the textbox with the help of variables, like store the string in any variable and then passed to the textbox. Code is given below:
string var = "TheEngineeringProjects.com";
textBox1.Text = var;
- Till now we have seen How to input value into textbox, now we are gonna have a look at how to extract value from textbox.
- If you want to extract the value from textbox then you have to use below code:
string var;
var = textBox1.Text;
- By using the above code, you can easily store the value of textbox into any variable and make it reusable for the whole application.
- You can set the textbox properties with the help of property panel too.
- If you want to modify the textbox from property panel then the shortcut for that is F4.
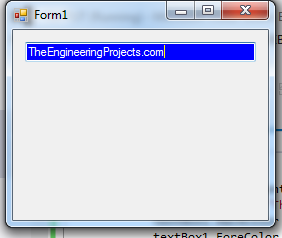
- If you want to change the textbox height and width dynamically then you have to use the below code.
- One more thing, you can also change its dimensions from the designer tab by just dragging the coordinates of textbox.
textBox1.Width = 250;
textBox1.Height = 50;
- If you want to change the background color, then below code will help you out:
textBox1.BackColor = Color.Blue;
- If you want to change the foreground color, then here's the code for it:
textBox1.ForeColor = Color.White;
- Now when you apply these codes then you will get something as shown in below figure:
- Now let's have a look at few of its Border styles.
- There are three types of the border which you can apply.
- FixedSingle.
- Fixed3d.
- None.
- If you want to change the border style for textbox then you have to use below codes:
textBox1.BorderStyle = BorderStyle.Fixed3D;
textBox1.BorderStyle = BorderStyle.FixedSingle;
textBox1.BorderStyle = BorderStyle.None;
- Till now we have seen different Properties of C# TextBox, now let's check out few of the events associated with it.
- Few of these events are keydown or keypress events.
- In the below code, I have captured the keystroke from the user and after that I have placed a check for the ENTER keystroke.
- So, whenever you press ENTER in C# TextBox then a Message Box will open up showing "You Pressed Enter".
private void textBox1_keydown(object sender, KeyEventArgs e)
{
   if(e.KeyCode == Keys.Enter)
   {
      MessageBox.Show("You Pressed Enter");
   }
}
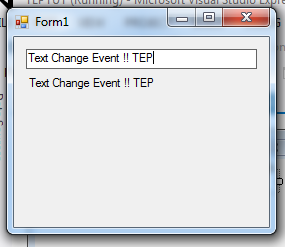
- You can also add some advanced features too like text change event which will occur when user will change the default text.
private void textBox1_TextChanged(object sender, EventArgs e)
{
      label1.Text = textBox1.Text;
}
- If you want to set the maximum length of the text inside textbox then you can also handle this with max length property like below code.
textBox1.MaxLength = 40;
- Sometimes you have to fix the textbox so that user can't add the value, in short, to make the textbox disable from the input. For this, you have to activate the ReadOnly property as true.
textBox1.ReadOnly = true;
- In the beginning, I have declared that you can make your text box as the multiline textbox for that you have to activate the multiline property as the following code do.
textBox1.Multiline = true;
- If you want your textbox as the password type input field then you have to make the characters as the password using below code.
textBox1.PasswordChar = '*';
- If you want to make your textbox like whenever the user enters any data it will start from the newline then there are two ways to do it, I'm sharing both the codes:
//First Method
textBox1.Text += "your text" + "\r\n";

//Second Method
textBox1.Text += "your text" + Environment.NewLine;
- Sometimes we use textbox only for integer values, but when the user adds an integer value in the textbox it will consider as the string by default, so we have to convert that into the integer. It's the major concept for which beginners are searching. Here in the below code, you will get the basic idea how to retrieve the integer value from the textbox input.
int i;
i = int.Parse (textBox1.Text);
- First, we have taken an integral type variable and then parsed the textbox value through integer. Now, we will parse the textbox with float and double using below code:
//String to Float conversion

		float  i;
		i = float.Parse (textBox1.Text);
//String to Double conversion

		double   i;
		i = float.Parse (textBox1.Text);
- Here we have done with our C# TextBox Control, and elaborate almost every property which we need in daily software development routine.
- If you practice these properties than you will become able to create your own small calculators and inventory systems.
- For just conclusion, I'm going to recap all the properties in one chunk of code given below:
using System;
using System.Drawing;
using System.Windows.Forms;

namespace WindowsFormsApplication1
{
    public partial class Form1 : Form
    {
        public Form1()
        {
            InitializeComponent();
        }

        private void Form1_Load(object sender, EventArgs e)
        {
            textBox1.Width = 250;
            textBox1.Height = 50;
            textBox1.Multiline = true;
            textBox1.BackColor = Color.Blue;
            textBox1.ForeColor = Color.White;
            textBox1.BorderStyle = BorderStyle.Fixed3D;
        }

        private void button1_Click(object sender, EventArgs e)
        {
            string var;
            var = textBox1.Text;
            MessageBox.Show(var);
        }
    }
}
- You need to drag the textbox and button on your form and then copy the code.
- When you will execute this code, it will demand any input from you and when you will enter and press the button it will show you the popup message box in which the input text appears.
- Here's the video which will help you better in understanding C# TextBox control: