


C# RadioButton Control


C# RadioButton Control
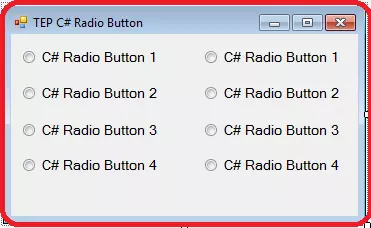
C# RadioButton has its own importance in desktop applications. Mostly point of sale applications used a Radio button to retrieve the specific input values. Such as the payment method is cash or credit. C# RadioButton enables the user to checked just one option at the same time and other options remain unchecked or unselected. If you are wanted to add C# RadioButton in your desktop application then you have to use the ToolBox in the design tab. Just search for the RadioButton and drag it to your application. In the following image, you can be observed that we have added the 8 RadioButtons and only one is selected. Because you can't select more than one RadioButton at the same time.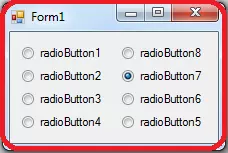
using System;
using System.Drawing;
using System.Windows.Forms;

namespace TEP
{
    public partial class Form1 : Form
    {
        public Form1()
        {
            InitializeComponent();
            radioButton5.Text = "TEP Code RB5";
            radioButton6.Text = "TEP Code RB6";
            radioButton7.Text = "TEP Code RB7";
            radioButton8.Text = "TEP Code RB8";
        }
    }
}
It depends on your ease, you can use the both method to set the name of radio buttons. For your better understanding, we have attached the screenshot of output along with the code.

C# RadioButton Properties
If you are wanted to override the default properties of C# RadioButton. Then you have to know about all properties, such as you can change the color of radio button text, changed the size of text, a color of background and foreground etc. Supposed that you are wanted to change the state of RadioButton, by default every radio button is unchecked, you can be checked any radio button during the execution of a desktop application. In the following code, we have used the Checked property and make that true.using System;
using System.Drawing;
using System.Windows.Forms;
namespace TEP
{
public partial class Form1 : Form
{
public Form1()
{
InitializeComponent();
radioButton1.Checked = true;
}
}
}
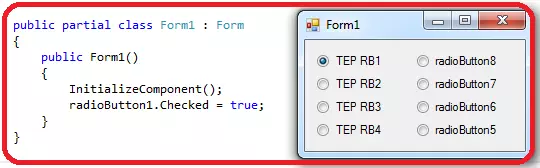
If you will add more radio buttons checked true then the only last radio button will be checked. Because you can only be checked one radio button at the same time. In the following image, you can preview that only radio button1 is checked.
using System;
using System.Drawing;
using System.Windows.Forms;

namespace strnull
{
    public partial class Form1 : Form
    {
        public Form1()
        {
            InitializeComponent();
            radioButton1.BackColor = Color.AliceBlue;
            radioButton2.BackColor = Color.AntiqueWhite;
            radioButton3.BackColor = Color.Aqua;
            radioButton4.BackColor = Color.Aquamarine;
            radioButton5.BackColor = Color.Azure;
            radioButton6.BackColor = Color.Beige;
            radioButton7.BackColor = Color.Bisque;
            radioButton8.BackColor = Color.BlueViolet;
        }
    }
}
You must have to use the Color object to set any color. For the better understanding, we have taken the screenshot of output along with the code which is overriding the color properties.

using System;
using System.Drawing;
using System.Windows.Forms;

namespace TEP
{
    public partial class Form1 : Form
    {
        public Form1()
        {
            InitializeComponent();
            radioButton1.ForeColor = Color.YellowGreen;
            radioButton2.ForeColor = Color.Tomato;
            radioButton3.ForeColor = Color.Violet;
            radioButton4.ForeColor = Color.Turquoise;
            radioButton5.ForeColor = Color.SteelBlue;
            radioButton6.ForeColor = Color.Sienna;
            radioButton7.ForeColor = Color.SeaGreen;
            radioButton8.ForeColor = Color.BlueViolet;
        }
    }
}
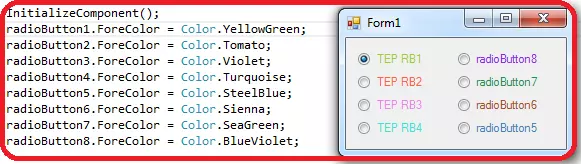
We used the Color object to set the color. In the following image, you can observe that how the color changes the appearance and interface. By using the color schemes you can make eye attractive windows form and make easier for the user to identified usable features of your app.
using System;
using System.Drawing;
using System.Windows.Forms;

namespace TEP
{
    public partial class Form1 : Form
    {
        public Form1()
        {
            InitializeComponent();
            radioButton1.Font = new Font(Font.FontFamily,10);
            radioButton2.Font = new Font(Font.FontFamily, 11);
            radioButton3.Font = new Font(Font.FontFamily, 12);
            radioButton4.Font = new Font(Font.FontFamily, 13);
            radioButton5.Font = new Font(Font.FontFamily, 12);
            radioButton6.Font = new Font(Font.FontFamily, 11);
            radioButton7.Font = new Font(Font.FontFamily, 10);
            radioButton8.Font = new Font(Font.FontFamily, 9);
        }
    }
}
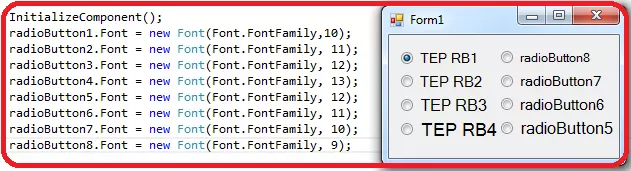
In the above code, we have used a different size for each RadioButton. The first four RadioButton size is increased and other four RadioButton size get a decrease. In the following image, you can observe the size of radio buttons.
using System;
using System.Drawing;
using System.Windows.Forms;

namespace TEP
{
    public partial class Form1 : Form
    {
        public Form1()
        {
            InitializeComponent();
            radioButton1.Font = new Font("Times New Roman", 11);
            radioButton2.Font = new Font("Century", 11);
            radioButton3.Font = new Font("Arial", 11);
            radioButton4.Font = new Font("Comic Sans MS", 11);
            radioButton5.Font = new Font("Copperplate Gothic Light", 11);
            radioButton6.Font = new Font("Georgia", 11);
            radioButton7.Font = new Font("Impact", 11);
            radioButton8.Font = new Font("Lucida Console", 11);

        }
    }
}
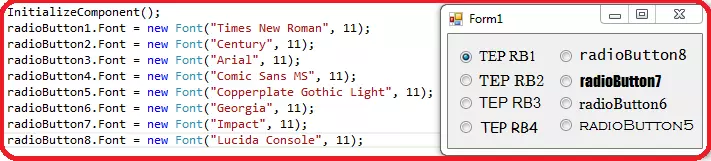
All the above-used fonts are the default font which is available in Windows. If you don't know which font you have to used then used Google Font. It will help you to select the best font for your desktop application. In the following image, you can observe how font changes the appearance of your desktop application.
using System;
using System.Drawing;
using System.Windows.Forms;

namespace TEP
{
    public partial class Form1 : Form
    {
        public Form1()
        {
            InitializeComponent();
        }
        private void button1_Click(object sender, EventArgs e)
        {
            if (radioButton1.Checked == true)
            {
                MessageBox.Show(radioButton1.Text);
            }
            else
            if (radioButton2.Checked == true)
            {
                MessageBox.Show(radioButton2.Text);
            }
            else
            if (radioButton3.Checked == true)
            {
                MessageBox.Show(radioButton3.Text);
            }
            else
            if (radioButton4.Checked == true)
            {
                MessageBox.Show(radioButton4.Text);
            }
            else
            if (radioButton5.Checked == true)
            {
                MessageBox.Show(radioButton5.Text);
            }
            else
            if (radioButton6.Checked == true)
            {
                MessageBox.Show(radioButton6.Text);
            }
            else
            if (radioButton7.Checked == true)
            {
                MessageBox.Show(radioButton7.Text);
            }
            else
            if (radioButton8.Checked == true)
            {
                MessageBox.Show(radioButton8.Text);
            }
        }
    }
}
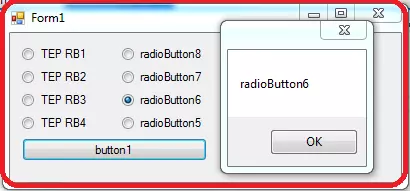
If you want to try the above code in your own compiler, then you have to add button click event first then you can execute the above code. It will allow you to select an option, and when you press the button it will generate the popup message and return the value of selected radio button. In the following image, you can observe the output of the above code.
using System;
using System.Drawing;
using System.Windows.Forms;

namespace TEP
{
    public partial class Form1 : Form
    {
        public Form1()
        {
            InitializeComponent();
            radioButton1.Image = Image.FromFile("C:\\Users\\Jade\\Pictures\\brownImage.jpg");
        }
    }
}
C# RadioButton Event
C# allows us to enhance the functionalities according to our requirements. Every desktop application has their own needs and uniqueness. If you want to perform any specific function on the certain time or on the certain action, then we used the C# Events. C# Events are simple as the other common functions, which are provided by the visual studio. You can use any user define a function and set it as the event handler. It depends on the developer ease. Mostly developer used the builtin events. There are several C# Events which are common among all the C# Tools. Some Events are specific to C# Tools, mean you can't use all the events for all the tools. Following are the C# Events which we will be used with RadioButton to enhance the interaction of the end-user.- C# RadioButton BackColorChanged Event
- C# RadioButton CheckedChanged Event
- C# RadioButton Click Event
- C# RadioButton ForeColorChanged Event
- C# RadioButton MouseHover Event
- C# RadioButton MouseLeave Event
- C# RadioButton TextChanged Event
C# RadioButton BackColorChanged Event
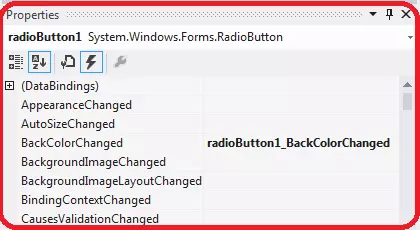
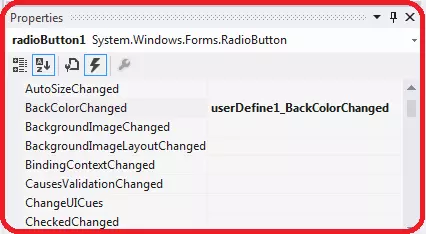
This event will occur only when the background color of a radio button is changed. Supposed we want to show a message or perform any functionality when background color of radio button changed, then we will use BackColorChanged Event. There is two method by which we can set this event for RadioButton. The first method is to activate this event from the property section of radio button via events. The second method is to create a user-defined function and set as the BackColorChanged Event in the event properties. In the following image, you can compare the both method.| First Method | Second Method |
|---|---|
|
|

|

|
using System;
using System.Drawing;
using System.Windows.Forms;
namespace strnull
{
public partial class Form1 : Form
{
public Form1()
{
InitializeComponent();
}
private void button1_Click(object sender, EventArgs e)
{
radioButton1.BackColor = Color.AliceBlue;
}
private void radioButton1_BackColorChanged(object sender, EventArgs e)
{
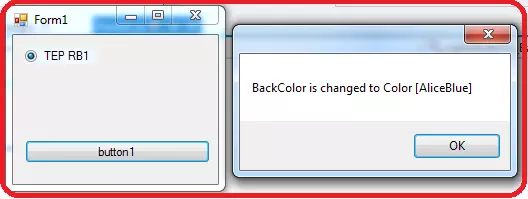
MessageBox.Show("BackColor is changed to " + radioButton1.BackColor.ToString());
}
}
}
In the above code, when the background color of the radio button is changed. Message prompt with the name of color which is set as the background. In the following image, you can observe the output of the above code.
C# RadioButton CheckedChanged Event
This event will occur and executed when user will change the option, such as user have select A first and then select the B then this event will be executed. In the following code, we are going to demonstrate the above scenario.using System;
using System.Drawing;
using System.Windows.Forms;
namespace TEP
{
public partial class Form1 : Form
{
public Form1()
{
InitializeComponent();
}
private void radioButton1_CheckedChanged(object sender, EventArgs e)
{
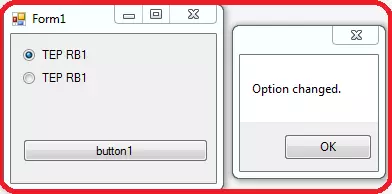
MessageBox.Show("Option changed.");
}
}
}
In the above code, we have used two radio button. Whenever you will change the radio buttons value or option CheckedChanged event gets executed. In the below image you can observe the output
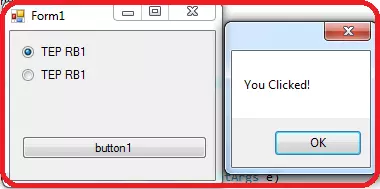
C# RadioButton Click Event
This event will occur when user will click on the radio button, whatever user will click to check the option or just click in the text of radio button. Supposed that you have required performing any kind of functionality when user will click on the radio button or the text of radio button then you can used Click event which will fulfill your requirement for this scenario. In the following code, we have demonstrated the above scenario.using System;
using System.Drawing;
using System.Windows.Forms;
namespace TEP
{
public partial class Form1 : Form
{
public Form1()
{
InitializeComponent();
}
private void radioButton1_Click(object sender, EventArgs e)
{
MessageBox.Show("You Clicked!");
}
}
}
In the above code, we have used two radio buttons and just added the click event to the first radio button. If you will click the radio button1 then you will observe the popup message but if you clicked in the radio button2 then nothing will happen except that radio button2 get selected. It's because we have added the Click event just for the radio button1. In the following image, you can observe the output of above code.
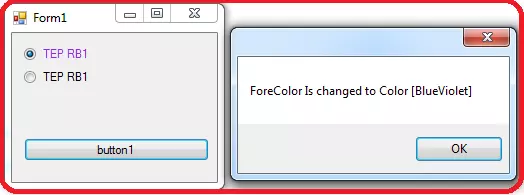
C# RadioButton ForeColorChanged Event
This event gets executed when user will change the font color or fore color of the radio button. Supposed that you have created a button and set fore color changed the code in button click function. So that when user will click the button, fore color get changed and after this ForeColorChanged event performed on the changing of the fore color. In the following code, you can observe the above scenario.using System;
using System.Drawing;
using System.Windows.Forms;
namespace TEP
{
public partial class Form1 : Form
{
public Form1()
{
InitializeComponent();
}
private void button1_Click(object sender, EventArgs e)
{
radioButton1.ForeColor = Color.BlueViolet;
}
private void radioButton1_ForeColorChanged(object sender, EventArgs e)
{
MessageBox.Show("ForeColor Is changed to " + radioButton1.ForeColor.ToString());
}
}
}
In the above code, we have set the ForeColor ti BlueViolet when user will click the button. Then ForeColorChanged Event executed and prompt the message which color is selected as the ForeColor. In the following image, you can observe the output of the above code.
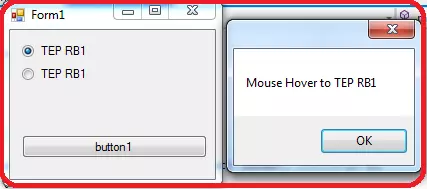
C# RadioButton MouseHover Event
This event is executed whenever the user hovers the cursor of the mouse on the radio button. If you will hover the mouse on radio button text then its also executed because that's also included in the boundaries of a radio button. In the following code, we are going to demonstrate the above scenario.using System;
using System.Drawing;
using System.Windows.Forms;
namespace TEP
{
public partial class Form1 : Form
{
public Form1()
{
InitializeComponent();
}
private void radioButton1_MouseHover(object sender, EventArgs e)
{
MessageBox.Show("Mouse Hover to " + radioButton1.Text.ToString());
}
}
}
In the above code, we have set the prompt message when user will hover the first radio button. You can declare any kind of functionality which you want to perform. In the following Image, you can be observed the output.
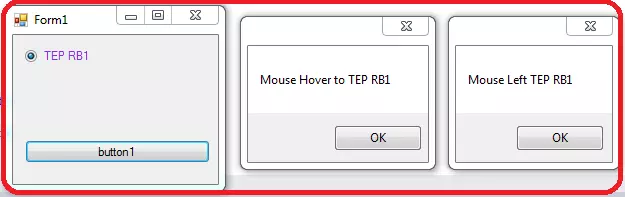
C# RadioButton MouseLeave Event
This event occurs when mouse cursor will leave the boundaries of the radio button, it's opposite to the mouseHover event. We are going to demonstrate this scenario in the following code along with the MouseHover Event. So that we can be observed both events at once.using System;
using System.Drawing;
using System.Windows.Forms;
namespace strnull
{
public partial class Form1 : Form
{
public Form1()
{
InitializeComponent();
}
private void radioButton1_MouseHover(object sender, EventArgs e)
{
MessageBox.Show("Mouse Hover to " + radioButton1.Text.ToString());
}
private void radioButton1_MouseLeave(object sender, EventArgs e)
{
MessageBox.Show("Mouse Left " + radioButton1.Text.ToString());
}
}
}
In the above code, you cab observed the MouseHover and MouseLeave both events. When user will hover the mouse a prompt message show that user is hover mouse cursor on radiobutton1 and when a user left the radiobutton1 boundaries its show prompt message again. In the below image you can observe the output of above code.
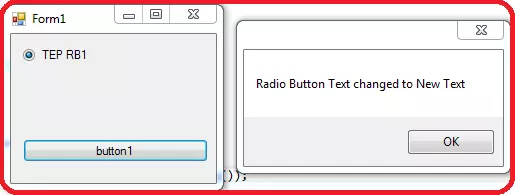
C# RadioButton TextChanged Event
This event will execute when user will change the text. To perform its functionality we have to create a button click event in which we declared to change the radio button text. When user will click the button, a text of radio button is get changed and cause of change text, TextChanged Event get executed. In the following code, we have demonstrated the above scenario. We used the simple message box to pop the message when TextChanged Event gets executed.using System;
using System.Drawing;
using System.Windows.Forms;
namespace TEP
{
public partial class Form1 : Form
{
public Form1()
{
InitializeComponent();
}
private void button1_Click(object sender, EventArgs e)
{
radioButton1.Text = "New Text";
}
private void radioButton1_TextChanged(object sender, EventArgs e)
{
MessageBox.Show("Radio Button Text changed to " + radioButton1.Text.ToString());
}
}
}
You can observe in the above code, there are two events. The button click event changed the text of radio button and TextChanged event get executed when text gets changed. In the following image, you can be observed the output. You also observed that when button event is executed radio button text doesn't change but the value is set to new text. After the execute of textChanged Event, it's get changed. It's because all the events have same priority or execution, so first events get executed then their effects applied.
×
![]()


