C# ProgressBar Control


C# ProgressBar Control
A progress bar is used to show the progress of any process which takes a long time compared to normal processes. Mostly you have viewed these kinds of progress bar during the installation of software. C# ProgressBar has three parameters, Maximum, Minimum and the value. Maximum represents the max progress or upper range of progress and minimum represent the min progress or lower value or range, where the value is the current point of a progress bar. By default in C# ProgressBar, the value of minimum is set to zero and maximum is 100. Progress bar filled from left to right as the universal standard. You can easily drag and drop the C# ProgressBar from the GUI toolbox to your desktop application. By default, the first instance of C# ProgressBar named as the ProgressBar1. If you are wanted to preview the outcome of progress bar then you can simply set the value in the initialize phase, as you can observe in the following code we have used four progress bar with different values.using System;
using System.Collections.Generic;
using System.ComponentModel;
using System.Data;
using System.Drawing;
using System.Linq;
using System.Text;
using System.Threading.Tasks;
using System.Windows.Forms;
namespace TEPArticle
{
public partial class Form1 : Form
{
public Form1()
{
InitializeComponent();
progressBar1.Value = 25;
progressBar2.Value = 50;
progressBar3.Value = 75;
progressBar4.Value = 100;
}
}
}
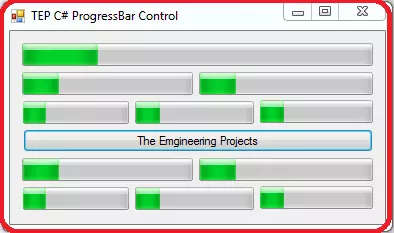
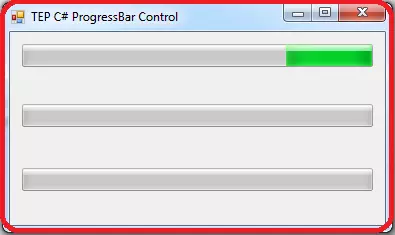
You can observe that we have used four progress bars which have values as 25, 50, 75 and 100. As you know the default value of the minimum range is zero and max range is 100 that's why we have used above values to demonstrate the states of the progress bar. In the following image, you can be observed the output of above code with progress bar states.
using System;
using System.Collections.Generic;
using System.ComponentModel;
using System.Data;
using System.Drawing;
using System.Linq;
using System.Text;
using System.Threading.Tasks;
using System.Windows.Forms;
namespace TEPArticle
{
public partial class Form1 : Form
{
public Form1()
{
InitializeComponent();
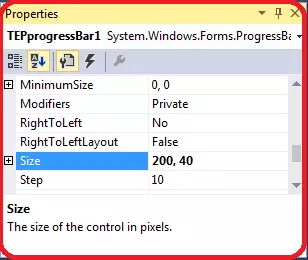
TEPprogressBar1.Value = 25;
TEPprogressBar1.Size = new Size(100,23);
}
}
}
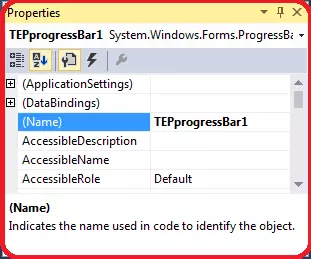
If you are looking to change the ProgressBar style then you can change that from the properties tab. There are three styles for the ProgressBar, by default its set to block and others are Continuous and Marquee. Even that you can set the ProgressBar styles from the following code.
using System;
using System.Collections.Generic;
using System.ComponentModel;
using System.Data;
using System.Drawing;
using System.Linq;
using System.Text;
using System.Threading.Tasks;
using System.Windows.Forms;

namespace TEPArticle
{
    public partial class Form1 : Form
    {
        public Form1()
        {
            InitializeComponent();

            TEPprogressBar1.Style = ProgressBarStyle.Blocks;
            TEPprogressBar2.Style = ProgressBarStyle.Continuous;
            TEPprogressBar3.Style = ProgressBarStyle.Marquee;

            TEPprogressBar1.Value = 25;
            TEPprogressBar2.Value = 50;
            TEPprogressBar3.Value = 75;

        }
    }
}
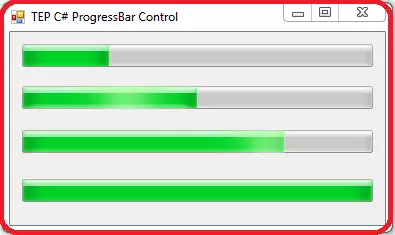
We have used three progress bars, before copy, the above code inserts the three progress bar in your desktop application. Then you can be used the above code but replaced the TEPprogressBar1,2,3 with the instance names which are using for your ProgressBars.
If you are wanted to make Right to left moving progress bar then you have to activate two properties for this. First, you have to make RightToLeftLayout true and then you have set RightToLeft.Yes as the value of a RightToLeft property of relative progress bar. From the following code, you can get the idea.
using System;
using System.Collections.Generic;
using System.ComponentModel;
using System.Data;
using System.Drawing;
using System.Linq;
using System.Text;
using System.Threading.Tasks;
using System.Windows.Forms;

namespace TEPArticle
{
    public partial class Form1 : Form
    {
        public Form1()
        {
            InitializeComponent();

            TEPprogressBar1.Style = ProgressBarStyle.Blocks;
            TEPprogressBar1.RightToLeftLayout = true;
            TEPprogressBar1.RightToLeft = RightToLeft.Yes;

            TEPprogressBar1.Value = 25;


        }
    }
}
Now you can observe the above code, we have activated two properties which are compulsory to change the progress bar flow. We have also attached the Image below which is the exact output of the above code.
C# ProgressBar Event Handlers
After learning the basics, its time to move to advanced level to play with a progress bar. In C# there are several built-in functions which are known as the event handler because they only execute on specific situations. Such as you are wanted to perform any task whenever the user will click on the progress bar. Then you will use a relative event handler to tackle this situation. There are several event handlers which you can use with ProgressBar. In the following section of the article, we are going to explore each event handler to demonstrate their purpose of use.- C# ProgressBar Click Event Handler
- C# ProgressBar MouseEnter Event Handler
- C# ProgressBar MouseHover Event Handler
- C# ProgressBar MouseLeave Event Handler
- C# ProgressBar Resize Event Handler
C# ProgressBar Click Event Handler
This event is designed to perform functionality whenever the user will once click on the progress bar. As much time the user will click on the progress bar that much times function is executed which is declared within the braces of click event handler. Most developers used to execute the notifications and the messages on click event handler, like the warnings. First, you have to activate the click event handler for relative progress bar then you can add your functionalities with that like in the below code.using System;
using System.Collections.Generic;
using System.ComponentModel;
using System.Data;
using System.Drawing;
using System.Linq;
using System.Text;
using System.Threading.Tasks;
using System.Windows.Forms;
namespace TEPArticle
{
public partial class Form1 : Form
{
public Form1()
{
InitializeComponent();
}
private void TEPprogressBar1_Click(object sender, EventArgs e)
{
MessageBox.Show("You have clicked on the TEP ProgressBar");
}
}
}
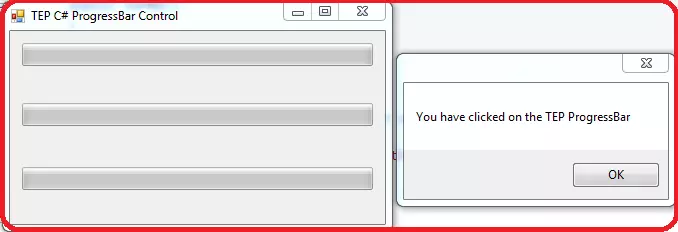
In the above code, you can observe we have used the message box as the functionality which will be performed on the single click. You can declare any kind of functionality like change the color, size and value of progress bar. In the following image, there is the exact output of above code.
C# ProgressBar MouseEnter Event Handler
This event handler is used to execute any functionality when the mouse cursor enters in the boundaries of the progress bar. The visible part of the progress bar is considered as the boundaries. When you slightly enter the cursor within the visible part this event handler will get executed. You can experiment this situation by the following a code.using System;
using System.Collections.Generic;
using System.ComponentModel;
using System.Data;
using System.Drawing;
using System.Linq;
using System.Text;
using System.Threading.Tasks;
using System.Windows.Forms;
namespace TEPArticle
{
public partial class Form1 : Form
{
public Form1()
{
InitializeComponent();
}
private void TEPprogressBar1_MouseEnter(object sender, EventArgs e)
{
MessageBox.Show("MouseEnter in the TEP ProgressBar");
}
}
}
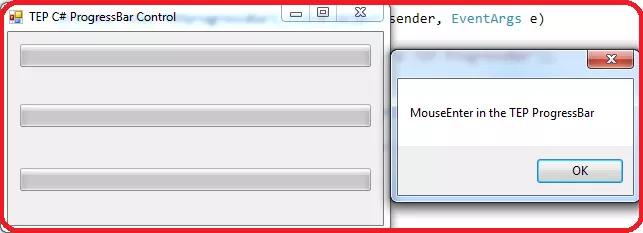
In the above code, you can be observed that we have used message box as the functionality within MouseEnter Event handler. So that whenever user will enter the mouse cursor within the visible part of progress bar message will get executed. Below is the exact output of the above code is attached.
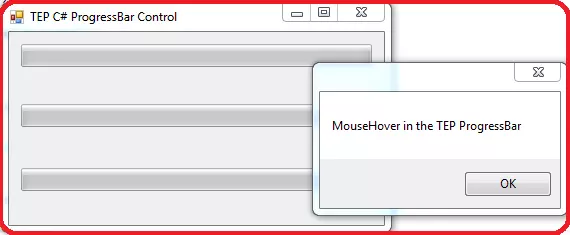
C# ProgressBar MouseHover Event Handler
This event is designed to perform an action whenever the user will hover the mouse in the visible part, hovers mean to stay for a moment during movement over visible part. Until you will moving the mouse over progress bar it will not execute, you must have to stay for a while over progress bar to activate this event handler. In the following code, we have created the proper code for above scenario.using System;
using System.Collections.Generic;
using System.ComponentModel;
using System.Data;
using System.Drawing;
using System.Linq;
using System.Text;
using System.Threading.Tasks;
using System.Windows.Forms;
namespace TEPArticle
{
public partial class Form1 : Form
{
public Form1()
{
InitializeComponent();
}
private void TEPprogressBar1_MouseHover(object sender, EventArgs e)
{
MessageBox.Show("MouseHover in the TEP ProgressBar");
}
}
}
You can observe that we have used the message box as the functionality. When the MouseHover event occurs message box prompt and shows a message which is defined by the MouseHover event handler. We have also attached the output of above code which you can preview below.
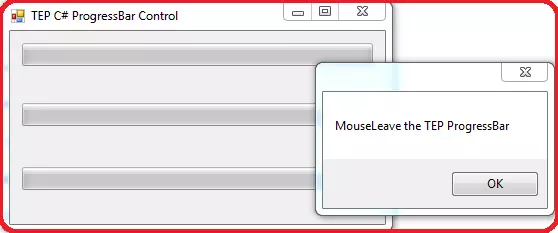
C# ProgressBar MouseLeave Event Handler
This event is designed to perform functionality whenever the mouse cursor will leave the visible boundaries of ProgressBar. In short, we can be said it is the reciprocal or inverse of MouseEnter event handler. Now we are going to create the code with MouseLeave event handler. After the activation of this event handler, you have to write functionality which you want to perform within MouseLeave event handler. From the following code, you can be observed the sequence of a program which we are going to execute.using System;
using System.Collections.Generic;
using System.ComponentModel;
using System.Data;
using System.Drawing;
using System.Linq;
using System.Text;
using System.Threading.Tasks;
using System.Windows.Forms;
namespace TEPArticle
{
public partial class Form1 : Form
{
public Form1()
{
InitializeComponent();
}
private void TEPprogressBar1_MouseLeave(object sender, EventArgs e)
{
MessageBox.Show("MouseLeave the TEP ProgressBar");
}
}
}
In the above code, we will observe we have used the message box. So that whenever mouse cursor will leave the visible part of progress bar it will get executed. You can perform any functionality instead of message box as you are required, for this tutorial we have used the message box. In the following image, you can observe the exact output which will come after execution.
C# ProgressBar Resize Event Handler
This event handler is designed to perform whenever the size of a progress bar is get changed in any mean such as the change in width or height. Now we are going to perform this event handler. You have to place a button on which click event handler you will declare the size changed functionality for a progress bar. So that, when you will click on the button size of a progress bar, is get changed. Then we will be used the Resize event handler for a relative progress bar. When size is get changed resize progress bar get executed. You can copy the below code and execute on your computer to get a clear idea.using System;
using System.Collections.Generic;
using System.ComponentModel;
using System.Data;
using System.Drawing;
using System.Linq;
using System.Text;
using System.Threading.Tasks;
using System.Windows.Forms;
namespace TEPArticle
{
public partial class Form1 : Form
{
public Form1()
{
InitializeComponent();
}
private void TEPprogressBar1_Resize(object sender, EventArgs e)
{
MessageBox.Show("TEP ProgressBar Size is Changed Now !!");
}
private void button1_Click(object sender, EventArgs e)
{
TEPprogressBar1.Size = new Size(100, 30);
}
}
}
In above code, you can observe that we have used message box as the functionality to be executed within Resize event handler. Before copy the above code you must have to place the progress bar and button on your desktop application and don't forget to change their name. Following is the image of exact above code which is taken after execution.

×
![]()