


C# ListBox Control


C# ListBox Control
- There are multiple functionalities which we can perform with C# ListBox. Usually, we used ListBox to give options in the form of a list.
- Mostly it's used in signup forms and point of sale applications. If you want to insert the values inside Listbox. Then you have to write the name of the list box and after that write Items.Add("YourData").
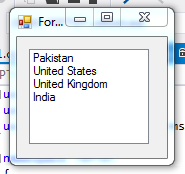
- In the following code, I have inserted countries names as the data of listbox:
using System;
using System.Drawing;
using System.Windows.Forms;

namespace TEPTUT
{
    public partial class Form1 : Form
    {
        public Form1()
        {
            InitializeComponent();
            listBox1.Items.Add("Pakistan");
            listBox1.Items.Add("United States");
            listBox1.Items.Add("United Kingdom");
            listBox1.Items.Add("India");
        }

   }
}
- Here is the image which is generated after the execution of above code:
- You can add the values in Listboxes using the arrays and string type variables. It depends on the logic of software development.
- You can also insert the values from the textbox.
- Here are following example codes which you can use to insert values in C# ListBox:
using System;
using System.Drawing;
using System.Windows.Forms;

namespace TEPTUT
{
    public partial class Form1 : Form
    {
        public Form1()
        {
            InitializeComponent();
            String var1 = "Lahore";
            String var2 = "Multan";
            String var3 = "Islamabad";
            String var4 = "Karachi";
            listBox1.Items.Add(var1);
            listBox1.Items.Add(var2);
            listBox1.Items.Add(var3);
            listBox1.Items.Add(var4);

        }

   }
}
- In the above code, we have inserted the values in C# ListBox with the string type variables.
- You can test the code in your compiler, drag the list box on the windows application and copied the above code and then execute.
- Now, we are gonna insert data in ListBox using arrays. Here's the code for it:
using System;
using System.Drawing;
using System.Windows.Forms;

namespace TEPTUT
{
    public partial class Form1 : Form
    {
        public Form1()
        {
            InitializeComponent();

            String[] city = new String[] { "Lahore", "Multan", "Islamabad", "Karachi"};

            for (int x = 0; x < city.Length; x++)
            {
                listBox1.Items.Add(city[x]);
            }

        }

   }
}
- The above code will insert the values in C# ListBox through Array with the help of loop.
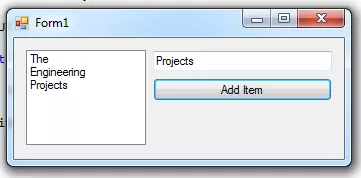
- Now let's have some fun and get some input from the user in C# Textbox Control and then add it in the ListBox.
- In the below code, I am getting value from the TextBox and then sending it to ListBox:
using System;
using System.Drawing;
using System.Windows.Forms;

namespace TEPTUT
{
    public partial class Form1 : Form
    {
        public Form1()
        {
            InitializeComponent();


        }

        private void button1_Click(object sender, EventArgs e)
        {
            listBox1.Items.Add(textBox1.Text);
        }

   }
}
- In the above code, we have used C# Button Control and C# Textbox Control.
- A textbox will get the values as the string and button will insert this value into ListBox.
- Here is the image after execution of above code:
- Till now, we have hada look at How to insert data in C# ListBox, now we will learn How to select any item from ListBox.
- Suppose you want to retrieve the selected item value, then you have to use the SelectedItem property.
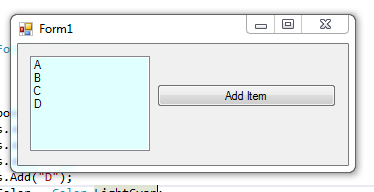
- In the below code I have added a button, so after selection of your item, when you click this button, an event will raise and it will generate a message popup of selected item value.
using System;
using System.Drawing;
using System.Windows.Forms;

namespace TEPTUT
{
    public partial class Form1 : Form
    {
        public Form1()
        {
            InitializeComponent();

            listBox1.Items.Add("A");
            listBox1.Items.Add("B");
            listBox1.Items.Add("C");
            listBox1.Items.Add("D");

        }

        private void button1_Click(object sender, EventArgs e)
        {

            MessageBox.Show(listBox1.SelectedItem.ToString());
        }

   }
}
C# ListBox Multiple Selection
- Supposed if you want to select multiple options at the same time, then you have to use the SelectionMode property and set it to the SelectionMode.MultiSimple.
- Using above mentioned property, you will be able to select multiple items at the same time.
- In the below code I have used the SelectionMode.MultiSimple property and used the foreach loop to show the message popup with the value of selected items.
- You just have to drag the list box and button on your application form, then copy the below code and execute it.
- To get a response on button click you have to select the multiple items in your ListBox:
using System;
using System.Drawing;
using System.Windows.Forms;
namespace WindowsFormsApplication1
{
    public partial class Form1 : Form
    {
        public Form1()
        {
            InitializeComponent();
        }
        private void Form1_Load(object sender, EventArgs e)
        {
            listBox1.Items.Add("Sunday");
            listBox1.Items.Add("Monday");
            listBox1.Items.Add("Tuesday");
            listBox1.Items.Add("Wednesday");
            listBox1.Items.Add("Thursday");
            listBox1.Items.Add("Friday");
            listBox1.Items.Add("Saturday");
            listBox1.SelectionMode = SelectionMode.MultiSimple;
        }
        private void button1_Click(object sender, EventArgs e)
        {
            foreach (Object obj in listBox1.SelectedItems )
            {
                MessageBox.Show(obj.ToString ());
            }
        }
    }
}
- Here is the screenshot of the above code execution.
- You can clearly see that I have select the first three indexes and It generates the message popup of just Sunday.
- Because I have used the foreach loop and it will give output in the form of the cycle and each cycle contain just one output.
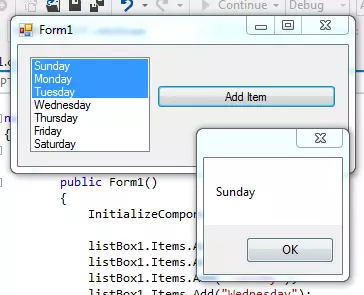
- When you will close the popup the next selected index value is shown in the message box. It's running until the selected indexes are left.
Clear C# ListBox
- Supposed you are wanted to remove all the values at once from listbox then you have to use the clear method.
- In the following code I have inserted the values inside Listbox and when user will click on the button it will clear the whole list.
- Create the new application and drag button and listbox. Then copy the following code and execute it:
using System;
using System.Drawing;
using System.Windows.Forms;

namespace TEPTUT
{
    public partial class Form1 : Form
    {
        public Form1()
        {
            InitializeComponent();
            listBox1.Items.Add("A");
            listBox1.Items.Add("B");
            listBox1.Items.Add("C");
            listBox1.Items.Add("D");


        }

        private void button1_Click(object sender, EventArgs e)
        {
            listBox1.Items.Clear();
        }

   }
}
Remove C# ListBox Items
- If you are wanted to remove a specific index or specific item value then you have to use Remove or RemoveAt methods.
- Remove method is used to delete the value by the exact wording and RemoveAt method is used to delete values according to the indexes.
- Here's the code for it:
using System;
using System.Drawing;
using System.Windows.Forms;

namespace TEPTUT
{
    public partial class Form1 : Form
    {
        public Form1()
        {
            InitializeComponent();
            listBox1.Items.Add("A");
            listBox1.Items.Add("B");
            listBox1.Items.Add("C");
            listBox1.Items.Add("D");
        }

        private void button1_Click(object sender, EventArgs e)
        {
            listBox1.Items.RemoveAt(0);
        }

   }
}
- The above code is removing the values by the reference of the index number.
- When the user will click on the button the Zero index is getting removed from the list.
- When the zero index is getting deleted the next index has automatically become zero.
- The following code is the implementation of this Method:
using System;
using System.Drawing;
using System.Windows.Forms;

namespace TEPTUT
{
    public partial class Form1 : Form
    {
        public Form1()
        {
            InitializeComponent();
            listBox1.Items.Add("A");
            listBox1.Items.Add("B");
            listBox1.Items.Add("C");
            listBox1.Items.Add("D");


        }

        private void button1_Click(object sender, EventArgs e)
        {
            listBox1.Items.Remove("A");
        }

   }
}
- The above code will delete the exact matched value only.
- I have selected A to delete. When you will execute the above code and click the button it will only remove the A.
- On the next button click it will not remove any of the indexes.
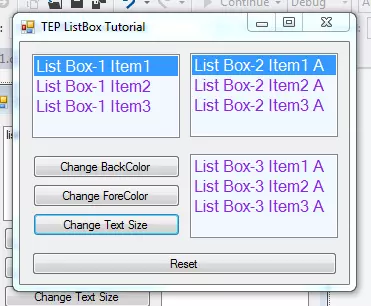
How to Change C# ListBox Text Size
- If you have to change the text size of C# ListBox, then you have to use Font property.
- In the following code, there is button click event, in which I have declared that when user will click the button the size of C# ListBox text will increase.
using System;
using System.Drawing;
using System.Windows.Forms;

namespace TEPTUT
{
    public partial class Form1 : Form
    {
        public Form1()
        {
            InitializeComponent();
            listBox1.Items.Add("A");
            listBox1.Items.Add("B");
            listBox1.Items.Add("C");
            listBox1.Items.Add("D");
        }

        private void button1_Click(object sender, EventArgs e)
        {
    listBox1.Font = new Font(Font.FontFamily, 12);
        }

   }
}
How to Change C# ListBox Text Background Color
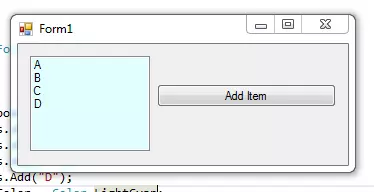
- If you are want to change the color of text or the background color of text. Then you have to use the BackColor property.
- In the following code, we have to change the color of list box text background.
- There are many colors which you can use as backColor.
using System;
using System.Drawing;
using System.Windows.Forms;

namespace TEPTUT
{
    public partial class Form1 : Form
    {
        public Form1()
        {
            InitializeComponent();
            listBox1.Items.Add("A");
            listBox1.Items.Add("B");
            listBox1.Items.Add("C");
            listBox1.Items.Add("D");
            listBox1.BackColor = Color.LightCyan;
        }

   }
}
- Here's the screenshot of output to give you an idea:
Changed C# ListBox Text Foreground Color
- If you are wanted to change the color of text or the foreground color, then you have to use the ForeColor property.
- In the following code, we have changed the color of the text to white and backColor to black, to prominent the text.
using System;
using System.Drawing;
using System.Windows.Forms;

namespace TEPTUT
{
    public partial class Form1 : Form
    {
        public Form1()
        {
            InitializeComponent();
            listBox1.Items.Add("The");
            listBox1.Items.Add("Engineering");
            listBox1.Items.Add("Projects");
            listBox1.Font = new Font(Font.FontFamily, 15);
            listBox1.BackColor = Color.Black;
            listBox1.ForeColor = Color.White;
        }


   }
}
C# ListBox Events
- If you want to perform specific tasks and functionality when user will do something specific, then we will use the C# Events.
- Some events are common across all the GUI tools. Now we will learn some events which will be worked with ListBox.
- Click Event
- Double Click Event
- MouseHover Event
- MouseLeave Event
- BackColorChanged Event
- ForeColorChanged Event
- SelectedIndexChanged Event
There are several more events which you can try to make list box more interactive. These events are used to give innovative concepts.
C# ListBox Click Event
- This event is used when you are wanted to perform any action in return of single click on Listbox.
- Suppose you want to show any kind of warning message in the form of a popup.
- Then we will be used this function.
- In the below code I have created a program, which will show the message when user will click once on the Listbox.
using System;
using System.Drawing;
using System.Windows.Forms;

namespace TEPTUT
{
    public partial class Form1 : Form
    {
        public Form1()
        {
            InitializeComponent();

        }

        private void listBox1_Click(object sender, EventArgs e)
        {
            MessageBox.Show("Warn ! Click is disable..");
        }


   }
}
- Here is the image of above code after execution.
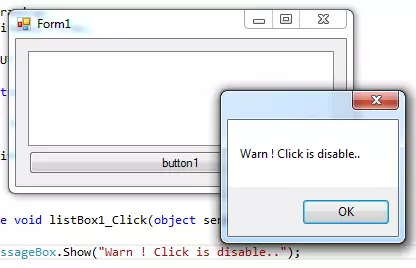
- You can perform any kind of functionality with _Click Event. You can guide the user with these kinds of popup messages, about how to use your developed application.
C# ListBox Double Click Event
This event occurs when user will click twice on the Listbox. Supposed you are wanted to perform any action when user will double click on the ListBox, then we will use this event. In the following code, we are changing the back color of ListBox when user will click twice.
using System;
using System.Drawing;
using System.Windows.Forms;

namespace TEPTUT
{
    public partial class Form1 : Form
    {
        public Form1()
        {
            InitializeComponent();

        }
        private void listBox1_DoubleClick(object sender, EventArgs e)
        {
            listBox1.BackColor = Color.Black;
        }
   }
}
To demonstrate double click event, we changed the color. You can code any functionality according to your needs.
C# ListBox MouseHover Event
This event occurs when user will hover mouse cursor on the Listbox. In the following code, we have changed the foreColor on mouse hover. When the mouse cursor will hover the color of font will be changed.
using System;
using System.Drawing;
using System.Windows.Forms;

namespace TEPTUT
{
    public partial class Form1 : Form
    {
        public Form1()
        {
            InitializeComponent();
            listBox1.Items.Add("The Engineering Projects");
        }

        private void listBox1_MouseHover(object sender, EventArgs e)
        {
            listBox1.ForeColor = Color.Bisque;
        }
   }
}
C# ListBox MouseLeave Event
This event occurs when user will remove the cursor from the Listbox. In the above code, we have changed the forecolor when a user hovers the mouse cursor. In the below code, we will change the forecolor again to black when a user removes mouse cursor.
using System;
using System.Drawing;
using System.Windows.Forms;

namespace TEPTUT
{
    public partial class Form1 : Form
    {
        public Form1()
        {
            InitializeComponent();
            listBox1.Items.Add("The Engineering Projects");
        }

        private void listBox1_MouseHover(object sender, EventArgs e)
        {
            listBox1.ForeColor = Color.Bisque;
        }

        private void listBox1_MouseLeave(object sender, EventArgs e)
        {
            listBox1.ForeColor = Color.Black;
        }
   }
}
C# ListBox BackColorChanged Event
This event occurs when user will change the background color of the Listbox. In the following code, we are going to change the color of background when user will hover the mouse on ListBox. When color will change, BackColorChanged event will occur. In which we will show popup message.
using System;
using System.Drawing;
using System.Windows.Forms;

namespace TEPTUT
{
    public partial class Form1 : Form
    {
        public Form1()
        {
            InitializeComponent();
            listBox1.Items.Add("The Engineering Projects");
        }

        private void listBox1_MouseHover(object sender, EventArgs e)
        {
            listBox1.BackColor = Color.Bisque;
        }

        private void listBox1_BackColorChanged(object sender, EventArgs e)
        {
            MessageBox.Show("BackGround Color is changed !!");
        }

   }
}
C# ListBox ForeColorChanged Event
This event occurs when user will change the foreground color of the Listbox. In the following code, we will be used mouse hover event to changed the foreColor and ForeColorChanged Event also. The forecolorchanged event will raise the message popup when a color of the foreground is getting changed.
using System;
using System.Drawing;
using System.Windows.Forms;

namespace TEPTUT
{
    public partial class Form1 : Form
    {
        public Form1()
        {
            InitializeComponent();
            listBox1.Items.Add("The Engineering Projects");
        }

        private void listBox1_MouseHover(object sender, EventArgs e)
        {
            listBox1.ForeColor = Color.Bisque;
        }

        private void listBox1_ForeColorChanged(object sender, EventArgs e)
        {
            MessageBox.Show("ForeGround Color is changed !!");
        }

   }
}
C# ListBox SelectedIndexChanged Event
This event occurs when user will select any item in the Listbox. In the below code I have taken two list box. When user will select any value from the first list box then according to that value listbox2 will show it's valued.
using System;
using System.Drawing;
using System.Windows.Forms;

namespace TEPTUT
{
    public partial class Form1 : Form
    {
        public Form1()
        {
            InitializeComponent();
            listBox1.Items.Add("The Engineering Projects");
            listBox1.Items.Add("C# Tutorials");
        }


        private void listBox1_SelectedIndexChanged(object sender, EventArgs e)
        {
            if (listBox1.SelectedIndex == 0)
            {
                listBox2.Items.Clear();
                listBox2.Items.Add("Arduino Projects");
                listBox2.Items.Add("Proteus Projects");
                listBox2.Items.Add("Matlab Projects");
            }
            else
                if (listBox1.SelectedIndex == 1)
                {
                    listBox2.Items.Clear();
                    listBox2.Items.Add("C# Label");
                    listBox2.Items.Add("C# TextBox");
                    listBox2.Items.Add("C# ComboBox");
                }
        }

   }
}
If you wanted to test the above code, then place two list boxes and copied the above code.
- Here's the Video for C# ListBox Control:
We have tried to give basics to major concepts of C# ListBox. All the above codes are working fine and added after testing. If you will cover all the above codes then you will become able to play with ListBoxes. ListBoxes play very important roles in Point Of Sale applications. Thanks for reading our tutorial, moreover you can watch ListBox video.


